Vue - 컴포넌트!
vue 컴포넌트
vue 컴포넌트 는 재사용할 수 있는 코드를 모은 코드 그룹으로
template 나 render 옵션을 통해 어떤 html 요소들이 들어갈지 정의해둘 수 있다.
전역 vue 컴포넌트
전역 vue 컴포넌트 생성방법은 아래와 같다.
Vue.component(tagName, options)
tagName: 태그명, 하이폰을 포함한 영문 이름 사용을 권장
options: templet 및 render 옵션을 지정, 렌더링 목적
<body>
<div id="app">
    <hello-component></hello-component>
</div>
<script>
    Vue.component('hello-component', {
        template: '<div>hello world</div>'
    });
    var vm = new Vue({
        el: '#app'
    });
</script>
</body>
실제 생성된 html 은 아래와 같다.
<div id="app">
  <div>hello world</div>
</div>
지역 vue 컴포넌트
지역 vue 컴포넌트 는 vue 인스턴스 내부에서 생성되어 사용된다.
<div id="example1">
    <my-component></my-component>
</div>
<div id="example2">
    <my-component></my-component>
</div>
<script>
    var vm1 = new Vue({
        el: "#example1",
        components: {
            // <my-component>는 상위 템플릿에서만 사용할 수 있습니다.
            'my-component': { template: '<div>사용자화 컴포넌트입니다!</div>' }
        }
    });
    var vm2 = new Vue({
        el: "#example2"
    });
</script>
실제 생성된 html 은 아래와 같다.
<div id="example1">
    <div>사용자화 컴포넌트입니다!</div>
</div>
<div id="example2">
    <my-component></my-component>
</div>
example2 의 경우 지역 vue 컴포넌트 로 교체되지 않았다.
위와같이 template에 바로 html 문자열을 넣은 방식을 인라인 템플릿 이라한다.
단순한 html 요소 작성 외에는 인라인 템플릿 은 권장하지 않는다.
컴포넌트 템플릿 생성 방법
아래처럼 <template> 혹은 <script type="text/x-template"> 태그를 사용하여
별도의 컴포넌트 템플릿을 생성하는 방법을 권장한다.
<body>
    <div id="app">
        <hello-component1></hello-component1>
        <hello-component2></hello-component2>
    </div>

    <!-- 방법1 -->
    <script type="text/x-template" id="helloTemplate1">
        <div>hello world1!!</div>
    </script>

    <!-- 방법2 -->
    <template id="helloTemplate2">
        <div>hello world2!!</div>
    </template>

    <script>
        Vue.component('hello-component1', {
            template: '#helloTemplate1'
        })
        Vue.component('hello-component2', {
            template: '#helloTemplate2'
        })

        var v = new Vue({
            el: '#app'
        })
    </script>
</body>
<template>태그는 IE에서 화면에 랜더링될 가능성이 있다고 함으로
<script type="text/x-template">을 더 권장
중첩 컴포넌트

최상위 루트 컴포넌트로 부터 중첨 컴포넌트 구조를 구성할 수 있다.
<div id="app">
    <app-nav></app-nav>
    <app-view>
        <app-sidebar></app-sidebar>
        <app-content></app-content>
    </app-view>
</div>
$emit
Emit: 내뿜다
props 를 통해 상위에서 하위 vue 컴포넌트 로 데이터 흐름이 진행되는 구성을 권장하지만
하위에서 상위로 데이터를 전달해야할 수 있다.
$emit 을 통해 하위 vue 컴포넌트가 이벤트 발생과 데이터를 함께 상위 vue 컴포넌트 로 전달할 수 있다.
<template id="childTemplate">
  <div>
    <button v-on:click="clickEvent" v-bind:data-lang="buttonInfo.value">
      {{ buttonInfo.text }}
    </button>
  </div>
</template>
<script>
  Vue.component('child-component', {
    template: '#childTemplate',
    props: ['buttonInfo'],
    methods: {
      clickEvent: function (e) {
        this.$emit('timeclick', e.target.innerText, e.target.dataset.lang);
      }
    }
  })
</script>
자식객체로 사용할 컴포넌트와 템플릿이다.
buttonInfo 라는 props 를 전달받아 버튼 속성과 요소의 value로 사용한다.
버튼 클릭시에 this.$emit(...) 호출을 통해 부모객체로 이벤트를 노출시킨다.
이벤트명, 전달할 데이터를 매개변수로 사용한다.
<template id="parent-template">
  <div>
    <child-component v-for="btn in buttons" :button-info="btn" @timeclick="timeclickEvent"></child-component>
    <hr/>
    <div>{{ msg }}</div>
  </div>
</template>
<script>
  Vue.component('parent-component', {
    template: '#parent-template',
    props: ['buttons'],
    data: function () {
      return { msg: "" };
    },
    methods: {
      timeclickEvent: function (k, v) {
        this.msg = k + ", " + v;
      }
    }
  })
</script>
부모 -> 자식 으로 데이터를 전달할 때에는 v-bind를 사용해 전달한다.
위에도 :button-info="btn"를 통해 부모 props 의 데이터를 넘기고 있다.
자식 -> 부모 으로 이벤트 발생을 전달할 때에는 자식컴포넌트는 this.$emit으로 이벤트 발생, 부모컴포넌트에선 v-on을 통해 이벤트의 콜백함수를 등록한다.
위에도 @timeclick="timeclickEvent" 을 통해 콜백 메서드를 설정하고 있다.
Vue 컴포넌트들은 data 속성을 통해 내부 저장소를 가지며 해당 데이터를 자식 컴포넌트에게 v-bind 를 props에 변경될 데이터를 전달(매핑) 시킬수 있다.
<template id="searchContactTeamplate">
  <div>
    <search-component placeholder="두글자 이상 입력후 엔터!" @search="searchEvent"></search-component>
    <contactlist-component :contacts="contactlist"></contactlist-component>
    <div v-show="isProcessing === true">조회중</div>
  </div>
</template>
<script>
  Vue.component('search-contact-component', {
    template: "#searchContactTeamplate",
    data: function () {
      return {
        contactlist: [],
        isProcessing: false
      };
    },
    methods: {
      searchEvent: function(inputValue) {
        // contactlist 변경
        ...
      }
    }
  })
</script>
자식 컴포넌트 search-component로부터 노출된 search 이벤트가 발생하면 searchEvent 메서드를 호출한다. 당연히 searchEvent는 contactlist를 편집하는 로직을 갖고있들 것.
또다른 자식 컴포넌트 contactlist-component를 보면 v-bind 로 contactlist를 매핑하였다.
EventBus
계층간의 데이터 매핑은 props, 이벤트 수신은 $emit 를 통해 진행했다.
동일 계층간에는 EventBus를 통해 데이터 전달이 가능하다.
말이
EventBus지 그냥vue 인스턴스이다.
vue 인스턴스를 컴포넌트간 공유하며 콜백 메서드 등록을 위탁하는 구조이다.
<script>
  // EventBus 로 사용할 vue 인스턴스
  var eventBus = new Vue();
</script>

<template id="chidl1Template">
  <button v-on:click="clickEvent">child1 button!!</button>
</template>

<template id="chidl2Template">
  <li v-for="t in timelist">{{ t }}</li>
</template>

<script>
  Vue.component('child1-component', {
    template: '#chidl1Template',
    methods: {
      clickEvent: function () {
        // child2 로 시간객체 전달
        eventBus.$emit('click1', new Date());
      }
    }
  });

  Vue.component('child2-component', {
    template: '#chidl2Template',
    created: function () {
      // 이벤트 수신부 생성
      eventBus.$on('click1', this.child1Click);
    },
    methods: {
      // 이벤트 처리
      child1Click: function (time) {
        this.timelist.push(time);
      }
    }
  });
</script>
위처럼 EventBus 역할을 하는 vue 인스턴스 에 이벤트를 주고받으면서 데이터를 전달한다.
하위 컴포넌트에서 발생한 이벤트를 상위 컴포넌트가 처리하는 것이 정석이기에
EventBus구조를 권장하지않는다.
.native 수식어
vue 컴포넌트 템플릿 내부에 이벤트 처리함수를 정의하기 보단
vue 컴포넌트 를 불러오는 외부에서 이벤트 처리함수를 정의하는 것을 권장한다.
<div id="app">
    <my-component v-on:click.native="doTheThing"></my-component>
</div>
<script>
    Vue.component('my-component', {
        template: '<button>버튼</button>'
    });

    new Vue({
        el: '#app',
        methods: {
            doTheThing: function (event) {
                console.log(event);
            }
        }
    });
</script>
.sync
<div id="app">
    <comp :foo.sync="bar"></comp>
</div>
<script>
    Vue.component('comp', {
        template: '<input v-on:keyup="update" v-model="foo_internal">',
        props: ["foo"],
        data: function () {
            return { "foo_internal": this.foo }
        },
        methods: {
            update: function () {
                this.$emit("update:foo", this.foo_internal);
            }
        }
    });

    var vm = new Vue({
        el: '#app',
        data: { bar: "hi2" }
    });
</script>
동적 컴포넌트
조건에 따라 각기 다른 컴포넌트들을 화면에 출력해야 할때 동적 컴포넌트를 사용한다.
v-bind:is 를 통해 동적 컴포넌트를 구현한다.
<template>
  <div>
    <div class="header">
      <h1>(주) OpenSG</h1>
      <nav>
        <ul>
          <li><a href="#" @click="changeMenu('home')">Home</a></li>
          <li><a href="#" @click="changeMenu('about')">About</a></li>
          <li><a href="#" @click="changeMenu('contact-component')">Contatct</a></li>
        </ul>
      </nav>
    </div>
    <div class="container">
      <component :is="currentView"></component>
    </div>
  </div>
</template>

<script>
import Home from "./components/Home.vue";
import About from "./components/About.vue";
import ContactComponent from "./components/Contact";

export default {
  name: "App",
  components: {
    Home, About, ContactComponent
  },
  data: function() {
    return { currentView: "home" };
  },
  methods: {
    changeMenu: function(view) {
      this.currentView = view;
    }
  }
};
</script>
<component> 태그 is 속성에 currentView 값을 바인딩 해두었다.
is 속성값에 따라 표시되는 컴포넌트가 동적으로 변환된다.
재귀 컴포넌트
재귀호출 구조의 컴포넌트, 트리구조의 데이터를 컴포넌트로 출력하고 싶을때 사용하면 유용하다.
<!-- Tree.vue -->
<template>
  <ul>
    <li v-for="s in subs" :class="s.type" :key="s.name">

      <tree v-if="s.subs" :subs="s.subs"></tree>
    </li>
  </ul>
</template>

<script>
export default {
  name: "tree",
  props: ["subs"]
};
</script>
<style scoped>
</style>
Tree.vue 파일 안에서 <tree> 컴포넌트 태그를 통해 자기 자신을 전달한다.
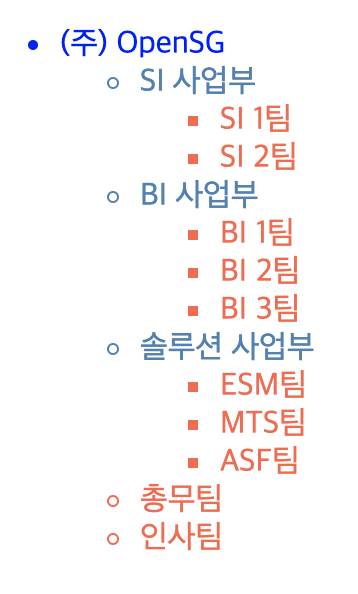
그리고 subs poprs 에는 아래와 같은 데이터가 삽입될 예정이다.
treedata: [
  {
    name: "(주) OpenSG",
    type: "company",
    subs: [
      {
        name: "SI 사업부",
        type: "division",
        subs: [
          { name: "SI 1팀", type: "team" },
          { name: "SI 2팀", type: "team" }
        ]
      },
      {
        name: "BI 사업부",
        type: "division",
        subs: [
          { name: "BI 1팀", type: "team" },
          { name: "BI 2팀", type: "team" },
          { name: "BI 3팀", type: "team" }
        ]
      },
      {
        name: "솔루션 사업부",
        type: "division",
        subs: [
          { name: "ESM팀", type: "team" },
          { name: "MTS팀", type: "team" },
          { name: "ASF팀", type: "team" }
        ]
      },
      { name: "총무팀", type: "team" },
      { name: "인사팀", type: "team" }
    ]
  }
]
컴포넌트 사용 주의사항
Vue.component 생성 위치
DOM 랜더링 순서상 브라우저는 DOM 태그들의 분석이 끝난 후 Vue.component 의 랜더링을 진행한다.
만약 태그요소 보다 Vue.component 구문이 위에 있다면 제대로 렌더링되지 않는다.
<script>
  Vue.component('option-component', {
    telmpate: '<option>hello</option>'
  })
</script>

<body>
  <div id="app">
    <select>
      <option-component></option-component>
      <option-component></option-component>
    </select>
  </div>
  ...
브라우저는 위에서 아래로 코드를 읽어가며 랜더링하기 때문에
JS 스크립트를 먼저 맞닥뜨리고 option-component 커스탬 태그를 찾지 못해 JS 코드는 무시된다.
이후 DOM은 select 밑에 특이한 태그가 있는 것을 발견하고 렌더링에서 지워버린다.
(select 태그의 자식으로 optoin 태그외에는 허용x)
결과적으로 select 안에 아무것도 없는것 처럼 출력된다.
루트요소 중복
또한 template 으로 사용하는 html 요소 문자열은 하상 하나의 최상위 루트를 가져야 한다.
{
    // 올바른 형식
    'my-comp': { template: '<div>컴포넌트1</div>' }
    // 올바르지 않은 형식
    'my-comp': { template: '<div>컴포넌트1</div><div>컴포넌트2</div>' }
}
부모-자식 태그
template 으로 사용하고 싶은 tagName 은 html 기본 태그명을 피해야 한다.
또한 부모자식관계를 갖는 select, table, ul, ol 등
자식역할로 vue 컴포넌트를 사용할 경우 무시된다.
DOM 랜더링 과정에서 브라우저가 자식태그가 이상하 경우 유효성 검증단계에서 미리 제거해버리기 때문에 vue 컴포넌트 의 영향을 받지 않는다.
생성해야 한다면 is 속성을 추가해야 한다.
<div>
    <select>
        <option is="option-component"></option>
        <option is="option-component"></option>
    </select>
</div>
<script>
    Vue.component('option-component', {
        telmpate: '<option>hello</option>'
    })
</script>
정상적인 태그임으로 브라우저 유효성 검증단계는 통과하고
향후 JS 스크립트가 실행될 때 vue 컴포넌트 와 is 속성을 매칭해 랜더링한다.
위에서 사용했던
<script type="text/x-template">태그를 사용해 한번에 탬플릿을 출력시키는 방법도 있다.
vue 컴포넌트 옵션
vue 컴포넌트 는 html 의 UI 관련된 기능을 주로하는 만큼
그에 관련된 옵션들이 많다.
method
vue 인스턴스와 마찬가지로 이벤트를 처리하기 위한 함수정의 가능
template
아래와 같이 인라인 템플릿으로 html 요소를 정의하거나
Vue.component('hello-component', {
      template: '<div>hello world</div>'
  });
CSS 선택자를 통해 template 을 지정한다.
<template id="helloTemplate2">
    <div>hello world2!!</div>
</template>

<script>
    Vue.component('hello-component1', {
        template: '#helloTemplate1'
    })
    Vue.component('hello-component2', {
        template: '#helloTemplate2'
    })

    var v = new Vue({
        el: '#app'
    })
</script>
data
vue 인스턴스의 data 옵션은 옵션객체,
vue 컴포넌트의 data 옵션은 옵션메서드 이다.
vue 컴포넌트 는 여러 인스턴스 탬플릿, 상위 vue 컴포넌트 로부터 불러져 사용되기 때문에
항상 새로운 data 객체를 만들어 사용하기 위해 옵션메서드 를 사용한다.
<template id='timeTemplate'>
  <div>
      <span>{{ nowTS }}</span>
      <button v-on:click="timeClick">현재 시간</button>
  </div>
</template>
<script>
Vue.component('time-component', {
  template: '#timeTemplate',
  data: function () {
    return { nowTS: 0 };
  },
  methods: {
    timeClick: function (e) {
      this.nowTS = (new Date()).getTime();
    }
  }
})
</script>
props
data 가 vue 인스턴스의 상태를 표기하듯
props 는 vue 컴포넌트의 상태값이다.
vue 컴포넌트를 사용하기 위한 매개변수 같은 개념 불변데이터이다.
vue 컴포넌트 내부에선 this 키워드로 접근할 수 있다.
아래처럼 child 라는 vue 컴포넌트 를 사용하기 위해 meesage 매개변수를 전달하듯이 태그를 생성한다.
<div id="example-2">
    <child message='하나'></child>
    <child message='둘'></child>
    <child message='셋'></child>
</div>
<!-- 생성된 html 요소
<div id="example-2">
    <span>하나</span>
    <span>둘</span>
    <span>셋</span>
</div>
 -->
<script>
    Vue.component('child', {
        props: ['message'],
        template: '<span></span>'
    });

    new Vue({
        el: '#example-2'
    });
</script>
아래와 같이 vue 컴포넌트 상태의 변수타입, 필수여부, 기본값, 유효성 검증 같은 기능을 정의하는 것을 권장한다.
단순 데이터 전달을 요구한다면 배열형식으로 props 전달,
데이터 전달과 함께 여러가지 추가사항을 정의하려면 객체형식으로 props 전달한다.
data 옵션과 마찬가지로 참조객체는 다른 메모리 위치 충돌 방지를 위해 default 속성을 함수로 정의한다.
Vue.component('example', {
   props: {
       propA: Number, // 기본 타입, default null(어떤 타입이든 사용가능)
       propB: [String, Number], // 여러 타입 사용가능
       propC: {
           type: String, // 문자열
           required: true // 필수
       },
       propD: {
           type: Number, // 숫자
           default: 10, // 기본값
           validator: function(value) { // 유효성 검사
               return value >= 10
           }
       },
       propE: {
           type: Object, // 객체타입
           default: function() { //객체 기본값은 팩토리 함수에서 반환
               return { message: 'hello' }
           }
       },
   }
});
일반 문자열이 아닌 객체나 숫자형의 데이터를 넘길때 v-bind 혹은 v-model 디렉티브를 사용해야한다.
그래야지 JS 표현식으로 값을 넘길수 있어 오휴가 발생하지 않는다.
<template id="listTemplate">
    <li>{{ message}}, {{ count + 10 }}</li>
</template>
<script>
    Vue.component('list-component', {
        template: '#listTemplate',
        props: {
            message: { type: String },
            count: { type: Number, required: true }
        }
    })
</script>

<body>
    <div id="app">
        <ul>
            <list-component message="test1" count="1000"></list-component>
            <list-component message="test2" :count="2000"></list-component>
            <list-component message="test3" :count="world"></list-component>
        </ul>
    </div>
</body>
<!--
<ul>
    <li>test1, 100010</li>
    <li>test2, 2010</li>
    <li>test3, NaN</li>
</ul>
 -->
<script>
    var vm = new Vue({ el: '#app' });
</script>
v-bind 와 일반 태그속성 설정된 count 가 있다.
test1 <li> 태그의 경우 오류발생, 문자열로 취급되어 랜더링된다.
test2 <li> 태그의 겅우 Number, 2000 으로 인식된다.
test3 <li> 태그의 경우 data 옵션에서 world 변수를 찾고, 없음으로 undefined로 설정된다.
render
html 요소로 템플릿을 지정하지 않고 JS 프로그래밍으로 html 요소를 생성
render 옵션 안에는 함수를 사용하며, 인자로 createElement 메서드를 전달받는다.
동적으로 props 를 전달해서 h1 ~ h6 태그를 생성하고 싶을때 아래처럼 사용 가능
<div id="app">
    <anchored-heading :level="1">Hello world!</anchored-heading>
</div>
<script>
    Vue.component('anchored-heading', {
        render: function (createElement) {
            return createElement(
                'h' + this.level, // 태그
                this.$slots.default // 자식의 배열
            )
        },
        props: {
            level: {
                type: Number,
                required: true
            }
        }
    })
    var vm = new Vue({
        el: '#app'
    });
</script>
슬롯
vue 컴포넌트의 재사용을 적극사용하기 위한 방법
다음과 같이 vue 컴포넌트 를 사용하면 <child-component> 태그 내부의 html 요소들을 모두 무시된다.
<div id="app">
    <child-component>
        <!-- 무시됨 -->
        <div>test message</div>
    </child-component>
</div>
<script>
    var vm = new Vue({
        el: "#app",
        components: {
            'child-component': { template: '<div>hello world</div>' }
        }
    });
</script>
내부의 요소를 출력하고 싶다면 하위 vue 컴포넌트에 전달하려면 슬롯을 사용하면 간단하다.
다음과 같이 컴포넌트 템플릿 과 함께 vue 컴포넌트 를 정의(my-component)
그리고 상위 컴포넌트에서 하위 컴포넌트에 전달할 여러 html 요소들을 추가한다.
<!-- 최상위 컴포넌트 -->
<div id="app">
    <h1>나는 부모 컴포넌트의 제목입니다.</h1>
    <my-component></my-component>
    <my-component>
        <!-- 전달할 추가요소 -->
        <p>이것은 원본 콘텐츠입니다.</p>
        <p>이것은 원본 중 추가 콘텐츠입니다.</p>
    </my-component>
</div>
<!-- 하위 컴포넌트 -->
<template id="myComponent">
    <div>
        <h2>나는 자식 컴포넌트의 제목입니다.</h2>
        <slot>
            <div>제공된 컨텐츠가 없을 때만 볼 수 있습니다.</div>
        </slot>
    </div>
</template>
<script>
    Vue.component('my-component', {
        template: '#myComponent'
    });
    var vm = new Vue({
        el: '#app',
    });
</script>
생성된 html 요소는 아래와 같다.
<div id="app">
    <h1>나는 부모 컴포넌트의 제목입니다.</h1>
    <div>
        <h2>나는 자식 컴포넌트의 제목입니다.</h2>
        <div>제공된 컨텐츠가 없을 때만 볼 수 있습니다.</div>
    </div>
    <div>
        <h2>나는 자식 컴포넌트의 제목입니다.</h2>
        <p>이것은 원본 콘텐츠입니다.</p>
        <p>이것은 원본 중 추가 콘텐츠입니다.</p>
    </div>
</div>
상위 컴포넌트에서 에서 정의한 컴포넌트 템플릿 의 html 요소들이 하위 컴포넌트의 <slot> 과 교체된다.
네임드 슬롯(Named Slot)
좀더 짜임새 있게 하위 컴포넌트 슬롯에 html 요소들을 전달하고 싶을 때 네임드 슬롯 사용
상위 컴포넌트에선 slot 속성,
하위 컴포넌트에선 name 속성을 사용해
원하는 위치에 상위 컴포넌트에서 전달하는 html 요소를 집어넣을 수 있다.
<!-- 최상위 컴포넌트 -->
<div id="app">
    <app-layout>
        <!-- header 에 집어넣을 내용 -->
        <h1 slot="header">여기에 페이지 제목이 위치합니다.</h1>
        <p>메인 콘텐츠 단락입니다.</p>
        <p>하나 더 있습니다.</p>
        <!-- footer 에 집어넣을 내용 -->
        <p slot="footer">여기는 연락처 정보가 위치합니다.</p>
    </app-layout>
</div>
<!-- 하위 컴포넌트 -->
<template id="appLayout">
    <div class="container">
        <header>
            <!-- 교체될 슬롯 -->
            <slot name="header"></slot>
        </header>
        <main>
            <slot></slot>
        </main>
        <footer>
            <!-- 교체될 슬롯 -->
            <slot name="footer"></slot>
        </footer>
    </div>
</template>
<script>
    Vue.component('app-layout', {
        template: '#appLayout'
    });
    var vm = new Vue({
        el: '#app',
    });
</script>
생성된 html 요소는 아래와 같다.
<div id="app">
    <div class="container">
        <header>
            <h1>여기에 페이지 제목이 위치합니다.</h1>
        </header>
        <main>
            <p>메인 콘텐츠 단락입니다.</p>
            <p>하나 더 있습니다.</p>
        </main>
        <footer>
            <p>여기는 연락처 정보가 위치합니다.</p>
        </footer>
    </div>
</div>
범위 슬롯(Scoped Slot)
slot 속성과 scope 속성을 같이 사용하여 역으로 하위 컴포넌트의 데이터를 상위 컴포넌트에 매핑시킨다
상위 컴포넌트는 매핑된 데이터를 기반으로 html 요소를 만들고
다시 하위 컴포넌트의 슬롯으로 전달한다.
상위 컴포넌트에서 하위 컴포넌트로부터 받은 데이터를 매핑하기 위해
태그 내부에 <template> 태그를 사용한다.
<!-- 상위 컴포넌트 -->
<div class="app">
    <child-component>
        <!-- 범위 슬롯을 위한 컴포넌트 템플릿 -->
        <template slot="type1" scope="p1">
            <div>
                {{p1.cx}} + {{p1.cy}} =
                {{ parseInt(p1.cx) + parseInt(p1.cy) }}
            </div>
        </template>
        <!-- 범위 슬롯을 위한 컴포넌트 템플릿 -->
        <template slot="type2" scope="p2">
            <div>
                {{p2.cx }} 더하기 {{p2.cy}} 는
                {{ parseInt(p2.cx) + parseInt(p2.cy) }}입니다.
            </div>
        </template>
    </child-component>
</div>
<!-- 하위 컴포넌트 -->
<template id="childComponent">
    <div class="child">
        X : <input type="text" v-model="x" /> <br />
        Y : <input type="text" v-model="y" /> <br />
        <slot name="type1" v-bind:cx="x" v-bind:cy="y"></slot>
        <slot name="type2" v-bind:cx="x" v-bind:cy="y"></slot>
    </div>
</template>

<script>
    Vue.component('child-component', {
        template: '#childComponent',
        data() {
            return { x: 4, y: 5 };
        }
    });
    var vm = new Vue({
        el: '#app',
    });
</script>
즉 상위 컴포넌트에선 <template slot... scope...> 태그로 하위 컴포넌트의 데이터를 전달받고
하위 컴포넌트에선 기존방식대로 <slot> 태그를 이용해 부모 컴포넌트로부터 html 요소를 전달받는다, 또 데이터를 상위 컴포넌트로 올릴때에는 v-bind 속성을 사용한다.
생성된 요소는 아래와 같다.
<div id="app">
    <div class="child">
        X : <input type="text"> <br>
        Y : <input type="text"> <br>
        <div>4 + 5 = 9</div>
        <div>4 더하기 5 는 9입니다.</div>
    </div>
</div>
v-slot
vue.js@2.6.0 에서 기존의 네임드 슬롯과 범위 슬롯을 통합한 v-slot 이라는 디렉티브가 나오면서
기존 사용하던 네임드슬롯, 범위슬롯이 Deprecated 되었다.
우선 아래와 같이 vue.js 업그레이드
<script src="https://cdn.jsdelivr.net/npm/vue@2.6.2/dist/vue.js"></script>
다음처럼 상위컴포넌트의 각종 네임드 슬롯, 범위슬롯 속성을 v-slot 하나로 적용 가능하다.
v-slot 은 # 단축어사용이 가능하다.
<!-- 상위 컴포넌트 -->
<div id="app">
    <child-component>
        <template v-slot:type1="p1">
            <div>
                {{p1.cx}} + {{p1.cy}} =
                {{ parseInt(p1.cx) + parseInt(p1.cy) }}
            </div>
        </template>
        <template #type2="p2">
            <div>
                {{p2.cx }} 더하기 {{p2.cy}} 는
                {{ parseInt(p2.cx) + parseInt(p2.cy) }}입니다.
            </div>
        </template>
    </child-component>
</div>
<!-- 하위 컴포넌트 -->
<template id="childComponent">
    <div class="child">
        X : <input type="text" v-model="x" /> <br />
        Y : <input type="text" v-model="y" /> <br />
        <slot name="type1" :cx="x" :cy="y"></slot>
        <slot name="type2" :cx="x" :cy="y"></slot>
    </div>
</template>

<script>
    Vue.component('child-component', {
        template: '#childComponent',
        data() {
            return { x: 4, y: 5 };
        }
    });
    var vm = new Vue({
        el: '#app',
    });
</script>
v-slot:type1 이 네임드슬롯 역할
"p1" 이 범위슬롯 역학을 담당한다.
싱글 컴포넌트 파일 - 컴포넌트 파일 분리
컴포넌트만 정의되어 있는 파일을 싱글 컴포넌트 파일 이라한다.
ES6 의 모듈화 구조를 사용해야 하기 때문에 webpack 과 같은 번들러 사용이 필수
다음과 같이 custom-table.vue 파일 정의 후 다른 인스턴스에서 import 하여 사용할 수 있다.
<!-- custom-table.vue -->
<template>
    <table>
        <my-row>
            <my-cell>123</my-cell>
            <my-cell>456</my-cell>
        </my-row>
    </table>
</template>

<script>
export default {
    name: 'custom-table',
    components: {
        'my-row': {
            name: 'my-row',
            render: function(h) {
                return h("tr", this.$slots.default);
            }
        },
        'my-cell': {
            name: 'my-cell',
            render: function(h) {
                return h("td", this.$slots.default);
            }
        }
    }
};
</script>
<div id="example">
    <custom-table></custom-table>
</div>

<script>
import Vue from "vue";
import CustomTable from "./custom-table";

new Vue({
    el: "#example",
    components: { CustomTable }
});
</script>