k8s - istio!
istio
https://istio.io/latest/
https://istio.io/latest/docs/ops/deployment/architecture/ https://github.com/istio/istio
https://www.udemy.com/course/kubernetes-istio-hands-on/
MSA 환경을 구축하면서 아래와 같은 공통적인 운영 패턴문제들이 발생하는데,
- Observability
- TLS configuration
- Service Discovery
- Distributed Tracing
- Circuit Breaking, Retry
- Blue-Green Deploy
서비스 메시 는 이런 MSA 패턴문제를 어플리케이션으로부터 분리해서 비지니스 로직 개발에 집중할 수 있게 한다.
과거
istio-system내부에선[Pilot, Citadel, Galley]서비스가 각각[원격측정, 라우팅, 정책검증]등의 책임가지고 실행되었지만,
1.5 버전부터 단순화되어istiod(istio-daemon)서비스로 통합되었다.
istiod 에서 작성한 정책들을 통해, 각 Pod 에 sidecar provider 를 배포하고, 서비스 메시 의 모든 in/out bound 트래픽을 관리한다.
istio 의 장점으로는 위의 모든 작업을 진행하는 동안 어플리케이션이나 Pod 의 설정 변겨 없이 위의 MSA 운영 패턴 구현이 가능하다.
Envoy
https://www.envoyproxy.io/
사이드카 provider 로 가장 유명한 프로젝트.
C++ 로 개발된 고성능 L7 프록시 서버.
Pod 의 컨테이너에선 Enovy 를 실행중이다.
Envoy컨테이너를[sidecar, data plane, istio-proxy]등으로 부름
서비스 메시를 구축할 때 거의 표준으로 사용되고 있는 프로젝트이다.
istio control plan 에선 k8s 리소스 상황에 맞춰 각종 설정을 Envoy 에 적용하고 실행시키는 구조이다.
설치
istioctl, helm 을 사용하여 설치 가능.
helm repo add istio https://istio-release.storage.googleapis.com/charts
# 압축파일 다운로드, base-1.20.3.tgz 버전 설치됨
helm fetch istio/base
# 압축파일 다운로드, istiod-1.20.3.tgz 버전 설치됨
helm fetch istio/istiod

# 압축 파일 해제
tar zxvf base-*.tgz
mv base base-helm
tar zxvf istiod-*.tgz
mv istiod istiod-helm

kubectl create namespace istio-system
istio k8s CRD 설치
# base-helm
helm install istio-base -f values.yaml . -n istio-system

kubectl get crd
# authorizationpolicies.security.istio.io
# envoyfilters.networking.istio.io
# istiooperators.install.istio.io
# peerauthentications.security.istio.io
# proxyconfigs.networking.istio.io
# requestauthentications.security.istio.io
# serviceentries.networking.istio.io
# sidecars.networking.istio.io
# telemetries.telemetry.istio.io
# virtualservices.networking.istio.io
# wasmplugins.extensions.istio.io
# ...
Istio discovery chart 설치
# istiod-helm
helm install istiod -f values.yaml . -n istio-system

kubectl get all -n istio-system
# NAME                         READY   STATUS    RESTARTS   AGE
# pod/istiod-bc4584967-pvpgv   1/1     Running   0          6m26s

# NAME             TYPE        CLUSTER-IP      EXTERNAL-IP   PORT(S)                                 AGE
# service/istiod   ClusterIP   10.97.153.154   <none>        15010/TCP,15012/TCP,443/TCP,15014/TCP   6m26s

# NAME                     READY   UP-TO-DATE   AVAILABLE   AGE
# deployment.apps/istiod   1/1     1            1           6m26s

# NAME                               DESIRED   CURRENT   READY   AGE
# replicaset.apps/istiod-bc4584967   1         1         1       6m26s

# NAME                                         REFERENCE           TARGETS         MINPODS   MAXPODS   REPLICAS   AGE
# horizontalpodautoscaler.autoscaling/istiod   Deployment/istiod   <unknown>/80%   1         5         1          6m26s
helm ls -n istio-system
# NAME            NAMESPACE       REVISION   ...  STATUS    ...  APP VERSION
# istio-base      istio-system    1          ...  deployed  ...  1.20.3
# istiod          istio-system    1          ...  deployed  ...  1.20.3
istio ingress gateway controller
https://istio.io/latest/docs/setup/additional-setup/gateway/
ingress 사용하기 위해 ingress controller 를 설치했듯이,
istio gateway 를 사용하기 위해 ingress gateway controller 설치가 필요하다.
위 url 에서 요구한대로 Kubernetes YAML 기반으로 LoadBalancer, Deployment, Role, RoleBinding 생성.
단 LoadBalancer 의 경우 이미 nginx-ingress 가 80, 443 포트를 사용중임으로 istio-ingress 는 8080, 8443 을 사용하도록 설정.
그리고 MetalLB 를 사용해 IP 하나를 공유해서 사용중임으로 아래 annotation 지정.
# istio/gateway-controller.yaml
# ...
metadata:
  name: istio-ingressgateway
  namespace: istio-system
  annotations:
    metallb.universe.tf/allow-shared-ip: "my-lb-service"
# ...
kubectl apply -f ingress.yaml
kubectl get all -n istio-system
# NAME                                        READY   STATUS    RESTARTS   AGE
# pod/istio-ingressgateway-7c86d547c7-rdr8b   1/1     Running   0          6m47s

# NAME                           TYPE           CLUSTER-IP      EXTERNAL-IP      PORT(S)                         AGE
# service/istio-ingressgateway   LoadBalancer   10.99.142.173   192.168.10.228   8080:31517/TCP,8443:32630/TCP   6m47s

# NAME                                   READY   UP-TO-DATE   AVAILABLE   AGE
# deployment.apps/istio-ingressgateway   1/1     1            1           6m47s

# NAME                                              DESIRED   CURRENT   READY   AGE
# replicaset.apps/istio-ingressgateway-7c86d547c7   1         1         1       6m47s
book-info 데모 서비스
https://github.com/istio/istio/blob/master/samples/bookinfo/platform/kube/bookinfo.yaml
istio 제공 데모서비스 bookinfo.yaml 파일을 사용해 istio 의 동작 확인.
book-demo namespace 를 생성하고 istio-injection 라벨을 설정.
해당 namespace 에 생성되는 Pod 에 istio sidecar 가 같이 동작하는지 확인.
kubectl create namespace book-demo
kubectl label namespace book-demo istio-injection=enabled
kubectl describe ns book-demo
# Name:         book-demo
# Labels:       istio-injection=enabled
#               kubernetes.io/metadata.name=book-demo
# Annotations:  <none>
# Status:       Active

kubectl apply -f bookinfo.yaml -n book-demo
kubectl get all -n book-demo
# NAME                                 READY   STATUS    RESTARTS   AGE
# pod/details-v1-698d88b-6ppfv         2/2     Running   0          42s
# pod/productpage-v1-675fc69cf-lghct   2/2     Running   0          42s
# pod/ratings-v1-6484c4d9bb-7bt57      2/2     Running   0          42s
# pod/reviews-v1-5b5d6494f4-8h8fz      2/2     Running   0          42s
# ...

# NAME                  TYPE        CLUSTER-IP       EXTERNAL-IP   PORT(S)    AGE
# service/details       ClusterIP   10.105.228.184   <none>        9080/TCP   42s
# service/productpage   ClusterIP   10.99.64.113     <none>        9080/TCP   42s
# service/ratings       ClusterIP   10.98.143.228    <none>        9080/TCP   42s
# service/reviews       ClusterIP   10.101.1.40      <none>        9080/TCP   42s

# NAME                             READY   UP-TO-DATE   AVAILABLE   AGE
# deployment.apps/details-v1       1/1     1            1           42s
# deployment.apps/productpage-v1   1/1     1            1           42s
# deployment.apps/ratings-v1       1/1     1            1           42s
# deployment.apps/reviews-v1       1/1     1            1           42s
# ...

# NAME                                       DESIRED   CURRENT   READY   AGE
# replicaset.apps/details-v1-698d88b         1         1         1       42s
# replicaset.apps/productpage-v1-675fc69cf   1         1         1       42s
# replicaset.apps/ratings-v1-6484c4d9bb      1         1         1       42s
# replicaset.apps/reviews-v1-5b5d6494f4      1         1         1       42s
# ...

kubectl get pod/details-v1-698d88b-6ppfv -n book-demo -o=jsonpath='{.spec.containers[*].name}' | tr ' ' '\n'

# details
# istio-proxy

kubectl exec -n book-demo "$(kubectl get pod -l app=ratings -o jsonpath='{.items[0].metadata.name}' -n book-demo)" -c ratings -- curl -sS productpage:9080/productpage| grep -o "<title>.*</title>"
# <title>Simple Bookstore App</title>
ratings 컨테이너에서 curl 을 통해 productpage:9080 호출, 서버가 정상동작하는지 확인
kiali
https://kiali.io/ observability console for Istio with service mesh, like grafana
istio 에서 제공하는 모니터링 콘솔 어플리케이션.
istio git 에서 제공하는 에드온을 통해 kaili 를 포함해 [prometheus, jeager, grafana] 등의 서드파티 어플리케이션을 쉽게 설치하고 통합 할 수 있다.
하지만 여기선 kiali 설치를 에드온으로 진행하지 않고 helm 차트를 사용한다.
그리고 기존 k8s 에 설치해둔 prometheus 와 tempo 를 사용해 istio 와 연결한다.
에드온으로 kiali, prometheus, jeager 를 설치할 경우 아래 url 참고.
<https://github.com/istio/istio/tree/master/samples/addons/
helm repo add istio https://kiali.org/helm-charts

helm search repo kiali

# 압축파일 다운로드, kiali-server-1.80.0.tgz 버전 설치됨
helm fetch kiali/kiali-server

# 압축 파일 해제
tar zxvf kiali-server-*.tgz
mv kiali-server kiali-server-helm
kiali 의 모니터링은 기본적인 k8s API 와 pormetheus 를 사용해 control-plane, data-plane 에서 수집한 데이터를 기반으로 동작한다.
기존에 생성해둔 prometheus, tempo 에 접근할 수 있도록 external_services 에 설정 추가.
istio_namespace: "istio-system" # default is where Kiali is installed

auth:
  openid: {}
  openshift: {}
  strategy: "anonymous"
...
external_services:
  custom_dashboards:
    enabled: true
  istio:
    root_namespace: ""
  prometheus:
    url: "http://thanos-query-frontend.thanos.svc.cluster.local:9090/"
  tracing:
    enabled: true
    in_cluster_url: "http://tempo.tempo.svc.cluster.local:3100/"
    provider: "tempo"
    use_grpc: false
...
server:
  port: 20001
  observability:
    metrics:
      enabled: true
      port: 9090
  web_root: "/dashboards/kiali"
  web_fqdn: kiali.istio.local # nginx ingress
# base-helm
helm install kiali-server -f values.yaml . -n istio-system
kiali.istio.local hosts 파일에 등록 후 https://kiali.istio.local/dashboards/kiali url 에 접속
prometheus 통합
기존 설치해둔 prometheus 의 config 파일에 아래와 같이 control-plan, data-plane(envoy) 을 스크래핑할 수 있도록 설정.
prometheus:
  ...
  prometheusSpec:
  ...
    additionalScrapeConfigs:
      - job_name: 'istiod' # control plan 메트릭 수집
        kubernetes_sd_configs:
        - role: endpoints
          namespaces:
            names:
            - istio-system
        relabel_configs:
        - source_labels: [__meta_kubernetes_service_name, __meta_kubernetes_endpoint_port_name]
          action: keep
          regex: istiod;http-monitoring
      - job_name: 'envoy-stats' # data plan 메트릭 수집
        metrics_path: /stats/prometheus
        kubernetes_sd_configs:
        - role: pod
        relabel_configs:
        - source_labels: [__meta_kubernetes_pod_container_port_name]
          action: keep
          regex: '.*-envoy-prom'
실제 모든 pod 의 envoy 컨테이너의 ports.name 에 위 regex 에 해당되는 문자열이 설정되어있다.
kubectl get pod details-v1-698d88b-6ppfv -o=jsonpath='{.spec.containers[*].ports[*].name}' -n book-demo
# http-envoy-prom
prometheus 가 metric 을 수집하고 있는 상황에서 ratings 에서 product 서비스를 호출하는 명령을 여러번 전송.
while true; \
do kubectl exec -n book-demo "$(kubectl get pod -l app=ratings -o jsonpath='{.items[0].metadata.name}' -n book-demo)" -c ratings -- curl -sS productpage:9080/productpage | grep -o "<title>.*</title>"; \
sleep 0.5; done
tempo 통합
envoy 에서 trace 관측데이터를 전달할 때 zipkin b3 방식만 사용함으로 tempo-helm 의 values.yaml 에 zipkin 프로토콜 수신지 설정
# tempo/value.yaml
tempo:
  ...
  receiver:
  ...
    zipkin:
      endpoint: "0.0.0.0:9411"
envoy 에서도 trace 관측데이터의 수신지를 설정하기 위해 defaultConfig 를 수정
# istiod/value.yaml
meshConfig:
  enablePrometheusMerge: true
  enableTracing: true
  defaultConfig: # envoy default config
    tracing:
      zipkin:
        address: tempo.tempo.svc.cluster.local:9411
      sampling: 100.0
이제 모든 envoy 에서 위 address 로 trace 데이터를 전달한다.
주의: 기존실행
envoy를 모두 재실행 해야 위 설정이 적용됨.
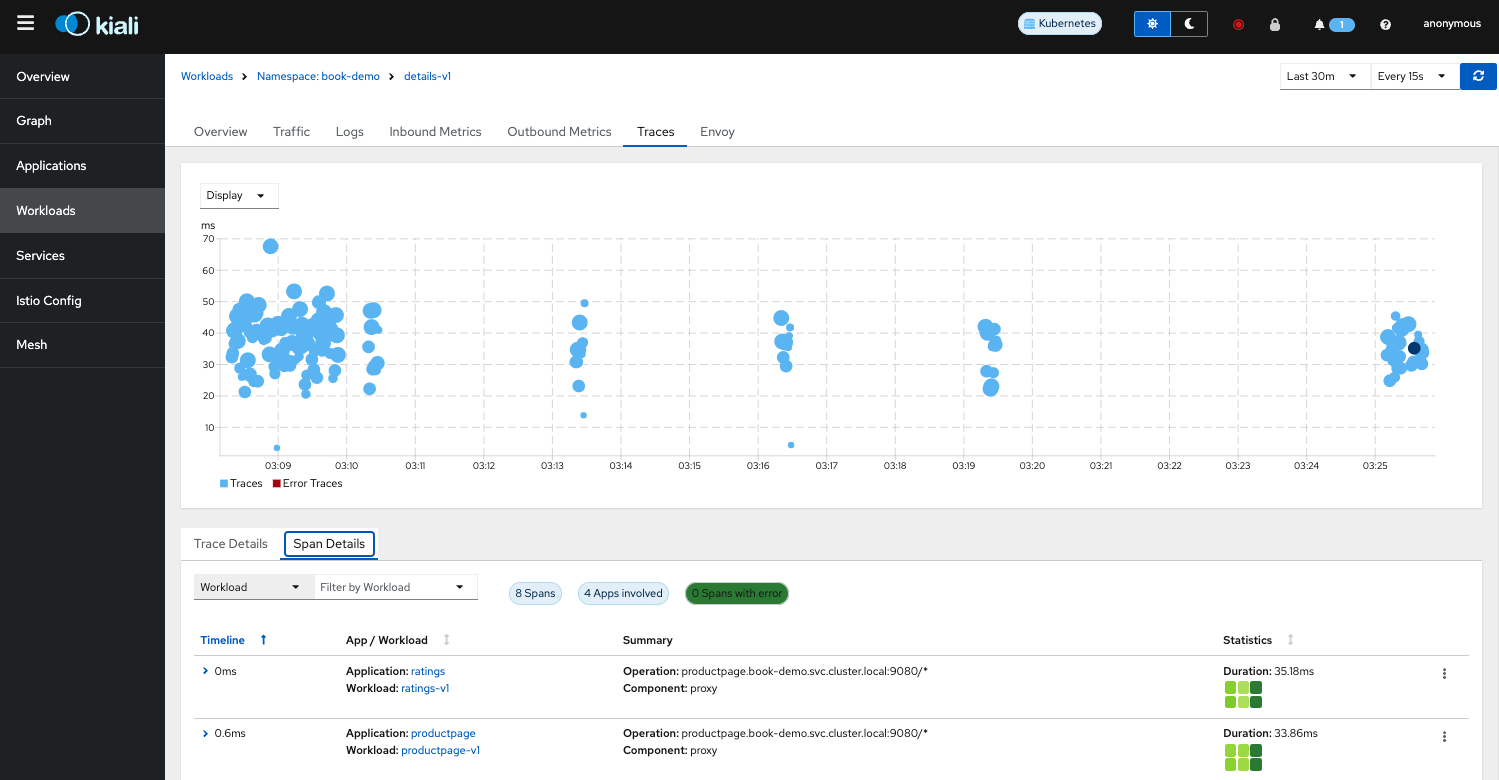
kiali 에서도 tempo 에 접근할 수 있도록 설정해두었기 때문에 아래 그림처럼 trace 데이터를 확인할 수 있다.
Traffic
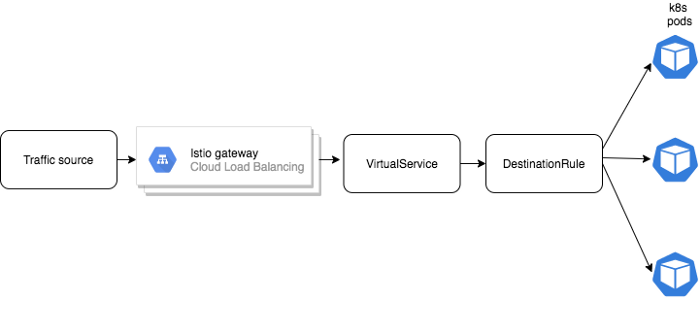
- VirtualService
트래픽 Policy, 트래픽 흐름을 제어해 카나리아 배포 같은 기능 구현 가능. - DestinationRule
트래픽을 분산하기 위한 정의서.
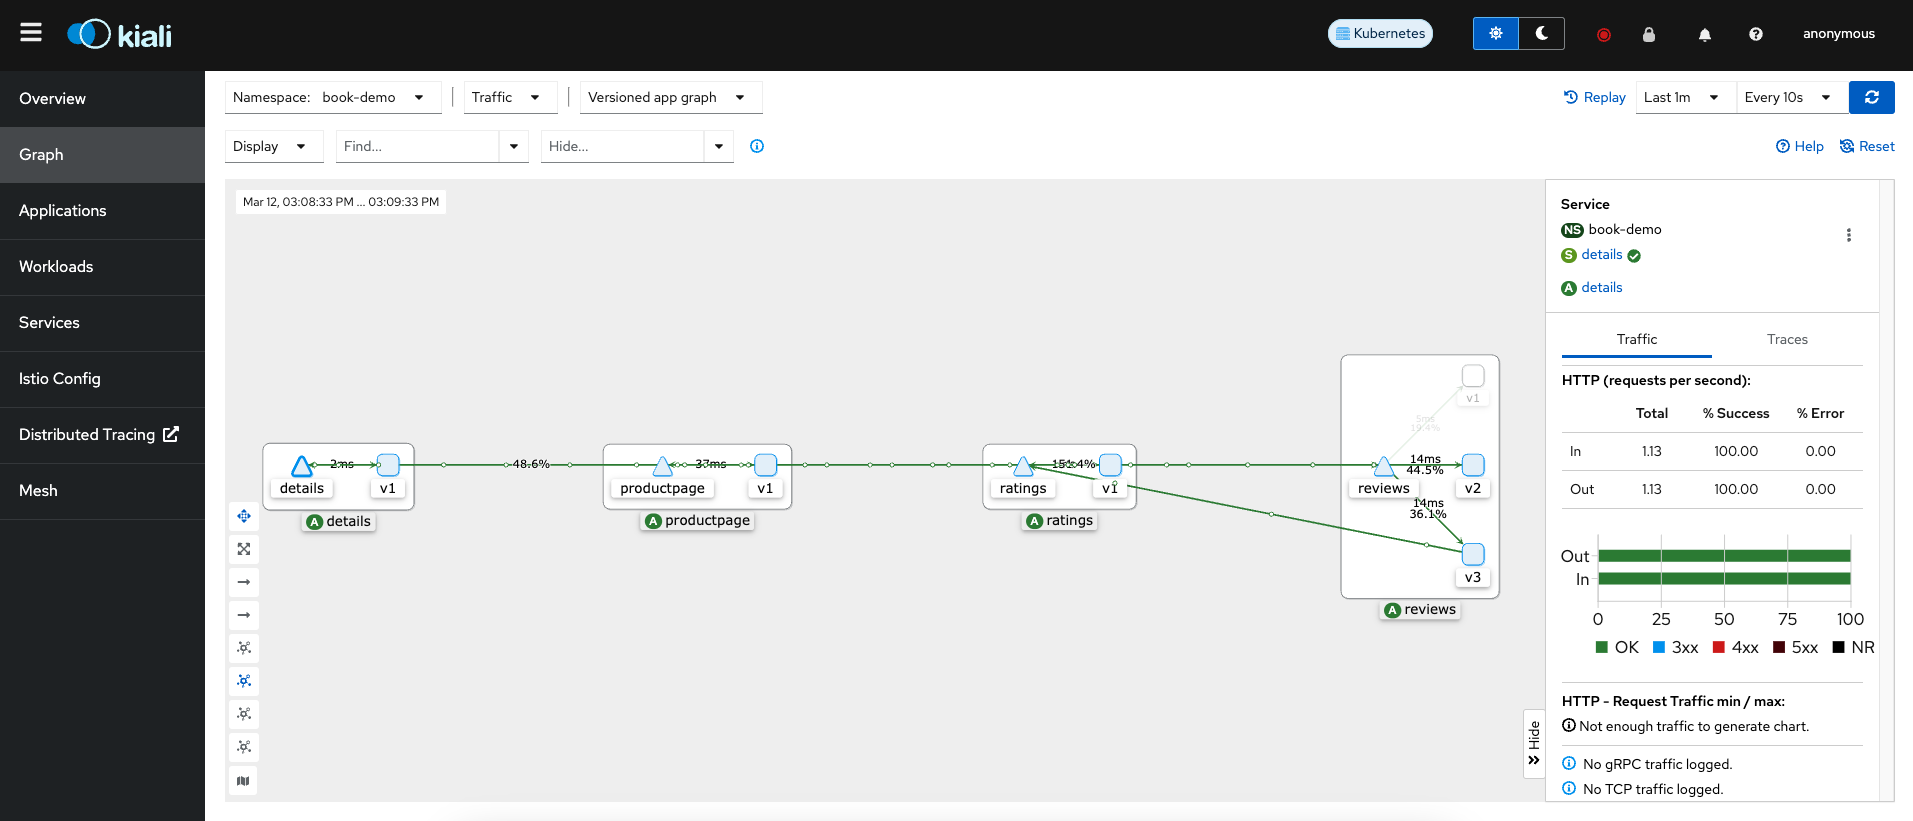
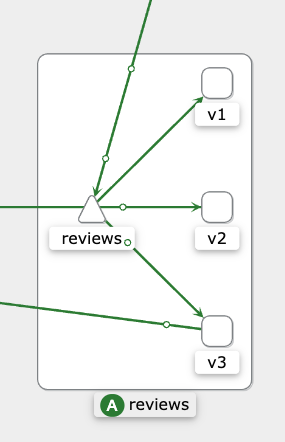
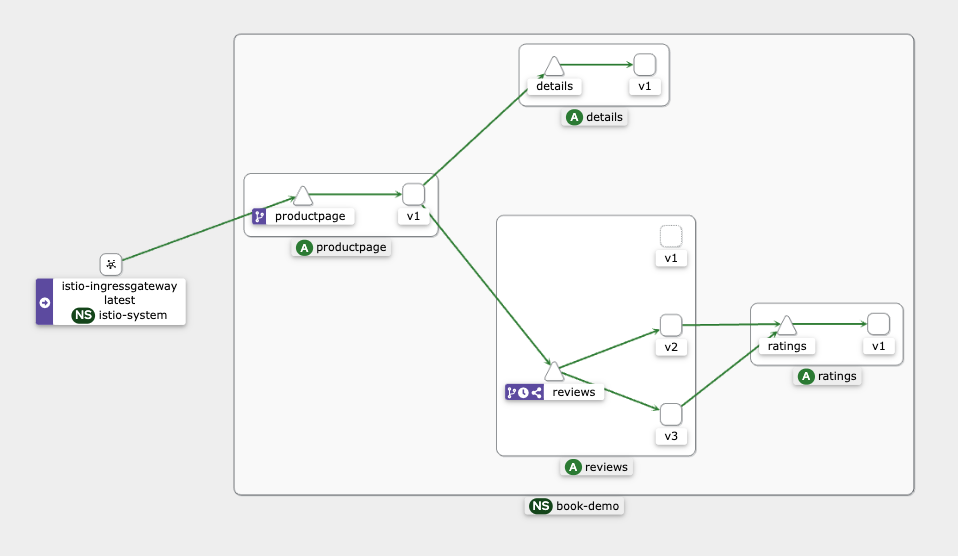
book-info 데모서비스에서 3개 버전 review deployment 에 접근할 수 있는 service 를 생성한다.
아무런 설정을 하지 않았다면 아래 그림처럼 기본 k8s service 라우팅 규칙인 round robin 으로 동작할 것이다.
만약 트래픽 퍼센티지를 아래와 같이 변경하고 싶다면,
review-v1:review-v2:review-v3=0:1:1
kiali 에서 그림처럼 설정할 수 있다.
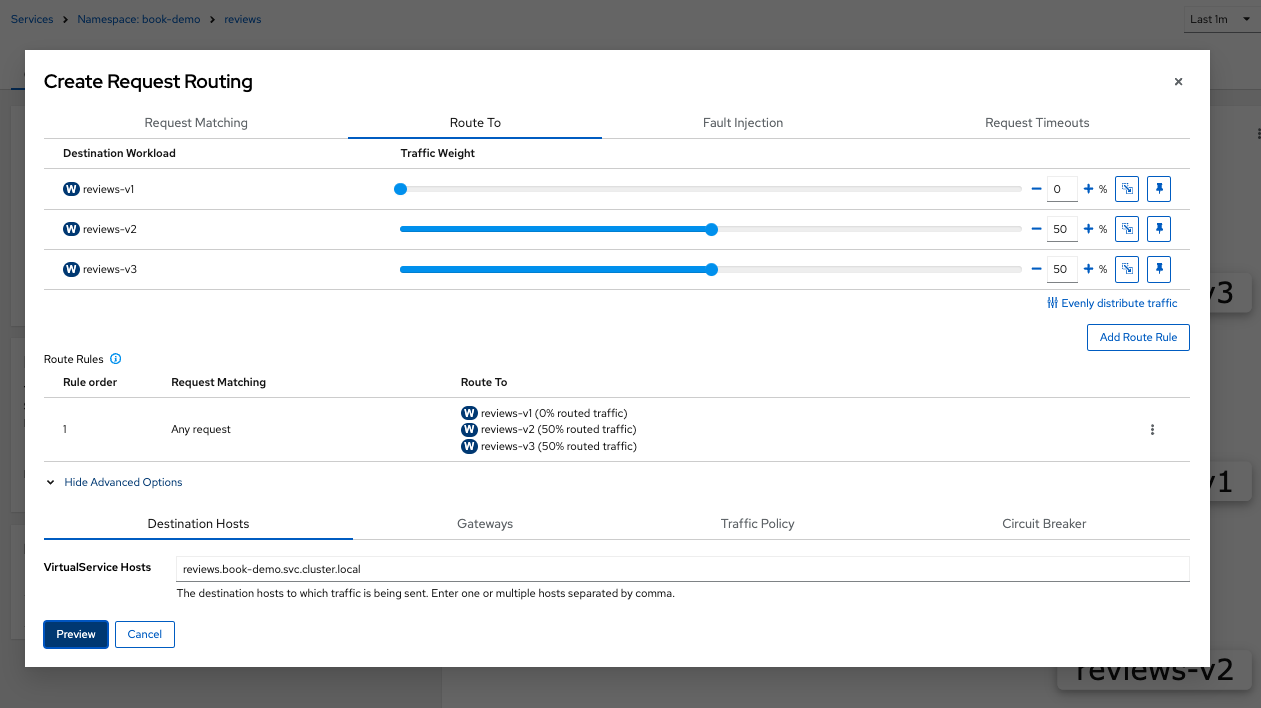
이때 아래와 같은 VirtualService 와 DestinationRule 이 생성된다.
kind: DestinationRule
apiVersion: networking.istio.io/v1beta1
metadata:
  namespace: book-demo
  name: reviews
  labels:
    kiali_wizard: request_routing
  annotations: ~
spec:
  host: reviews.book-demo.svc.cluster.local
  subsets:
    - name: v1
      labels:
        version: v1
    - name: v2
      labels:
        version: v2
    - name: v3
      labels:
        version: v3
  trafficPolicy: ~
---
kind: VirtualService
apiVersion: networking.istio.io/v1beta1
metadata:
  namespace: book-demo
  name: reviews
  labels:
    kiali_wizard: request_routing
spec:
  hosts:
    - reviews.book-demo.svc.cluster.local
  gateways: ~
  http:
    - route:
        - destination:
            host: reviews.book-demo.svc.cluster.local
            subset: v1
          weight: 0
        - destination:
            host: reviews.book-demo.svc.cluster.local
            subset: v2
          weight: 50
        - destination:
            host: reviews.book-demo.svc.cluster.local
            subset: v3
          weight: 50
---
생성된 VirtualService, DestinationRule 는 istio control plane 에 전달되고, data plane 의 라우팅 규칙을 재작성 하는데 사용된다.
kiali 를 통해 생성된 istio resource yaml 을 바로 적용하는것도 좋지만, 대부분 코드 추적을 위해 직접 yaml 파일을 생성하고 적용한다.
VirtualService
- timeout
- retries
- route
- weight-base
- mirror
kind: VirtualService
apiVersion: networking.istio.io/v1beta1
metadata:
  namespace: book-demo
  name: reviews-vs # virtual service name
spec:
  hosts:
    - reviews.book-demo.svc.cluster.local # service DNS name
  gateways: ~
  http: # http 라우팅 규칙
    - match: # prefix 라우팅
      # IF
      - headers: # http header 에
          end-user: # end-user:admin 이 있을경우 라우팅
            exact: admin
            # regex 문법도 존재함
      # OR
      - uri: # uri 에
          prefix: "/review"
        # AND
        header: # query 에
          - x-version: # v=v1 일 경우
            exact: v1
      route: # 조건일치 목적지
        - destination:
            host: reviews.book-demo.svc.cluster.local # service DNS name
            subset: subset-v1 # DestinationRule 정의된 subset

    # - match: another matching rule

    - route: # 기본 라우팅
      - destination:
          host: reviews.book-demo.svc.cluster.local # service DNS name
          subset: subset-v2 # DestinationRule 정의된 subset
        weight: 50 # weight-based routing
      - destination:
          host: reviews.book-demo.svc.cluster.local # service DNS name
          subset: subset-v3 # DestinationRule 정의된 subset
        weight: 50 # weight-based routing
      timeout: 10s  # 시간초과
      retries: # 재시도
        attempts: 3
        perTryTimeout: 2s
spec.http.[].route: 기본 라우팅spec.http.[].match.route: 매칭 라우팅
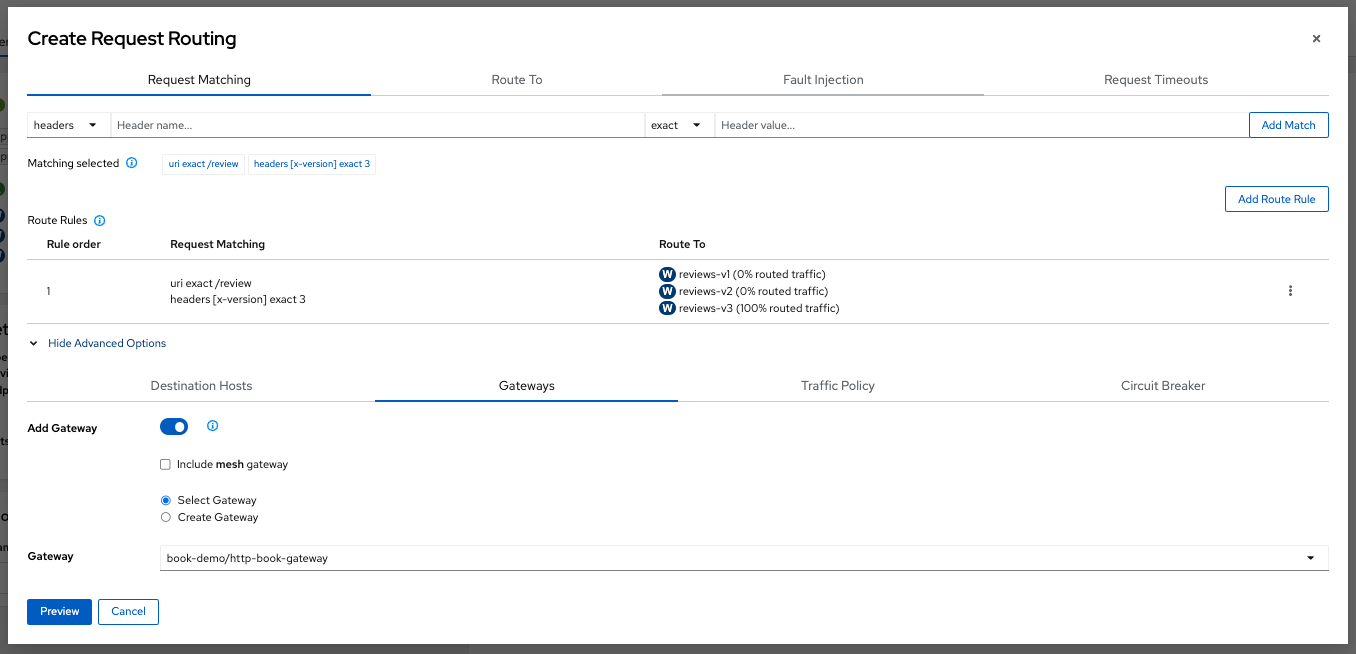
VirtualService 의 match 속성을 사용하면 프로덕션 환경에서 일반 사용자는 접근못하고 관리자만 접근 가능하도록 테스트용 서버를 동작시킬 수 있다.
이런 배포방식을 Dark Release 라고 부름
FaultInjection
결함을 주입해서 어플리케이션 전체에서 발생하는 문제를 테스트할 수 있다.
kind: VirtualService
apiVersion: networking.istio.io/v1beta1
metadata:
  namespace: book-demo
  name: reviews-vs # virtual service name
spec:
  hosts:
    - reviews.book-demo.svc.cluster.local # service DNS name
  gateways: ~
  http:
    - match:
      - headers: # http header 에
          - x-version: # v=v1 일 경우
            exact: v1
      fault: # 해당 match 에 결합 주입
        delay:
          fixedDelay: 10s
          percentage:
            value: 100.0
        abort:
          httpStatus: 500
          percentage:
            value: 10.0
      route: # 조건일치 목적지
        - destination:
            host: reviews.book-demo.svc.cluster.local # service DNS name
            subset: subset-v1 # DestinationRule 정의된 subset

    - route: # 기본 라우팅
      - destination:
          host: reviews.book-demo.svc.cluster.local
          subset: subset-v2
        weight: 50
      - destination:
          host: reviews.book-demo.svc.cluster.local
          subset: subset-v3
        weight: 50
DestinationRule
아래와 같은 작업 수행 가능
- load-balancer
- circuit-breaker
kind: DestinationRule
apiVersion: networking.istio.io/v1beta1
metadata:
  namespace: book-demo
  name: reviews
spec:
  host: reviews.book-demo.svc.cluster.local # service DNS name
  subsets:
    - name: subset-v1 # subset name
      labels: # selector
        version: v1 # label name
    - name: subset-v2
      labels:
        version: v2
    - name: subset-v3
      labels:
        version: v3
  trafficPolicy: ~
Circuit Breaker
https://istio.io/latest/docs/reference/config/networking/destination-rule/#TrafficPolicy https://istio.io/latest/docs/reference/config/networking/destination-rule/#OutlierDetection
MSA 특성상 하나의 마이크로 서비스의 장애로 인해 전체 시스템 장애로 전파되는 Cacading Failure 가 발생할수 있다.
보통 Cacading Failure 를 막기위한 방법으로 Circuit Breaker 를 자주 설정하여 사용하는데, java 진영에선 resilience4j 와 같은 라이브러리를 사용한 방식이 유일했다.
istio 를 사용해 Circuit Breaker 를 구현함으로써, 라이브러리 의존성을 벗어날 수 있고, 각 서비스에서 광범위한 코딩 작업을 하지 않아도 구현이 가능하다.
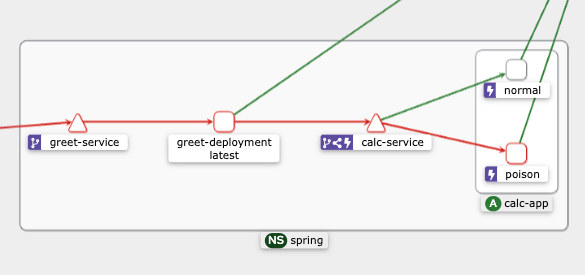
테스트를 위해 calc-service 의 경우 2개 version 으로 운영중이며, 그중 하나는 임의로 500 에러를 반환하도록 설정하였다.
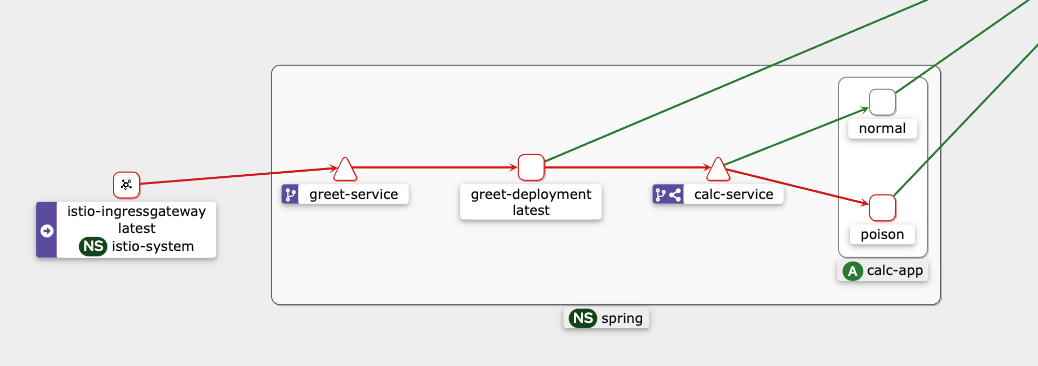
DestinationRule 에 spec.trafficPolicy.trafficPolicy 을 추가해서 Circuit Breaker 역할을 구현
kind: DestinationRule
apiVersion: networking.istio.io/v1beta1
metadata:
  namespace: spring
  name: calc-destination-rule
spec:
  host: calc-service.spring.svc.cluster.local
  subsets:
    - name: normal
      labels:
        version: normal
    - name: poison
      labels:
        version: poison
  trafficPolicy:
    outlierDetection:
      consecutive5xxErrors: 1 # default 5, 5XX 에러발생 횟수
      interval: 10s # default 10s
      baseEjectionTime: 1m # default 30s
      maxEjectionPercent: 100 # default 10%, 모든 요청을 ejection 가능
---
# Gateway 전용 VirtualService
kind: VirtualService
apiVersion: networking.istio.io/v1beta1
metadata:
  namespace: spring
  name: calc-virtual-service-for-gateway
spec:
  http:
    - route:
        - destination:
            host: calc-service.spring.svc.cluster.local
# Circuit Breaker 설정시 정상 서비스로 라우팅하기 위해 모두 주석처리 함
#            subset: normal
#          weight: 50
#        - destination:
#            host: calc-service.spring.svc.cluster.local
#            subset: poison
#          weight: 50
  hosts:
    - calc.kube.demo.com
  gateways:
    - spring-kube-demo-gateway
5XX 에러가 한번이라도 발생하면 Circuit Breaker 가 동작되도록 설정한다.
trafficPolicy 를 삽입하면서 번개모양의 아이콘이 추가되었다.
테스트 결과 처음 오류가 한번 발생하면, 그 이후 1m 까지는 오류가 발생한 서비스로 라우팅되지 않는다.
while true; \
do curl -sS http://calc.kube.demo.com:8080/calculating/1/2; echo ''; sleep 0.5; done
# {"timestamp":"2024-03-21T10:19:45.455+00:00","status":500,"error":"Internal Server Error","path":"/calculating/1/2"}
# 3
# 3
# 3
# 3
# 3
# 3
# 3
# 3
# 3
# 3
주의사항으로 만약 VirtualService 에서 weight, subset 을 설정해두었다면 에러 발생시 아래와 같이 Circuit Breaker 가 동작하지만, 자체적으로 요청의 절반은 503 처리를 수행한다.
while true; \
do curl -sS greet.kube.demo.com:8080/greeting/1/2; echo ''; \
sleep 0.5; done
# 3
# 3
# {"timestamp":"2024-03-21T07:37:27.668+00:00","status":500,"error":"Internal Server Error","path":"/calculating/1/2"}
# 3
# 3
# 3
# no healthy upstream # 503 에러임
# no healthy upstream
# no healthy upstream
# 3
# no healthy upstream
# 3
# no healthy upstream
istio 의 Circuit Breaker 기능이 라이브러리로 구성되는것 보다는 부족할 순 있지만, 장애 서비스의 요청을 우회하고 막음으로서 Cacading Failure 는 충분히 예방할 수 있다.
Gateway
사전에
istio ingress gateway controller설치 필요.
Service Mesh 가장자리에서 VirtualService 까지 트래픽을 제어하는 독립형 Envoy 프록시.
istio 를 사용하기 전, 외부에서 들어오는 트래픽의 흐름은 아래와 같다.
LoadBalancer Service -> (Ingress) -> Another Service or Pod
여기서 Ingress 와 Service 사이에 VirtualService 를 삽입한다 하더라도 Ingress 는 k8s 표준 이고 VritualService 는 istio CRD 이기 때문에 istio proxy 를 통해 패킷이 전달되지 않는다.
즉 외부요청을 바로 VirtualService 로 접근시키고 싶다면 Gateway 를 사용해야 한다.
아래와 같이 istio gateway 를 통해 라우팅해야 외부요청이 envoy 로 전달된다.
LoadBalancer Service -> Istio Gateway Container(Gateway) -> VirtualService
동일한 namespace 에 Gateway 를 생성, hosts 에 *.book.example.com 같이 와일드카드를 지정해서 라우팅할 도메인 범위를 지정.
/etc/hosts 에 product.book.example.com 도메인 등록.
kind: Gateway
apiVersion: networking.istio.io/v1beta1
metadata:
  namespace: book-demo
  name: http-book-gateway
spec:
  # The selector matches the ingress gateway pod labels.
  # If you installed Istio using Helm following the standard documentation, this would be "istio=ingress"
  selector:
    istio: ingressgateway # gateway controller 중 label 이 istio=ingressageteway 인 pod 를 사용할 gateway 로 지정
  servers:
  - port:
      number: 8080 # load balanacer 의 port 와 매핑
      name: http
      protocol: HTTP
    hosts:
    - "*.book.example.com" # 라우팅할 hosts, 여러개 지정 가능
VirtualServie 와 Gateway 를 서로 매핑시켜 product 서비스까지 라우팅할 수 있도록 설정.
kind: DestinationRule
apiVersion: networking.istio.io/v1beta1
metadata:
  namespace: book-demo
  name: productpage
spec:
  host: productpage.book-demo.svc.cluster.local
  subsets:
    - name: v1
      labels:
        version: v1
  trafficPolicy: ~
---
kind: VirtualService
apiVersion: networking.istio.io/v1beta1
metadata:
  namespace: book-demo
  name: productpage
spec:
  hosts:
    - product.book.example.com # gateway 에서 설정한 hosts 와 매핑
  gateways:
    - http-book-gateway # gateway 명 지정
  http:
    - route:
        - destination:
            host: productpage.book-demo.svc.cluster.local
            subset: v1
          weight: 100
reviews, details 의 VirtualService 도 L7 LB 역할을 수행하는 Gateway 를 통해 외부에서 바로 접근시킬 수 있다.
주의사항으로 Gateway 를 지정한 VirtualService 의 경우 Gateway 에서 들어온 트래픽만 처리하고 서비스들간의 트래픽에선 사용되지 않는다.
Gateway 와 서비스들간의 통신 모두 처리하고 싶다면 2개 VirtualService 를 각각 생성해야 한다.
ServiceEntry
istio 가 내부적으로 유지 관리하는 서비스 레지스트리에 항목
apiVersion: networking.istio.io/v1alpha3
kind: ServiceEntry
metadata:
  name: svc-entry
spec:
  hosts:
  - ext-svc.example.com
  ports:
  - number: 443
    name: https
    protocol: HTTPS
  location: MESH_EXTERNAL # 서비스 레지스트리에 외부 종속성을 추가
  resolution: DNS
---
apiVersion: networking.istio.io/v1alpha3
kind: DestinationRule
metadata:
  name: ext-res-dr
spec:
  host: ext-svc.example.com
  trafficPolicy:
    connectionPool:
      tcp:
        connectTimeout: 1s
Security
k8s 노드를 AWS AZ 에 배치해 운영한다면 암호화 되지 않은 통신이 외부에 노출될 수 있다.
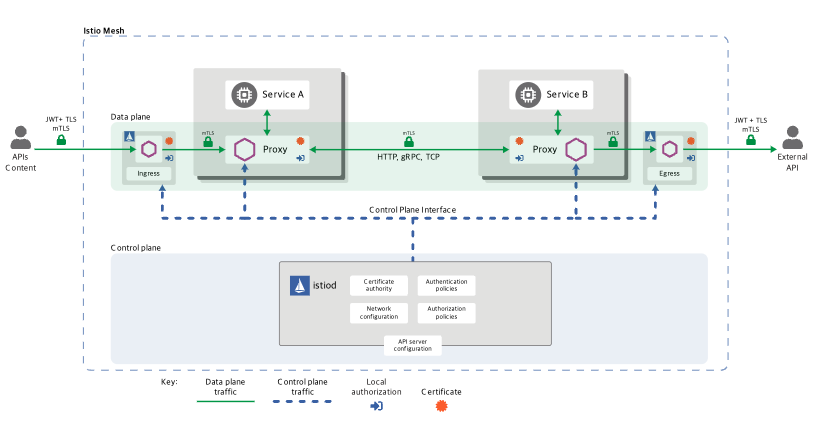
istio 와 mTLS(mutal TLS, 상호 TLS) 기능을 사용하면 엔드포인트간 통신을 쉽게 암호화 처리할 수 있다.
기존 istio Citadel 에서 하는 작업이었으며 현재 istiod 로 통합됨.
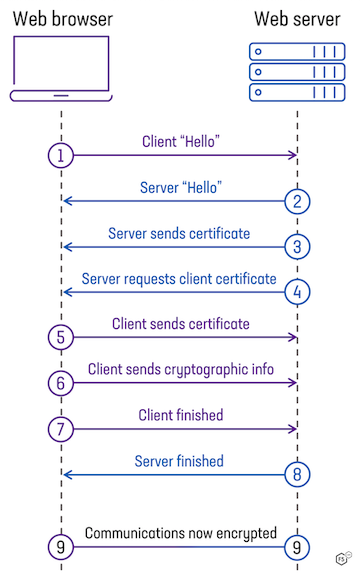
그림처럼 서버와 클라이언트 상호간 인증서를 교환하며 헨드쉐이크하고, 신뢰할 수 있는 사용자의 통신만 허용시켜 Zero Trust 접근 방식을 사용할 수 있다.
모든 엔드포인트를 제어할 수 있는 폐쇄된 환경에 적합한 프로토콜이다.
PeerAuthentication
암호화 정책 설정 전, 테스트를 위해 NodePort Service 를 생성하고 review 서비스에 접근가능한지 확인
apiVersion: v1
kind: Service
metadata:
  name: reviews-nodeport
  namespace: book-demo
  labels:
    app: reviews
    service: reviews
spec:
  type: NodePort
  selector:
    app: reviews
  ports:
  - port: 9080 # 클러스터 내부에서 접근할 서비스 포트
    targetPort: 9080 # 실제 Pod의 포트
    nodePort: 30123
curl http://192.168.10.XXX:30123/reviews/0
# {"id": "0","podname": "reviews-v1-5b5d6494f4-5x82z","clustername": "null","reviews": [{  "reviewer": "Reviewer1",  "text": "An extremely entertaining play by Shakespeare. The slapstick humour is refreshing!"},{  "reviewer": "Reviewer2",  "text": "Absolutely fun and entertaining. The play lacks thematic depth when compared to other plays by Shakespeare."}]}%
종단간 인증정책, 워크로드에 적용하는 mTLS 모드 를 지정
apiVersion: security.istio.io/v1beta1
kind: PeerAuthentication
metadata:
  name: example-peer-policy
  namespace: book-demo # 해당 namespace 안에서 mTLS 인증정책 사용
spec:
  mtls:
    # mode: PERMISSIVE # 일반 텍스트, TLS 모두 허용, default 값
    mode: STRICT # TLS 트래픽만 허용
    # mode: DISABLE # 상호 TLS 비활성화
PERMISSIVE 모드를 사용하면 istio 메시에 포함되지 않은 서비스도 암호화 되지 않은 네트워크로 통신 가능하다.
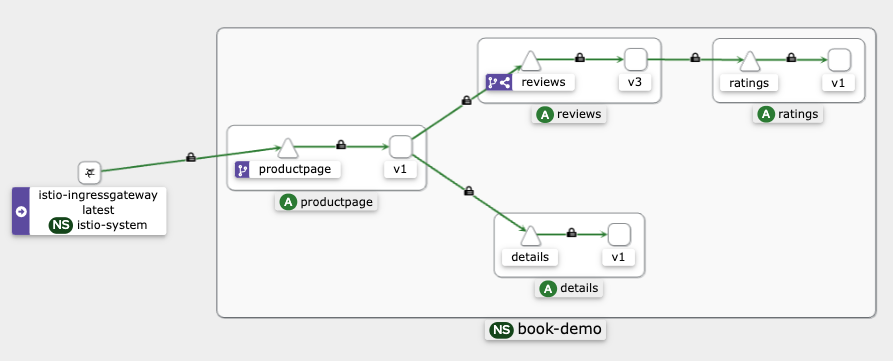
kiali 에서 security 체크박스 설정 후 엔드포인트 통신구간에 자물쇠 아이콘이 설정되었는지 확인.
지정 후 다시한번 NodePort Service 서비스에 접근
curl http://192.168.10.XXX:30123/reviews/0
# curl: (56) Recv failure: Connection reset by peer