Vue - 디렉티브!
보간법 디렉티브
HTML DOM 문서 조각 에 데이터를 표기할 때 으로 머스태시(Mustache), 디렉티브 방식 을 사용한다.
여러방법으로 인스턴스 템플릿에 데이터 바인딩을 진행하는데
통틀어 보간법(Interpolation) 이라고 한다.
문자열 보간법 - Mustache v-text
vue 템플릿에 Mustache, v-text 를 사용하여 요소 content 에 문자열을 삽입한다.
이를 문자열 보간법이라 함
<div id="app">
    <!-- html tag escape 처리됨, 태그가 그대로 출력 -->
    <span>{{ msg }}</span>
    <span v-text="msg"></span>
</div>
<script>
    new Vue({
        el: "#app",
        data: { msg: "Hello <b>Vue.js</b>" }
    });
</script>
리소스에 따라 데이터 바인딩하기 위한 방법이 다르다.
속성 보간법 - v-bind
vue 템플릿에 v-bind 를 사용하여 요소 attribute 에 문자열을 삽입한다.
이를 속성 보간법이라 함
요소의 속성은 html 문법에서 가장 사용되는 데이터이기에 보간법 디렉티브중 가장 많이 사용된다.
v-bind 를 : 콜론으로 표기할 수 있다.
<div id="simple1">
<!-- 동일한 문법 -->
<input type="text" v-bind:value="message">
<input type="text" :value="message">
</div>
<script type="text/javascript">
var simple = new Vue({
el: '#simple1',
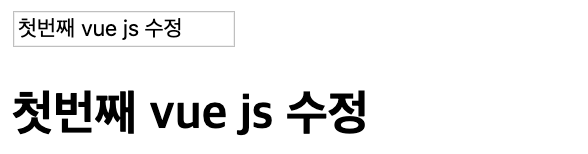
data: { message: '첫번째 vue js' }
});
</script>
일회성 보간법 - v-once
한번 렌더링 되면 그 이후로는 다시 렌더링 되지 않는다.
<div id="example">
    <span v-once>{{message}}</span>
    <span v-once v-text="message"><span>
</div>
<script type="text/javascript">
    var vm = new Vue({
        el: "#example",
        data: { message: "hello world" }
    })
</script>
html 보간법 - v-html
기존 Mustache 표현식이나 v-text 는 html 문자열을 이스케이프처리 하지만
v-html 을 사용하면 랜더링 처리한다.
<div id="app">
    <!-- html 태그가 랜더링됨 -->
    <span v-html="msg"></span>
</div>
<script>
    new Vue({
        el: "#app",
        data: { msg: "Hello <b>Vue.js</b>" }
    });
</script>
v-model
v-bind, v-html, v-text 등의 디렉티브는 단방향 으로 단순 값을 출력하기만 한다.
v-model 을 설정하면 관계를 양방향으로 데이터 바인딩되어 vue 인스턴스 에서도 변화된 값이 지원된다.
input 태그에서 많이 사용
<div id="simple1"> <input type="text" v-model="message"> </div>
<div id="simple2"> <h2>{{message}}</h2> </div>
<script type="text/javascript">
    var model = { message: '첫번째 vue js' };
    var vm1 = new Vue({
        el: '#simple1',
        data: model
    });

    var vm2 = new Vue({
        el: '#simple2',
        data: model
    });
</script>
실시간으로 밑의 simple2의 h2태그값이 변경된다.
객체의 변경은 vue 내부의 감시자(watcher) 가 탐지하여 관련된 요소를 다시 렌더링한다.
v-model 수식어
v-model.lazy 포커스 이동시 데이터 업데이트
v-model.trim 앞뒤 공백 자동 제거
v-model.number 숫자형으로 자동 형변화
<input type="text" v-model.lazy="message1">
<input type="text" v-model.trim="message2">
<input type="text" v-model.number="message3">
제어문 디렉티브
반복이나 조건부로 DOM 랜더링을 진행할 때 v-for, v-if 등의 디렉티브 사용한다.
v-if, v-else, v-else-if
어느언어에나 있는 if, else, else-if 구문을 디렉티브로 사용하여
조건에 부합하는 요소만 렌더링한다.
<div id="account">
    잔고: <input type="text" name="" id="" v-model="balance"><br>
    회원 등급:
    <span v-if="balance >= 1000000">Gold</span>
    <span v-else-if="balance >= 500000">Silver</span>
    <span v-else-if="balance >= 200000">Bronze</span>
    <span v-else>Basic</span>
</div>
<script type="text/javascript">
    var vm = new Vue({
        el: "#account",
        data: { balance: 0 }
    })
</script>
v-model 로 바인딩된 balance 값이 변경될 때 마다 회원등급이 변경된다.
만약 요소 하나가 아닌 여러개의 요소의 랜더링 여부를 결정하고 싶을 때에는 <template> 태그 사용을 권장한다.
<template v-if="id == 1">
  <span>값은</span>
  <span>1입니다</span>
</template>
v-show
v-if 와 마찬가지로 조건부 랜더링을 위한 디렉티브
단 v-show 는 렌더링은 하되 display 속성값으로 노출 여부를 결정한다.
자주 환경이 변경되는 경우엔 v-show 를 사용하는것이 효율적이다.
예금액: <input type="text" name="" id="" v-model="amount">

<img src="http://sample.bmaster.kro.kr/img/error.png" alt=""
  style="width: 15px; height: 15px; vertical-align: middle;"
  v-show="amount < 0"/>
그림처럼 v-model 로 바인딩된 amount 의 값이 0 미만일 경우 이미지를 출력한다.

v-for
이터레이블 데이터를 반복출력할 때 사용한다.
vue.js 는 내부적으로 배열에 push, pop, shift, unshift, splice, sort, reverse 메서드를 재구현하기 떄문에
변경을 감지해서 재랜더링 처리한다.
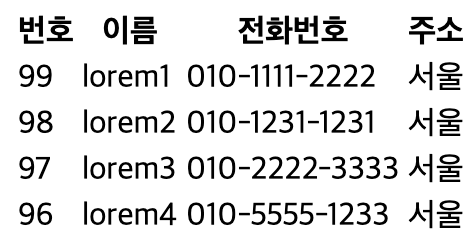
아래 예는 v-for 과 배열을 사용했을 경우
<div id="example">
    <table id="list">
    <thead><tr>
        <th>번호</th><th>이름</th>
        <th>전화번호</th><th>주소</th>
    </tr></thead>

    <tbody>
        <tr v-for="content in contents">
            <td>{{content.no}}</td><td>{{content.name}}</td>
            <td>{{content.tel}}</td><td>{{content.address}}</td>
        </tr>
    </tbody>
    </table>
</div>
<script>
    var list = new Vue({
        el: "#example",
        data: {
        "contents" : [
            {"no": 99, "name": "lorem1", "tel": "010-1111-2222", "address": "서울"},
            {"no": 98, "name": "lorem2", "tel": "010-1231-1231", "address": "서울"},
            {"no": 97, "name": "lorem3", "tel": "010-2222-3333", "address": "서울"},
            {"no": 96, "name": "lorem4", "tel": "010-5555-1233", "address": "서울"}
        ]
        }
    })
</script>
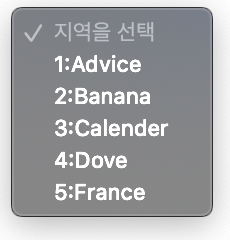
아래예는 객체를 이터레이블 형식으로 사용하였을 경우
<div id="example">
    <select name="" id="regions">
        <option disabled selected value="">지역을 선택</option>
        <option v-for="(val, key) in regions" v-bind:value="key">{{val}}</option>
    </select>
</div>
<script>
    var vm = new Vue({
        el: "#example",
        data: {
            "A": "Advice",
            "B": "Banana",
            "C": "Calender",
            "D": "Dove",
            "F": "France"
        }
    })
</script>
index를 따로 사용해야 한다면 index 로 사용할 식별자를 뒤에 추가
<tr v-for="(content, idx) in contents">
  <td>{{idx}}</td> <!-- 0 부터 시작 -->
  <td>{{content.no}}</td>
  <td>{{content.name}}</td>
  <td>{{content.tel}}</td>
  <td>{{content.address}}</td>
</tr>
<option v-for="(val, key, idx) in regions" v-bind:value="key">
    :
</option>
:key
v-for 사용시 key 속성 사용을 권장한다.
DOM 랜더링 및 식별시 최적화를 지원하고 수정시에 발생하는 재 랜더링에도 최적화한다.
<tr v-for="(content, idx) in contents" :key="content.no">
  <td>{{idx}}</td> <!-- 0 부터 시작 -->
  <td>{{content.no}}</td>
  <td>{{content.name}}</td>
  <td>{{content.tel}}</td>
  <td>{{content.address}}</td>
</tr>
v-for 와 다른 디렉티브 같이 사용하기
v-for 와 v-if 디렉티브를 동시에 사용해 순 회할 요소를 필터링할 경우
v-else-if, v-else 디렉티브는 같이 사용할 수 없다.
<div id="app">
    <ul>
        <li v-for="entry in items" v-if="entry.location == 'KR'">
          {{ entry.name }}
        </li>
    </ul>
</div>
이벤트 디렉티브
HTML 요소에서 발생하는 이벤트의 경우 아래와 같이
onclick, onkeydown 같은 이벤트를 리스닝하는 이벤트 메서드를 별도로 정의했었다.
<p id="p_title">안녕하세요. 여러분. Vue.js를 배우시길 잘하셨을 겁니다</p>
<button id="btn_title">메시지 뒤집기</button>
<script>
    document.querySelector("#btn_title").onclick = function (e) {
        var old_str = document.querySelector("#p_title").innerHTML;
        var reverse_str = old_str.split('').reverse().join('');
        document.querySelector("#p_title").innerHTML = reverse_str;
    }
</script>
vue.js 에선 이벤트 처리를 수행하기 위해 v-on 디렉티브와 여러 표현식을 사용한다.
v-on:click
v-on:click 표현식으로 클릭 이벤트를 처리한다.
<div id="example-1">
    <button v-on:click="">Add 1</button>
    <p>위 버튼을 클릭한 횟수는 {{ counter }} 번 입니다.</p>
</div>
<script type="text/javascript">
    var vm = new Vue({
        el: '#example-1',
        data: { counter: 0 },
        methods: {
            increase: function (e) {
                this.counter += 1;
                console.log(e); // MouseEvent {isTrusted: true, screenX: -1105, screenY: -61, clientX: 26, clientY: 26, …}
            }
        }
    })
</script>
만약 이벤트 메서드에 여러개의 매개변수를 전달하고 싶다면 $event 변수를 명시해야한다.
<div id="example-1">
    <button v-on:click="increase('hi', $event)">Add 1</button>
    <p>위 버튼을 클릭한 횟수는 {{ counter }} 번 입니다.</p>
</div>
<script type="text/javascript">
    var vm = new Vue({
        el: '#example-1',
        data: { counter: 0 },
        methods: {
            increase: function (msg, e) {
                this.counter += 1;
                console.log(msg); // hi
                console.log(e); // MouseEvent {isTrusted: true, screenX: -1105, screenY: -61, clientX: 26, clientY: 26, …}
            }
        }
    })
</script>
자주 설정되는 작업이기에 v-on:click 을 @click 으로 단축사용할 수 있다.
또한 간단한 이벤트 함수의 경우 단순 표현식으로만 정의 가능하다.
<div id="example-1">
    <button @click="counter += 1">Add 1</button>
    <p>위 버튼을 클릭한 횟수는 {{ counter }}번 입니다.</p>
</div>
<script>
    var example1 = new Vue({
        el: '#example-1',
        data: { counter: 0 }
    });
</script>
.left: 마우스 왼쪽 버튼을 눌렀을 때.contextmenu: 마우스의 오른쪽 버튼을 눌렀을 때
v-on:kepup, v-on:keydown, v-on:keypress
키 이벤트 는 주로 아래 3개를 사용
:keyup:keydown:keypress
각 키 이벤트 에서 사용하는 키 수식어 몇개를 알아본다.
enter, tab, space, esc
<div id="app">
    <input v-on:keyup.enter="submit">
    <input v-on:keydown.tab="tabed">
    <input v-on:keyup.esc="esc_key">
    <input v-on:keyup.space="space_key">
</div>
<script>
    var vm = new Vue({
        el: "#app",
        methods: {
            submit: function () {
                console.log("[Enter] 키가 떼어집니다.");
            },
            tabed: function () {
                console.log("[Tab] 키를 누르셨습니다.");
            },
            esc_key: function () {
                console.log("[Esc] 키를 누르셨습니다.");
            },
            space_key: function () {
                console.log("[Space] 키를 누르셨습니다.");
            }
        }
    });
</script>
각 키보드의 키는 keycode 값으로 대체 가능하다.
enter 의 경우 13 이며 v-on:keyup.enter 을 v-on:keyup.13 으로 대체 가능
아래처럼 자주쓰는 keycode 의 경우 상수화 시켜서 관리하는 것을 권장한다.
<div id="app">
    <input type="text" v-on:keyup.numpad7="doThat">
</div>
<script type="text/javascript">
    Vue.config.keyCodes.numpad7 = 103;
    new Vue({
        el: "#app",
        methods: {
            doThat: function () {
                console.log("숫자 키패드의 7을 눌렀습니다.");
            }
        }
    });
</script>
alt, ctrl, meta
각종 시스템키 이벤트를 처리하기 위한 수식어로
alt: 윈도우 alt 키, 맥OS option 키
ctrl: 윈도우 ctrl 키, 맥OS control 키
meta: 윈도우 키, 맥OS coomand 키
보통 시스템키의 경우 다른 키와 같이 결합되어 사용되는 경우가 많다.
<input @keyup.alt.c="clear">
alt+c 키를 같이 눌렀을 때 호출된다.
또한 alt+c+shift 를 눌러도 수행되는데 시스템키에 한정하여 다른키를 같이 눌러도 이벤트가 수행된다.
exact
<input @keyup.alt.c="clear1" @keyup.alt="clear2">
위와같이 이벤트가 설정되어 있을 경우 alt+c 가 눌리면 메서드가 모두 호출된다.
exact 를 사용하면 눌린키가 정확이 일치해야 호출하도록 설정
<input @keyup.exact.alt.c="clear1" @keyup.exact.alt="clear2">
custom event
v-on 뒤에 커스텀 이벤트를 지정하여 처리하도록 할 수 있다.
<div v-on:increment="incrementTotal">test</div>
<button @click="this.$emit('increment')">버튼</button>
객체단위로 지정
만약 많은양의 이벤트를 매핑시켜야 한다면
아래와 같이 객체단위로 v-on 에 지정시킬 수 있음
<div id="example-1">
    <button v-on="on">Button</button>
</div>
<script>
    var example1 = new Vue({
        el: '#example-1',
        data: {
            on: {
                click: e => console.log("click invoked", e),
                mouseover: e => console.log("mouseover invoked", e),
                mouseout: e => console.log("mouseout invoked", e)
            }
        }
    });
</script>
이벤트 버블링 막기
이벤트 처리단계는 3단계로 구분된다.
CAPTURING Phase- 이벤트를 발생시킨 요소 포착RASING Phase- 이벤트와 연결된 함수를 호출BUBBLING Phase- 이벤트 발생 요소의 상위 요소에게도 이벤트 호출
<body>
    <div id="example">
        <div id="outer" @click="outerClick">
            outer
            <div id="inner" @click="innerClick">
                inner
            </div>
        </div>
    </div>
    <script type="text/javascript">
        var vm = new Vue({
            el: "#example",
            methods: {
                innerClick: function (e) {
                    console.log("### INNER CLICK")
                    console.log("Event Phase : ", e.eventPhase);
                    console.log("Current Target : ", e.currentTarget);
                    console.log("Target : ", e.target);
                },
                outerClick: function (e) {
                    console.log("### OUTER CLICK")
                    console.log("Event Phase : ", e.eventPhase);
                    console.log("Current Target : ", e.currentTarget);
                    console.log("Target : ", e.target);
                }
            }
        })
    </script>
</body>
inner 를 클릭했을때 출력되는 데이터는 아래와 같다.
### INNER CLICK
Event Phase : 2
Current Target : <div id="inner">inner</div>
Target : <div id="inner">inner</div>
### OUTER CLICK
Event Phase : 3
Current Target : <div id="outer">…</div>
Target : <div id="inner">inner</div>
innerClick 이벤트 출력확인
outerClick 이벤트 출력에선 e.currentTarget 은 #outer 이지만 e.target 은 #inner 임을 확인할 수 있다.
이렇듯 상위 요소로 BUBBLING 하는 것은 막거나
필요하다면 제어를 위한 수식어를 별도로 사용하는 것을 권장한다.
click 이벤트를 중점으로 이벤트 버블링을 제어하는 방법을 설명한다.
e.stopPropagation(), v-on:{exp}.stop
이벤트 버블링을 저지하고 싶다면 각 함수 맨 아래에 e.stopPropagation() 을 추가한다.
methods: {
    innerClick: function (e) {
        console.log("### INNER CLICK")
        console.log("Event Phase : ", e.eventPhase);
        console.log("Current Target : ", e.currentTarget);
        console.log("Target : ", e.target);
        e.stopPropagation();
    },
    outerClick: function (e) {
        console.log("### OUTER CLICK")
        console.log("Event Phase : ", e.eventPhase);
        console.log("Current Target : ", e.currentTarget);
        console.log("Target : ", e.target);
        e.stopPropagation();
    }
}
e.preventDefault(), v-on:{exp}.prevent
또한 <a> 태그의 페이지 이동같은 기본 이벤트를 저지하고
설정한 이벤트를 실행시킬 때에도 e.preventDefault() 혹은 v-on:{event}.prevent 수식어로 대체 가능하다.
또한 두 효과를 동시에 보려면 아래와 같이 함수를 연달아 호출하던가
e.stopPropagation();
e.preventDefault();
수식어를 연달아 호출하면 된다.
v-on:click.prevent.stop
v-on:{exp}.capture
상위 요소가 하위요소보다 먼저 이벤트를 핸들링하고 싶을때 capture 수식어를 사용한다.
v-on:{exp}.self
발생한 이벤트는 상위요소로 계속 전파되는데
상위 요소중 @click.self 가 요소에 적용되어 있다면 e.currentTarget 이 자신이 아니라면 이벤트를 호출하지 않는다.
반드시 자기자신을 클릭했을 때만 호출하고 싶다면 @click.self 를 지정해두면 된다.
v-on:{exp}.once
이벤트를 단 한번 호출시키고 싶다면 @click.self 를 사용