CI/CD - Jenkins Pipeline!
Jenkins
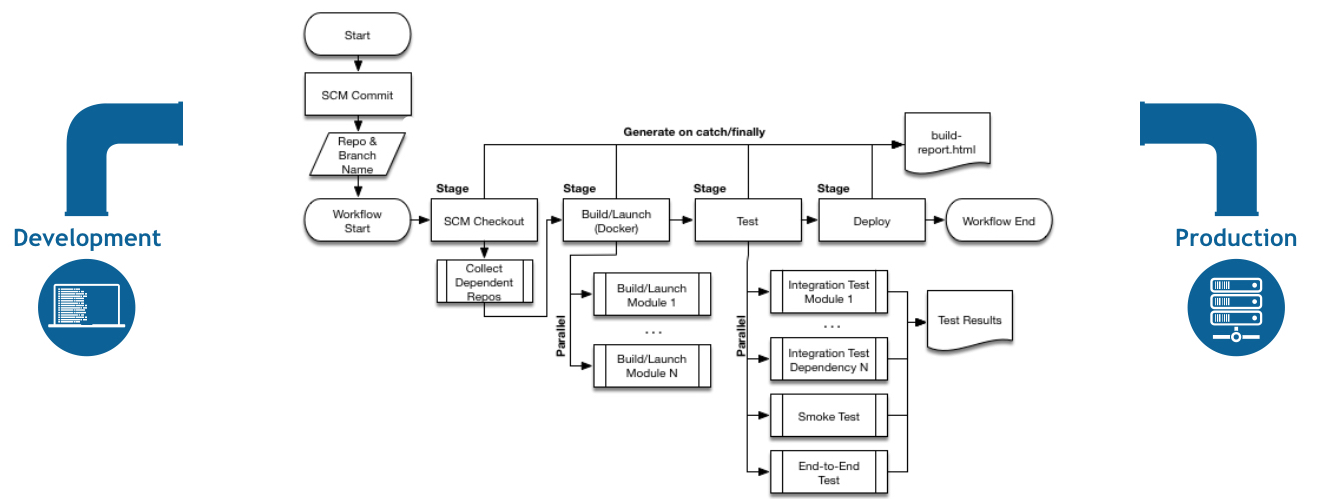
대부분 위와 같은 형태의 CI/CD 를 구성한다.
Jenkins 는 간결한 지시어 파이프라이닝 Directive pipeline 을 통해 쉽게 위 그림과 같은 환경 구축할수있다.
Jenkins 설치
도커를 사용해 jenkins를 설치한다.
50000 포트는 Jenkins 마스터와 통신하기 위한 포트
docker pull jenkins/jenkins:jdk17

docker run -d -p 8080:8080 -p 50000:50000 \
 -e JENKINS_OPTS="--prefix=/jenkins" \
 --name myjenkins jenkins/jenkins
# 패스워드 출력
docker exec -it -u root myjenkins cat /var/jenkins_home/secrets/initialAdminPassword
Github 연동
ssh-keygen -t rsa -f id_rsa_deploy_jenkins
# 아래 2개 파일 생성되었는지 확인
# id_rsa_deploy_jenkins
# id_rsa_deploy_jenkins.pub

# Github Repository Setting - Deploy Keys - Add Deploy Key
# 위 경로에 id_rsa_deploy_jenkins.pub 출력값 저장
# ssh-rsa AAAAB3NzaC1yc2E...-9.local
cat id_rsa_deploy_jenkins.pub

# Jenkins 관리 - Credentials - System(global) - Add Credentails - SSH Username with private key
# Private Key - Enter directly - Key (Add)
# 위 경로에 id_rsa_deploy_jenkins 출력값 저장
# -----BEGIN OPENSSH PRIVATE KEY-----
# b3BlbnNzaC1rZXktdjEAAAAABG5vbmUAAAAEbm9uZQAAAAAAAAABAAABlwAAAAdzc2gtcn
# ...
# AgMEBQ==
# -----END OPENSSH PRIVATE KEY-----
cat id_rsa_deploy_jenkins
만약 인증서 관련 오류가 발생할 경우 Jenkins 관리 - Security - Git Host Key Verification Configuration 에서 No verification 선택
username/password 형태의 git 연동에서도 ssl 인증서 오류가 발생할 수 있다.
Jenkins 관리 - System - Global Properties 에서 환경변수 [GIT_SSL_NO_VERIFY, false] 설정
Jenkins 플러그인
Jenksin 관리 - Plugins 에 들어가보면 기본적으로 CI/CD 할 만큼의 플러그인들이 설치되어 있다.
- git, github
- shell command
- gradle
CI/CD 구성에 따라 추가적으로 아래와 같은 플러그인들을 설치할 수 있다.
- GitLab
- Maven Integration
- SSH server, Publish Over SSH
설치된 플러그인들은 Jenkins Web UI 를 통해 사용 및 설정 가능하지만 개발자가 원하는 CI/CD 를 구성하기에는 한계가 있다.
대부분의 경우 Jenkins Pipeline 을 통해 플러그인을 사용하고 CI/CD 를 처리한다.
Jenkins Pipeline
Jenkins Pipeline 은 스크립트 형식의 언어를 사용하여 프로그래밍 형식으로 CI/CD 를 지원한다.
Jenkins Pipeline 에서 제공하는 언어는 아래 2가지
- Declarative Pipeline: DSL 기반 스크립트 작성
- Scripted Pipeline: Groovy 기반 스크립트 작성
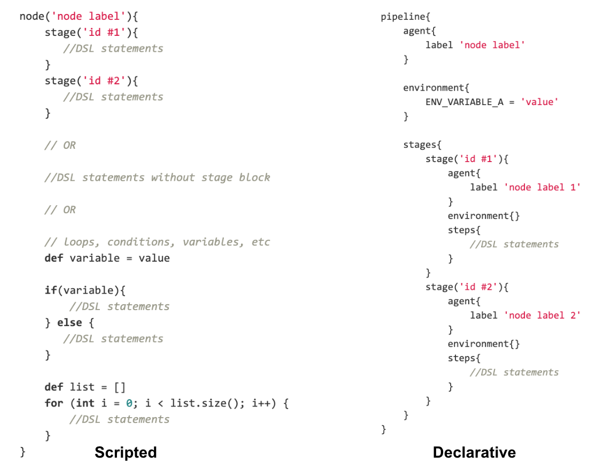
Declarative Pipeline 이 최신 문법이며 대부분의 경우 더 간결하고 유지보수가 쉬운 Declarative Pipeline 사용을 권장한다.
복잡한 로직또한 Declarative Pipeline 의 script 블럭을 통해 처리가능하기 때문에 어떤걸 사용하던지 상관 없지만, 사용방법이 좀 더 간결하고 Jenkins 에서 좀더 더 지원하는 Declarative Pipeline 사용을 권장한다.
그외의 두 차이점에 대해 리뷰한 영상도 있으니 참고
https://www.youtube.com/watch?v=GJBlskiaRrIDeclarative Pipeline
https://www.youtube.com/watch?v=JPDKLgX5bRg
https://www.jenkins.io/doc/book/pipeline/syntax/#declarative-pipeline/Scripted Pipeline
https://www.jenkins.io/doc/book/pipeline/syntax/#scripted-pipeline
Jenkins 에서 제공하는 Syntax 사용을 강제하다보니 오류발생 가능성이 적고 간결하게 구성가능하다.
// Declarative Pipeline
pipeline {
    // jenkins 에서 제공하는 pipeline 실행 agent
    // slave node, docker, k8s 기반 빌드환경 구성 가능
    agent any
    // stages 흐름 정의 섹션
    stages {
        stage('Build') {
            agent any // stage 별로 지정가능
            steps {
                // 실행단계,
                echo 'start!' // echo 와 같은 명령어는 steps 에만 있음
                sh 'make'
            }
            post {
                // 스테이지 결과에 따라 후속조치
                success { echo "build success" }
                failure { echo "build failed" }
                always { echo "alway" }
                cleanup { echo "after all other post condtion" }
            }
        }
        stage('Test') {
            when {
                branch "dev"
                envrionment name: "PROFILE", value: "dev"
                steps {
                    sh 'make check'
                    junit 'reports/**/*.xml'
                }
            }
        }
        stage('Deploy') {
            steps {
                echo "Deploying...."
            }
        }
    }
}
// Scripted Pipeline
node {
    stage('Example') {
        try {
            sh 'exit 1'
        }
        catch (exc) {
            echo 'Something failed, I should sound the klaxons!'
            throw
        }
    }
}
environment
job - Pipeline Syntax 페이지에 가면 현재 Jenkins 에서 사용가능한 global env 를 확인할 수 있다.
| global env | 설명 |
|---|---|
| JOB_NAME | job 이름 |
| JOB_URL | job URL |
| BUILD_URL | job 의 build URL |
| BUILD_NUMBER | 현재 build number. |
| JENKINS_URL | jenkins URL |
| BRANCH_NAME | 브랜치명, multibranch 프로젝트인 경우 사용 |
| WORKSPACE | 브랜치명, multibranch 프로젝트인 경우 사용 |
pipeline {
    agent any
    options {
        disableConcurrentBuilds() // 파이프 라인의 동시 실행 X
    }
    triggers {
        pollSCM('H/2 * * * *') // 2분마다 pollSCM
    }
    environment {
        CC = 'clang'
        HELLO = """${sh(
            returnStdout: true,
            script: 'echo "hello_world"'
        )}"""
    }
    stages {
        stage('print global env') {
            steps {
                echo env.JOB_NAME // demo-project/main
                echo env.JOB_URL // http://localhost:8080/jenkins/job/demo-project/job/main/
                echo env.BUILD_URL // http://localhost:8080/jenkins/job/demo-project/job/main/3/
                echo env.BUILD_NUMBER // 3
                echo env.JENKINS_URL // http://localhost:8080/jenkins/
                echo env.BRANCH_NAME // main
                echo env.WORKSPACE // /var/jenkins_home/workspace/demo-project_main
            }
        }
        stage('print local env') {
            steps {
                echo CC // clang
                echo "hi ${HELLO}" // hi hello_world
            }
        }
    }
}
currentBuild
현재 실행 중인 파이프라인에 대한 빌드 정보 객체
job - Pipeline Syntax 페이지에 가면 현재 Jenkins 에서 사용가능한 currentBuild 설명을 볼 수 있다.
| 변수명 | 설명 |
|---|---|
| currentResult | |
| number | 빌드 번호, BUILD_NUMBER 와 동일 |
| displayName | 출력된 빌드 번호 |
| projectName | 프로젝트명 |
| getBuildCauses | 빌드 유발한 json 정보 |
| previousBuild | 이전 빌드 정보 객체 |
pipeline {
    agent any
    options {
        disableConcurrentBuilds() // 파이프 라인의 동시 실행 X
    }
    triggers {
        pollSCM('H/2 * * * *') // 2분마다 pollSCM
    }
    stages {
        stage('print currentBuild') {
            steps {
                echo "currentResult ${currentBuild.currentResult}" // currentResult SUCCESS
                echo "number ${currentBuild.number}" // number 18
                echo "displayName ${currentBuild.displayName}" // displayName #18
                echo "projectName ${currentBuild.projectName}" // projectName main
                echo "previousBuild displayName ${currentBuild.previousBuild.displayName}" // previousBuild displayName #17

                script {
                    currentBuild.result = "SUCCESS"
                }
                echo "result ${currentBuild.result}" // result SUCCESS
            }
        }
        stage('print currentBuild.getBuildCauses') {
            steps {
                echo "causes ${currentBuild.getBuildCauses()}"
                // [[_class:hudson.model.Cause$UserIdCause, shortDescription:Started by user demo, userId:demo, userName:demo]]
                // pollSCM 에서 실행: [[_class:hudson.triggers.SCMTrigger$SCMTriggerCause, shortDescription:Started by an SCM change]]
                echo "specificCause ${currentBuild.getBuildCauses('hudson.model.Cause$UserIdCause')}"
                // [[_class:hudson.model.Cause$UserIdCause, shortDescription:Started by user demo, userId:demo, userName:demo]]
                // pollSCM 에서 실행: null
            }
        }
    }
}
getBuildCauses 의 경우 직접 build 버튼을 눌렀을 때 출력값과 pollSCM 으로부터 실행된 출력값이 다르게 나옴.
currentBuild.changeSets
https://javadoc.jenkins.io/plugin/git/hudson/plugins/git/GitChangeSetList.html
https://javadoc.jenkins.io/plugin/git/hudson/plugins/git/GitChangeSet.html
https://javadoc.jenkins.io/hudson/scm/ChangeLogSet.html
https://javadoc.jenkins.io/hudson/scm/ChangeLogSet.AffectedFile.html
git plugins 에 구현된 객체로 [GitChangeSetList, GitChangeSet] 등이 있으며,
git 과 연동되어 변경된 파일 목록들 확인 가능하다.
pipeline {
    agent any
    options {
        disableConcurrentBuilds() // 파이프 라인의 동시 실행 X
    }
    triggers {
        pollSCM('H/2 * * * *') // 2분마다 pollSCM
    }
    stages {
        stage('print currentBuild.changeSets') {
            steps {
                script {
                    def changeLogSets = currentBuild.changeSets  // GitChangeSetList, 커밋 목록 확인
                    for (int i = 0; i < changeLogSets.size(); i++) {
                        def entries = changeLogSets[i].items
                        for (int j = 0; j < entries.length; j++) {
                            def entry = entries[j] // GitChangeSet
                            def files = new ArrayList(entry.affectedFiles) // ChangeLogSet.AffectedFile
                            for (int k = 0; k < files.size(); k++) {
                                def file = files[k]
                                echo "filepath: ${file.path}, editType:${file.editType.name}"
                                // filepath: src/main/kotlin/com/demo/jenkins/adaptor/Second.java, editType: add
                                // filepath: src/main/kotlin/com/demo/jenkins/adaptor/First.java, editType: add
                                // filepath: src/main/kotlin/com/demo/jenkins/adaptor/Third.java, editType: add
                            }
                        }
                    }
                } // end script
            }
        }
    }
}
Groovy CPS
Jenkins Pipeline 은 Groovy CPS(연속전달스타일: Continuation Passing Style) 라는 라이브러리를 사용하여 특수한 인터프리터 내에서 스크립트를 실행시킨다.
Jenkins Pipeline 의 Groovy 코드는 CPS 변환을 통해 실행 상태를 디스크에 저장해가면서 코드를 실행시켜나간다.
이때 CPS 변환 제한하는 Groovy 코드가 있는데, 아래와 같은 코드는 CPS 변환 과정에서 오류를 발생시킨다.
def sortByLength(List<String> list) {
  list.toSorted { a, b -> Integer.valueOf(a.length()).compareTo(b.length()) }
}

...

script {
    def sorted = sortByLength(['333', '1', '4444', '22'])
    echo(sorted.toString())
}
list.toSorted 내부의 클로저는 CPS 변환이 되었지만 Iterable.toSorted 자체는 CPS 변환이 이루어지지 않는다.
이런 이유 때문에 아래와 같이 함수 외부에 @NonCPS 어노테이션을 사용해서 스크립트 전체가 CPS 변환 에서 벗어나는 방법을 사용한다.
@NonCPS
def sortByLength(List<String> list) {
    ...
}
Multi module gradle build
repository 가 모두 분리되어 있고
JFrog Aritifactory와 같은 사내Maven Repository운영시에는multi module로 구성할 필요가 없기에 skip
아래와 같은 gradle multi module 프로젝트 구조를 가지고 있는 상태에서 연관 모듈이 변경되었을 때 Jenkins pipeline 에서 서비스를 빌드하는 방법을 알아본다.
./gradlew projects

> Task :projects

------------------------------------------------------------
Root project 'demo'
------------------------------------------------------------

Root project 'demo'
+--- Project ':boot'
|    +--- Project ':boot:core'
|    |    \--- Project ':boot:core:web'
|    \--- Project ':boot:service'
|         +--- Project ':boot:service:book'
|         +--- Project ':boot:service:customer'
|         \--- Project ':boot:service:dashboard'
\--- Project ':data'
     +--- Project ':data:book-data'
     +--- Project ':data:customer-data'
     \--- Project ':data:reply-data'
서비스들은 아래와 같이 data 모듈들과 의존관계를 가지고 있다.
// boot/build.gradle.kts
project(":boot:service:customer") {
    dependencies {
        implementation(project(":data:customer-data"))
    }
}

project(":boot:service:book") {
    dependencies {
        implementation(project(":data:book-data"))
    }
}

project(":boot:dashboard") {
    dependencies{
        implementation(project(":data:book-data"))
        implementation(project(":data:customer-data"))
    }
}
모듈 관계조회 메서드
:data:xxx 모듈이 변경되었을 때 의존성이 있는 서비스만 CI/CD 되어야 하기 때문에 아래와 같이 의존성을 파악할 수 있는 함수를 gradle 에 정의.
// boot/build.gradle.kts

/**
 * 해당 모듈로부터 의존되는 서비스 목록 반환
 * @param input 변화한 모듈 리스트
 * */
fun getAffectedServices(vararg input: String): Set<String> {
    val result = mutableSetOf<String>() // affected service list
    val services: List<Project> = rootProject.allprojects.filter { it.path.startsWith(":boot:service:") }
    services.forEach { service ->
        val visitedPaths = HashSet<String>()
        val q: LinkedList<Project> = LinkedList()
        q.add(service)
        while (!q.isEmpty()) {
            val project = q.poll()
            if (input.contains(project.path)) {
                result.add(service.path)
                return@forEach
            }
            visitedPaths.add(project.path)
            project.configurations["implementation"].dependencies
                .filterIsInstance<ProjectDependency>() // 직접 구현한 dependency 필터링
                .map { it.dependencyProject }
                .filter { !visitedPaths.contains(it) }
                .forEach { q.add(it) }
        }
    } // end forEach
    return result
}

tasks.register("getAffectedServices") {
    val inputs: List<String> =
        project.findProperty("modules")?.toString()?.split(",") ?: emptyList()
    doLast {
        val services = getAffectedServices(*inputs.toTypedArray())
        println(services.joinToString(","))
    }
}

tasks.register("getAllServices") {
    doLast {
        val services = rootProject.allprojects
            .filter { it.path.startsWith(":boot:service:") }
            .map { service -> service.path }
            .toSet()
        println(services.joinToString(","))
    }
}
# 모든 서비스 조회
./gradlew -q getAllServices
# :boot:service:admin,:boot:service:book,:boot:service:customer,:boot:service:dashboard

# modules 와 관련있는 서비스 조회
./gradlew -q getAffectedServices -Pmodules=:data:customer-data,:data:book-data
# :boot:service:book,:boot:service:customer,:boot:service:dashboard
CI Pipeline
먼저 변경된 모듈 목록을 알려면 변경된 file 리스트를 알아야한다.
여기서 currentBuild.changeSets 를 사용해서 해당 커밋에 변경된 목록을 알 수 있다.
@NonCPS
def getChanges() {
    def changes = []
    // GitChangeSetList, 깃 커밋 목록
    def changeLogSets = currentBuild.changeSets
    for (int i = 0; i < changeLogSets.size(); i++) {
        def entries = changeLogSets[i].items
        for (int j = 0; j < entries.length; j++) {
            def entry = entries[j] // ChangeLogSet.Entry
            def files = new ArrayList(entry.affectedFiles) // ChangeLogSet.AffectedFile
            for (int k = 0; k < files.size(); k++) {
                def file = files[k]
                changes.add(file.path)
            }
        }
    }
    return changes
}
def affectedServices = []

pipeline {
    agent any
    options {
        disableConcurrentBuilds() // 파이프 라인의 동시 실행 X
    }
    triggers {
        pollSCM('H/2 * * * *') // 2분마다 pollSCM
    }
    environment {
        CREDENTIALS_ID = 'credential_docker_hub'
    }
    stages {
        stage('get affected services') {
            steps {
                script {
                    if (currentBuild.getBuildCauses('hudson.model.Cause$UserIdCause').size() > 0) {
                        def outputs = sh(script: "./gradlew -q getAllServices", returnStdout: true).trim()
                        echo "output result: $outputs"
                        affectedServices = outputs.split(',')
                        return
                    }
                    echo 'generate chage list'
                    // 변경된 파일목록 생성
                    def changes = getChanges()
                    def modulePaths = new HashSet<String>() // 변경된 모듈 paths
                    for(def change : changes) {
                        if (change.endsWith("build.gradle.kts")) {
                            // build.gradle.kts 가 변경되었다면 모든 서비스 빌드
                            def outputs = sh(script: "./gradlew -q getAllServices", returnStdout: true).trim()
                            echo "output result: $outputs"
                            affectedServices = outputs.split(',')
                            break
                        } else {
                            // directory 구조를 module path 형태로 변환
                            if (change.startsWith("boot")) {
                                def cs = change.split("/")
                                if (cs != null && cs.size() >= 3) {
                                    def modulePath = cs[0..2].join(':')
                                    modulePaths.add(":" + modulePath)
                                }
                            }
                            else if(change.startsWith("data")) {
                                def cs = change.split("/")
                                if (cs != null && cs.size() >= 2) {
                                    def modulePath = cs[0..1].join(':')
                                    modulePaths.add(":" + modulePath)
                                }
                            }
                        }
                    }
                    if (modulePaths.size() != 0) {
                        def inputs = modulePaths.join(',')
                        def outputs = sh(script: "./gradlew -q getAffectedServices -Pmodules=${inputs}", returnStdout: true).trim()
                        echo "output result: $outputs"
                        affectedServices = outputs.split(',')
                    }
                    echo "affectedServices: $affectedServices"
                } // end script
            }
        }
        stage('build affected services') {
            steps {
                script {
                    withCredentials([usernamePassword(credentialsId: CREDENTIALS_ID, passwordVariable: 'CREDENTIALS_PASSWORD', usernameVariable: 'CREDENTIALS_USERNAME')]) {
                        for (def service in affectedServices) {
                            echo "${service} build start"
                            def command = service + ":jib"
                            sh "./gradlew clean ${command} -PdhUsername=${CREDENTIALS_USERNAME} -PdhPassword=${CREDENTIALS_PASSWORD}"
                            echo "${service} build end"
                        }
                    }
                }
            }
        }
    }
}
아쉬운점은 directory 구조를 module path 로 변환하는 과정이 번거롭고 하드코딩이 일부 추가되어 있다는 점.
다른 gradle 어플리케이션에서도 동일한 pipeline 으로 처리하려면 gradle 함수 정의와 매핑 알고리즘을 추가해야한다.