Vue - vue-router!
Vue 와 axios
axios 는 여러 컴포넌트에게 자주 사용되기 때문에 각 컴포넌트에 import 하기 보다 main.js 에 한번만 import 해서 사용하는 것이 깔끔하다.
또한 프로토 타입으로 등록해 다른 뷰 인스턴스에서 쉽게 접근할 수 있도록 설정한다.
// main.js
import axios from 'axios'
Vue.prototype.$axios = axios;
...
...
이제 다른 Vue 인스턴스 내에서 import 없이 아래와 같이 사용할 수 있다.
this.$axios.put(...)
프록시 서버 생성
일반적으로 vue 같은 클라이언트 서버는 단독으로 데이터를 출력하기 보단 별도의 서비스 제공자와 협력하여 클라이언트에게 데이터를 뿌리기 때문에 CORS 에러가 발생할 수 있다.
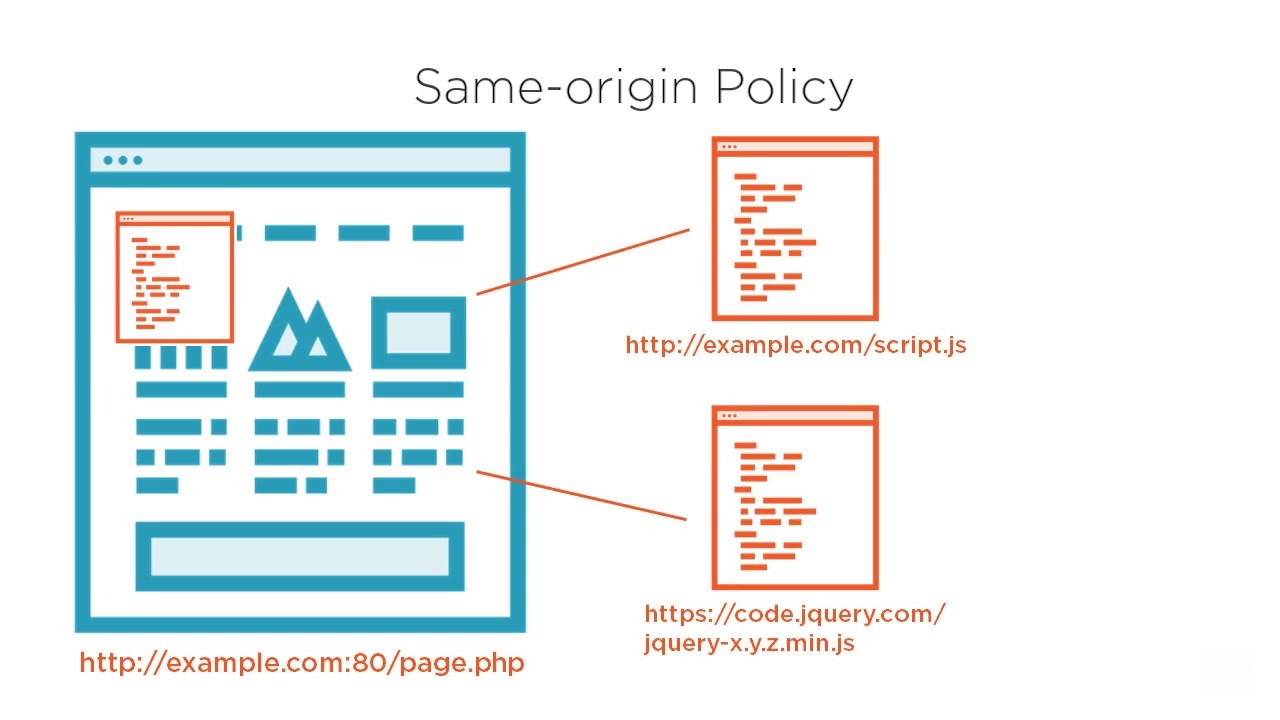
서비스 제공자에 axios 를 사용해 리소스를 가져오는데 위와같은 사항때문에 때에 따라 프록시 서버 설정이 필요하다.
많은 서비스 제공자는 SOP(Same Origin Policy)를 사용하기에 CORS 에러가 발생할 수 있다.
서비스 서버 또한 같은 개발자가 관리한다면 SOP 를 사용하지 않음으로 해결이 가능하지만 아니라면
프록시 서버를 두어 클라이언트가 자신을 통해 서비스 제공자에게 request할 수 있도록 한다.
물론 서비스 제공자에서
CORS를 지원한다면(SOP를 사용하지 않는다면) 프록시를 따로 둘 필요는 없다.
/* vue.config.js */
moudel.exports = {
    devServer: {
        proxy: {
            '/api': {
                target: 'http://sample.bmaster.kro.kr',
                changeOrigin: true,
                pathRewrite: {
                    '^/api': ''
                }
            }
        }
    }
}
vue.config.js 파일 생성후 위와 같이 작성,
개발용 서버(자기자신의 프록시 서버)에 /api/contacts 로 요청하면 서비스 제공자 sample.bmaster.kro.kr/contacts 로의 접근을 자신을 경유해 요청 전달.
vue-router
vue.js 의 SPA 상에서 페이지의 변화를 위해 vue router 객체를 이용해 페이지를 동적으로 변화시킴
<div id="app">
    <h1>Hello App!</h1>
    <p>
        <router-link to="/vue">Go to Vue.js</router-link>
        <router-link to="/react">Go to React.js</router-link>
    </p>
    <router-view></router-view>
</div>
<script>
    const Comp1 = { template: '<div>vue</div>' }
    const Comp2 = { template: '<div>react</div>' }

    const router = new VueRouter({
        routes: [
            { path: '/vue', component: Comp1 },
            { path: '/react', component: Comp2 }
        ]
    })

    const app = new Vue({
        el: "#app",
        router: router
    })
</script>
VueRouter 에 라우팅경로와 랜더링을 위한 vue 컴포넌트를 지정하고
<router-link>, <router-view> 태그를 통해 화면에 html 요소를 출력한다.
생성된 html 요소는 아래와 같다.
<div id="app">
    <h1>Hello App!</h1>
    <p>
      <a href="#/vue" class="">Go to Vue.js</a>
      <a href="#/react" class="">Go to React.js</a></p>
</div>
<a> 태그를 눌러 <router-view> 위치의 html 요소가 동적으로 바뀜을 확인할 수 있다.
동적라우팅
<router-link to="/vue">Go to Vue.js</router-link>
<router-link v-bind:to="'/contact/'+c.no">{{c.name}}</router-link>
to 속성값을 동적으로 설정하는것을 동적라우팅 이라 한다.
위와같이 v-bind:to 속성을 사용한다.
VueRouter 인스턴스에 동적라우팅 path 를 추가, path parameter 형식으로 데이터 전달이 가능하다.
const Comp = {
    template: '<div>vue {{ no }}</div>',
    computed: {
        no: function () {
            return this.$route.params.no;
        }
    }
}

const router = new VueRouter({
    routes: [
        { path: "/", component: Home },
        { path: "/contact/:no", component: Comp }
  ]
});
vue 컴포넌트 에선 this.$route.params 객체를 사용해 path parameter 파라미터를 참조할 수 있다.
아래 같이 객체리터럴 형식으로 path parameter 를 구성할 수 있으며
query parameter 와 this.$route.query 를 통해서도 구성 가능하다.
<router-link v-bind:to="{path:'/article', params: { no:234 }}">article</router-link>
<!-- /article/234 -->
<router-link v-bind:to="{path:'/board', query: { page:2 }}">Board</router-link>
<!-- /board?page=2 -->
중첩라우팅
<router-view> 내부의 계층형식으로 <router-view> 사용할 때 중첩라우팅를 사용한다.
routes 객체의 children 속성을 통해 <router-view> 에 표기될 하위 컴포넌트를 지정한다.
<div id="app">
    <h1>Hello App!</h1>
    <ul>
        <li v-for="entry in article" :key="entry.no">
            <router-link :to="'/board/' + entry.no">{{ entry.title }}</router-link>
        </li>
    </ul>
    <router-view></router-view>
</div>
<script>
    const Comp = {
        template:
            `<div>게시판 컴포넌트입니다.
                <router-view></router-view>
            </div>`
    }
    const ChildComp = {
        template: '<div>vue {{ this.$route.params.no }}</div>'
    }

    const router = new VueRouter({
        routes: [
            {
                path: '/board',
                component: Comp,
                children: [ { path: ":no", component: ChildComp }]
            }
        ]
    })

    const app = new Vue({
        el: "#app",
        router: router,
        data: {
            article: [
                { no: 1, title: "Vue.js 책이 출간되었어요." },
                { no: 2, title: "이중민 과장님 수고 많았어요" },
                { no: 3, title: "시간은 길지 않아요" }
            ]
        }
    })
</script>
상위 라우팅은 /board 와 Comp 컴포넌트를 매칭했고
하위 라우팅은 :no 와 ChildComp 컴포넌트를 매칭했다.
this.$route.params 를 바로 사용하거나
아래처럼 watch 속성을 사용
export default {
  ...
  ...
  watch: {
    '$route': function(to, from) {
      this.no = to.params.no;
    }
  }
}
이름기반 라우팅
URL 기반이 아닌 이름기반으로 vue 컴포넌트 라우팅 하는것을 이름기반 라우팅 이라함
to 속성에 객체리터럴을 저장하며 name 속성을 추가한다.
<template>
  ...
  <router-link v-bind:to="{name: 'home'}">Home</router-link>
</template>
<script>
...
const router = new VueRouter({
  routes: [
    { path: "/home", name: "home", component: Home },
  ]
});
...
</script>
path parameter, query parameter 파라미터를 참조할 수 있다.
name 속성을 쓰면서도 데이터를 넘길 수 있다.
<router-link v-bind:to="{name:'article', params: {no:234}}">article</router-link>
<!-- /article/234 -->
<router-link v-bind:to="{name:'board', query: {page:2}}">Board</router-link>
<!-- /board?page=2 -->
이제 복잡한 path 구조를 외우지 않고 라우팅이 가능하다.
중복만 되지 않는다면 name 속성만으로도 충분이 라우팅 구성이 가능하다.
그래도
vue route객체에path값은 필수
const router = new VueRouter({
  routes: [
    ...
    { path: "/contacts", name: "contacts", component: Contacts ,
      children: [
        { path: ":no", name: "contactbyno", component: ContactByNo }
      ]
    }
  ]
});
router.push
<router-view> 위치에 vue 컴포넌트 를 표기하기 위해 반드시 <router-link> 에 URL 을 설정해서 클릭시킬 필요는 없다.
JS 프로그래밍 방식의 라우팅 제어가 가능하다.
router.push 메서드를 사용하면 JS 를 통해 라우팅처리 가능하다.
<button @click="page_move">3번 게시물 보기</button>
const app = new Vue({
    el: "#app",
    router: router,
    data: {
        article: [ ... ]
    },
    methods: {
        page_move: function (event) {
            this.$router.push({
                name: "article",
                params: { no: 3 }
            });
        }
    }
})
위처럼 이벤트를 처리할 함수 내부에 router.push 메서드를 사용하여 라우팅 가능
this.$router.push({
        name: "article",
        params: { no: 3 }
    }, function() {
      console.log("이벤트, 라우팅 처리 완료!")
    }
);
라우팅 속성 연결
라우팅된 컴포넌트에서 path parameter, query parameter 파라미터를 가져왔었는데
this.$route.params 이 아닌 props 속성을 통해 파라미터를 전달 받을 수 있다.
route객체로부터 의존성을 제거함으로props속성 사용을 권장한다.
vue router객체에props: true를 설정하면 된다.
<div id="app">
    <router-link to="/home">Go to Vue.js</router-link>
    <router-link v-bind:to="'/contact/'+c.no">{{c.name}}</router-link>
    <router-view></router-view>
</div>
<script>
    const Home = { template: '<div>home</div>' }
    const Comp = { template: '<div>vue {{ no }}</div>', props: ['no'] }

    const router = new VueRouter({
        routes: [
            { path: "/home", component: Home },
            { path: "/contact/:no", component: Comp, props: true }
        ]
    });

    const app = new Vue({
        el: "#app",
        router: router,
        data: {
            c: { no: 1, name: "test" }
        }
    })
</script>
컴포넌트에서 props 를 사용하도록 하려면 VueRouter 객체에 path parameter, query parameter 형식에 따라 props 사용 가능설정을 해주어야 한다.
query parameter 형식 props 매핑
path 와 각종 파라미터를 속성으로 갖는 객체를 반환하는 메서드를 정의하고 VueRouter 객체의 props 속성에 할당
function connectQueryToProp(route) {
  return { no: route.query.no, path: route.path };
}

const router = new VueRouter({
  mode: "history",
  routes: [
    {
      path: "/contacts",
      name: "contacts",
      component: Contacts,
      children: [
        {
          path: "contact",
          name: "contactbyno",
          component: ContactByNo,
          props: connectQueryToProp
        }
      ]
    },
    { path: "*", component: NotFound }
  ]
});
path parameter 형식 props 매핑
어차피 파라미터를 path 를 통해 넘기기에 {param, path}객체를 반환하는 메서드를 따로 정의할 필요가 없다.
단 props 속성만 true 로 변경하고 path 속성에 파라미터명을 적용.
const router = new VueRouter({
  mode: "history",
  routes: [
    {
      path: "/contacts",
      name: "contacts",
      component: Contacts,
      children: [
        {
          path: ":no",
          name: "contactbyno",
          component: ContactByNo,
          props: true
        }
      ]
    },
    { path: "*", component: NotFound }
  ]
});
라우팅 모드
아래 2가지 모드
historyhash(default)
history 모드로 변겨하려면 아래처럼 mode 설정을 변경한다.
const router = new VueRouter({
  mode: 'history',
  routes: [...]
});
hash 는 url 의 # 이후의 경로는 페이지 내부의 이름 으로 여겨져 페이지가 다시 로드되지 않는다.
하지만 북마크 사용이 불가능하다.
history 는 변경된 url 을 요청하면 새로운 네트워크 요청이 일어난다.
history는 변경된url의 리소스를 반환할 별도의 웹서버 구동이 필요함
찾을 수 없는 라우팅 처리
먼저 404 대신 출력할 페이지를 작성, 컴포넌트의 간단한 템플릿만 사용하자.
<!-- NotFound.vue -->
<template>
  <h1>요청하신 경로는 존재하지 않습니다</h1>
</template>
맨 아래 router 객체 마지막에 * 에스타링크 기호로 라우팅 되지 않은 요청을 위에 정의한 컴포넌트로 이동
const router = new VueRouter({
  mode: 'history',
  routes: [
    { path: "/home", name: "home", component: Home },
    { path: "/about", name: "about", component: About },
    ...
    ...
    { path: "*", component: NotFound }
  ]
});
Navigation Guards
라우팅 이동전, 이동후 훅과 같은 메서드를 사용해
라우팅을 취소, 제어하는 방법을 Navigation Guards 라 한다.
vue 라우터 Navigation Guards
라우팅이 일어나기 전에 실행되는 훅 메서드를 정의할 수 있다.
주로 로그인, 권한을 이동전에 확인할 때 사용한다.
매개변수로 to, from, next 세가지 사용
to, from 은 이동 전, 후의 라우팅 객체를 참조, next 는 라우팅의 진행여부를 결정한다.
const router = new VueRouter({
  routes: [
    ...
    {
      path: "/contacts/:no",
      name: "contactByNo",
      component: ContactByNo,
      beforeEnter: (to, from, next) => {
        console.log(`beforeEnter! ${from.path} --> ${to.path}`);
        next();
      }
    }
  ]
});
beforeEnter 는 vue 컴포넌트 가 생성될 때에만 호출되기 때문에 이미 생성된 컴포넌트에서 경로만 이동될 때에는 호출되지 않는다.
/contacts/1에서/contacts/2로 이동할때에는 호출되지 않는다는 뜻
next()는 꼭 호출해야 네비게이션이 중지되지 않는다.
router.beforeEach, router.afterEach 메서드 정의를 통해 각 라우터가 아닌 모든 라우터,
전역수준의 Navigation Guards 를 위한 메서드를 정의할 수 있다.
afterEach 는 라우팅이 완료된 이후에 호출되는 콜백 메서드를 정의한다.
const router = new VueRouter({...});

router.beforeEach((to, from, next) => {});
router.afterEach((to, from, next) => {});
- 내비게이션 시작
beforeEachbeforeEnter- 이미 인스턴스가 생성되어 있다면 호출 안될 수 도 있음.beforeRouteEnter- 이미 인스턴스가 생성되어 있다면 호출 안될 수 도 있음.beforeRouteUpdate- 내비게이션 완료
afterEachbeforeRouteLeave
next() - 다음 훅 으로 이동
next(false) - 현재 내비게이션 중지, from 라우트 객체의 url 로 재설정
next("path") - path 경로로 리다이렉트, 새로운 내비게이션 시작
next(error) - 현재 내비게이션 중지, route.onError() 에 등록한 콜백 메서드가 호출됨.
아래와 같이 from 라우트 객체의 데이터를 사용해 접근제어를 할 수 있다.
지정한 url 에서 이동된것이 아니라면 /home 으로 리다이렉트 시킨다.
const router = new VueRouter({
  routes: [
    {
      path: "/contacts",
      name: "contacts",
      component: Contacts,
      children: [
        {
          path: ":no",
          name: "contactbyno",
          component: ContactByNo,
          beforeEnter: (to, from, next) => {
            console.log("@@ beforeEnter!: " + from.path + "-->" + to.path);
            if (from.path.startsWith("/contacts")) next();
            else next("/home");
          }
        }
      ]
    }
  ]
});
vue 컴포넌트 Navigation Guards
vue 컴포넌트 내부에서도 라우팅 제어 메서드를 정의할 수 있다.
beforeRouteEnter - 랜더링하는 라우트 이전에 호출되는 훅, 뷰 인스턴스 생성전에 호출되기에 this 사용 불가능
beforeRouteLeave - 현재경로에서 다른 경로로 빠져나갈때 호출되는 훅
beforeRouteUpdate - 이미 렌더링된(뷰 인스턴스가 생성된) 컴포넌트의 경로가 변경될 때 호출되는 훅, 컴포넌트가 첫 생성시에는 beforeRouteEnter 가 호출되고 그이후로 경로만 변경될 경우 beforeRouteUpdate 가 호출된다.
beforeEnter 와 마찬가지로 beforeRouteEnter는 컴포넌트가 첫 생성될 때에만 호출되고 url 변경으로 인한 데이터만 변경될 때에는 호출되지 않는다.
export default {
  name: "contactbyno",
  ...
  ...
  beforeRouterEnter(to, from, next) {
    console.log("** beforeRouteUpdate");
    this.no = to.params.no;
    next();
  }
};
똑같이 매개변수로 to, from, next 를 갖는다.
beforeEach에선next()를 생략하면 네비게이션이 진행되지 않지만 컴포넌트의beforeRoute...에선 생략해도 진행된다.