NGINX!
개요
정적 파일을 처리하는 HTTP 서버로서의 역할
단순 웹서버의 역할은 HTML, CSS, Javascript, 이미지와 같은 정보를 웹 브라우저(Chrome, Iexplore, Opera, Firefox 등)에 전송하는 역할을 한다. (HTTP 프로토콜을 준수)
리버스 프록시는 Event driven 형식으로 요청을 처리하며, 이런 정적파일을 호스팅 하는 역할을 쉽게 할 수 있다.
응용프로그램 서버에 요청을 보내는 리버스 프록시로서의 역할
두번째 역할은 리버스 프록시(reverse proxy)인데, 한마디로 말하면 클라이언트는 가짜 서버에 요청하면, 프록시 서버가 배후 서버(reverse server)로부터 데이터를 가져오는 역할을 한다.
프록시 서버: Nginx
리버스 서버: 어플리케이션 서버
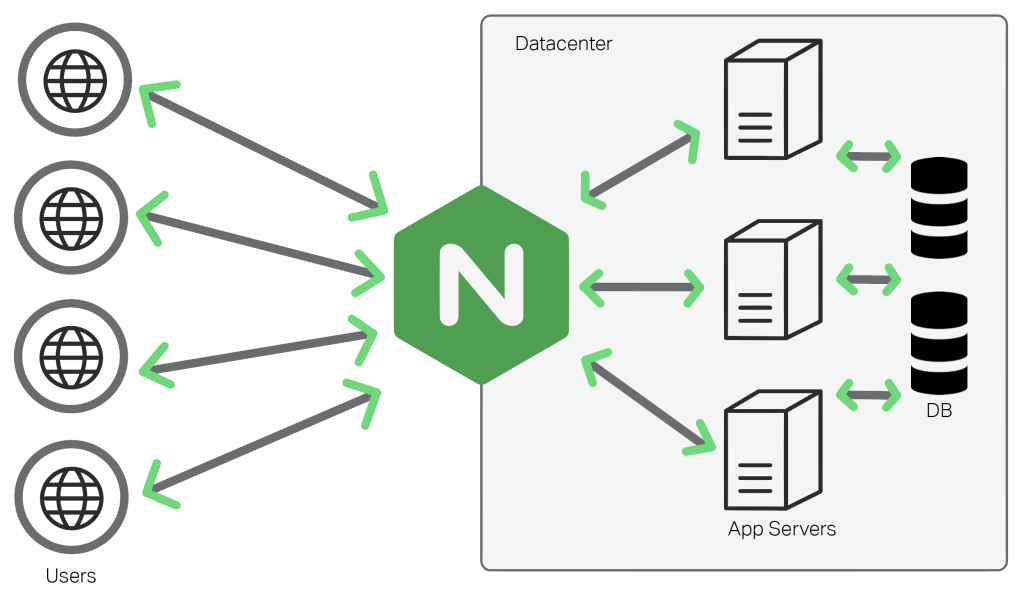
리버스 프록시를 두는 이유는 네트워크 대역이 다른 두 그룹 사이의 중개인 역할도 있지만,
요청에 대한 버퍼링, 캐싱, 요청을 분산시킬 수 있는 로드 밸런스기능 을 수행할 수 있기 때문.
Nginx 구조
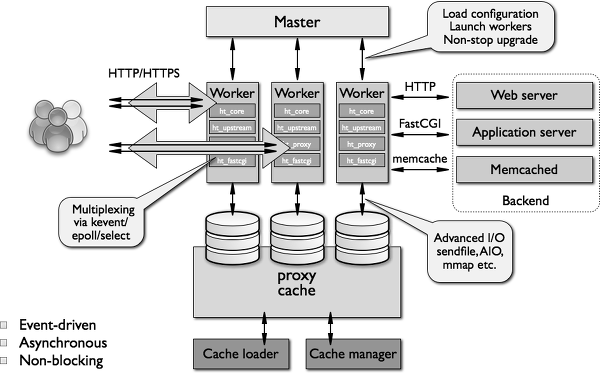
엔진엑스의 실행이 막 시작된 순간에는 Master Process 라 부르는 특별한 프로세스 한 개만 존재한다.
마스터 프로세스 자신은 어떤 클라이언트 요청도 처리하지 않으며 단지 그 일을 대신 수행할 작업자 프로세스를 낳아서 증식(invoke)하는데, 이때 작업자 프로세스의 사용자/그룹은 바뀐다.
환경 설정에서 작업자 프로세스의 수, 작업자 프로세스당 최대 접속 수 등을 정할 수 있다.
Nginx 기본 명령어
# 버전확인
$ nginx -v
nginx version: nginx/1.14.0 (Ubuntu)
# /etc/nginx/nginx.conf 문법 체크
$ sudo nginx -t
nginx: the configuration file /etc/nginx/nginx.conf syntax is ok
nginx: configuration file /etc/nginx/nginx.conf test is successful

# config 파일 위치 지정하여 문법체크
$ sudo nginx -t -c /etc/nginx/nginx.conf
nginx: the configuration file /etc/nginx/nginx.conf syntax is ok
nginx: configuration file /etc/nginx/nginx.conf test is successful

# nginx 프로세스 종료
$ nginx -s stop
# 현재 연결 중인 컨넥션이 모두 완료될 때까지 기다린 후 종료한다.
$ nginx -s quit
# 설정파일 수정후 적용
$ nginx -s reload
Nginx 지시어
nginx 서버를 사용하기위한 수많은 지시어 들이 있고 이를 컨피그 파일로 관리하며 서버실행시에 적용한다.
https://nginx.org/en/docs/ https://opentutorials.org/module/384/4526
서버가 설치되면 아래 형식의 default 컨픽그 파일이 적용된다.
# /etc/nginx/nginx.conf

user www-data;
worker_processes auto; # cpu core 개수만큼 할당
pid /run/nginx.pid;
include /etc/nginx/modules-enabled/*.conf;

events {
  worker_connections 768;
}

http {
  sendfile on;
  tcp_nopush on;
  tcp_nodelay on;
  keepalive_timeout 65;
  types_hash_max_size 2048;
  include /etc/nginx/mime.types;
  default_type application/octet-stream;
  ssl_protocols TLSv1 TLSv1.1 TLSv1.2; # Dropping SSLv3, ref: POODLE
  ssl_prefer_server_ciphers on;
  access_log /var/log/nginx/access.log;
  error_log /var/log/nginx/error.log;
  gzip on;
  include /etc/nginx/conf.d/*.conf;
  include /etc/nginx/sites-enabled/*;
}
mime.types 에는 각종 통신에 사용되는 각종 문자열들이 key-value 형식으로 저장되어있다.
# /etc/nginx/mime.types

types {
  text/html                             html htm shtml;
  text/css                              css;
  text/xml                              xml;
  image/gif                             gif;
  image/jpeg                            jpeg jpg;
  application/javascript                js;
  ...
  text/plain                            txt;
  ...
  image/png                             png;
  ...
  application/json                      json;
  ...
}
worker_processes  1;
events {
    worker_connections  1024;
}
http {
    include       mime.types;
    server {
        listen       80;
        location / {
            root   html;
            index  index.html index.htm;
        }
    }
}
http 블록
http 블록은 이후에 소개할 server, location의 루트 블록, 여기서 설정된 값을 하위 블록들은 상속한다.
http 블록은 여러개를 사용할 수 있지만 관리상의 이슈로 한번만 사용하는 것을 권장한다.
http, server, location 블록은 계층구조를 가지고 있다.
많은 지시어가 각각의 블록에서 중복선언될 수 있는데
상위블록의 지시어는 하위 블록의 기본값으로 설정된다.
하위블록에서 선언된 지시어는 상위의 선언을 무시하고 적용한다.
server 블록
server 블록은 하나의 웹사이트를 선언하는데 사용된다.
가상 호스팅(
Virtual Host)의 개념이다.
예를들어 하나의 서버로 2개의 어플리케이션 서버를 동시에 운영하고 싶은 경우 사용.
events 블록
이벤트 블록은 주로 네트워크의 동작방법과 관련된 설정값을 가진다.
이벤트 블록의 지시어들은 이벤트 블록에서만 사용할 수 있고, 다른 블록과는 상속관계를 갖지 않는다.
이벤트 모듈 지시어에 대한 설명은 이벤트 모듈 지시어 사전을 참고한다.
upstream 블록
nginx 만으로 클러스터링 구성을 지원하는 블록
nginx는 라운드 로빈 로드밸런싱 메커니즘으로 요청을 어플리케이션에 할당 한다.
아래 설정으로 메커니즘 변경이 가능하다.
http://nginx.org/en/docs/http/ngx_http_upstream_module.html
| 속성 | 설명 |
|---|---|
ip_hash |
같은 방문자로부터 도착한 요청은 항상 같은 업스트림 서버가 처리 할 수 있게 한다. session clustering 이 구성되지 않은 경우 유용하다. |
least_conn |
최소요청을 처리한 서버에 우선적으로 요청을 배치 |
least_time |
최소요청시간 서버에 우선적으로 요청을 배치 |
weight=n |
업스트림 서버의 비중을 나타낸다. 이 값을 2로 설정하면 두번의 요청이 해당 서버에서 먼저 처리된다. |
max_fails=n |
n으로 지정한 횟수만큼 실패가 일어나면 서버가 죽은 것으로 간주한다. |
fail_timeout=n |
max_fails가 지정된 상태에서 이 값이 설정만큼 서버가 응답하지 않으면 죽은 것으로 간주한다. |
down |
해당 서버를 사용하지 않게 지정한다. ip_hash; 지시어가 설정된 상태에서만 유효하다. |
backup |
모든 서버가 동작하지 않을 때 backup으로 표시된 서버가 사용되고 그 전까지는 사용되지 않는다. |
least_conn |
요청이 제일적은 서버로 요청 할당 |
keepalive |
서버 연결을 유지하기위한 캐시 할당, 연결 유지 수를 설정 |
keepalive_request |
keepalive 되는동안 요청 가능한 횟수, 모두 채우면 연결이 닫힘 |
keepalive_timeout |
keepalive 유지 시간 |
keepalive 가 worker process 가 연결가능한 최대 연결 개수를 넘지 말것
연결객체 유지때문에 새로운 연결을 받지 못할 수 있음
location 블록
location 블록은 server 블록 안에 등장하면서 특정 URL을 처리하는 방법을 정의한다.
이를테면 http://.../course/1, http://.../module/1 처럼 URL 뒤에 붙는 context 로 접근하는 요청을 다르게 처리하고 싶을 때 사용한다.
prefix match
# prefix match
location /greet {
      return 200 'this is prefix match';
}
위에서 작성한 /greet은 prefix match 이다.
http://localhost/greetAbracadabra 로 접근해도 /greet... 까지는 일치하기 때문에 위의 location 블록에 해당된다.
# redirect
location /logo {
  return 307 /thumb.png;
}
http://localhost/logo 로 접근하면 http://localhost/thumb.png 로 리다이렉트 된다.(URI 도 자동으로 변환된다)
preferential prefix match
# preferential prefix match
location ^~ /greet {
      return 200 'this is regex match';
}
약간 우선순위가 높은 prefix match 이다.
위의 prefix match 와 regex match 보다 높은 우선순위를 가진다.
exact match
# exact match
location = /greet {
      return 200 'this is exact match';
}
완전히 매칭되는 URI 대해서만 location을 지정하고 싶으면 위처럼 exact match를 사용
regex match
# case sensitive regex match
location ~ /greet[0-9] {
      return 200 'this is regex match';
}
regex 를 사용해서 URL location을 지정이 가능하다. ~ 를 사용해 regex match를 사용
# case insensitive regex match
location ~* /greet[0-9] {
      return 200 'this is regex match';
}
case insensitive(대소문자 구분x) 를 사용하면 ~* 를 사용.
priority 순서는 정의한 위치일것 같지만 아래와 같다.
exact > preferential > regex > prefix
root, alias 지시자
root: location 으로 넘어온 부분을 root로 설정한 경로에 추가한다.
alias: location 으로 넘어온 부분 alias 로 설정한 경로에서 찾는다.
location /static/ {
  root /var/www/app/static;
  autoindex off;
}
/var/www/app/static/static 경로에서 index.html 을 찾는다.
location /static/ {
  alias /var/www/app/static/;
  autoindex off;
}
/var/www/app/static/ 에서 찾는다.`
autoindex: on 으로 설정시 디렉토리 내부의 목록을 보여주는 index 페이지를 출력, off 는index.html이 없으면 에러반환
Nginx variable
http://nginx.org/en/docs/varindex.html
https://opentutorials.org/module/384/4508
variable은 nginx.conf 에서 사용할 수 있는 변수를 의미.
NGINX 에서 어던 변수들을 지원하는지 알아보자.
http://localhost:8080/test?arg=123&name=kouzie
실제 variable 이 어떻게 출력되는지 확인
location /test {
    add_header Content-Type text/plain;
    return 200
'
host: $host,
http_host: $http_host,
http_accept: $http_accept,
http_connection: $http_connection,
args: $args,
scheme: $scheme,
remote_addr: $remote_addr,
uri: $uri,
args: $args,
arg_name: $arg_name,
';
}
host: 192.168.100.101,
http_host: 192.168.100.101:8080,
http_accept: text/html,application/xhtml+xml,application/xml;q=0.9,image/webp,image/apng,*/*;q=0.8,application/signed-exchange;v=b3;q=0.9,
http_connection: keep-alive,
scheme: http,
remote_addr: 192.168.100.101,
uri: /test,
args: arg=123&name=kouzie,
arg_name: kouzie,
| 변수명 | 설명 |
|---|---|
$host |
host 명 |
$http_ |
http 헤더값 출력, 케밥표기식 사용 |
$uri |
uri |
$args |
파라미터 문자열 |
$scheme |
http 혹은 https |
$remote_addr |
클라이언트 주소 |
$proxy_host |
proxy_pass 지시자에 설정되어 있는 host, port |
$proxy_port |
proxy_pass 지시자에 설정되어 있는 port |
$proxy_add_x_forwarded_for |
클라이언트가 전달한 X-Forwarded-For 헤더, 헤더가 존재하지 않는다면 $remote_addr값으로 대체 |
configuration variable
configuration variable은 if와 같은 conditional state를 작성할때 주로 사용합니다.
server {
  # configuration variable
  set $weekend 'No';

  # check if weekend
  if ( $date_local ~ 'Saturday|Sunday' ){
    set $weekend 'Yes';
  }

  # return $weekend value
  location /is_weekend {
    return 200 $weekend;
  }
}
Nginx 모듈
rewrite
rewrite 는 입력받은 URI 을 정규표현식으로 찾아 URI을 변환하는 역할을 한다.
단 rewrite는 redirect와는 다르게 내부적으로 요청을 처리하고 URI는 기존에 호출했던 URI를 유지한다.
# rewrite
rewrite ^/user/\w+ /greet;

lcoation /greet {
  return 200 "Hello User"
}
^ 는 문자열 시작을 알리는 메타문자
\w 는 모든 영숫자를 표시하는 메타문자
/user 로 시작하고 뒤에 /영숫자가 오는 모든 URI 를 /greet 로 rewrite 하여 서버 리소스를 출력한다.
rewrite를 사용하면 URI의 특정 부분을 grap해 사용할 수 있다.
( ) 내부에 grap 하고싶은 URI의 특정 부분표기,
$로 grap 할 수 있다.
proxy_pass
프록시 서버의 프로토콜과 매핑 할 URI를 설정. http또는 https
location /name/ {
  proxy_pass http://127.0.0.1/remote/;
}
location /name/ {
  rewrite    /name/([^/]+) /users?name=$1 break;
  proxy_pass http://127.0.0.1;
}
location /other/ {
  rewrite ^/other(/.*)$ $1 break; # url에서 other 뒤에 있는 URL을 전부 그대로 사용.
  proxy_pass http://other;
  proxy_set_header X-Real-IP $remote_addr; # 실제 접속자의 IP를 X-Real-IP 헤더에 입혀서 전송.
  proxy_redirect off;
}
proxy_http_version
proxy_set_header
location /other/ {
  rewrite /other(/.*)$ $1 break;
  proxy_pass http://other;
  proxy_set_header X-Real-IP $remote_addr; # 실제 접속자의 IP를 X-Real-IP 헤더에 입혀서 전송.
  proxy_redirect off;
}
proxy_redirect
proxy_bind
proxy_bind address [transparent] | off;
proxy_bind $remote_addr transparent;