모니터링 - fluentbit!
log agent
로그 수집 백엔드 서비스로 로그를 전달해주는 대표적인 agent 들이 있다.
- promtail
grafana 에서 만든 로그 수집기, loki 와 연동된다. - fluentd
Treasure Data 에서 만든 로그 수집기, CNCF 산하 프로젝트로 다양한 프로젝트와 연동된다,
매우 많은 input/output, 플러그인을 가지고 있음. - fluentbit fluentd 의 경량버전
위 log agent 모두 file 에서 tail 방식으로 로그를 읽어들여 서버에 전달하는 방법을 사용하며,
[DB, App, Web] 등에서 발생하는 로그를 scrape 해서 로그 수집 백엔드 서비스 로 전달한다.
다양한 로그 수집툴이 있지만 CNCF 에서 운영되는 fluentd 가 많이 사용되며 커뮤니티도 크다.
이번 포스팅에선 회사에서 만든 fluentbit 에 대해 알아볼 예정.
fluentbit
https://docs.fluentbit.io/manual/
https://github.com/fluent/fluent-bit
https://logz.io/blog/fluentd-vs-fluent-bit/
fluentbit 는 고성능/저비용을 위해 설계되었으며 450KB 으로도 실행 가능하다.
추상화된 I/O 처리기는 비동기 및 event-driven, read/write, retry, buffer 방식을 정의할 수 있다.
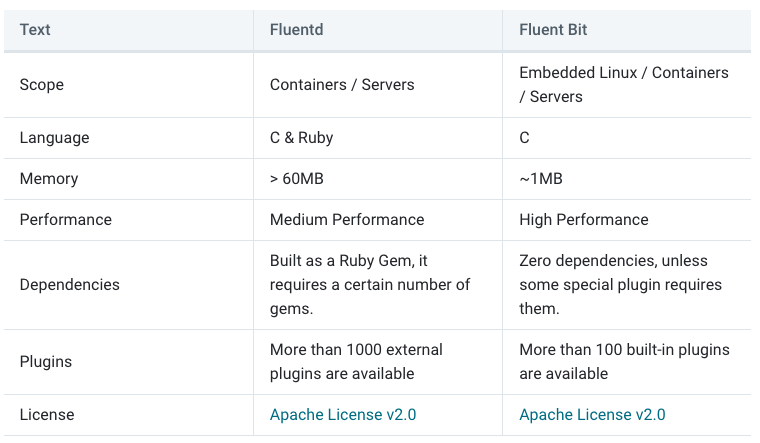
fluentd 와 fluentbit 의 차이는 아래와 같다.
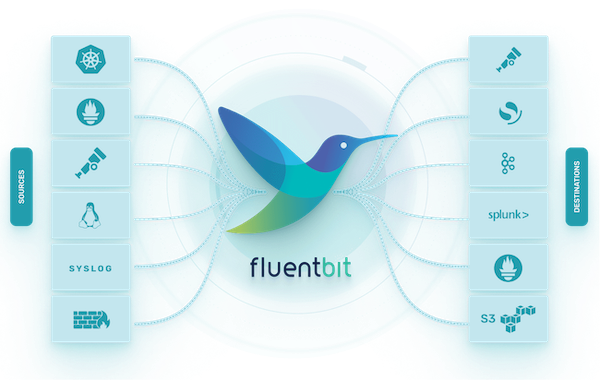
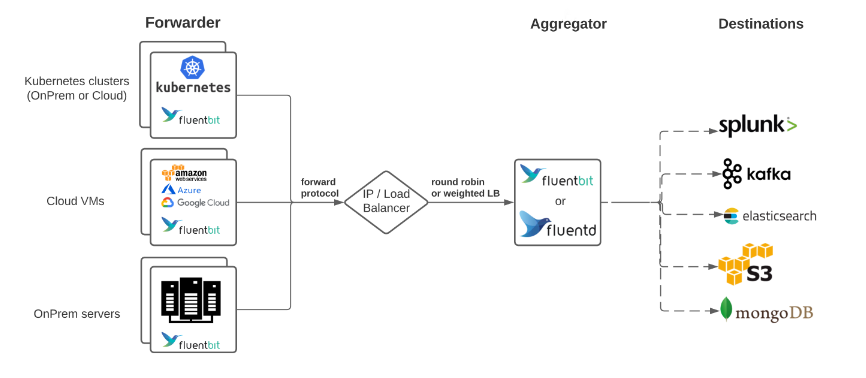
fluentbit 의 다양한 아키텍처 컨셉.
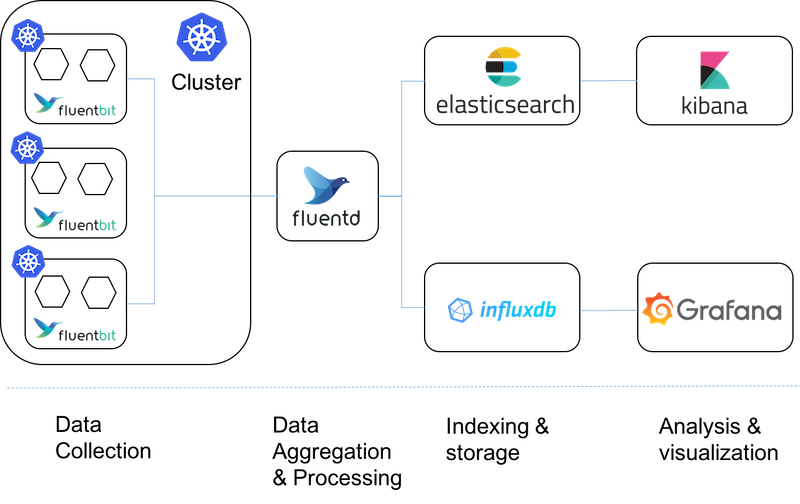
저비용 방식인 fluentbit 를 k8s daemonset 으로 사용하고, 중간에 로그 통합, 변조 가능한 fluentd 를 사용한다.
로컬 테스트
작성한 fluentbit 를 배포하기 전에 로컬에서 테스트할 수 있음.
파싱해야할 로그데이터, fluentbit 설정을 volume 으로 설정하고 아래 docker-compose 실행.
version: "3.7"
services:
  fluent-bit:
    image: cr.fluentbit.io/fluent/fluent-bit
    volumes:
      - ./etc:/fluent-bit/etc     # fluentbit data pipeline 설정
      - ./log:/demo               # 테스트할 로그파일을 /log 에 저장
설정
https://docs.fluentbit.io/manual/administration/configuring-fluent-bit/classic-mode
https://docs.fluentbit.io/manual/administration/configuring-fluent-bit/classic-mode/configuration-file
https://docs.fluentbit.io/manual/pipeline
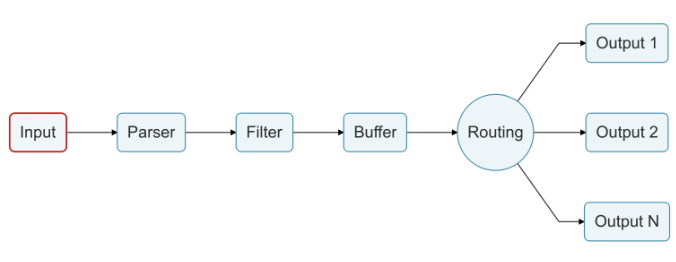
- Input
[Mqtt, Http, File]등, 여러가지 입력을 받음. - Parser
구조화되지 않은 데이터를 구조화된 데이터로 변환. - Filter & Buffer
각종 필터링, 추가설정 처리. Filter Parser 를 사용하여 추가적인 구조화도 가능. - Rounting
[Tag, Match]를 통해 데이터를 Output 으로 라우팅. - Output
[aws cloudwatch, s3, loki, elasticsearch]등 여러가지 출력을 지원.
fluentbit 설정에선 위 pipeline 컨셉에 대한 설정을 진행한다.
각 파이프라인 최상위 설정은 섹션이라 하며 종류는 아래와 같다.
- SERVICE
- INPUT
- OUTPUT
- FILTER
- PARSER
각 섹션 별로 여러가지 플러그인이 있으며, 플러그인별로 설정가능한 속성도 모두 다르다.
여기서는 아래 섹션 과 플러그인 사용에 대해서 간단히 알아볼 예정.
- INPUT: tail
- OUTPUT: stdout, loki
- FILTER: parser
- PARSER, MULTILINE_PARSER: regex
PARSER
아래는 docker 컨테이너가 출력하는 전형적인 로그.
{"log":"VM settings:\n","stream":"stderr","time":"2024-02-14T06:11:01.863689738Z"}
{"log":"    Max. Heap Size (Estimated): 48.32G\n","stream":"stderr","time":"2024-02-14T06:11:01.864559753Z"}
{"log":"    Using VM: OpenJDK 64-Bit Server VM\n","stream":"stderr","time":"2024-02-14T06:11:01.864580683Z"}
{"log":"\n","stream":"stderr","time":"2024-02-14T06:11:01.864589707Z"}
{"log":"\n","stream":"stdout","time":"2024-02-14T06:11:02.588861317Z"}
{"log":"  .   ____          _            __ _ _\n","stream":"stdout","time":"2024-02-14T06:11:02.588918303Z"}
{"log":" /\\\\ / ___'_ __ _ _(_)_ __  __ _ \\ \\ \\ \\\n","stream":"stdout","time":"2024-02-14T06:11:02.588928853Z"}
{"log":"( ( )\\___ | '_ | '_| | '_ \\/ _` | \\ \\ \\ \\\n","stream":"stdout","time":"2024-02-14T06:11:02.588938558Z"}
{"log":" \\\\/  ___)| |_)| | | | | || (_| |  ) ) ) )\n","stream":"stdout","time":"2024-02-14T06:11:02.588948398Z"}
{"log":"  '  |____| .__|_| |_|_| |_\\__, | / / / /\n","stream":"stdout","time":"2024-02-14T06:11:02.58895741Z"}
{"log":" =========|_|==============|___/=/_/_/_/\n","stream":"stdout","time":"2024-02-14T06:11:02.588966528Z"}
{"log":" :: Spring Boot ::                (v3.2.1)\n","stream":"stdout","time":"2024-02-14T06:11:02.589437328Z"}
{"log":"2024-02-14T15:18:15.837+09:00  INFO 1 --- [demo] [nio-8080-exec-1] o.a.c.c.C.[Tomcat].[localhost].[/]       : Initializing Spring DispatcherServlet 'dispatcherServlet'\n","stream":"stdout","time":"2024-02-14T06:18:15.838158945Z"}
{"log":"2024-02-14T15:18:15.838+09:00  INFO 1 --- [demo] [nio-8080-exec-1] o.s.web.servlet.DispatcherServlet        : Initializing Servlet 'dispatcherServlet'\n","stream":"stdout","time":"2024-02-14T06:18:15.838347228Z"}
{"log": "java.lang.Exception: Exception just occured bro", "stream": "stdout", "time": "2024-02-14T06:18:15.838347228Z"}
{"log": "    at io.buildpacks.example.sample.FooBarController.Foo(FooBarController.java:17) ~[classes!/:0.0.1-SNAPSHOT]", "stream": "stdout", "time": "2024-02-14T06:18:15.838347228Z"}
{"log": "    at java.base/jdk.internal.reflect.NativeMethodAccessorImpl.invoke0(Native Method) ~[na:na]", "stream": "stdout", "time": "2024-02-14T06:18:15.838347228Z"}
{"log": "    at java.base/jdk.internal.reflect.NativeMethodAccessorImpl.invoke(NativeMethodAccessorImpl.java:78) ~[na:na]", "stream": "stdout", "time": "2024-02-14T06:18:15.838347228Z"}
{"log": "    at java.base/jdk.internal.reflect.DelegatingMethodAccessorImpl.invoke(DelegatingMethodAccessorImpl.java:43) ~[na:na]", "stream": "stdout", "time": "2024-02-14T06:18:15.838347228Z"}
  ...
위와 같은 형태의 로그를 저장해야할 경우 [json, regex] 를 처리할 PARSER 섹션 를 정의해야한다.
PARSER 섹션은 별도의 별도의 파일로 저장해서 사용해야한다.
총 세개의 PARSER 섹션 정의
docker_jsonspringboot_logspringboot_multiline
# parser.conf
[PARSER]
    Name        docker_json
    Format      json
    Time_Key    time
    Time_Format %Y-%m-%dT%H:%M:%S.%L
    Time_Keep   On

[PARSER]
    Name        springboot_log
    Format      regex
    Regex       ^(?<time>\d{4}-\d{2}-\d{2}T\d{2}:\d{2}:\d{2}\.\d{3}\+\d{2}:\d{2})\s+(?<level>\w+)\s+(?<pid>\d+)\s+---\s+\[(?<thread>[^\]]+)\]\s+\[\s+(?<logger>[^\]]+)\]\s+(?<source>[^\s+:]+)\s+:\s+(?<message>.+)$
    Time_Key    time
    Time_Format %Y-%m-%dT%H:%M:%S.%L%z

[MULTILINE_PARSER]
    name          springboot_multiline
    type          regex
    flush_timeout 1000
    # rules |   state name  | regex pattern                  | next state
    # ------|---------------|--------------------------------------------
    # 문자로 시작하는 줄을 멀티라인 로그의 시작으로 식별, 보통 spring boot 로그는 시간(숫자)로 시작함
    Rule     "start_state"   "^[^\d]"                         "multi_line"
    # 멀티라인 로그 처리를 계속
    Rule     "multi_line"    "/.*/"                           "multi_line"
Spring Boot 버전에 따라 시간출력 형태가 다름으로 Regex 변경 필요, ChatGPT 를 사용하면 잘 출력해준다.
docker 컨테이너가 출력하는 /var/log/containers/*.log 로그파일을 tail 하는데 모든 로그형태가 json 이기에, 이를 한번 파싱하기 위해 docker_json 를 정의한다.
파싱된 로그안에는 SpringBoot 기본 로그, 에러 혹은 기타 출력물의 멀티라인 형태 로그가 구성되어있다.
이를 파싱하기 위해 springboot_log, springboot_multiline 를 정의한다.
INPUT, OUTPUT, FILTER
위에서 정의한 PARSER 를 INPUT, FILTER 에서 적저히 사용하고 OUPUT 으로 내보내야 한다.
그리고 태그에 docker.spring 를 설정해서 하나의 파이프라인으로 처리되도록 설정.
[INPUT]
    Name tail
    Path /demo/*.log
    Parser      docker_json
    read_from_head   true
    Tag  docker.spring

[FILTER]
    Name parser
    Match docker.spring
    Key_Name log
    Parser springboot_log

[FILTER]
    Name Multiline
    Match docker.spring
    multiline.key_content log
    multiline.parser springboot_multiline

[OUTPUT]
    Name stdout
    Match *
여기선 parser FILTER 와 multiline FILTER 를 사용한다.
stdout 으로 출력된 결과를 확인하고 regex 로 로그가 파싱되어 라벨이 붙어있는지 확인한다.
docker 운영
docker 로그를 fluentbit 를 사용해 수집하는 테스트 진행,
docker 로그는 컨테이너 이름으로 저장되지 않기 때문에 tailing 으로 특정 컨테이너의 로그를 수집하긴 힘들다.
log-driver 를 fluentd 로 지정하여 fluentbit 로 log 를 전송할 수 있다.
아래와 같이 서비스에 fluentd logging driver 를 설정해서 실행.
x-test-logging: &default_logging
  driver: "fluentd"
  options:
    fluentd-address: localhost:24224 # host 에서 접근하는 IP 지정

services:
  fluentbit:
    image: fluent/fluent-bit:3.2.4
    ports:
      - "24224:24224"
    volumes:
      - ./fluent-bit.conf:/fluent-bit/etc/fluent-bit.conf
  demo-log-app1:
    image: alpine
    logging: *default_logging
    command: sh -c "trap 'exit' SIGTERM; while true; do echo 'demo log1'; sleep 2; done"
  demo-log-app2:
    image: alpine
    logging: *default_logging
    command: sh -c "trap 'exit' SIGTERM; while true; do echo 'demo log2'; sleep 5; done"
사용한 fluent-bit.conf 파일은 아래와 같다.
[Service]
    Flush        1
    Log_Level    info

[Input]
    Name         forward
    Listen       0.0.0.0
    Port         24224
    TAG          fluentd.*

[Output]
    Name         stdout
    Match        *
    Format       json_lines
    Retry_Limit  False
k8s 운영
fluentbit 와 같은 log agent 은 대부분 클라우드 환경에서 운영되며 헬름을 이용한 설치도 지원한다.
fleuntbit 의 로그수집은 filelog tail 방식이기 때문에 각 노드에 로그에 접근하기 위한 Daemonset 으로 설치된다.
helm repo add fluent https://fluent.github.io/helm-charts
helm search repo fluent

# 압축파일 다운로드, fluent-bit-0.43.0.tgz 버전 설치됨
helm fetch fluent/fluent-bit
# 압축 파일 해제
tar zxvf fluent-bit-*.tgz
mv fluent-bit fluent-bit-helm
위에서 구성한 SpringBoot 로그 [PARSING, INPUT, OUTPUT, FILTER] 를 value.yaml 에 설정
수많은 conatiners 로그중 demo-*.log 형태의 로그만 저장시킨다.
# value.yaml
config:
  service: |
    ...
  inputs: |
    [INPUT]
        Name tail
        Path /var/log/containers/demo-*.log
        Parser      docker_json
        read_from_head   true
        Tag  docker.spring

  filters: |
    [FILTER]
        Name parser
        Match docker.spring
        Key_Name log
        Parser springboot_log

    [FILTER]
        Name Multiline
        Match docker.spring
        multiline.key_content log
        multiline.parser springboot_multiline
    ...
  customParsers: |
    [PARSER]
        Name        docker_json
        Format      json
        Time_Key    time
        Time_Format %Y-%m-%dT%H:%M:%S.%L
        Time_Keep   On

    [PARSER]
        Name        springboot_log
        Format      regex
        Regex       ^(?<timestamp>\d{4}-\d{2}-\d{2}T\d{2}:\d{2}:\d{2}\.\d{3}\+\d{2}:\d{2})\s+(?<level>\w+)\s+(?<pid>\d+)\s+---\s+\[(?<thread>[^\]]+)\]\s+\[\s*(?<logger>[^\]]+)\]\s+(?<class>[^\s*:]+)\s+:\s+(?<message>.+)$
        Time_Key    time
        Time_Format %Y-%m-%dT%H:%M:%S.%L%z

    [MULTILINE_PARSER]
        name          springboot_multiline
        type          regex
        flush_timeout 1000
        # rules |   state name  | regex pattern                  | next state
        # ------|---------------|--------------------------------------------
        # 문자로 시작하는 줄을 멀티라인 로그의 시작으로 식별
        Rule     "start_state"   "^[^\d]"                         "multi_line"
        # 멀티라인 로그 처리를 계속
        Rule     "multi_line"    "/.*/"                           "multi_line"

  outputs: |
    [OUTPUT]
        Name stdout
        Match docker.spring

    [OUTPUT]
        Name  loki
        Host  loki-write.loki.svc.cluster.local
        Port  3100
        Uri   /loki/api/v1/push
        Match docker.spring
        Tls   off
        labels  job=demo-project
        label_keys   $level,$logger,$source
loki 에 최종 로그를 저장하도록 설정한다.
데모코드
https://github.com/Kouzie/local-k8s/tree/main/monitoring/fluent-bit
https://github.com/Kouzie/local-k8s/tree/main/monitoring/fluentbit-docker-compose-test