Spring Cloud - Loadbalancer, Feign!
Client-side Load balancer
Load Balancing 은 들어오는 트래픽을 여러 백엔드 서버에 효율적으로 분산시키는 것을 의미한다.
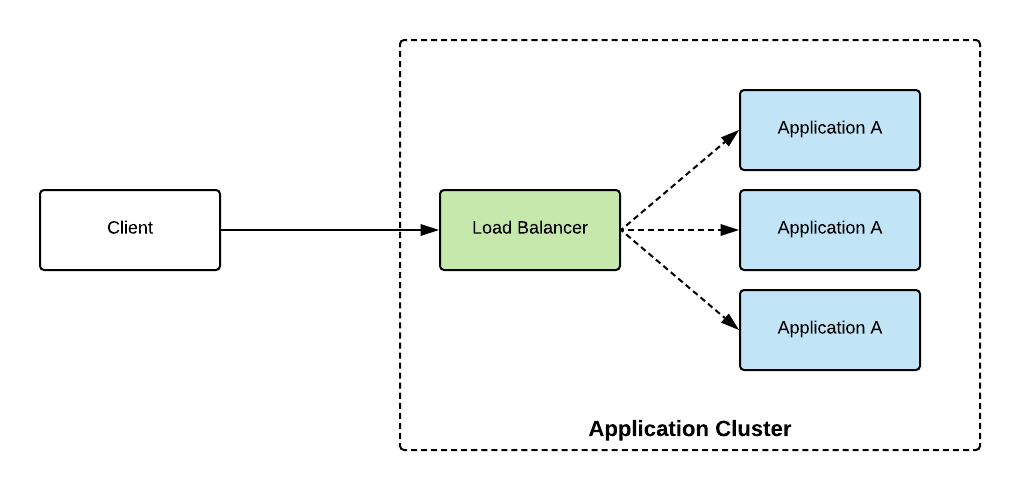
아래 그림과 같이 중앙에 Load Balancing 역할을 해줄 Load Balancer 장비를 두고 트래픽을 분산시키는 것이
전통적인 Server-side Load Balancer 이다.

이전에 배운 Spring Cloud Gateway 가 Server-side Load Balancer 역할을 해준다.
Client-side Load balancer 는 클라이언트가 이미 모든 서버에 대한 url 주소를 알고 있으면
Load Balancer 장비 없이도 클라이언트 내부에서 라운드 로빈으로 분배해서 각 서버에 요청하는 개념이다.
Eurekra 의 Service Discovery 기능을 사용하면 각 서비스들은 다른 서비스들의 url 을 알 수 있음으로
Client-side Load balancer 개념을 사용해 서로 통신할 수 있다.
Client-side Load balancer 를 구현할 수 있는 몇가지 라이브러리가 있다.
netrix ribbonSpring Cloud LoadbalancerSpring Cloud OpenFeign
여기서
netrix ribbon은Spring Cloud Hoxton Release를 마지막으로 더이상 지원하지 않기 때문에
아래 2가지만 알아본다.
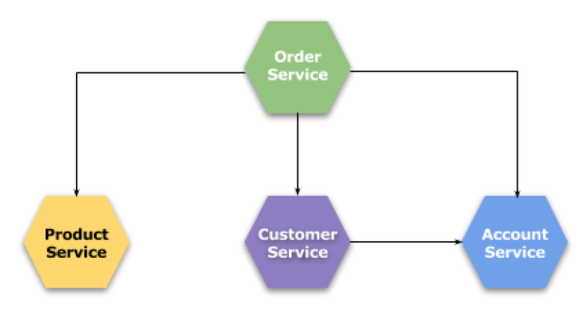
테스트를 위해 사전에 그림과 같이 Eureka Client 4개를 동작시킨다.


Spring Cloud Loadbalancer
https://docs.spring.io/spring-cloud-commons/docs/current/reference/html/#spring-cloud-loadbalancer
사용방법은 간단하다
아래처럼 Loadbalancer 용 RestTemplate 을 생성하고 @LoadBalanced 어노테이션을 사용해 의존성 주입하여 사용하면 된다.
// Eureka 연동 Client-side LB 를 위한 RestTemplate
@LoadBalanced
@Bean
RestTemplate loadBalanced() {
    return new RestTemplate();
}

// 일반 Rest 요청을 위한 RestTemplate
@Primary
@Bean
RestTemplate restTemplate() {
    return new RestTemplate();
}
@Autowired
@LoadBalanced
private RestTemplate loadBalanced;

...

String result = loadBalanced.getForObject("http://product-service/product/test", String.class);
product-service 의 host port 정보는 DefaultServiceInstance 객체를 스프링 빈으로 등록하여 매핑한다.
Service Discovery 기능을 사용할 경우 자동으로 service-id 와 host port 가 매핑되고
Service Discovery 기능을 사용하지 않을 경우 수기로 service-id 와 host:port 를 매핑해야 한다.
수기로 매핑할 때 application.properties 와 java config 를 사용해 등록하는 방법을 알아본다.
수기 매핑 - application.properties
https://docs.spring.io/spring-cloud-commons/docs/current/reference/html/#simplediscoveryclient
order service 의 application.properties 에 아래와 같이 설정
# app
spring.application.name=order-service
# eurkea, cloud config disable 처리
eureka.client.enabled=false
spring.cloud.config.enabled=false

spring.cloud.discovery.client.simple.instances.product-service[0].uri=http://localhost:8082
spring.cloud.discovery.client.simple.instances.product-service[1].uri=http://localhost:8083
내부적으로 Map<String, List<DefaultServiceInstance>> 형태의 데이터를 생성한다.
수기 매핑 - java config
@Bean
public ServiceInstanceListSupplier serviceInstanceListSupplier() {
    return new ServiceInstanceListSupplier() {
        @Override
        public String getServiceId() {
            return "product-service";
        }

        @Override
        public Flux<List<ServiceInstance>> get() {
            return Flux.just(Arrays.asList(
                new DefaultServiceInstance("product-1", "product-service", "localhost", 8080, false),
                new DefaultServiceInstance("product-2", "product-service", "localhost", 8081, false)
            ));
        }
    };
}
@LoadBalancerClient 어노테이션을 사용하면 Spring Cloud Loadbalancer 에 기본적으로 설정되어 있는 LoadBalancerClientConfiguration 환경구성을 사용하지 않고 변경할 수 있다.
추가적으로 설정해야할 사항이 많음으로
default configuration사용을 권장
// default org.springframework.cloud.loadbalancer.annotation.LoadBalancerClientConfiguration
@LoadBalancerClient(name = "demo-lb", configuration = CustomLoadBalancerConfiguration.class)
Service Discovery 를 사용하면 application.properties 와 java config 을 사용할 필요가 없다.
오히려 수기 설정의 우선순위가 더 높아 제대로 동작하지 않음으로 지워야한다.
Spring Cloud OpenFeign
implementation 'org.springframework.cloud:spring-cloud-starter-openfeign'
https://docs.spring.io/spring-cloud-openfeign/docs/current/reference/html/
기존에 Netflix 에서 개발된 Http client binder 이지만 Spring Cloud 프로젝트에 합류됨
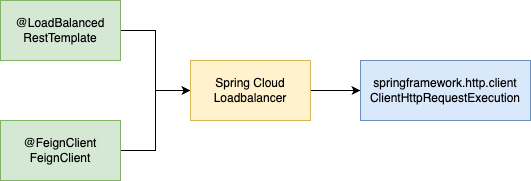
Spring Cloud Loadbalancer 기반으로 Client-side Loadbalacing 기능을 제공한다.
위에서 배운 @LoadBalanced 어노테이션을 사용하는 RestTemplate 과 클래스 관계도를 비교하면 아래 그림과 같다.

사용방법은 간단하다 아래와 같이 @EnableFeignClients 어노테이션을 추가하고
@SpringBootApplication
@EnableDiscoveryClient
@EnableFeignClients
public class OrderApplication {
    ...
}
@FeignClient 어노테이션의 name 속성과 Service Discovery 된 service-id 를 매핑시켜 사용하면 된다.
만약 동일한 service-id 에 여러개의 @FeignClient 를 생성하고 싶다면 contextId 속성을 다르게 설정하면 됨
@FeignClient(name = "customer-service", contextId = "customerClient1")
public interface CustomerClient {
    // 아래 restTemplate 호출과 동일
    // restTemplate.getForObject("http://customer-service/withAccounts/{id}", Customer.class, order.getCustomerId());
    @GetMapping("/withAccounts/{id}")
    Customer findByIdWithAccounts(@PathVariable("id") Long id);
}

@FeignClient(name = "product-service")
public interface ProductClient {
    //restTemplate.postForObject("http://product-service/ids", order.getProductIds(), Product[].class);
    @PostMapping("/ids")
    List<Product> findByIds(List<Long> ids);
}
정의한 @FeignClient 인터페이스는 컴파일 단계에서 재정의 되기 때문에 아래와 같이 의존성 주입하여 사용하면 된다.
@Autowired
CustomerClient customerClient;

@Autowired
ProductClient productClient;
...
...

List<Product> products = productClient.findByIds(order.getProductIds());
Customer customer = customerClient.findByIdWithAccounts(order.getCustomerId());
Get 방식의 feign client api 를 호출할 경우 query parameter 을 위한 POJO 객체 사용시 @ModelAttribute 가 아닌 @SpringQueryMap 사용한다.
ActivityDetailResponseDto getActivityDetail(@SpringQueryMap DetailRequestDto requestDto);
feign.codec.ErrorDecoder
Spring 관련 어노테이션으로 Feign 을 쉽게 이용할 수 있는 이유를 먼저 알아야 한다.
Feign 에서 Http Request, Http Response 를 주고 받을 때 내부적으로 Feign 라이브러리에서 사용하는 Encoder, Decoder 로 감쌓 데이터를 주고 받고
Spring 관련 어노테이션이 설명되어 있는 정보(feign.contract) 가 설정되어 있기 때문이다.
Feign의 각종 편의기능을 쉽게 이용할 수 있으며 커스터마이징 하고 싶다면@FeignClient의configuration설정을 이용하면 됨(권장X)
우리는 Decoder 에서 발생한 에러의 예외처리를 ErrorDecoder 를 통해 처리 가능
Reponse 를 확인 후 정의한 Exception 객체를 전달할 수 있음
@Slf4j
@Component
@RequiredArgsConstructor
public class FeignErrorDecoder implements ErrorDecoder {
    @Override
    public Exception decode(String methodKey, Response response) {
        log.error("feign error invoked, method:{}, status:{}, reason:{}", methodKey, response.status(), response.reason());
        return new FeignRequestException(response);
    }
}

@Slf4j
public class FeignRequestException extends RuntimeException {
    private String reason;

    public FeignRequestException(Response response) {
        try {
            InputStream inputStream = response.body().asInputStream();
            reason = new String(inputStream.readAllBytes());
        } catch (IOException e) {
            log.error("IOException invoked, type:{}, msg:{}", e.getClass().getSimpleName(), e.getMessage());
            reason = e.getMessage();
        }
    }
}
feign.RequestInterceptor
서비스간 통신에 모든 Http Request 헤더에 특정 api key 를 추가해야하는 등의 작업을 할 때 아래와 같이 feign.RequestInterceptor 객체를 스프링 빈으로 등록한다.
@Component
public class FeignClientInterceptor implements RequestInterceptor {
    private static final String API_KEY = "api-key";

    @Value("${api.key}")
    private String apiKey;

    // 모든 feign client 요청은 api-key 를 추가하여 전달
    @Override
    public void apply(RequestTemplate template) {
        template.header(API_KEY, apiKey);
    }
}
@RequestLine
@FeignClient 를 사용하면 Service Discovery 에서 서비스 목록을 읽어 loadbalancer 목록에 자동으로 Feign 객체들을 만들어 저장한다.
그리고 저장해둔 Feign 객체를 round robbin 형식으로 호출하는 구조이다.
@RequestLine 어노테이션을 사용하면 단순 URL 과 Feign 객체를 매핑해서 사용할 수 있다.
아래와 같이 @RequestLine 어노테이션을 가진 interface 를 정의
그리고 Feign.builder() 메서드를 사용해 Feign 객체를 만들면 된다.
public interface ProductRequestLine {
    @RequestLine("GET /product/{id}")
    Product findById(@Param("id") Long id);
}
// for rest json encode, decode
@Autowired
private ObjectFactory<HttpMessageConverters> messageConverters;

@GetMapping("/product/{productId}/line")
public Product getProdcutById(@PathVariable Long productId) {
    ProductRequestLine productService = Feign.builder()
        .encoder(new SpringEncoder(messageConverters))
        .decoder(new SpringDecoder(messageConverters))
        .target(ProductRequestLine.class, "http://localhost:8080/");
    Product result = productService.findById(productId);
    return result;
}
ProductRequestLine 인터페이스는 Feign.builder 메서드를 토행 리플렉션 되어 HardCodedTarget 객체로 반환되고 Http Request 를 수행하게 된다.
@FeignClient를 사용하면 이런Feign객체들이 로르밸런싱 될 수 있도록 여러개 저장되어 있다고 보면 된다.만약 좀더 세세한 jackson 처리가 필요하다면 아래 의존성을 추가해서
Encoder,Decoder를 재정의하면 된다.
implementation "io.github.openfeign:feign-jackson"
@RequestLine 를 사용하면 URL 을 직접 하드코딩해야 함으로 Client-side Load balancing 과는 거리가 멀어진다.
k8s service, aws load balancer 와 같은 기술과 함께 http://product-service DNS 기반 URL 을 사용해 클라우드 내부 컴포넌트에서 로르밸런싱 되도록 설정해야 한다.