스프링 시큐리티
로그인, 인증 등을 통해 어떤 사용자에게 페이지를 보여주고 보여주지 않고를 정하는 일은 매우 번거로운 일이다.
스프링에선 개발자를위한 간단한 보안 처리 라이브러리를 제공한다.
개발자가 보안관련 영역에 관여하는 것은 아래 3가지
- 인증처리 : 현재 사용자가 누구인지 확인하는 과정
- 인가처리 : 현재 사용하자가 특정 URL에 접근 가능한지 확인하는 과정
- UI처리 : 권한이 없는 사용자가 특정 URL에 접근했을 때 알맞은 에러화면을 보여주거나 인증화면으로 이동시키는 처리
우리는 3가지 항목에 대해 인증, 인가, UI처리를 해보도록 하자.
공지사항 목록보기 : 인증필요 없이 모든 사용자가 사용 가능
공지사항 상세보기 : 일반 사용자 인증 필요
공지사항 작성, 수정, 삭제 : 관리자 인증 필요
스프링 시큐리티 설정
스프링 시큐리티를 위한 jar파일들을 설치하기 위해
pom.xml에 아래 <dependency>를 3개를 추가하자.
<!-- 스프링 시큐리티 -->
<dependency>
  <groupId>org.springframework.security</groupId>
  <artifactId>spring-security-web</artifactId>
  <version>3.2.4.RELEASE</version>
</dependency>
<dependency>
  <groupId>org.springframework.security</groupId>
  <artifactId>spring-security-config</artifactId>
  <version>3.2.4.RELEASE</version>
</dependency>
<dependency>
  <groupId>org.springframework.security</groupId>
  <artifactId>spring-security-taglibs</artifactId>
  <version>3.2.4.RELEASE</version>
</dependency>
원활한 진행을 위해
<org.springframework-version>속성에4.0.4.RELEASE로 설정
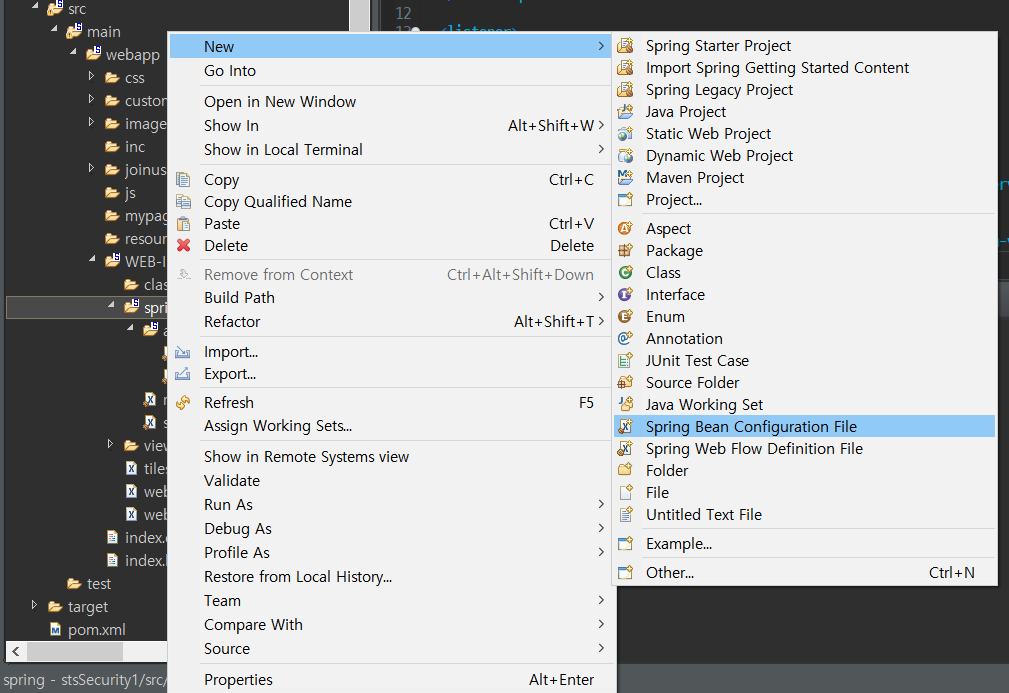
라이브러리를 추가했으면 보안관련 빈 객체를 생성하는 설정파일을 만들자.
/WEB-INF/spring/security-context.xml
Spring 프로젝트에서 xml파일을 만들때 아래 그림처럼 만들어보자.

<?xml version="1.0" encoding="UTF-8"?>
<beans
  xmlns="http://www.springframework.org/schema/beans"
  xmlns:xsi="http://www.w3.org/2001/XMLSchema-instance"
  xmlns:security="http://www.springframework.org/schema/security"
  xsi:schemaLocation="
  http://www.springframework.org/schema/beans
  http://www.springframework.org/schema/beans/spring-beans.xsd
  http://www.springframework.org/schema/security
  http://www.springframework.org/schema/security/spring-security-3.2.xsd">

</beans>
자동으로 사용할 라이브러리의 네임스페이스가 추가된 xml파일이 만들어진다.
<beans>태그에security네임스페이스 사용을 위한 설정이 자동 추가되어있다.
xml을 만들었으면 다음과 같이 web.xml에 스프링 시큐리티 설정파일을 포함시킨다.
<?xml version="1.0" encoding="UTF-8"?>
<web-app xmlns:xsi="http://www.w3.org/2001/XMLSchema-instance" xmlns="http://xmlns.jcp.org/xml/ns/javaee"
  xsi:schemaLocation="http://xmlns.jcp.org/xml/ns/javaee http://xmlns.jcp.org/xml/ns/javaee/web-app_3_1.xsd"
  metadata-complete="true" version="3.1">
  <context-param>
    <param-name>contextConfigLocation</param-name>
    <param-value>
    /WEB-INF/spring/service-context.xml
    /WEB-INF/spring/security-context.xml
    </param-value>
  </context-param>
  ...
  ...
security네임스페이스를 통해 사용하는 태그들을 하나씩 알아보자.
<security:http>, <security:intercept>
스프링 시큐리티의 핵심기능을 설정하는 태그이다.
특정 url에 접그하려면 어떤 권한이 필요한지, 로그인과정, 로그아웃 과정, 권한이 없어 접근 인가되지 않을경우 어떤 페이지로 이동시킬 것인지 모두 <security:http>, <security:intercept>태그로 설정한다.
<security:http> - 인증, 인가를 설정하는 태그
<security:intercept> - 인증이 필요한 페이지를 등록하고 해당하는 권한을 설정
<security:http auto-config="true">
  <security:intercept-url pattern="/customer/noticeDetail.htm" access="ROLE_USER"/>
  <security:intercept-url pattern="/customer/noticeReg.htm" access="ROLE_ADMIN"/>
  <security:intercept-url pattern="/customer/noticeEdit.htm" access="ROLE_ADMIN"/>
  <security:intercept-url pattern="/customer/noticeDelete.htm" access="ROLE_ADMIN"/>
</security:http>
pattern 속성 - 권한과 인증이 필요한 페이지 등록
pattern이기 때문에 ant패턴을 사용 가능하다.
access 속성 - 권한을 가진 롤 옵션 등록
위에선 단순 해당 권한이 있는지 검사하였지만 아래 표현식을 사용해 디테일한 설정이 가능하다.
access속성 표현식 목록
| Expression | Description |
|---|---|
hasRole([role])hasAuthority([role]) |
해당 권한을 가졌는지 검사 (생략한 것과 차이 없음) |
hasAnyRole([role1,role2])hasAnyAuthority([role1,role2]) |
지정한 권한중 하나라도 가졌는지 검사, 각 권한은 콤마로 구분 |
principal |
Allows direct access to the principal object representing the current user |
authentication |
Allows direct access to the current Authentication object obtained from the SecurityContext |
permitAll |
모두 허용 |
denyAll |
모두 거부 |
isAnonymous() |
임의 사용자인지 검사 |
isRememberMe() |
기억된 사용자인지 검사 |
isAuthenticated() |
인증된 사용자인지 검사, 기억된 사용자도 포함 |
isFullyAuthenticated() |
완전한 인증을 거친 사용자인지 검사(실제 로그인 과정을 거친 사용자) |
noticeDetail.htm - 일반 사용자(ROLE_USER) 접근 가능
noticeReg.htm, noticeEdit.htm, noticeDelete.htm - 관리자(ROLE_ADMIN) 접근가능
별도로
access속성이 추가되지 않은 url은 모든 사용자가 접근 가능하다.
<security:authentication-manager> - 테스트 계정 생성
간단한 테스트를 위해 DB에 접근해 사용자 로그인처리를 하는 것이 아니라
스프링 컨테이너(메모리상)에 계정 정보를 올리고 사용해보자.
<!-- security-context.xml -->
<?xml version="1.0" encoding="UTF-8"?>
<beans
  xmlns="http://www.springframework.org/schema/beans"
  xmlns:xsi="http://www.w3.org/2001/XMLSchema-instance"
  xmlns:security="http://www.springframework.org/schema/security"
  xsi:schemaLocation="
    http://www.springframework.org/schema/beans
    http://www.springframework.org/schema/beans/spring-beans.xsd
    http://www.springframework.org/schema/security
    http://www.springframework.org/schema/security/spring-security-3.2.xsd">

  <security:http auto-config="true">
		<security:intercept-url pattern="/customer/noticeDetail.htm" access="ROLE_USER"/>
		<security:intercept-url pattern="/customer/noticeReg.htm" access="ROLE_ADMIN"/>
		<security:intercept-url pattern="/customer/noticeEdit.htm" access="ROLE_ADMIN"/>
		<security:intercept-url pattern="/customer/noticeDelete.htm" access="ROLE_ADMIN"/>
	</security:http>

	<security:authentication-manager>
		<security:authentication-provider>
			<security:user-service>
				<security:user name="newlec" authorities="ROLE_USER" password="1234"/>
				<security:user name="admin" authorities="ROLE_ADMIN" password="qwer"/>
			</security:user-service>
		</security:authentication-provider>
	</security:authentication-manager>
</beans>
newlec 계정은 ROLE_USER 권한으로
admin 계정은 ROLE_ADMIN 권한으로 설정.
필터 설정
security-context.xml 설정이 끝났으면 web.xml에서 root Dispatcher에 security-context.xml등록해 모든 시큐리티 빈 객체를 공용으로 사용할 수 있도록 설정한다.
<?xml version="1.0" encoding="UTF-8"?>
<web-app xmlns:xsi="http://www.w3.org/2001/XMLSchema-instance" xmlns="http://xmlns.jcp.org/xml/ns/javaee"
  xsi:schemaLocation="http://xmlns.jcp.org/xml/ns/javaee http://xmlns.jcp.org/xml/ns/javaee/web-app_3_1.xsd"
  metadata-complete="true" version="3.1">
  <context-param>
    <param-name>contextConfigLocation</param-name>
    <param-value>
    /WEB-INF/spring/service-context.xml
    /WEB-INF/spring/security-context.xml
    </param-value>
  </context-param>

  <listener>
    <listener-class>
      org.springframework.web.context.ContextLoaderListener
    </listener-class>
  </listener>
  ...
  ...
  <filter>
    <filter-name>springSecurityFilterChain</filter-name>
    <filter-class>org.springframework.web.filter.DelegatingFilterProxy</filter-class>
  </filter>
  <filter-mapping>
    <filter-name>springSecurityFilterChain</filter-name>
    <url-pattern>/*</url-pattern>
  </filter-mapping>
</web-app>
그리고 DelegatingFilterProxy라는 필터 클래스가 등장한다.
DelegatingFilterProxy클래스는 보통 필터와 다르게 스프링 빈 객체를 필터로 쓰고싶을때 사용하는 클래스이다.
springSecurityFilterChain 이름의 스프링 빈 객체를 찾아 필터로 등록하는데 security-context.xml을 포함한 어떠한 xml에서도 springSecurityFilterChain 빈 객체를 생성한 적이 없다.
springSecurityFilterChain 빈 객체는 시큐리티 네임스페이스를 설정하는 과정에서 등록된다.
springSecurityFilterChain 빈 객체의 클래스 타입은 FilterChainProxy로 보안 관련 서블릿 필터(pom.xml에서 등록한 클래스)들을 여러개 묶어놓은 Proxy 객체이다.

어쨋건 여러개의 보안관련 서블릿 객체가 뭉칭 Proxy객체를 DelegatingFilterProxy를 통해 필터로 등록했으니 인가, 인증, UI 관련 보안처리에 대한 설정은 끝났다!
실제 테스트를 위해 /customer/noticeDetail.htm url로 <security:authentication-manager>에서 설장한 newlec 아이디로 로그인 해보자.
만든적도 없는 페이지가 띄어진다.
(심지어 로그인도 된다!)
/web/spring_security_login 이라는 페이지 url이 잡힌다.
이는 security-context.xml에서 설정한 <security:http auto-config="true">의 auto-config설정때문
스프링 시큐리티에서 기본적으로 제공하는 로그인 페이지가 설정된다.
우리가 만든 로그인 페이지로 사용하도록 <security:http>태그 속성을 바꾸자
그리고 security-context.xml은 스프링 시큐리티 설정만들어갈 것임으로 security네임스페이스를 생략할수 있게 설정하자.
원래는 beans가 네임스페이스 없이 사용되도록 아래와 같이 설정되어 있었다.
xmlns="http://www.springframework.org/schema/beans"
xmlns:security="http://www.springframework.org/schema/security"
이제 security를 생략할수 있도록 아래처럼 변경
xmlns:beans="http://www.springframework.org/schema/beans"
xmlns="http://www.springframework.org/schema/security"
<?xml version="1.0" encoding="UTF-8"?>
<beans:beans xmlns:beans="http://www.springframework.org/schema/beans"
	xmlns:xsi="http://www.w3.org/2001/XMLSchema-instance"
	xmlns="http://www.springframework.org/schema/security"
	xsi:schemaLocation="http://www.springframework.org/schema/beans
		http://www.springframework.org/schema/beans/spring-beans.xsd
		http://www.springframework.org/schema/security
		http://www.springframework.org/schema/security/spring-security-3.2.xsd">

	<!-- <http auto-config="true"> -->
	<http>
		<form-login login-page="/joinus/login.htm" authentication-failure-url="/joinus/login.htm?login_error"/>
		<intercept-url pattern="/customer/noticeDetail.htm" access="ROLE_USER"/>
		<intercept-url pattern="/customer/noticeReg.htm" access="ROLE_ADMIN"/>
		<intercept-url pattern="/customer/noticeEdit.htm" access="ROLE_ADMIN"/>
		<intercept-url pattern="/customer/noticeDelete.htm" access="ROLE_ADMIN"/>
	</http>

	<authentication-manager>
		<authentication-provider>
			<user-service>
				<user name="newlec" authorities="ROLE_USER" password="1234"/>
				<user name="admin" authorities="ROLE_ADMIN" password="qwer"/>
			</user-service>
		</authentication-provider>
	</authentication-manager>
</beans:beans>
기본 로그인 페이지를 바꾸기 위해 <form-login> 태그를 사용해야 한다.
<security:http>태그의 auto-config="true" 속성을 제거하고 <form-login>태그의 login-page속성을 통해 로그인페이지를 지정한다.
authentication-failure-url속성은 로그인 실패시 이동할 url주소이다.
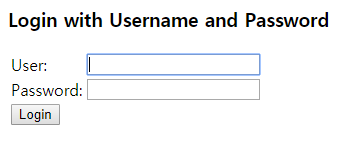
이제 로그인이 필요한 noticeDetail.htm 페이지로 접속해서 우리가 지정한 로그인 페이지 url /joinus/login.htm이 요청되면 성공이다.
그럼 사용자는 /joinus/login.jsp 파일 안에 <form>의 <input>태그들에 데이터를 집어넣고 submit 하면 springSecurityFilterChain 필터가 id와 pw를 받아 <authentication-manager>태그에 설정한 user와 일치하는지 검사해야 한다.
그럼 submit하는 주소와 id와 pw에 해당하는 <input>태그의 name 속성을 뭘로 줘야할까?
다음처럼 form태그의 action 속성과 input태그의 name속성값을 변경하자.
<form action='<c:url value="/j_spring_security_check" />' method="post">
  ...
  <input name="j_username" class="text" />
  ...
  <input type="password" name="j_password" class="text" />
  ...
</form>
submit주소와 파라미터 명을 j_...로 시작하는 <form-login>태그 속성의 기본값으로 설정하면 전달할 수 있다.
이 값들은 <form-login>태그 속성을 통해 변경할 수 있다.
<form-login> 속성
| 속성 | 설명 | 기본값 |
|---|---|---|
login-page |
로그인 페이지 주소를 지정 | /spring_security_login |
login-processing-url |
로그인 페이지 form action에 입력할 주소 지정 | /j_spring_security_check |
username-parameter |
로그인 페이지 form에 있는 username을 저장한 변수이름 지정 | j_username |
password-parameter |
로그인 페이지 form에 있는 password을 저장한 변수이름 지정 | j_password |
default-target-url |
로그인 성공인 경우 호출할 주소 지정 | / |
authentication-failure-url |
로그인 실패인 경우 호출할 주소 지정 | /spring_security_login?login_error |
로그아웃 주소와 로그아웃 후 이동 주소를 설정하고 싶으면 logout 태그를 수정
<logout logout-url="/survey/logout" logout-success-url="/survey/logout"/>
로그인 여부 판단, 로그아웃
JSP/servlet에선 session에 로그인 정보를 저장하고 이를 통해서 로그인 여부를 판단하였다.
그리고 session에서 이 정보를 지움으로 로그아웃 과정을 거쳤다.
스프링 시큐리티에서도 비슷한 기능을 지원한다.
스프링 시큐리티에선 로그인 정보는 request객체의 getUserPrincipal()메서드를 통해 request객체의 userPrincipal객체를 가져온다.
사용자가 로그인 했다면 Principal클래스의 userPrincipal객체가 존재할 것이다.
<c:if>태그를 통해 로그인 여부를 확인할 수 있다.
로그아웃 버튼의 경우 위 스프링 시큐리티 <form-login>의 로그아웃 기본값인 /j_spring_security_logout 사용.
<c:if test="${ empty pageContext.request.userPrincipal }">
  <a href="${ pageContext.request.contextPath }/joinus/login.htm">로그인</a>
</c:if>
<c:if test="${ not empty pageContext.request.userPrincipal }">
  <a href="<c:url value="/j_spring_security_logout" />">
  [${pageContext.request.userPrincipal.name}]로그아웃</a>
</c:if>
Principal객체 제공 메서드들
| 메소드 명 | 리턴 타입 | 설명 |
|---|---|---|
getAuthorities() |
Collection<? extends GrantedAuthority> |
계정이 갖고있는 권한 목록을 리턴한다. |
getPassword() |
String |
계정의 비밀번호를 리턴한다. |
getUsername() |
String |
계정의 이름을 리턴한다. |
isAccountNonExpired() |
boolean |
계정이 만료되지 않았는 지 리턴한다. (true: 만료안됨) |
isAccountNonLocked() |
boolean |
계정이 잠겨있지 않았는 지 리턴한다. (true: 잠기지 않음) |
isCredentialNonExpired() |
boolean |
비밀번호가 만료되지 않았는 지 리턴한다. (true: 만료안됨) |
isEnabled() |
boolean |
계정이 활성화(사용가능)인 지 리턴한다. (true: 활성화) |
로그아웃 성공시 이동하는 url을 설정하자.
<logout>태그를 사용해 설정할 수 있다.
<http>
		<form-login login-page="/joinus/login.htm" authentication-failure-url="/joinus/login.htm?login_error"
		default-target-url="/customer/notice.htm"/> <!-- 기본 로그인 url이동주소, 어디 이동중에 걸린거라면 그 위치로 가지만 -->
		<logout logout-success-url="/customer/notice.htm"/>
		<intercept-url pattern="/customer/noticeDetail.htm" access="ROLE_USER"/>
		<intercept-url pattern="/customer/noticeReg.htm" access="ROLE_ADMIN"/>
		<intercept-url pattern="/customer/noticeEdit.htm" access="ROLE_ADMIN"/>
		<intercept-url pattern="/customer/noticeDelete.htm" access="ROLE_ADMIN"/>
	</http>
spring-security-taglibs <s:authorize>태그
위에서 userPrincipal객체와 <c:if>태그를 통해 로그인 상태정보를 확인하였는데
로그인 상태정보 확인용 별도 태그가 있다. - <s:authorize>
이제 <c:if> 등으로 로그인 여부를 확인할 필요 없다.
<s:authorize>태그를 쓰려면 먼저 pom.xml에 다음 라이브러리가 추가되어 있어야 한다.
<dependency>
  <groupId>org.springframework.security</groupId>
  <artifactId>spring-security-taglibs</artifactId>
  <version>3.2.4.RELEASE</version>
</dependency>
<s:authorize>태그를 통해 단순 로그인 여부를 판단하는 것 보다 디테일한 설정이 가능하다.
먼저 jsp에서 s: 태그를 사용하기 위해 아래 태그 라이브러리 명시
<%@ taglib prefix="s" uri="http://www.springframework.org/security/tags"%>
<s:authorize ifNotGranted="ROLE_USER">
  <a href="${ pageContext.request.contextPath }/joinus/login.htm">로그인</a>
</s:authorize>

<s:authorize ifAnyGranted="ROLE_USER, ROLE_ADMIN">
  <s:authentication property="name" var="loginUser"/>
  <!-- loginUser식별자로 name값을 저장 -->
  <a href="<c:url value="/j_spring_security_logout" />">
  [${ loginUser }]로그아웃</a>
</s:authorize>
ifAllGranted - 모든 ROLE을 가지고 있어야 true
ifAnyGranted - ROLE중 하나만 가지고 있다면 true
ifNotGranted - 해당 ROLE이 없다면 true
security-config.xml에서 admin계정을 다음과 같이 설정했다.
<user name="admin" authorities="ROLE_ADMIN, ROLE_USER" password="qwer"/>
공지사항 글쓰기의 경우 admin만 가능하도록 설정해야 하기 때문에 ifAllGranted속성을 사용해 ROLE_ADMIN, ROLE_USER 두가지 권한을 모두 가지고 있는 계정만 글쓰기 a태그가 보이도록 설정해보자.
<s:authorize ifAllGranted="ROLE_ADMIN, ROLE_USER">
  <a class="btn-write button" href="noticeReg.htm">글쓰기</a>
</s:authorize>
로그인한 사용자 정보는 html 문서에서도 자주 사용되지만
컨트롤러나 DAO 클래스에서도 많이 사용된다. 누그 글쓰기 했는지, 댓글을 남겼는지 등
UserDetails user = (UserDetails) SecurityContextHolder.getContext().getAuthentication().getPrincipal();
notice.setWriter(user.getUsername());
Principal객체를UserDetails로 다운캐스팅하였는데 둘의 차이점은 사실상 없다… (제공 메서드 똑같음)
SecurityContextHolder를 통해 Principal 객체를 가져와도 되지만
메서드의 매개변수로 Principal를 넣으면 자동으로 초기화 된다.
public String noticeReg( ..., Principal principal) {
  ...
  ...
  notice.setWriter(principal.getName());
  ...
}
DB와 연동한 로그인 처리
이제 <security:authentication-manager>로 스프링 컨테이너에서 사용하는 계정이 아니라
실제 DB에서 가져온 정보를 가지고 로그인 처리를 해보자.
로그인 처리를 위해선 DB 칼럼명이 username, password 로 되어있어야 하고
사용여부 칼럼인 enalbled가 있어야 한다.(0, 1값을 가지는 칼럼)
그리고 각 계정에 대한 권한이 설정된 테이블이 있어야 한다.
<userid - ROLE...>
원래는 member테이블의 칼럼명이 username, password이여야 하지만 member테이블의 칼럼명은 그렇지 않다…
그리고 사용여부인 enabled칼럼이 있어야 하지만 칼럼이 없다.
alias와 상수값을 통해 비슷하게 구현하자.
또한 계정별로 권한이 있는 authority테이블이 있어야 하지만 없음으로 대충 member테이블로 authority테이블을 흉내내보자.
기존의 <authentication-manager> 설정을 아래와 같이 변경.
<authentication-manager>
  <authentication-provider>
    <jdbc-user-service data-source-ref="dataSource"
    users-by-username-query="
    SELECT id as username, pwd as password, 1 as enabled
    FROM member
    WHERE id = ?
    "
    authorities-by-username-query="
    SELECT id as username,
        CASE WHEN id='admin'THEN 'ROLE_ADMIN'
              ELSE 'ROLE_USER'
        END as authority
      FROM member
      WHERE id = ?"
    />
  </authentication-provider>
</authentication-manager>
users-by-username-query속성을 통해 로그인 처리를 한다.
항상 username, password, enabled 칼럼이 순서대로 와야한다.
authorities-by-username-query속성으로 권한인증을 한다.
WHERE id = ?의 ?값은 항상 id값이 들어가야 한다.
소스파일: https://github.com/Kouzie/Kouzie.github.io/blob/master/_posts/Spring/stsSecurity1.zip
스프링 시큐리티 구조
위에서 간단한 속성으로 스프링 시큐리티 사용방법을 알아봤는데 위에 내용 가지고는 제대로된 로그인 처리를 할 수 없다.
테이블명도 고정으로 사용해야할 뿐더러 로그인 성공시 어떤 작업을 수행하고 싶거나, 실패시에 특정 작업을 수행할 때
스프링 시큐리티 구조를 파악해야한다.
Authentication
먼저 가장 기본이 되는 시큐리티 객체는 Authentication이다.
수많은 스프링 시큐리티 구조의 각종 클래스가 로그인 작업을 수행하고 결과값으로 나오는 것이 Authentication
public interface Authentication extends Principal, Serializable
보면 Principal를 상속받고 있다. Principal은 시스템을 사용하려고 하는 사용자, 디바이스 혹은 시스템을 통칭한다.
어쨋건 Principal보다는 Authentication이 여러 과정을 거쳐 만들어진 더 상위의 개념이다.
Authentication 제공메서드 목록
| 메서드명 | 반환값 | 설명 |
|---|---|---|
getUsername() |
String |
주체의 이름을 리턴한다. |
getAuthorities() |
Collection<? extends GrantedAuthority> |
주체가 갖고있는 권한 목록을 리턴한다. |
getCredentials() |
String |
주체의 증명되는 값을 반환, 주로 비밀번호. |
getPrincipal() |
Object |
주체를 표현하는 객체를 구한다. |
getDetails() |
Object |
주체의 상세정보, IP 등의 정보를 저장하는 용도로 사용 |
setAuthenticated(boolean authenticated) |
void |
인증 여부를 설정 |
getAuthorities가 반환하는 GrantedAuthority은
String getAuthority(); 메서드 하나 정의되어 있는 인터페이스이다. 단순 문자열로된 권한을 저장하기 위해 설계된 클래스
new SimpleGrantedAuthority("USER_ROLE") 을 사용해 권한을 생성할 수 있다.
SecurityContextHolder,SecurityContext
만들어진Authentication을 보관하는 클래스
Authentication authentication = SecurityContextHolder.getContext().getAuthentication();
위와 같은 코드로 불러올 수 있다.
앞으로 알아가야할 객체들….
ProviderManager, AuthenticationManager
AuthenticationProvider, DaoAuthenticationProvider
UserDetailService, UserDetailsManager, JdbcUserDetailsManager
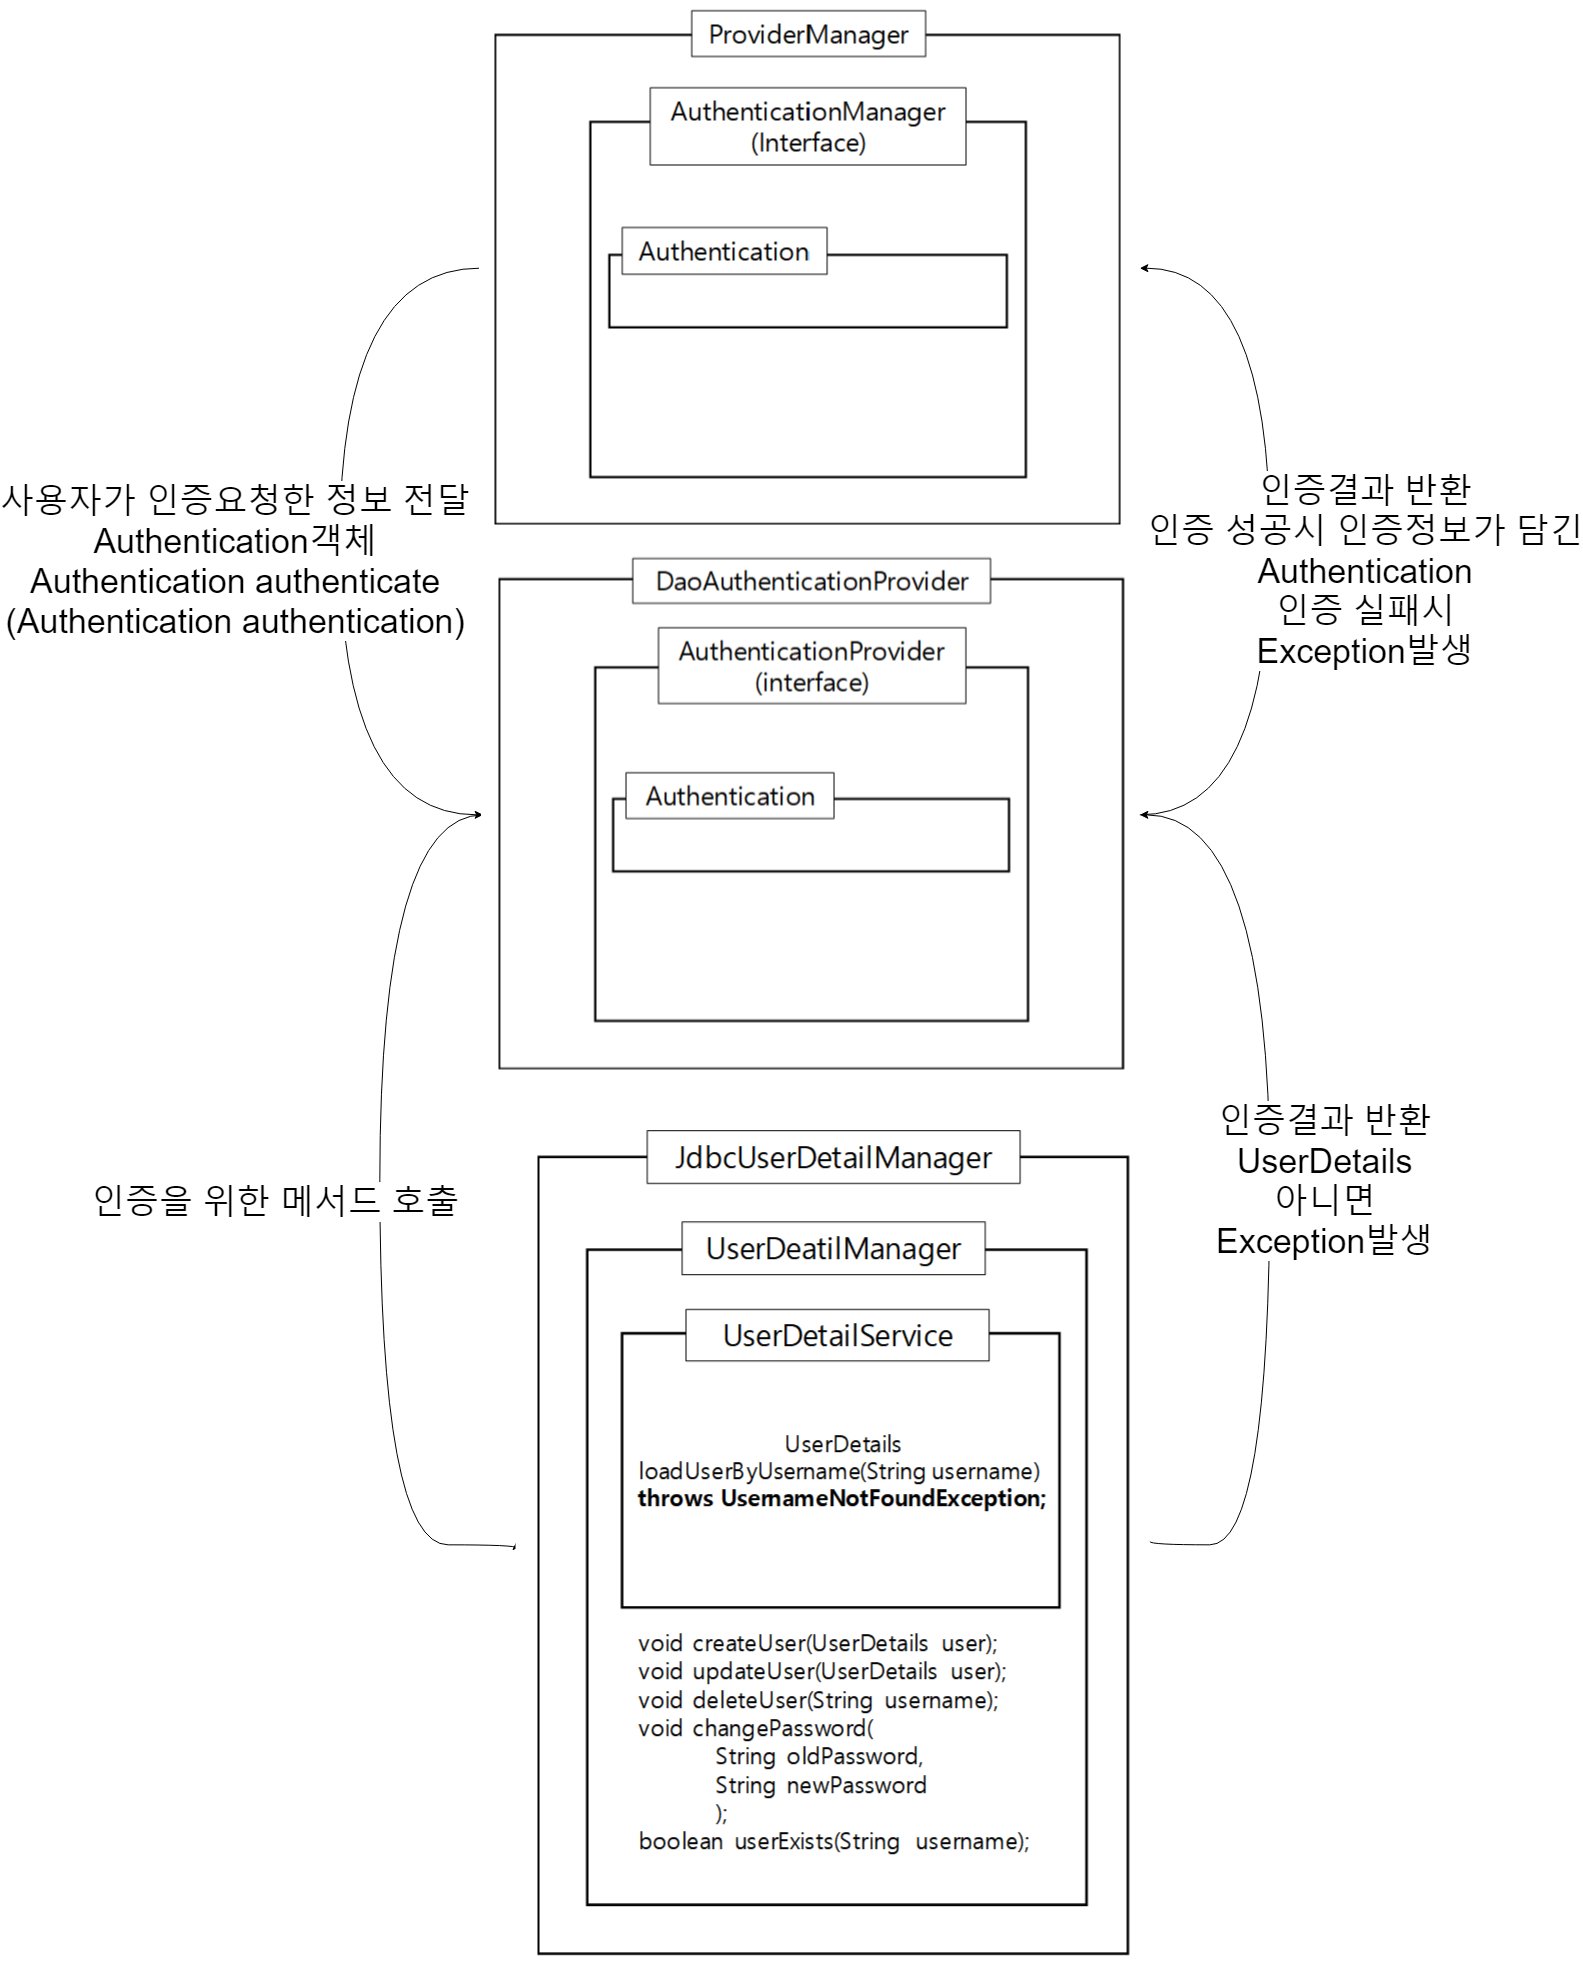
AuthenticationManager, ProviderManager
스프링 시큐리티에선 사용자 인증시 AuthenticationManager 인터페이스를 사용,
Authentication authentication(Authentication authentication); 메서드를 통해 인증에 성공하면 인증정보를 담은 Authentication객체를 반환한다.
...Manager들은 인증객체를 요청하고 만들어진 인증객체를 반환하기만 한다. (정말 매니저….)
보통 사용자ID, PW를 사용해 인증을 하기 때문에 UsernamePasswordAuthenticationToken라는 Authentication에 인증정보가 저장된 구현체를 사용한다.
실제 인증시에는 AuthenticationManager 인터페이스를 구현하는 ProviderManager 사용해 인증하는데
인증 로직이 담긴 AuthenticationProvider를 사용한다.
즉 사용자가 입력한 인증정보를 담아 ProviderManager에게 넘기면 AuthenticationProvider가 인증된객체를 돌려주거나
예외를 돌려주거나 한다.
단순 ID, PW비교하기 싫다면 AuthenticationProvider를 구현한 커스텀Provider를 작성해줘야 한다.
AuthenticationProvider, DaoAuthenticationProvider
DB에서 Id, Pw를 읽어와 단순 로그인 처리를 한다면 DaoAuthenticationProvider만 있으면 된다.
시큐리티 빈 객체를 만들 때 아래태그를 사용하였는데
<jdbc-user-service data-source-ref="dataSource"...
이게 DaoAuthenticationProvider를 사용하겠단 뜻이다.
AuthenticationProvider는 인증객체를 생성만 하고 인증과정은 아래의 UserDetailService에서 수행한다.
UserDetailsService, UserDetailsManager, JdbcUserDetailsManager
이녀석들이 실제 DB와 연결해서 인증과정을 거치는 인터페이스와 클래스이다.
UserDetailsService에 loadUsersByUsername메서드가 정의되어 있는데 Id를 사용해 사용자를 검색하는 메서드이다.
사용자가 검색되면 UserDetails 클래스가 반환되고 UserDetails의 getPassword()메서드를 호출해 패스워드를 비교한다.
이과정중 하나라도 실패하면 예외가 발생되어 차례대로 건너가 AuthenticationManager가 받게된다.
그럼 결국 로그인 실패처리…
UserDetailsManager은 UserDetailsService인터페이스를 상속하는 인터페이스고 사용자 추가, 변경, 삭제 등의 작업을 할 수 있는 메서드가 정의되어 있다.
UserDetailsManager를 구현한 JdbcUserDetailsManager 클래스로 실제 DB와 연결해 사용자 추가, 변경, 삭제 메서드가 구현되어 있다.
간단한 그림