스프링MVC
기존에 JSP/Servlet에서 사용하던 Model2패턴 MVC와
스프링 프레임워크에서 사용하는 MVC 여러 차이점이 있다.
JSP/Servlet | Spring Framework
|—|—|
Controller | Front Controller
Handler | Controller
View | View
Spring에선 보통 maven 빌드관리를 사용한 프로젝트를 생성하지만 전체적인 구조를 알기 위해 먼저 eclipse에서 Dynamic web project로 스프링 프레임워크를 사용해보자.
스프링 MVC 구성 요소
| 요소 | 역할 |
|---|---|
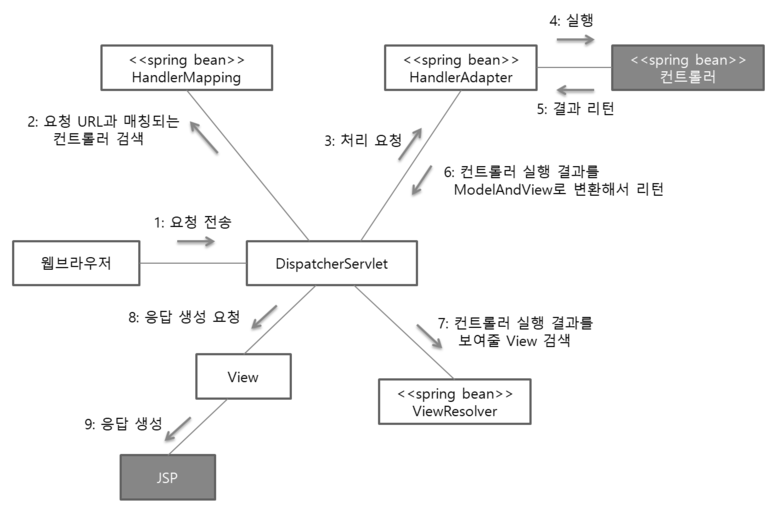
DispatcherServlet |
브라우저가 보낸 요청을 일괄 관리하는 FrontController, 결과값을 view에 전달하여 알맞은 응답을 생성.View에 전달하여 알맞은 응답을 생성하도록 한다. |
HandlerMapping |
요청URL과 Controller클래스를 맵핑 |
HandlerAdapter |
DispatcherServlet의 처리 요청을 변환해서 컨트롤러에게 전달하고, 컨트롤러의 응답 결과를 DispatcherServlet이 요구하는 형식으로 변환한다, 웹 브라우저 캐시 등의 설정도 담당(실제 일을 시키는 역할) |
Controller(컨트롤러) |
클라이언트의 요청을 처리(비즈니스 로직-Service을 호출), 결과를 리턴한다. 응답 결과에서 보여줄 데이터를 모델에 담아 전달한다. |
ModelAndView |
컨트롤러가 처리한 결과 정보 및 뷰 선택에 필요한 정보를 담는다. |
ViewResolver |
컨트롤러 클래스가 반환한 뷰 이름으로 이동할 뷰를 결정, 컨트롤러의 처리 결과를 보여줄 뷰를 결정한다. |
View(뷰) |
JSP를 이용하여 웹브라우저에 컨트롤러의 처리 결과 화면을 생성한다. |
스프링 MVC를 위한 설정을 web.xml에 추가하기
스프링 MVC를 사용하기 위해 아래 기본 설정은 반드시 설정되고 개발과정이 시작된다.
- web.xml에 DispatcherServlet 설정
- web.xml에 캐릭터 인코딩 처리 위한 필터 설정
- 스프링 MVC 설정
A. Handlermapping, HandlerAdapter 설정
B. ViewResolver 설정
web.xml에 DispatcherServlet 설정
java 프로젝트에선 xml설정파일 혹은 자바코드 설정파일과 GenericXmlApplicationContext, AnnotationConfigApplicationContext 객체를 통해 스프링 컨테이너를 생성했다면
웹 프로젝트에선 org.springframework.web.servlet.DispatcherServlet 객체를 통해 스프링 컨테이너를 생성한다.
<?xml version="1.0" encoding="UTF-8"?>
<web-app
	xmlns:xsi="http://www.w3.org/2001/XMLSchema-instance"
	xmlns="http://xmlns.jcp.org/xml/ns/javaee"
	xsi:schemaLocation="http://xmlns.jcp.org/xml/ns/javaee
		http://xmlns.jcp.org/xml/ns/javaee/web-app_3_1.xsd"
	metadata-complete="true"
	version="3.1">
	<display-name>Spring Web Project</display-name>
	<description>
		Welcome to Tomcat
	</description>
	<servlet>
		<servlet-name>dispatcher</servlet-name>
		<servlet-class>org.springframework.web.servlet.DispatcherServlet</servlet-class>
		<load-on-startup>1</load-on-startup>
	</servlet>
	<servlet-mapping>
		<servlet-name>dispatcher</servlet-name>
		<url-pattern>*.htm</url-pattern>
	</servlet-mapping>
</web-app>
dispatcher란 이름으로 서블릿 객체를 생성하였는데 스프링 컨테이너를 생성할 때 필요한 설정파일의 이름이 DispatcherServlet 객체를 생성할 때 사용한 식별자 이름을 사용해야 한다.
dispatcher란 이름을 사용하면 스프링 컨테이너 생성시 필요한 설정파일을 dispatcher-servlet.xml 이란 xml파일로 관리한다.
/WEB-INF/안에 위치한[서블릿이름]-servlet.xml파일
만약 설정파일을 1개 이상 사용하고 싶거나 설정 파일명을 식별자에 따르게 하고 싶지 않다면 다음과 같이 설정.
...
...
<servlet>
	<servlet-name>dispatcher</servlet-name>
	<servlet-class>org.springframework.web.servlet.DispatcherServlet</servlet-class>
	<load-on-startup>1</load-on-startup>
</servlet>
<servlet-mapping>
	<servlet-name>dispatcher</servlet-name>
	<url-pattern>*.htm</url-pattern>
</servlet-mapping>
<init-param>
	<param-name>contextConfigLocation</param-name>
	<param-value>
		/WEB-INF/contextConfig1.xml
		/WEB-INF/contextConfig2.xml
		/WEB-INF/contextConfig3.xml
	</param-value>
</init-param>
...
...
<param-value> 태그에서 xml경로를 설정할 때 구분자로 콤자, 공백, 탭, 개행, 세미콜론 을 사용할 수 있다.
dispatcher를 위한 xml설정파일을 다음과 같이 설정
contextConfigLocation라는 파라미터를 쓰면, Context Loader가 load할 수 있는 설정파일을 여러개 쓸 수 있다.
dispatcher-servlet.xml는spring-framework-3.0.2.RELEASE\docs\spring-framework-reference\pdf파일에서 450페이지로 참고
```xml <?xml version=”1.0” encoding=”UTF-8”?>
형식은 java프로젝트에서 사용하던 xml형식과 같다.(`<bean>`태그로 스프링 빈 객체 생성, `<property>`태그로 의존설정 등)

만약 `dispatcher-servlet.xml`과 같은 xml설정파일이 아닌 자바 코드기반 설정파일을 `DispatcherServlet`객체 생성시 설정파일로 사용하고 싶다면 `web.xml`에 아래와 같이 설정

```xml
<!-- web.xml -->
<servlet>
	<servlet-name>dispatcher</servlet-name>
	<servlet-class>org.springframework.web.servlet.DispatcherServlet</servlet-class>
	<load-on-startup>1</load-on-startup>
</servlet>
<servlet-mapping>
	<servlet-name>dispatcher</servlet-name>
	<url-pattern>*.htm</url-pattern>
</servlet-mapping>
<init-param>
	<param-name>contextClass</param-name>
	<param-value>org.springframework.context.annotation.AnnotationConfigApplicationContext</param-value>
</init-param>
<init-param>
	<param-name>contextConfigLocation</param-name>
	<param-value>config.ConfigLocation</param-value>
</init-param>
DispatcherServlet은 기본적으로 스프링 컨테이너를 생성할 때 설정을 통해 사용할 구현 클래스로 org.springframework.web.context.support.XmlWebApplicationContext을 사용하는데 이를 @Configuration 어노테이션을 사용한 자바코드 설정파일로 구현하고 싶다면 구현클래스를 위와같이 org.springframework.context.annotation.AnnotationConfigApplicationContext 클래스로 바꿔 주어야 한다.
스프링 CharacterEncodingFilter
JSP/Servlet에선 http프로토콜을 요청받는 문자열 인코딩을 utf-8로 사용하기 위해 별도로 CharacterEncodingFilter 필터클래스를 생성해 샤용 하였다.
https://kouzie.github.io/jsp/JSP-필터/#webxml에-필터-매핑
스프링 프레임워크에서 CharacterEncodingFilter를 제공함으로 web.xml에 설정만 하면 된다.
<?xml version="1.0" encoding="UTF-8"?>
<web-app xmlns:xsi="http://www.w3.org/2001/XMLSchema-instance"
	xmlns="http://xmlns.jcp.org/xml/ns/javaee"
	xsi:schemaLocation="http://xmlns.jcp.org/xml/ns/javaee
		http://xmlns.jcp.org/xml/ns/javaee/web-app_3_1.xsd"
	metadata-complete="true" version="3.1">
	...
	...
	<filter>
		<filter-name>encodingFilter</filter-name>
		<filter-class>org.springframework.web.filter.CharacterEncodingFilter</filter-class>
		<init-param>
			<param-name>encoding</param-name>
			<param-value>UTF-8</param-value>
		</init-param>
	</filter>
	<filter-mapping>
		<filter-name>encodingFilter</filter-name>
		<url-pattern>/*</url-pattern>
	</filter-mapping>
	...
	...
</web-app>
스프링 MVC 설정 파일 작성
JSP/Servlet에서는 하나의 작업(글쓰기, 글목록 보기, 글 상세 보기 등)에 하나의 핸들러가 매칭되서 작업했었다.
https://kouzie.github.io/jsp/JSP-MVC패턴/#커맨드-패턴-기반-컨트롤러
CommandHandler라는 인터페이스를 구현한 핸드러들은process()메서드를 오버라이딩 하고 이동할view파일명을 전달한다.
스프링도 위와 같이 하나의 작업에 하나의 컨트롤러를 등록해 사용할 수 있다.
스프링에선 행위를 처리하는 객체를 컨트롤러라 부른다.
핸들러 → 컨트롤러
<!-- dispatcher-servlet.xml -->
<?xml version="1.0" encoding="UTF-8"?>
<beans xmlns="http://www.springframework.org/schema/beans"
	...
	...>
   <bean id="noticeDao" class="newlecture.dao.NoticeDao"></bean>
   <bean name="/customer/notice.htm" class="controllers.customer.NoticeController">
     <property name="noticeDao" ref="noticeDao"></property>
   </bean>
   <bean name="/customer/noticeDetail.htm" class="controllers.customer.NoticeDetailController">
     <property name="noticeDao" ref="noticeDao"></property>
   </bean>
</beans>
글목록보기와 글 상세보기가 정의되어 있는 컨트롤러 클래스이다.
게시글 DB연결 관련 메서드를 사용하기 위해 NoticeDao 객체를 의존설정한다.
dispatcher-servlet.xml가 위와 같이 설정되어 있었는데 NoticeController, NoticeDetailController는 다음과 같이 정의되어 있다.
public class NoticeController implements Controller{
	private NoticeDao noticeDao;
	public void setNoticeDao(NoticeDao noticeDao) {
		this.noticeDao = noticeDao;
	}

	@Override
	public ModelAndView handleRequest(HttpServletRequest request, HttpServletResponse response) throws Exception {
		String p_page = request.getParameter("pg");
		String p_field = request.getParameter("field");
		String p_query = request.getParameter("query");

		int page = 1;
		String field = "title";
		String query = "%%";

		if( p_page != null && !p_page.equals(""))
			page= Integer.parseInt(p_page);

		if( p_field != null && !p_field.equals(""))
			field= p_field;

		if( p_query != null && !p_query.equals(""))
			query=  "%"+p_query+"%";

		ModelAndView mv = new ModelAndView("notice.jsp");
		mv.addObject("test", "Hello, SpringMVC");
		List<Notice> list = this.noticeDao.getNotices(page , field, query);
		mv.addObject("list", list);
		return mv;
	}
}
public class NoticeDetailController implements Controller{

	private NoticeDao noticeDao;
	public void setNoticeDao(NoticeDao noticeDao) {
		this.noticeDao = noticeDao;
	}

	@Override
	public ModelAndView handleRequest(HttpServletRequest request, HttpServletResponse response) throws Exception {
		 String seq = request.getParameter("seq");
		 Notice notice = this.noticeDao.getNotice(seq);
		 ModelAndView mv= new ModelAndView("noticeDetail.jsp");
		 mv.addObject("notice", notice);
		return mv;
	}
}
모두 org.springframework.web.servlet.mvc.Controller란 인터페이스와 handleRequest메서드를 구현하고 있는데
<bean name="/customer/notice.htm" ...> 빈 객체 name 속성에 설정된 url 패턴에 해당하는 작업을 수행하는 컨트롤러 임을 의미한다.
또한 ModelAndView객체에 이동할 view 파일 설정, view페이지에서 출력할 list혹은 notice객체를 포함시켜 반환한다.
Controller를 구현해 하나의 작업에 하나의 컨트롤러를 작성하게 되면 나중에 컨트롤러 클래스가 많아지며 관리가 어려워 진다.
@Controller을 사용한 컨트롤러 구현 과정
@Controller애노테이션을 클래스에 적용@RequestMapping애노테이션을 이용해서 처리할 요청 경로 지정- 웹 브라우저의 [요청을 처리할 메소드(컨트롤러 메소드)]를 구현하고, 뷰 이름 리턴
스프링 프레임워크에선 @Controller, @RequestMapping 어노테이션과 Model객체를 통해 하나의 메서드로 하나의 작업을 처리할 수 있다.
컨트롤러 클래스를 작업당 하나씩 만들지 않아도 되기 때문에 관리가 수월해진다.
@Controller어노테이션이 적용된 클래스 안의 메서드를 컨트롤러 메서드라 한다.
@Controller
@RequestMapping("/customer/*")
public class CustomerController {
	private NoticeDao noticeDao;

	@Autowired
	public void setNoticeDao(NoticeDao noticeDao) {
		this.noticeDao = noticeDao;
	}

	//상세보기
	@RequestMapping("noticeDetail.htm")
	public String noticeDetail(HttpServletRequest request, HttpServletResponse response)
	throws ClassNotFoundException, SQLException {
		int req = Integer.parseInt(request.getParameter("req"));
		Notice notice = this.noticeDao.getNotice(seq);
		requset.setAttribute("notice", notice);
		return "noticeDetail.jsp";
	}


	@RequestMapping("notice.htm")
	public String notices(HttpServletRequest request, HttpServletResponse response) throws ClassNotFoundException, SQLException {
		int p_page = Integer.parseInt(requset.getParameter("page"));
		String p_field = requset.getParameter("field");
		String p_query = requset.getParameter("query");

		int page = 1;
		String field = "title";
		String query = "%%";

		if( p_page != null && !p_page.equals(""))
			page= Integer.parseInt(p_page);

		if( p_field != null && !p_field.equals(""))
			field= p_field;

		if( p_query != null && !p_query.equals(""))
			query=  "%"+p_query+"%";

		List<Notice> list = this.noticeDao.getNotices( page , field, query);
		requset.setAttribute("list", list);
		return "notice.jsp";
	}
}
위의 예제를 보면 클래스명 위에 @Controller에 더불어 @RequestMapping("/customer/*") 어노테이션이 적용되어 있다.
그리고 밑의 컨트롤러 메서드에는 @RequestMapping("notice.htm") 괄호안에 마지막 url패턴만 정의되어 있다.
즉 웹context/customer/notice.htm 형식의 url패턴이 들어오면 @RequestMapping("/customer/*")가 지정되어 있는 컨트롤러 클래스 CustomerController 안의 @RequestMapping("notice.htm")가 지정되어 있는 컨트롤러 메서드가 notices() 호출되어 요청을 처리하고 notice.jsp 뷰 페이지로 이동 시킨다.
return "notice.jsp"이 되어있는데 @RequestMapping("/customer/*")로 설정된 컨트롤러 클래스에서 반환된 값이기 때문에 뷰 페이지도 /WebContent/customer 폴더 아래에 있는 notice.jsp파일을 호출한다.
뷰페이지, ViewResolver
보안적인측면을 위해 외부에서 바로 접근하지 못하는 /WEB-INF 폴더에 jsp파일들을 넣어놓는다.
이를 위해 반환된 문자열 앞에 /WEB-INF/view/ 을 붙여야 하는데 @RequestMapping("/customer/*")은 url매핑도 겸하고 있음으로 변경할 수 없다.
JSP/Servlet에서는 커맨드 컨트롤러에 prefix와 suffix를 사용해 앞 뒤에 뷰 페이지 경로를 붙여 완전한 경로를 완성했는데
스프링 프레임워크에서도 xml설정을 통해 prefix와 suffix를 반환된 뷰 페이지 문자열에 붙일 수 있다.
<mvc:annotation-driven />
<bean id="viewResolver" class="org.springframework.web.servlet.view.InternalResourceViewResolver">
  <property name="prefix" value="/WEB-INF/view" />
  <!-- <property name="suffix" value=".jsp" /> -->
</bean>
웹context/customer/notice.htm 형식으 url패턴이 들어오면 notice.jsp 문자열을 반환하고 이는 @RequestMapping("/customer/*")을 통해 /customer/notice.jsp으로 변경된다.
그리고 xml에 설정된 ViewResolver를 통해 /WEB-INF/view/customer/notice.jsp으로 변경된다.
서블릿 매핑에 따른 컨트롤러 경로 매핑, 디폴트 서블리 설정
JSP/Servlet에선 컨트롤러가 url패턴을 잡기 위해 뒤에 .do, .ad 등의 의미없는 확장자 같은 문자열을 붙여 요청을 컨트롤러가 캐치하였는데
웹 개발 초기에는 위와같은 방식을 자주 사용했지만 최근에는 확장자 방식을 사용하기 보다 의미에 맞는 URL을 사용하는 방법을 주로 사용한다.
기존에 아래와 같이 url패턴을 설정했다면
http://localhost/springMVC2/customer/notice.do
http://localhost/springMVC2/customer/notice.do?notice_seq=10
최근에는 아래와 같이 url패턴을 사용한다.
http://localhost/springMVC2/customer/notice/list
http://localhost/springMVC2/customer/notice/10
위와같은 url매핑을 사용하려면 아래와 같이 DispatcherServlet 프론트 컨트롤러에 url매핑해줘야 한다.
<servlet>
	<servlet-name>dispatcher</servlet-name>
	<servlet-class>org.springframework.web.servlet.DispatcherServlet</servlet-class>
	<load-on-startup>1</load-on-startup>
</servlet>
<servlet-mapping>
	<servlet-name>dispatcher</servlet-name>
	<url-pattern>/customer/*</url-pattern>
</servlet-mapping>
/customer/* 처럼 url-parttern을 사용했다면 @RequestMapping을 통해 컨트롤러 메서드와 url을 매핑시킬 때는 customer을 제외해야 한다.
만약 /customer/notice/list url패턴을 처리하는 컨트롤러 메서드를 만들고 싶다면 @RequestMapping를 아래와 같이 설정
@RequestMapping("/notice/list")
| 요청 URL | 서블릿 매핑 URL 패턴 | 컨트롤러 매핑 경로 |
|---|---|---|
/SpringContext/notice/list.do |
/notice/* |
/list.do |
/SpringContext/notice/list.do |
*.do |
/notice/list.do |
/SpringContext/noticeDetail |
/noticeDetail |
/noticeDetail |
위와 같은 컨트롤러 매핑경로는 혼란이 많은데 그냥 모든 url경로를 사용해 컨트롤러 메서드에 매핑하고 싶다면 아래
실제 웹 사이트를 만들때 /customer url패턴 외에도 여러 경로의 url패턴이 생길 것인대 이를 일일이 <url-pattern>으로 지정하는 것은 너무 귀찮은 일이다.
DispatcherServlet 의 url매핑 경로로 전체 매핑경로를 사용하면 전체경로를 매핑경로로 사용할 수 있다. <url-pattern>/</url-pattern>
하지만 위와같이 설정하면 .js, .css 등 여러 파일도 DispatcherServlet에 걸리게 되는데 이를 처리하는 컨트롤러 메서드가 없으면 스타일과 자바스크립트가 사이트에 적용되지 않는다…
그렇다고 수많은 스타일 시트, 자바스크립트 파일 위치를 반환시키는 컨트롤러 메서드를 정의할 수 도 없다.
Jsp/Serviet에선 이를 처리하기 위한 방법이 있지 않지만 Spring에선 디폴트 서블릿 객체를 통해 처리 가능하다.
@PathVariable
경로변수로 URL을 통해 파라미터를 전달할 때 ? 가 아닌 url경로를 통해 매개변수값을 지정하여 넘길 수 있다.
@RequestMapping(value="/all/{bno}", method=RequestMethod.GET)
public ResponseEntity<List<ReplyVO>> list(@PathVariable("bno") int bno) {
	...
	...
}
url 경로에 bno값을 포함시켜 입력하면 @PathVariable어노테이션을 이용해 파라미터로 사용할 수 있다.
@RequestMapping을 이용한 요청 매핑
위에선 간단히 컨트롤러 클래스에는 @RequestMapping("/customer/*") 설정을
컨트롤러 메서드에는 @RequestMapping("notice.htm") 설정을 적용하였다.
이 외에 @RequestMapping 어노테이션을 통해 어떻게 url매핑을 할 수 있는지 알아보자.
여러개의 url패턴을 하나의 컨트롤러 메서드로 처리
String배열 형식으로 어노테이션 괄호안에 값을 지정한다.
@RequestMapping({"/notice.htm", "/noticeDetail.htm"})
public String sampleMethod(...) {
	...
	...
}
http 전송방식(post, get)에 따른 컨트롤러 메서드 지정
url매핑과 method설정을 같이 하고 싶다면 value, method속성을 사용하자.
@RequestMapping(value="/noticeReg.htm", method="RequestMethod.GET")
public String sampleMethodGet(...) {
	...
	...
}
@RequestMapping(value="/noticeReg.htm", method="RequestMethod.POST")
public String sampleMethodPost(...) {
	...
	...
}
배열 형식으로 value 속성을 설정해도 된다.
@RequestMapping( value={ "noticeReg.htm"}, method=RequestMethod.GET )
최근에 REST API가 많이 사용되며 HTTP데이터로 JSON이나 XML데이터를 전송하는 일이 많아졌다.
웹 브라우저에서 폼을 전송할 때 사용하는 application/x-www-form-urlencoded 외에
ajax를 통해 JSON 데이터를 전송할 떄 사용하는 application/json
xml데이터를 전송할 때 사용하는 application/xml 과 같은 정보가 헤더에 포함되어 서버로 전달되는데
@RequestMapping의 consumes속성을 사용하면 이를 구분해서 컨트롤러 메서드에 매핑 가능하다.
@RequestMapping( value={ "noticeReg.htm"}, method=RequestMethod.GET, consumes="application/json")
@RequestMapping( value={ "noticeReg.htm"}, method=RequestMethod.GET, consumes="application/xml")
Ant 패턴을 이용한 경로 매핑
@RequestMapping 매핑의 경로를 설정할 때 Ant패턴을 사용해 url패턴을 잡아낸다.
Ant패턴은 다음 3가지 특수문자를 이용해 경로 표시
-
-
- 0개 또는 그이상의 글자
-
- ? - 1개 이상의 글자
- ** - 0개 또는 그이상의 디렉토리 경로
@RequestMapping("/member/?*.info")
/member/로 시작하고 확장자가 .info로 끝나는 모든 경로
@RequestMapping("/faq/f?00.fq)
/faq/경로의 1글자가 f와 0사이에 위치하는 모든 경로
@RequestMapping("/folder/**/files)
/folder/로 시작해서 /files로 끝나는 모든 경로
컨트롤러 메서드 주요 파라미터
MVC 구조에선 model이 처리한 결과(데이터)를 view에서 출력해야 하는데
데이터를 받고 넘기는 방법이 여러가지 있다.
컨트롤러 메서드의 파라미터와 리턴값을 통해 여러 방법으로 요청 파라미터를 받고 view로 결과를 넘기는데 하나씩 알아보자.
| 파라미터 | 설명 |
|---|---|
HttpServletRequest, HttpServletResponse |
요청/응답 처리를 위한 서블릿 API |
Httpsession |
HTTP세션을 위한 서블릿 API |
Model, ModelMap, Map |
뷰에 데이터를 전달하기 위한 모델 |
@RequestParam |
HTTP 요청 파라미터 값 |
@RequestHeader, @CookieValue |
요청 헤더와 쿠키값 |
@PathVariable |
경로변수 |
커맨드 객체 |
요청 데이터를 저장할 객체 |
Errors, BindingResult |
검증 결과를 보관할 객체, 커맨드 객체 바로뒤에 일치해야함 |
@RequestBody (파라미터에 적용) |
요청 몸체를 객체로 반환, 요청 몸체의 JSON이나 XML을 알마게 객체로 변환 |
Writer, OutputStream |
응답 결과를 직접 쓸 때 사용할 출력 스트림 |
위에선 HttpServletRequest, HttpServletResponse 객체를 통해 뷰에 표시할 데이터를 담아 전달했지만
스프링 프레임 워크에선 이 외에도 많은 방법이 있다.
@RequestMapping("notice.htm")
public String notices(HttpServletRequest request, HttpServletResponse response, Model model)
throws ClassNotFoundException, SQLException {
	int p_page = Integer.parseInt(requset.getParameter("page"));
	String p_field = requset.getParameter("field");
	String p_query = requset.getParameter("query");

	int page = 1;
	String field = "title";
	String query = "%%";

	if( p_page != null && !p_page.equals(""))
		page= Integer.parseInt(p_page);

	if( p_field != null && !p_field.equals(""))
		field= p_field;

	if( p_query != null && !p_query.equals(""))
		query=  "%"+p_query+"%";

	List<Notice> list = this.noticeDao.getNotices( page , field, query);
	// requset.setAttribute("list", list);
	model.addAttribute("list", list);
	return "notice.jsp";
}
Model의 주요 함수
Model addAttribute(String attrName, Object attrValue)
이름이 attrName이고 값이 attrValue인 모델 속성을 추가한다. 반환값이 Model이기 때문에 체인처럼 연결해 추가 가능
Model addAllAttribute(Map)
맵 콜렉션을 사용해 속석을 추가, 마찬가지로 Model을 반환.
boolean containsAttribute(String attrName)
attrName을 가진 모델 속성이 있는지 boolean값으로 반환.
ModelMap의 경우 Model객체의 자식 클래스로 부모 클래스의 함수를 그대로 사용 가능하다.
차이는 인터페이스, 구현 클래스 차이….
@RequestParam 어노테이션
@RequestParam 어노테이션을 통해 HttpServletRequest의 getParameter()메서드를 사용하지 않고 요청 파라미터를 구할 수 있다.
@RequestMapping("noticeDetail.htm")
public String noticeDetail(HttpServletRequest request, HttpServletResponse response, Model )
throws ClassNotFoundException, SQLException {
	int req = Integer.parseInt(request.getParameter("req"));
	Notice notice = this.noticeDao.getNotice(seq);
	requset.setAttribute("notice", notice);
	return "noticeDetail.jsp";
}
그저 req라는 파라미터 하나 받는 일인데 request부터 형변환, getParameter 메서드 호출까지 하는일이 너무 많다.
@RequestParam 어노테이션을 사용하면 코드를 많이 생략할 수 있다.
@RequestMapping("noticeDetail.htm")
public String noticeDetail(@RequestParam("req") int req, Model model)
throws ClassNotFoundException, SQLException {
	Notice notice = this.noticeDao.getNotice(req);
	model.addAttribute("notice", notice);
	return "noticeDetail.jsp";
}
만약 파라미터로 받은 값을
@RequestParam을 통해 형변환 불가능 할 경우 400 error을 반환한다.
@RequestParam에는 value, required, defaultValue 속성이 있다.
value는 파라미터명을 지정할 때 사용하며 required는 파라미터가 넘어오지 않더라도 오류발생하지 않도록 하는 설정이다.
public String search(@RequestParam(value="req", required=false) String req) {...}
당연히 값이 넘어오지 않으면 req는 null로 초기화된다.
(기본형의 경우 null로 초기화 할 수 없으니 조심)
defaultValue속성의 경우 값이 넘어오지 않을경우 기본값을 설정하는 속성이다.
public String search(@RequestParam(value="req", required=false, defaultValue="10") String req) {...}
null검사를 생략하기 때문에 페이징 처리 등에서 유용하게 사용된다.
Httpsession
Httpsession 객체를 받기 위해 request.getSession() 메서드를 사용했는데
스프링MVC에선 파라미터로 받을 수 있다.
단 HttpServletRequest의 getSession(false) 메서드는 매개변수로 false를 넣으면 기존에 session이 존재하지 않았다면 null을 반환한다.
스프링MVC를 통해 매개변수로 Httpsession객체를 받으면 기존에 존재하지 않을경우 생성해서 반환한다.
만약 세션 존재 유무에 따른 코딩을 해야한다면 HttpServletRequest을 사용하도록 하자.
커맨드 객체
회원가입을 받기 위해 아래와 같은 form태그를 사용할 때
<form action="">
	이메일: <input type="text" name="email"/>><br>
	이름: <input type="text" name="name"/><br>
	암호: <input type="text" name="pw1"/><br>
	암호확인: <input type="text" name="pw2"/><br>
</form>
보통은 request객체를 이용해 개별적으로 요청 파라미터를 받는다.
String email = requset.getParameter("email");
String name = requset.getParameter("name");
String pw1 = requset.getParameter("pw1");
String pw2 = requset.getParameter("pw2");
하지만 스프링 MVC에선 넘어오는 파라미터 명과 같은 이름을 가진 필드들을 가지고 있는 클래스와
클래스 안에 get, set 메서드가 정의되어 있다면 위와 같은 번거로운 작업을 할 필요 없다.
public class MemberRequest {
	private String email;
	private String name;
	private String pw1;
	private String pw2;

	//get, set 메서드....
}
위와 같이 넘어오는 파라미터명과 똑같은 이름을 가진 필드로 설정한 클래스를 정의하고
컨트롤러 메서드 매개변수로 그냥 MemberRequest를 사용하면 자동으로 요청 파라미터로 초기화된 객체가 매개변수로 넘어온다.
@RequestMapping("member_join.htm")
public String member_join(MemberRequest member) throws ClassNotFoundException, SQLException {
	...
	...
	return "index.jsp";
}
또한 이렇게 초기화된 커맨드 객체는 뷰에 전달할 모델에 자동 포함된다.
모델 식별자로 MemberRequest클래스중 앞글자만 소문자로 변환되어 memberRequest으로 뷰에서 사용 가능하다.
만약 클래스명이 너무 길거나 복잡에 모델명으로 사용하고 싶지 않다면 @ModelAttribute어노테이션을 사용하자.
@RequestMapping("member_join.htm")
public String member_join(@ModelAttribute("mem") MemberRequest member) throws ClassNotFoundException, SQLException {
	...
	...
	return "index.jsp";
}
@ModelAttribute 어노테이션은 모델명 지정외에도 공통 모델 처리가 가능하다.
@Controller
@RequestMapping("/event/*")
public class EventController {

	@ModelAttribute("recEventList")
	public List<Event> recommend() {
		return eventService.getRecommendedEventList();
	}

	@RequestMapping("/list")
	public String list(Model model) {
		List<Event> eventList = eventService.getOpenedEventList();
		model.addAttribute("eventList", eventList);
		return "event/list";
	}

	@RequestMapping("/detail")
	public String list(Model model) {
		...
		...
		return "event/detail";
	}
}
/event/list요청이 오던 /event/detail요청이 오던 상관없이 eventService.getRecommendedEventList() 메서드가 반환하는 List<Event> 객체를 사용하고 싶을 때 @ModelAttribute("recEventList")를 사용해 list.jsp, detail.jsp에서 recEventList모델을 사용할 수 있다.
컨트롤러 메서드 주요 리턴 타입
| 리턴 타입 | 설명 |
String |
뷰 이름 |
void |
컨트롤러에서 응답을 직접 작성 |
ModelAndView |
모델과 뷰 정보를 함께 리턴 |
객체 |
메서드에 @RequestBody가 적용된 경우 리턴 객체를 JSON이나 XML과 같은 알맞은 응답으로 반환 |
리다이렉트 처리
Jsp/Servlet에선 HttpServletResponse의 sendRedirect()메서드를 통해 클라이언트에게 리다이렉트 응답을 했는데
스프링 MVC에선 redirect: 접두어를 리다이렉트 주소 앞에 붙여 응답한다.
ex) return "redirect:/main";
접두어 뒤에 완전한 url을 사용할 수 있다.
return "redirect:https://kouzie.github.io";
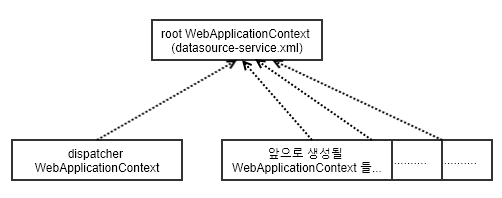
WebAppliactionContext 계층
AppliactionContext는 스프링 컨테이너를 생성하고 접근하는 객체가 상속하는 클래스이다.
스프링 컨테이너는 빈객체를 생성해 나가는 일종의 공장같은 개념으로 여러개의 스프링 컨테이너가 생길 수 있고 계층관계를 가질 수 도 있다.
웹 프로젝트에선 AppliactionContext으로 스프링 컨테이너를 생성, 관리하지 않고 DispatcherServlet을 사용해 스프링 컨테이너를 생성, 관리했는데
웹 프로젝트에선 DispatcherServlet를 여러개 생성 가능하다. 물론 각 DispatcherServlet에 해당하난 xml설정파일이 있어야 한다.
이렇게 만들어진 여러개의 DispatcherServlet에서 생성된 빈 객체 끼리는 별도 설정 없이는 서로 접근이 불가능하다.
당연히 서로 접근해야 하는 경우가 발생하는데 DAO나 DB 템플릿 객체 같은 것이 이에 해당된다.
굳이 여러개의 DispatcherServlet에 각각 만들어줄 필요가 없는 클래스들이 각각의 DispatcherServlet에 공유되어야 하는데 이를 위해 사용하는 것이 WebAppliactionContext 계층 개념이디.
이런 이유로 서로 접근할 통로를 만들기 위해 부모역할을 하는 root AppliactionContext을 사용하는데
root AppliactionContext는 ContextLoaderListener 을 사용해 만들 수 있다.
<!-- web.xml -->
<?xml version="1.0" encoding="UTF-8"?>
<web-app xmlns:xsi="http://www.w3.org/2001/XMLSchema-instance"
	xmlns="http://xmlns.jcp.org/xml/ns/javaee"
	xsi:schemaLocation="http://xmlns.jcp.org/xml/ns/javaee http://xmlns.jcp.org/xml/ns/javaee/web-app_3_1.xsd"
	metadata-complete="true"
	version="3.1">
  <display-name>Welcome to Tomcat</display-name>
  <description>Welcome to Tomcat</description>
  <servlet>
		<servlet-name>dispatcher</servlet-name>
		<servlet-class>org.springframework.web.servlet.DispatcherServlet</servlet-class>
		<load-on-startup>1</load-on-startup>
  </servlet>
  <servlet-mapping>
    <servlet-name>dispatcher</servlet-name>
    <url-pattern>*.htm</url-pattern>
  </servlet-mapping>
</web-app>
web.xml을 위와같이 설정하면 dispatcher-servlet.xml 파일을 찾아 DispatcherServlet 객체를 생성한다.
xml파일의 이름을 지정하고 싶다면
<init-param>태그 사용
<!-- dispatcher-servlet.xml -->
<?xml version="1.0" encoding="UTF-8"?>
<beans
  xmlns="http://www.springframework.org/schema/beans"
  xmlns:xsi="http://www.w3.org/2001/XMLSchema-instance"
  xmlns:p="http://www.springframework.org/schema/p"
  xmlns:context="http://www.springframework.org/schema/context"
  xsi:schemaLocation=" http://www.springframework.org/schema/beans
	http://www.springframework.org/schema/beans/spring-beans-3.0.xsd
	http://www.springframework.org/schema/context
	http://www.springframework.org/schema/context/spring-context-3.0.xsd">

	<context:component-scan base-package="controllers, newlecture"/>
  <bean id="multipartResolver" class="org.springframework.web.multipart.commons.CommonsMultipartResolver">
    <property name="maxUploadSize" value="-1"></property>
  </bean>

  <bean id="dataSource" class="org.springframework.jdbc.datasource.DriverManagerDataSource">
    <property name="driverClassName" value="oracle.jdbc.driver.OracleDriver"></property>
    <property name="username" value="scott"></property>
    <property name="password" value="tiger"></property>
    <property name="url" value="jdbc:oracle:thin:@172.17.107.68:1521:xe"></property>
  </bean>
  <bean id="jdbcTemplate" class="org.springframework.jdbc.core.JdbcTemplate">
    <constructor-arg>
      <ref bean="dataSource" />
    </constructor-arg>
  </bean>
</beans>
파입 업로드를 위한 multipartResolver, DB연동을 위한 dataSource객체와 jdbcTemplate 템플릿 객체.
그리고 component-scan을 통해 자동 생성되는 여러개의 빈 객체들…
앞으로 여러개의 DispatcherServlet 객체가 생성된다 했을 때 데이터베이스 연동을 위한 dataSource과 jdbcTemplate은 앞으로 생길 DispatcherServlet에 각각 하나씩 가지고 있을 필요 없이
모든 DispatcherServlet가 하나의 객체로 공유하면 된다.
즉 DB연동 객체를 가지는 DispatcherServlet 를 따로 분리해보자.
DB연동 객체는 모든 DispatcherServlet 객체에서 접근 가능해야 함으로 root AppliactionContext에서 빈 객체로 생성할 것 이다.
먼저 기존의 dispatcher-servlet.xml 파일에서 DB연관 서블릿 객체를 모두 지우고
<!-- dispatcher-servlet.xml -->
<?xml version="1.0" encoding="UTF-8"?>
<beans
  xmlns="http://www.springframework.org/schema/beans"
  xmlns:xsi="http://www.w3.org/2001/XMLSchema-instance"
  xmlns:p="http://www.springframework.org/schema/p"
  xmlns:context="http://www.springframework.org/schema/context"
  xsi:schemaLocation=" http://www.springframework.org/schema/beans
	http://www.springframework.org/schema/beans/spring-beans-3.0.xsd
	http://www.springframework.org/schema/context
	http://www.springframework.org/schema/context/spring-context-3.0.xsd">

	<context:component-scan base-package="controllers, newlecture"/>
  <bean id="multipartResolver" class="org.springframework.web.multipart.commons.CommonsMultipartResolver">
    <property name="maxUploadSize" value="-1"></property>
  </bean>
</beans>
따로 DB연동 객체를 생성하는 xml설정파일을 생성
<!-- datasource-service.xml -->
<?xml version="1.0" encoding="UTF-8"?>
<beans xmlns="http://www.springframework.org/schema/beans"
  xmlns:xsi="http://www.w3.org/2001/XMLSchema-instance"
  xmlns:p="http://www.springframework.org/schema/p"
  xmlns:context="http://www.springframework.org/schema/context"
  xsi:schemaLocation="
  http://www.springframework.org/schema/beans
  http://www.springframework.org/schema/beans/spring-beans-3.0.xsd
  http://www.springframework.org/schema/context
  http://www.springframework.org/schema/context/spring-context-3.0.xsd">
  <bean id="dataSource" class="org.springframework.jdbc.datasource.DriverManagerDataSource">
    <property name="driverClassName" value="oracle.jdbc.driver.OracleDriver"></property>
    <property name="url" value="jdbc:oracle:thin:@172.17.107.68:1521:xe"></property>
    <property name="username" value="scott"></property>
    <property name="password" value="tiger"></property>
  </bean>
  <bean id="jdbcTemplate" class="org.springframework.jdbc.core.namedparam.NamedParameterJdbcTemplate">
    <constructor-arg ref="dataSource"></constructor-arg>
  </bean>
</beans>
이제 web.xml에서 root AppliactionContext 용 Dispatcher객체를 생성하고 root AppliactionContext안의 빈 객체를 사용할 Dispatcher를 만들면 된다.
<?xml version="1.0" encoding="UTF-8"?>
<web-app xmlns:xsi="http://www.w3.org/2001/XMLSchema-instance" xmlns="http://xmlns.jcp.org/xml/ns/javaee" xsi:schemaLocation="http://xmlns.jcp.org/xml/ns/javaee http://xmlns.jcp.org/xml/ns/javaee/web-app_3_1.xsd" metadata-complete="true" version="3.1">
  <display-name>Welcome to Tomcat</display-name>
  <description>
     Welcome to Tomcat
  </description>
  <context-param>
    <param-name>contextConfigLocation</param-name>
    <param-value>
      /WEB-INF/datasource-service.xml
    </param-value>
  </context-param>
  <listener>
    <listener-class>
      org.springframework.web.context.ContextLoaderListener
    </listener-class>
  </listener>

  <servlet>
    <servlet-name>dispatcher</servlet-name>
    <servlet-class>org.springframework.web.servlet.DispatcherServlet</servlet-class>
    <load-on-startup>1</load-on-startup>
  </servlet>
  <servlet-mapping>
    <servlet-name>dispatcher</servlet-name>
    <url-pattern>*.htm</url-pattern>
  </servlet-mapping>
</web-app>
<context-param>태그와 <listener>태그를 통해 root AppliactionContext를 만든다.
컨테이너에 설정되는 컨텍스트 파라미터 contextConfigLocation에 <param-value> 태그안의 적혀있는 xml파일들을 집어넣어 공용으로 사용할 빈객체들을 생성한다.
위 xml 설정대로라면 지금은 총 2개의 WebAppliactionContext(스프링 컨테이너)가 생겼다.
아직 만들어지지 않았지만 앞으로 만들어지는 WebAppliactionContext 객체들도 root AppliactionContext이 제공하는 DB연결 객체를 사용할 수 있다.