AOP (Aspect Oriented Programming)
Aspect Oriented Programming 관점 지향적 프로그래밍 기법
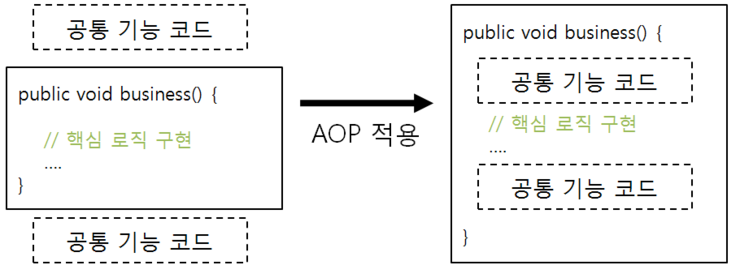
우리가 게시판을 만들때 글쓰기, 혹은 댓글쓰기 기능을 수행하기 전에 로그인 인증과정을 거쳐야 가능하도록 설정하는데 이런 기능 관점으로 프로그래밍 하는 것을 뜻한다.
jsp/servlet에선 글쓰기 작업을 하기 전에 로그인 인증과정을 거치려면 필터를 사용하거나 핸들러에서 로그인 인증과정을 거치는 코딩을 처음에 위치하도록 해야한다.
로그인 인증과정을 거치는 과정이 글쓰기 하나뿐이면 상관없지만 계속 늘어난다면 필터를 쓰지 않고는 중복코드가 계속 늘어난다.
이러한 중복 코드를 제거하기 위해 필터를 사용하는데
물론 스프링에서도 필터를 사용해도 되지만 AOP를 사용하면 좀더 구조적으로(유지보수 쉽게) 처리 가능하다.
스프링에서 모든 기능은 핵심 비지니스 로직과 공통 기능으로 나뉜다.
로그인 인증과정 같이 중복되고 공통적으로 사용되는 기능을 공통 기능이라 하며 cross-cutting concern(공통 관심사항)이라 표현한다.
이런 공통 기능을 AOP에서 어떻게 처리하는지 알아보자.
AOP 주요 용어
| 용어 | 의미 |
|---|---|
Aspect |
여러 객체에 공통적으로 적용되는 기능을 Aspect라 한다. 인증, 트랜잭션, 보안 과 같은 공통적 기능을 의미한다. |
Advice |
공통적으로 사용되는 기능(Aspect)를 핵심 로직에 언제 적용하는지, 시점을 의미한다(핵심기능 시작 전, 후, 예외발생시 등). |
JoinPoint |
Advice를 적용 가능한 지점을 의미한다. 핵심 기능과 공통 기능이 어느지점에서 만나는지를 의미하며 메서드 호출, 필드값 변경 지점을 의미한다. |
Pointcut |
많은 JoinPoint중에 실제 핵심기능과 보조기능이 접하게 되는 지점을 Pointcut이라 한다. JoinPoint의 부분집합을 Pointcut이라 할 수 있다. |
Weaving |
프로그래머가 설정한 Advice대로 Aspect를 핵심로직 코드에 적용하는 것, 행위를 뜻한다. |
구현되는 Advice의 종류
| Advice명 | 설명 | 사용 클래스 |
|---|---|---|
Before Advice |
핵심기능 전에 수행하는 공통 기능 (로그인 체크 등) | MethodBeforeAdvice |
Around Advice |
핵심기능 수행 전 후에 수행하는 고통 기능 (시간 체크 등) | MethodInterceptor |
After Returning Advice |
예외 발생이 없을 경우 수행하는 기능 | AfterReturningAdvice |
After Throwing Advice |
예외 발생할 경우 수행하는 기능 | ThrowsAdvice |
After Advice |
예외 발생 상관없이 핵심기능 수행 후 수행하는 공통 기능 |
공통기능이 핵심기능 어느시점에 실행 되는지에 따라 위 5가지 Advice를 택해야 한다.
여러개의 Advice를 하나의 핵심 기능에 적용시켜도 상관 없다.
Weaving하는 시점
AOP는 꼭 스프링에서만 사용하는 개념이 아니며 다음 3가지 시점에 Weaving(적용)한다.
- 컴파일시
- 클래스 로딩시
- 런타임시
스프링 프레임워크에선 3번째 방법인 런타임시에 Weaving할 수 있는데 Proxy기반의 AOP이다.
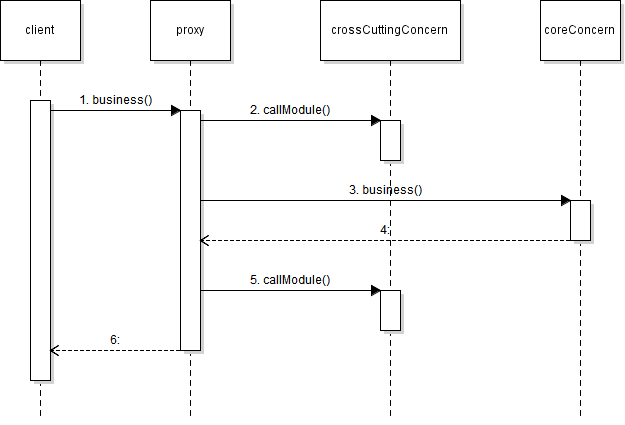
crossCuttingConcern: 공통 관심사항
coreConcern: 핵심 기능
핵심 기능을 하는 클래스, 보조(공통)기능을 하는 클래스가 있으면 따로 2개의 클래스가 올라가고
가상으로 만들어진 프로그래머가 설정한 대로 위의 여러 클래스(핵심, 보조 클래스들)가 짬뽕(Weaving)된 Proxy(가짜)클래스가 만들어진다.
이러한 Proxy 클래스를 만드는 방법은 다음 3가지가 있다.
- XML스키마 기반의 POJO 클래스를 이용한 AOP구현
- AspectJ에서 정의한 @Aspect 어노테이션 기반의 AOP구현
- 스프링API를 이용한 AOP구현
이중 XML스키마를 이용한 1번과 어노테이션을 사용한 2번을 알아보자
Proxy 객체 만들어보기
위의 3가지 방법은 스프링에서 제공하는 기능을 이용해 Proxy클래스를 만드는 것 인데
어떻게 Proxy 클래스가 만들어지는지 알기 위해 라이브러리를 사용하지 않고 Proxy 클래스를 만들어 보자.
먼저 계산기 뼈대를 가진 Calculator 인터페이스 작성
public interface Calculator {
    int add(int x, int y);
    int sub(int x, int y);
    int mult(int x, int y);
    int div(int x, int y);
}
그리고 이를 구현한 CalcultorImpl 클래스 작성
@Component
public class CaculatorImpl implements Calculator {

    @Override
    public int add(int x, int y) {
        int result = x + y; return result;
    }
    @Override
    public int sub(int x, int y) {
        int result = x - y; return result;
    }
    @Override
    public int mult(int x, int y) {
        int result = x * y; return result;
    }
    @Override
    public int div(int x, int y) {
        int result = x / y; return result;
    }
}
@Component어노테이션은 당연히 스프링 빈으로 등록하기 위한 설정…
public static void main(String[] args) {
    Calculator calc = new CaculatorImpl();
    System.out.println(calc.add(4,2));
    System.out.println(calc.sub(4,2));
}
출력값
6
2
핵심기능이 계산기 기능을 하는 연산과정이다.
공통기능으로 핵심기능이 처리되는 시간을 로그로 기록하도록 설정하자.
@Override
public int add(int x, int y) {
    Log log = LogFactory.getLog(this.getClass());
    StopWatch sw = new StopWatch();
    log.info("add() start");
    sw.start();
    int result = x + y;
    sw.stop();
    log.info("add() stop");
    log.info("add() 처리시간: " + sw.getTotalTimeMillis());
    return result;
}

@Override
public int sub(int x, int y) {
    Log log = LogFactory.getLog(this.getClass());
    StopWatch sw = new StopWatch();
    log.info("sub() start");
    sw.start();
    int result = x - y;
    sw.stop();
    log.info("sub() stop");
    log.info("sub() 처리시간: " + sw.getTotalTimeMillis());
    return result;
}
6월 19, 2019 8:00:43 오후 CaculatorImpl add
정보: add() start
6월 19, 2019 8:00:43 오후 CaculatorImpl add
정보: add() stop
6월 19, 2019 8:00:43 오후 CaculatorImpl add
정보: add() 처리시간: 0
6
6월 19, 2019 8:00:43 오후 CaculatorImpl sub
정보: sub() start
6월 19, 2019 8:00:43 오후 CaculatorImpl sub
정보: sub() stop
6월 19, 2019 8:00:43 오후 CaculatorImpl sub
정보: sub() 처리시간: 0
2
모든 함수에 위와 같은 코드를 추가시키는 것이 부담스럽다…
로그출력같은 공통적인 보조업무를 빼서 Proxy 클래스를 만들어 보자
InvocationHandler 인터페이스를 상속한 LogPrintHandler클래스를 정의해 공통 기능을 구현한 보조클래스와 핵심 기능이 합쳐진 proxy 클래스를 만들어보자.
public class LogPrintHandler implements InvocationHandler {
    private Object target;
    public LogPrintHandler(Object target) {
        this.target = target;
    }
    @Override
    public Object invoke(Object proxy, Method method, Object[] args) throws Throwable {
        Log log = LogFactory.getLog(this.getClass());
        StopWatch sw = new StopWatch();
        log.info(method.getName() + "() start"); //method 이름을 가져오는 메서드
        sw.start();
        int result = (int) method.invoke(target, args);
        sw.stop();
        log.info(method.getName() + "() stop");
        log.info(method.getName() + "() 처리시간: " + sw.getTotalTimeMillis());
        return result;
    }
}
Spring AOP과정에서 위와같은 LogPrintHandler와 같은 Proxy클래스가 생기게 된다 보면 된다.
public static void main(String[] args) {
    Calculator target = new CaculatorImpl();
    Calculator calc_proxy = (Calculator)Proxy.newProxyInstance(
            target.getClass().getClassLoader(),
            target.getClass().getInterfaces(),
            new LogPrintHandler(target));
    System.out.println(calc_proxy.add(1, 2));
}
6월 19, 2019 3:13:52 오후 aop.LogPrintHandler invoke
정보: add start
6월 19, 2019 3:13:52 오후 aop.LogPrintHandler invoke
정보: add stop
6월 19, 2019 3:13:52 오후 aop.LogPrintHandler invoke
정보: add 처리시간: 0
3
스프링 라이브러리를 사용해 Proxy객체 생성
스프링의 AOP기능을 사용하기 위해 먼저 다음 jar파일을 build path에 추가하자.
C:\Class\SpringClass\spring-framework-3.0.2.RELEASE-dependencies\org.aopalliance\com.springsource.org.aopalliance\1.0.0\com.springsource.org.aopalliance-1.0.0.jar
목표는 add메서드 실행 전 로그기록, 실행 후 로그기록, 소요시간 로그 기록이다.
즉 핵심 기능 전 후 에 실행되는 공통 기능인 Around Advice클래스를 만들자.
Around Advice기능을 가진 Proxy클래스를 정의하려면 먼저 공통기능 클래스를 정의하기 위한 MethodInterceptor 인터페이스를 구현해야한다.
@Component
public class LogPrintAroundAdvice implements MethodInterceptor{
    @Override
    public Object invoke(MethodInvocation method) throws Throwable {
        String m_name = method.getMethod().getName();
        Log log = LogFactory.getLog(this.getClass());
        StopWatch sw = new StopWatch();
        log.info(m_name + " start");
        sw.start();
        Object result = method.proceed();
        sw.stop();
        log.info(m_name + " stop");
        log.info(m_name + " 처리시간: " + sw.getTotalTimeMillis());
        return result;
    }
}
Around Advice을 통해 핵심기능 함수 실행문으로 들어온 후 시작 바로후, 끝나기 바로 전에 공통기능 삽입이 가능하다.
만약 핵심기능 실행 전, 혹은 후에 공통기능을 먼저 삽입하고 싶다면,
핵심기능 수행전 매개변수, 핵심기능 수행 후 반환값을 사용해 공통 기능을 수행해야 한다면
Before Advice 역할을 하는 MethodBeforeAdvice 인터페이스를 구현,
After Returning Advice역할을 하는 AfterReturningAdvice 인터페이스를 구현한 공통 기능 클래스를 정의해야 한다.
@Component
public class LogPrintBeforeAdvice implements MethodBeforeAdvice {

    @Override
    public void before(Method method, Object[] args, Object target) throws Throwable {
        String m_name = method.getName();
        Log log = LogFactory.getLog(this.getClass());
        log.info(">>>  " + m_name + "() : BeforAdvice called...");
    }
}
@Component
public class LogPrintAfterReturningAdvice implements AfterReturningAdvice{

    @Override
    public void afterReturning(Object returnValue, Method method, Object[] args, Object target) throws Throwable {
        // 수행이 완료된 후 호출되는 Advice임으로 첫번째 매개변수로 method가 반환한 값이 들어간다.
        String m_name = method.getName();
        Log log = LogFactory.getLog(this.getClass());
        log.info("<<<  " + m_name + "() : AfterReturningAdvice called...");
    }
}
위와 같이 AOP 기법을 사용한 공통 기능 클래스를 모두 정의하였으면 xml을 통해 핵심기능 클래스와 공통기능 클래스를 하나의 Proxy클래스로 만들어주면 된다.
<?xml version="1.0" encoding="UTF-8"?>
<beans xmlns="http://www.springframework.org/schema/beans"
    xmlns:xsi="http://www.w3.org/2001/XMLSchema-instance"
    xsi:schemaLocation="http://www.springframework.org/schema/beans
    http://www.springframework.org/schema/beans/spring-beans-3.0.xsd"
    >
    <context:component-scan base-package="aop"/>
    <!-- Calculator proxy = (Calculator)Proxy.newProxyInstance(
                target.getClass().getClassLoader(),
                target.getClass().getInterfaces(),
                new LogPrintHandler(target)); 이 과정과 같다.-->
    <bean id="proxy" class="org.springframework.aop.framework.ProxyFactoryBean">
        <property name="target"><!-- ProxyFactoryBean의 setTarget() 메서드 호출 -->
            <ref bean="calc"/>
        </property>
        <property name="proxyInterfaces"><!-- ProxyFactoryBean의 setProxyInterfaces() 메서드 호출 -->
            <list>
                <value>aop.Calculator</value>
            </list>
        </property>
        <property name="interceptorNames"><!-- ProxyFactoryBean의 setInterceptorNames() 메서드 호출 -->
            <list>
                <value>logPrintAroundAdvice</value>
                <value>logPrintBeforeAdvice</value>
                <value>logPrintAfterReturningAdvice</value>
            </list>
        </property>
    </bean>
</beans>
이제 스프링 프레임워크를 사용해서 Proxy 클래스를 만들어보자.
스프링 프레임워크 AOP
오직 스프링 라이브러리를 사용해 AOP기법을 사용하기 위해 각각 MethodBeforeAdvice, AfterReturningAdvice, MethodInterceptor 3개의 인터페이스를 구현한 클래스를 정의하였지만
스프링 프레임워크의 AOP를 사용하면 태그를 사용해 하나의 클래스로 모두 구현할 수 있다.
AOP스프링 프레임웤 안에선 메서드 단위로 Advice를 정의할 수 있기 때문에 상관 3개의 역할을 가지는 메서드를 가지고 있는 클래스 하나만 정의하면 된다.
aopaliance-1.0.0.jar 파일에 더불어
spring-framework-3.0.2.RELEASE-dependencies\org.aspectj\com.springsource.org.aspectj.weaver\1.6.8.RELEASE 폴더 위치의 jar com.springsource.org.aspectj.weaver-1.6.8.RELEASE.jar파일 추가
먼저 스프링 AOP를 사용하지 않고 Proxy객체를 정의하려면 아래와 같이 xml설정을 하였다.
<?xml version="1.0" encoding="UTF-8"?>
<beans xmlns="http://www.springframework.org/schema/beans"
    xmlns:xsi="http://www.w3.org/2001/XMLSchema-instance"
    xsi:schemaLocation="http://www.springframework.org/schema/beans
    http://www.springframework.org/schema/beans/spring-beans-3.0.xsd"
    >
    <context:component-scan base-package="aop"/>
    <bean id="proxy" class="org.springframework.aop.framework.ProxyFactoryBean">
        <property name="target">
            <ref bean="calc"/>
        </property>
        <property name="proxyInterfaces">
            <list>
                <value>aop.Calculator</value>
            </list>
        </property>
        <property name="interceptorNames">
            <list>
                <value>logPrintAroundAdvice</value>
                <value>logPrintBeforeAdvice</value>
                <value>logPrintAfterReturningAdvice</value>
            </list>
        </property>
    </bean>
</beans>
스프링 AOP로 다시 구현해보자.
먼저 aop네임스페이스를 사용하기 위해 <beans> 태그에 다음 속성 추가
xmlns:aop="http://www.springframework.org/schema/aop",
xsi:schemaLocation=http://www.springframework.org/schema/aop
그리고 위에서 Around, Before, AfterReturningAdvice를 구현하기 위해 3개의 클래스를 정의한 반면
우리는 아래처럼 하나의 클래스에 위의 3가지 Advice역할을 하는 메서드를 정의할 것이다.
<?xml version="1.0" encoding="UTF-8"?>
<beans xmlns="http://www.springframework.org/schema/beans"
    xmlns:context="http://www.springframework.org/schema/context"
    xmlns:xsi="http://www.w3.org/2001/XMLSchema-instance"
    xmlns:aop="http://www.springframework.org/schema/aop"
    xsi:schemaLocation="http://www.springframework.org/schema/beans
    http://www.springframework.org/schema/beans/spring-beans-3.0.xsd
    http://www.springframework.org/schema/context
    http://www.springframework.org/schema/context/spring-context.xsd
    http://www.springframework.org/schema/aop
    http://www.springframework.org/schema/aop/spring-aop.xsd">

    <context:component-scan base-package="aop"></context:component-scan>

    <!-- xml 기반 aop 설정 부분 -->
    <bean id="logPrintProfiler" class="aop.LogPrintProfiler"></bean>
    <aop:config>
        <aop:aspect id="traceAspect" ref="logPrintProfiler">
            <aop:pointcut expression="execution(public * aop..*(*,*))" id="publicMethod"/>
            <aop:around pointcut-ref="publicMethod" method="trace"/>
            <aop:before pointcut-ref="publicMethod" method="before"/>
            <aop:after pointcut-ref="publicMethod" method="afterFinally"/>
        </aop:aspect>
    </aop:config>
</beans>
코드를 보면 <bean>태그를 사용해 logPrintProfiler 스프링 빈 객체를 생성.
<aop:config> 태그를 통해 스프링 AOP기법을 사용한 Proxy객체를 정의한다.
<aop:aspect> 태그를 통해 공통기능과 핵심기능이 있는 proxy객체 생성.
<aop:pointcut id="publicMethod" expression="execution(public * aop..*(*,*))">
Pointcut 설정, id 속성은 Pointcut을 구분하는 데 사용하는 식별 값
expression 속성을 통해 설정한 Advice를 어떤 핵심기능 어느위치에 적용할지 설정.
public * aop..*(*,*):public접근 지정자의return type상관없이 aop패키지 안의 (..*하위포함) 매개변수 2개의 함수에 대해 다음 공통기능을 모두 사용.
Pointcut을 설정하고 <aop:around>, <aop:before>, <aop:after>등 의 태그를 통해 어느 시점(Advice)에서 공통기능(Aspect)를 실행시킬지 설정한다.
| 태그 | 설명 |
|---|---|
<aop:before> |
메서드 실행 전에 적용되는 Advice를 정의 |
<aop:after-returning> |
메서드가 정상적으로 실행 후 적용되는 Advice를 정의 |
<aop:after-throwing> |
메서드가 예외를 발생시킬 때 적용되는 Advice를 정의 (catch같은 역할) |
<aop:after> |
예외발생 여부 상관없이 적용되는 Advice를 정의 (finally같은 역할) |
<aop:around> |
메서드 호출 이전, 이후, 예외 발생 등 모든 시점에 적용 가능한 Advice를 정의 |
logPrintProfiler 스프링 빈 객체를 다음과 같이 정의
// 공통 기능을 구현한 클래스: Aspect    <aop:aspect></aop:aspect>
public class LogPrintProfiler {

    // After Advice
    public void afterFinally(JoinPoint joinPoint) {
        String m_name = joinPoint.getSignature().getName();
        System.out.println("> after advice: " + m_name + "() 호출");
    }

    // Before Advice
    public void before(JoinPoint joinPoint) {
        // JoinPoint joinPoint 실제 대상 객체의 메소드 정보 또는 매개변수값을 얻어올 수 있다
        // joinPoint.getTarget();
        // joinPoint.getArgs();
        String m_name = joinPoint.getSignature().getName();
        System.out.println("> before advice: " + m_name + "() 호출");
    }

    // Around Advice
    public void trace(ProceedingJoinPoint joinPoint) throws Throwable {
        String signatureString = joinPoint.getSignature().toShortString();
        System.out.println(signatureString + " 시작");
        long start = System.currentTimeMillis();

        try {
            Object result = joinPoint.proceed();    // 실제 객체의 메소드(주요 기능) 실행
            return result;
        } finally {
            long finish = System.currentTimeMillis();
            System.out.println(signatureString + " 종료");
            System.out.println(signatureString + " 실행 시간 : " + (finish - start) + "ms");
        }
    }
}
AOP에선 JoinPoint인터페이스를 구현한 객체를 항상 첫번째 파라미터로 지정해야 오류가 발생하지 않는다.
JoinPoint 인터페이스는 아래 3개 함수를 통해 호출되는 대상 객체, 메서드 그리고 전달되는 파라미터 목록에 접근할 수 있는 메서드를 제공
Signature getSignature( ) - 호출되는 메서드에 대한 정보를 구함
Object getTarget( ) - 대상 객체를 구함
Object[ ] getArgs( ) - 파라미터 목록을 구함
Signature 인터페이스를 통해 호출되는 메서드와 관련된 정보를 구할 수 있다.
String getName( ) - 메서드의 이름을 구함
String toLongName( ) - 메서드를 완전하게 표현한 문장을 구함(메서드의 리턴 타입, 파라미터 타입 모두 표시)
String toShortName( ) - 메서드를 축약해서 표현한 문장을 구함(메서드의 이름만 구함)
기타정보
만약 After Returning Advice에서 반환된 값을 가지고 공통기능을 수행하고 싶다면 Object 타입의 매개변수를 추가하자.
...
public void afterReturning(Object ref) {
    ...
    //ref를 통해 반환된값 접근
}
특정 타입의 반환값만 공통 기능으로 수행시키고 싶다면 Object 타입 대신 별도의 타입을 주어도 된다.
만약 호출 메서드의 정보나 전달되는 파라미터값도 알아야 한다면 JoinPoint객체와 Object 총 2개의 매개변수를 사용
public void afterReturning(JoinPoint joinPoint, Object ref) {...}
JoinPoint의 getArgs( )메서드를 통해 파라미터 목록을 구할 있다.
Arround Advice
위에서 보다싶이 Arround Advice는 좀 특별하다.
Around Advice로 Before, After, After Returning, After Throwing Advice들을 모두 구현할 수 있으며 다른 Advice과는 다르게 첫번째 매개변수로 ProceedingJoinPoint를 사용한다.
ProceedingJoinPoint는 JoinPoint의 자식 클래스로 Signature, 타겟, 파라미터 목록을 구할수 있을 뿐 아니라
대상 객체를 호출할 수 있는 proceed() 메서드를 제공 한다.
Around Advice 를 구현할때 ProceedingJoinPoint를 매개변수 타입으로 사용하지 않으면 에러 발생한다.
구현할 Advice에 따라 proceed() 메서드 호출 지점을 정하면 된다.
public class LogPrintProfiler {
    ...
    ...
    // Around Advice
    public Object trace(ProceedingJoinPoint joinPoint) throws Throwable {
        String signatureString = joinPoint.getSignature().toShortString();
        System.out.println(signatureString + " 시작");
        long start = System.currentTimeMillis();

        try {
            Object result = joinPoint.proceed();    // 실제 객체의 메소드(주요 기능) 실행
            return result;
        } finally {
            long finish = System.currentTimeMillis();
            System.out.println(signatureString + " 종료");
            System.out.println(signatureString + " 실행 시간 : " + (finish - start) + "ms");
        }
    }
}
Aspect 어노테이션 기반 AOP
공통기능(Aspect)을 정의한 클래스에서 어노테이션을 사용하면 xml에 설정한 aop네임스페이스 태그 생략이 가능하다.
@Aspect, @Poingcut("expression"), @After, @Before, @Arround 등 어노테이션을 사용해서 위의 xml을 대타가능
@Component
@Aspect
public class LogPrintProfiler {

    @Pointcut("execution(public * aop..*(*,*))")
    public void profileTarget() {}

    // After Advice
    @After("profileTarget()")
    public void afterFinally(JoinPoint joinPoint) {
        String m_name = joinPoint.getSignature().getName();
        System.out.println("> after advice: " + m_name + "() 호출");
    }

    // Before Advice
    @Before("profileTarget()")
    public void before(JoinPoint joinPoint) {
        // JoinPoint joinPoint 실제 대상 객체의 메소드 정보 또는 매개변수값을 얻어올 수 있다
        // joinPoint.getTarget();
        // joinPoint.getArgs();
        String m_name = joinPoint.getSignature().getName();
        System.out.println("> before advice: " + m_name + "() 호출");
    }

    // Around Advice
    @Around("profileTarget()")
    public Object trace(ProceedingJoinPoint joinPoint) throws Throwable {
        String signatureString = joinPoint.getSignature().toShortString();
        System.out.println(signatureString + " 시작");
        long start = System.currentTimeMillis();

        try {
            Object result = joinPoint.proceed();    // 실제 객체의 메소드(주요 기능) 실행
            return result;
        } finally {
            long finish = System.currentTimeMillis();
            System.out.println(signatureString + " 종료");
            System.out.println(signatureString + " 실행 시간 : " + (finish - start) + "ms");
        }
    }
}
코드를 보면 @Pointcut("execution(public * aop..*(*,*))")을 통해 Pointcut을 정의하고 각 Advie설정 괄호 안에 Pointcut 식별자를 값으로 넣는다.
@After("profileTarget()")
@Aspect어노테이션을 가진 스프링 빈 객체 (Aspect객체)를 xml설정을 통해 생성하려면 <aop:aspectj-autoproxy/>태그를 추가로 적용해야 한다.
<?xml version="1.0" encoding="UTF-8"?>
<beans xmlns="http://www.springframework.org/schema/beans"
    xmlns:context="http://www.springframework.org/schema/context"
    xmlns:xsi="http://www.w3.org/2001/XMLSchema-instance"
    xmlns:aop="http://www.springframework.org/schema/aop"
    xsi:schemaLocation="http://www.springframework.org/schema/beans
    http://www.springframework.org/schema/beans/spring-beans-3.0.xsd
    http://www.springframework.org/schema/context
    http://www.springframework.org/schema/context/spring-context.xsd
    http://www.springframework.org/schema/aop
    http://www.springframework.org/schema/aop/spring-aop.xsd">

    <aop:aspectj-autoproxy/>
    <context:component-scan base-package="aop"></context:component-scan>
</beans>
xml설정이 아닌 @Configuration을 통한 자바 설정 파일을 사용할 경우 <aop:aspectj-autoproxy/>대신 @EnableAspectJAutoProxy 어노테이션을 사용
@Aspect
public class LogPrintProfiler {
    ...
    ...
}

---

@Configuration
@EnableAspectJAutoProxy
public class Config {
    @Bean
    public LogPrintProfiler logPrintProfiler() {
        return new LogPrintProfiler();
    }

    @Bean
    public RecordImpl record() {
        return new RecordImpl();
    }

    @Bean(name="service")
    public RecordViewImpl getService() {
        return new RecordViewImpl();
    }
}
AspactJ 표현식
어떤 클래스들에 Aspect(공통기능)클래스를 접합해 Proxy 객체로 만들지 범위를 지정하기 위해 사용하는 AspactJ 표현식에 대해 알아보자.
<aop:pointcut id="publicMethod" expression="execution(public * aop..*(*,*))">
excution 괄호 안에 들어가는 조합의 기본 형식은 아래와 같다.
excution(수식어패턴? 리턴타입 클래스이름패턴?메서드이름패턴(파라미터패턴))
파라미터패턴 - 매칭될 파라미터에 대해 명시함.
*을 이용해서 모든 값을 표현할 수 있다...을 이용해서 0개 이상이라는 의미를 표현할 수 있다.
execution( public void set*(..) )
- 수식어패턴 : public
- 리턴타입 : void
- 클래스이름 : 생략됨
- 메서드이름 : setter (set으로 시작하는 메서드)
- 파라미터패턴 : 파라미터가 0개 이상 ‘(..)’
execution( * chap07.*.*() )
- 수식어패턴 : 생략됨
- 리턴타입 : * ← 전부
- 클래스이름 : chap07.* ← chap07패키지에 있는 모든 클래스. chap07 하위패키지까지는 아님. (chap07 : 패키지명.)
- 메서드이름 : * ← 전부
- 파라미터패턴 : 공란 ← 없음
execution( * chap07..*.*(..) )
- 수식어패턴 : 생략됨
- 리턴타입 : * ← 전부
- 클래스이름 : chap07..* ← chap07패키지 및 해당 패키지 하위의 모든 클래스 (chap07 : 패키지명.)
- 메서드이름 : * ← 전부
- 파라미터패턴 : (..) ← 0개 이상
execution( Long chap07.Calculator.factorial(..) )
- 수식어패턴 : 생략됨
- 리턴타입 : Long
- 클래스이름 : chap07.Calculator
- 메서드이름 : factorial
- 파라미터패턴 : (..) ← 0개 이상
execution( * get*(*) )
- 수식어패턴 : 생략됨
- 리턴타입 : * ← 전부
- 클래스이름 : 생략됨
- 메서드이름 : getter (get으로 시작하는 메서드)
- 파라미터패턴 : * ← 1개
execution( * get*(*, *) )
- 수식어패턴 : 생략됨
- 리턴타입 : * ← 전부
- 클래스이름 : 생략됨
- 메서드이름 : getter (get으로 시작하는 메서드)
- 파라미터패턴 : *, * ← 2개
execution( * read*(Integer, ..) )
- 수식어패턴 : 생략됨
- 리턴타입 : * ← 전부
- 클래스이름 : 생략됨
- 메서드이름 : read로 시작하는 모든 메서드
- 파라미터패턴 : Integer, .. ← 1개 이상의 파라미터를 가짐. 첫번째 파라미터형은 Integer형이여야 함
출처: https://m.blog.naver.com/PostView.nhn?blogId=imf4&logNo=220697094435&proxyReferer=https%3A%2F%2Fwww.google.com%2F
Pointcut의 조합
<aop:pointcut id="publicMethod" expression="execution(public * aop..*(*,*))">
@Aspect
public class LogPrintProfiler {

    @Pointcut("execution(public * aop..*(*,*))")
    public void profileTarget() {}
    ...
    ...
}
<aop:pointcut>태그, @Pointcut 어노테이션을 보면
접근지정자가 public이고, 매개변수, 몸체가 없다.
함수명은 Poingcut의 식별자로 사용할 수 있다.
각각의 표현식은 && 또는 || 연산자를 이용하여 연결 가능
XML 설정파일에 한해서는 스프링에서 and, or를 사용 허용함(&&를 &&로 써야 하는 불편함이 있기 때문)
@Pointcut("execution( * get*(*) )")
public void getterMethod() {}

@Pointcut("execution( public void set*(..) )")
public void setterMethod() {}

@Pointcut("execution( * get*(*) ) || execution( public void set*(..) )")
public void getsetMethod() {}
위와 같이 2개의 Pointcut을 정의했을때 이 두개를 합친 Pointcut을 정의할 수 있다.
혹은 아래와 같이 설정도 가능하다.
@Pointcut("getterMethod() || setterMethod()")
public void getsetMethod() {}
xml설정파일에서도 조합이 가능하다.
<aop:pointcut id="publicMethod" expression="execution( * get*(*) ) or execution( public void set*(..) )">
xml문서에선 ||표시하려면 ||를 사용해야 하는데 번거로움으로 xml 한해서는 or문자열을 사용 가능하다.
Advice 적용 순서
하나의 JoinPoint에 여러개의 Advice가 적용될 경우, 순서를 명시적으로 저장할 수 있다.
아래 2가지 방법을 통해 순서를 지정 가능하다.
@Order애노테이션 적용@Aspect @Order(2) public class LogginAspect { ... }Ordered인터페이스 구현 -getOrder()메소드를 구현해서Advice적용 순서 값을 리턴@Aspect public class LogginAspect implements Ordered { private int order = 1; public int getOrder() { return this.order; } }
XML 스키마 사용 시, <aop:aspect> 태그의 order 속성을 사용해서 Advice 순서 지정
order는 값이 낮을수록 높은 우선순위의 Advice
스프링 프레임워크 AOP 실습
스프링 AOP에 대해 어느정도 배웠으니 실제 스프링 프레임워크에서 AOP를 사용해보자.
먼저 pom.xml에 다음 3개 dependency 추가
<dependency>
    <groupId>org.springframework</groupId>
    <artifactId>spring-tx</artifactId>
    <version>${org.springframework-version}</version>
</dependency>
<dependency>
    <groupId>org.springframework</groupId>
    <artifactId>spring-aop</artifactId>
    <version>${org.springframework-version}</version>
</dependency>
<dependency>
        <groupId>org.aspectj</groupId>
        <artifactId>aspectjweaver</artifactId>
        <version>1.6.11</version>
</dependency>
그리고 servlet-context.xml에 aop설정의 위해 aop, tx namespace추가하고 아래태그를 추가한다.
<aop:aspectj-autoproxy></aop:aspectj-autoproxy>
<aop:config></aop:config>
<?xml version="1.0" encoding="UTF-8"?>
<beans xmlns="http://www.springframework.org/schema/beans"
    xmlns:aop="http://www.springframework.org/schema/aop"
    xmlns:tx="http://www.springframework.org/schema/tx"
    ...
    xsi:schemaLocation="
        ...
        http://www.springframework.org/schema/aop
        http://www.springframework.org/schema/aop/spring-aop-4.1.xsd
        http://www.springframework.org/schema/tx
        http://www.springframework.org/schema/tx/spring-tx-4.0.xsd">
    ...
    ...
    <!-- root-context.xml 수정 -->
    <context:component-scan base-package="org.zerock"/>
    <aop:aspectj-autoproxy></aop:aspectj-autoproxy>
    <aop:config></aop:config>
</beans>
@Component
@Aspect
public class SampleAdvice {
    private static final Logger logger = LoggerFactory.getLogger(SampleAdvice.class);

    @Before("AspactJ 표현식")
    public void startLog(JoinPoint jp) {
        logger.info("------------------");
        logger.info("------------------");
        logger.info(Arrays.toString(jp.getArgs()));
    }

    @Around("AspactJ 표현식")
    public Object timeLog(ProceedingJoinPoint pjp) throws Throwable {
        // Throwable -> Exception객체의 상위 객체
        long startTime = System.currentTimeMillis();
        logger.info(Arrays.toString(pjp.getArgs()));
        Object result = pjp.proceed();
        long endTime = System.currentTimeMillis();
        logger.info(pjp.getSignature().getName() + ": " + (endTime - startTime));
        logger.info("=============================");
        return result;
    }
}
info메서드를 통해 콘솔에 로그가 출력되지 않는다면 log4j.xml에 다음과 같이 추가
<!-- Root Logger -->
<root>
    <priority value="info warn" />
    <appender-ref ref="console" />
</root>