어노테이션을 이용한 객체간 DI 자동 연결
지금까지 xml파일에서 스프링 빈 객체를 만들고 <property>태그를 사용해서 set메서드, 혹은 생성자를 통해 필드를 초기화 했다.
하지만 어노테이션을 이용한 객체간 의존 자동 연결을 서정하면 <property>태그를 사용해 일일이 필드를 초기화 할 필요 없이 자동으로 추가 가능하다.
스프링 컨테이너가 알아서 자료 타입에 맞는 자바 빈 객체를 찾아서 매치시켜 준다! 즉 개발자가 일일이 의존정보를 프로퍼티 태그로 설정하지 않더라도 자동적으로 의존관계를 추가시킬 수 있다!
프로젝트를 진행하다보면 의존관계가 뻔한 클래스들이 있다.
예를 들어 DisplayHandler는 DisplayService를 필요로 하고 DisplayService는 DisplayDAO를 필요로 한다.
특히 싱글톤 같은 경우(~~Factory같은 클래스) 의존관계가 명확하기 때문에 자동주입 되면 편하다!
의존관계를 자동 설정하는 여러 설정 어노테이션이 여러개 있는데 모두 알아보자.
@Autowired, @Resource, @Inject
@Autowired 어노테이션
의존관계를 자동으로 설정할 때 사용하는 어노테이션.
생성자, 필드, 메서드에 사용 가능하다.
어노테이션을 설정하고 DI를 자동 주입하려면 xml파일에 <context:anntation-config>태그가 필요하다.
당연히 context 네임 스페이스를 사용하려면 beans 태그에 설정이 필요하다.
<beans
	xmlns="http://www.springframework.org/schema/beans"
	xmlns:context="http://www.springframework.org/schema/context"
	xmlns:xsi="http://www.w3.org/2001/XMLSchema-instance"
	xsi:schemaLocation="http://www.springframework.org/schema/beans
	http://www.springframework.org/schema/beans/spring-beans-3.0.xsd
	http://www.springframework.org/schema/context
	http://www.springframework.org/schema/context/spring-context.xsd"
	>
	...
	...
</beans>
https://kouzie.github.io/spring/Spring-개요/#spring에서-객체생성
위 주소에서 사용했던 Record, RecordImple, RecordView, RecordViewImple 클래스를 @Autowired어노테이션을 사용해서 자동 주입되록 설정하자.
먼저 xml파일에 context네임스페이스를 사용할 수 있도록 <beans> 태그 속성을 추가하고
<context:annotation-config/>태그를 통해 어노테이션을 통해 의존설정 한다고 스프링 컨테이너에 알린다.
<?xml version="1.0" encoding="UTF-8"?>
<beans xmlns="http://www.springframework.org/schema/beans"
	xmlns:xsi="http://www.w3.org/2001/XMLSchema-instance"
	xmlns:context="http://www.springframework.org/schema/context"
	xsi:schemaLocation="http://www.springframework.org/schema/beans
	http://www.springframework.org/schema/beans/spring-beans-3.0.xsd
	http://www.springframework.org/schema/context
	http://www.springframework.org/schema/context/spring-context.xsd" >

	<context:annotation-config/>
	<bean id="record" class="di.RecordImpl"/>
	<bean id="service" class="di.RecordViewImpl"/>
</beans>
record 빈 객체, sevice 빈 객체 모두 생성만 하지 관계설정 코드는 xml에 있지 않다.
이제 RecordViewImpl클래스에 스프링 컨테이너가 의존설정 할 수 있도록 필드, 메서드, 생성자 위에 @Autowired어노테이션을 추가한다.
public class RecordViewImpl implements RecordView{

	@Autowired
	private RecordImpl record = null;
	public RecordViewImpl() {}

	@Autowired
	public RecordViewImpl(Record record) {
		this.record = (RecordImpl) record;
	}
	public RecordImpl getRecord() {
		return record;
	}

	@Autowired
	public void setRecord(RecordImpl record) {
		this.record = record;
	}

	@Override
	public void input() {
		try(Scanner scanner = new Scanner(System.in);){
			System.out.print("> kor,eng,mat input ? ");
			this.record.setKor(scanner.nextInt());
			this.record.setEng(scanner.nextInt());
			this.record.setMat(scanner.nextInt());
		} catch (Exception e) {
			e.printStackTrace();
		}
	}

	@Override
	public void output() {
		System.out.printf(
				"> kor:%d, eng:%d, mat:%d, tot=%d, avg=%.2f\n"
				,this.record.getKor()
				,this.record.getEng()
				,this.record.getMat()
				,this.record.total()
				,this.record.avg()
				);
	}
}
위에선 필드, 메서드, 생성자 모두 @Autowired어노테이션을 추가했지만 하나만 추가해도 동작한다.
스프링 컨테이너가 Record 타입에 해당하는 빈 객체를 찾아 알아서 주입시킨다.**
xml파일을 보면
Record을 구현한RecordImpl이 자동으로 주입되는데 상속관계에만 있다면 주입시킬 수 있다.
자바 코드에서의 자동 주입
xml설정과 비해 따로 달라질 건 없다. 오히려 <context:annotation-config/> 태그 역할도 이미 자바코드설정의 @Configuration 어노테이션에 포함되어 있기 때문에 xml에 비해 더더욱 건들일 것 이 없다.
똑같이 @Autowired 어노테이션을 사용하나 생성자에 붙여 사용하지 못한다.
이뉴는 자바코드에선 직접 생성자를 호출하기 때문에 우리가 지정한 @Anntation으로 설정한 스프링 컨테이너가 끼어들 틈이 없기 때문.
먼저 설정파일 역할을 해줄 Config.java 를 다음과 같이 설정
기존에는 다음과 같이 사용했었다.
@Bean
	public RecordViewImpl service(Record record) {
		return new RecordViewImpl(record);
	}
@Configuration
public class Config {
	@Bean
	public RecordImpl record() {
		return new RecordImpl();
	}

	@Bean
	public RecordViewImpl service() {
		return new RecordViewImpl();
	}
}
service()메서드에 매개변수도 설정함수도 없고 그저 RecordViewImpl를 반환한다.
service 빈 객체에 record를 설정하는 코드가 일절 없는데도 자동주입된다.
public class RecordViewImpl implements RecordView{
	@Autowired
	private RecordImpl record = null;
	...
	...
	@Autowired
	public void setRecord(RecordImpl record) {
		this.record = record;
	}
	...
	...
}
당연히 생성자를 제회한 필드나 set메서드에 @Autowired 어노테이션 적용이 필요하다.
만약 xml에 record 빈 객체를 생성하는 <bean>태그가 없다면? 다음과 같은 오류가 발생한다.
...
[di.Record]: : No matching bean of type [di.Record] found for dependency: expected at least 1 bean which qualifies as autowire candidate for this dependency.
...
분명 @Autowired어노테이션을 통해 Record타입의 빈 객체를 의존관계로 형성하겠다고 스프링 컨테이너한테 알렸는데 생성된 Record 빈 객체가 하나도 없기 때문!
Record타입의 빈 객체가 있다면 의존관계로 설정하고 없다면 null로 설정하고 싶다면 @Autowired(required=false)로 설정하면 된다.
@Qualifier - 한정자
만약 Record 타입의 빈 객체가 2개 이상 만들어질 경우?
...
<bean id="frist_record" class="di.RecordImpl"/>
<bean id="second_record" class="di.RecordImpl"/>
<bean id="service" class="di.RecordViewImpl"/>
...
다음과 같은 오류가 발생한다.
...
Caused by: org.springframework.beans.factory.NoSuchBeanDefinitionException: No unique bean of type [di.Record] is defined: expected single matching bean but found 2: [frist_record, second_record]
...
당연히 오류가 발생한다.
DI관계를 만들 때 같은 타입의 객체가 여러개 생성될 경우는 드물지만 여러개의 같은 type의 빈 객체를 만들 상황도 발생한다.
@Autowired어노테이션을 사용할 때 이런 상황을 대처하기 위해 @Qualifier어노테이션을 사용해 별칭을 주어 의존관계를 설정할 클래스를 한정지을 수 있다.
먼저 <qualifier>태그를 사용해 스프링 빈 객체에 한정자(별칭)을 부여한다.
...
<context:annotation-config/>
<bean id="first_record" class="di.RecordImpl">
	<qualifier value="first"/>
</bean>
<bean id="second_record" class="di.RecordImpl">
	<qualifier value="second"/>
</bean>
<bean id="service" class="di.RecordViewImpl"/>
...
그리고 @Autowired를 사용하는 생성자, 필드, 메서드에 다음과 같이 @Qualifier 어노테이션을 적용
@Autowired()
@Qualifier("first")
public void setRecord(RecordImpl record) {
	this.record = record;
}
@Autowired를 사용하는 상황에서 대처하라고 만들어진게@Qualifier, 그런 상황이 아니라면 ref 태그 사용하면 된다.
@Resource - 식별자
@Resource어노테이션도 같은 타입의 스프링 빈 객체가 여러개 생성되었을 때 특정한 빈 객체 하나만 의존관계로 설정하고 싶을 때 사용하는 어노테이션이다.
@Qualifier와 다르게 @Resource는 name속성에 정의된 내용을 기준으로 스프링 빈 객체를 선택한다.
따로 별칭을 주는 것 보다 그냥 식별자를 통해 DI를 할 빈 객체를 주입하기 때문에 더 수월하다.
다음과 같이 xml이 설정되어 있을 때
<bean id="first_record" class="di.RecordImpl"/>
<bean id="second_record" class="di.RecordImpl"/>
<bean id="service" class="di.RecordViewImpl"/>
@Resource어노테이션과 name 설정으로 스프링 빈 객체를 지정한다.
@Autowired(required=false)
@Resource(name="first_record")
public void setRecord(RecordImpl record) {
	this.record = record;
}
참고로
@Resource을 사용하면@Autowired를 생략할 수 있다. 어차피 자동 생성시 빈 객체를 한정하기 위해서 사용하는 어노테이션 임으로.@Resource(name="first_record") public void setRecord(RecordImpl record) { this.record = record; }심지어
@Resource()괄호안의 내용을 생략할 경우@Autowired처럼 사용할 수 있다.
@Component - 컴포넌트 스캔을 이용한 빈 자동 등록
@Autowired를 사용하면 아래와 같이 <bean>태그를 통해 스프링 빈 객체를 생성하기만 해도 의존관계가 자동 형성된다.
<?xml version="1.0" encoding="UTF-8"?>
<beans xmlns="http://www.springframework.org/schema/beans"
	xmlns:xsi="http://www.w3.org/2001/XMLSchema-instance"
	xmlns:context="http://www.springframework.org/schema/context"
	xsi:schemaLocation="http://www.springframework.org/schema/beans
	http://www.springframework.org/schema/beans/spring-beans-3.0.xsd
	http://www.springframework.org/schema/context
	http://www.springframework.org/schema/context/spring-context.xsd" >

	<context:annotation-config/>
	<bean id="record" class="di.RecordImpl"/>
	<bean id="service" class="di.RecordViewImpl"/>
</beans>
<property>태그를 생략할 수 있어 매우 간편하다!
그런데 @Component어노테이션을 사용하면 빈 객체를 생성하는 <bean>태그마저도 생략하고 생성후 자동 등록할 수 있다.
@Component을 사용해 빈객체를 자동 생성해보자.
먼저 xml을 다음과 같이 설정
<?xml version="1.0" encoding="UTF-8"?>
<beans xmlns="http://www.springframework.org/schema/beans"
	xmlns:xsi="http://www.w3.org/2001/XMLSchema-instance"
	xmlns:context="http://www.springframework.org/schema/context"
	xsi:schemaLocation="http://www.springframework.org/schema/beans
	http://www.springframework.org/schema/beans/spring-beans-3.0.xsd
	http://www.springframework.org/schema/context
	http://www.springframework.org/schema/context/spring-context.xsd" >

	<context:component-scan base-package="di"/>
</beans>
<context:component-scan base-package="di"/> 새로운 태그가 추가되었는데
di패키지 안에 정의된 모든 클래스(하위 패키지까지)를 돌며 @Component어노테이션이 적용된 클래스를 빈 객체로 자동 생성한다.
생성할 클래스 위에 @Component어노테이션을 추가하면 된다.
@Component
public class RecordImpl implements Record{
	private int kor;
	private int mat;
	private int eng;
	//get, set 생략...
	public RecordImpl(int kor, int mat, int eng) {
		this.kor = kor;
		this.mat = mat;
		this.eng = eng;
	}
	@Override
	public int total() {
		return kor+mat+eng;
	}
	@Override
	public double avg() {
		return (kor+mat+eng)/3.0;
	}
}

@Component
public class RecordViewImpl implements RecordView{
	private RecordImpl record = null;

	public RecordViewImpl() {}
	public RecordViewImpl(Record record) {
		this.record = (RecordImpl) record;
	}

	public RecordImpl getRecord() {
		return record;
	}
	@Autowired
	public void setRecord(RecordImpl record) {
		this.record = record;
	}

	@Override
	public void input() {
		try(Scanner scanner = new Scanner(System.in);){
			System.out.print("> kor,eng,mat input ? ");
			this.record.setKor(scanner.nextInt());
			this.record.setEng(scanner.nextInt());
			this.record.setMat(scanner.nextInt());
		} catch (Exception e) {
			e.printStackTrace();
		}
	}

	@Override
	public void output() {
		System.out.printf(
				"> kor:%d, eng:%d, mat:%d, tot=%d, avg=%.2f\n"
				,this.record.getKor()
				,this.record.getEng()
				,this.record.getMat()
				,this.record.total()
				,this.record.avg()
				);
	}

}
클래스 위에 @Component를 설정하면 스프링 컨테이너에게 이 클래스는 자바빈 객체로 자동 등록하라고 명시한다.
자동 생성을 하면 당연히 자동 연결은 따라와야 한다. 연결과정만 xml에서 따로할 수 는 없다… 그리고
<context:component-scan>을 설정하면<context: annotation-config>은 생략해도@Resource,@Autowired를 사용 가능하다.
자바코드 설정파일에선 @ComponentScan(basePackage="")으로 패키지를 지정할 수 있으나
3.x버전에선 지원하지 않는다. 3.x버전에선 xml을 통해서만 지정 가능하다.
그럼 자동 등록된 클래스들의 식별자는 어떻게 지정될까?
보통 클래스명 앞에 첫 문자만 소문자로 지정되어 스프링 컨테이너에서 생성된다.
만약 이름을 별도로 지정하고 싶다면 @Component("지정할 이름") 괄호에 이름을 지정할 수 있다.
basepackage를 통해 component-scan할 패키지를 등록하는데
filter를 통해 특정한 하위 패키지를 제외하거나 regex를 사용해 패키지를 등록하는 기능이 있다.
<context:component-scan base-package="패키지명">
	<context:include-filter type="regex" expression=".*Service">
	<context:exclude-filter type="aspectj" expression="net..*DAO">
</context:component-scan>
정규식 외에 여러 방법으로 패키지 지정이 가능하다. type속성으로 어떤 방법을 사용할 것 인지 명시한다.
| tpye 속성 | 설명 |
|---|---|
annotaion |
클래스에 지정한 어노테이션이 적용됐는지 여부, expression="org.sample.SomeAnnotaion", @SomeAnnotaion이 적용되어 있을 경우 빈 객체로 생성 |
assignable |
클래스가 지정한 타입으로 할당 가능한지의 여부, expression="di.Record", Record로 할당 할 수 있는 클래스를 빈 객체로 생성 |
regex |
정규 표현식으로 클래스 명을 지정 |
aspectj |
AspectJ 표현식으로 클래스 명을 지정 |
위의 AspectJ 표현식중 net..*DAO의 뜻은 net 패키지 하위에 모든 DAO로 끝나는 클래스를 빈 객체로 등록한다.
참고: 빈 객체로 자동 등록 시킬 때
@Component외에도 사용하는 어노테이션이 3가지 있다.
@Service,@Repository,@Controller
각각 MVC패턴에서 사용되는
Service,DAO,Controlloer를 의미하며
@Repository을 사용 할 경우 스프링에서 사용되는 익셉션으로 변환되는 기능이 자동 적용된다.
@Component혹은 @Repository 등의 어노테이션을 사용해 빈 객체를 생성하는 <bean>태그 혹은 자바설정에서의 @Bean어노테이션을 생략하게 되면 자연스럽게 <property>태그 혹은 자바설정에서 필드를 설정하는 코드도 생략된다.
@Component등의 어노테이션으로 자동 등록했으면 @Autowired, @Resource등의 어노테이션으로 의존관계의 자동연결은 필수이다.
자바코드설정의
<context:component-scan base-package="패키지명">의 어노테이션 버전은@ComponentScan(basePackage="패키지명")이다.
추가 내용
ApplicationContext 메서드
지금까지 여러 ApplicationContext객체의 자식 클래스들 (GenericXmlApplicationContext, AnnotationConfigApplicationContext)의 getBeans()메서드를 추로 사용해 왔는데 다른 메서드들을 알아보자.
BeanFactory 제공 메서드
한개의 Bean에 대한 정보를 구하는데 메서드의 초점이 맞춰져 있다.
|메서드명|설명|
|—|—|
boolean containBean (String name) | 인수에 지정된 이름의 Bean 이 정의되어 있는지 여부를 반환한다.
Object getBean(String name) | 지정된 이름의 Bean 인스턴스를 생성해서 반환한다. (형변환 필요)
Object getBean(Class<T> requiredType) | requiredType인 빈 객체를 구한다, 없거나 2개 이상이면 예외발생
T getBean(String name, Class<T> requiredType) | 인수에 지정된 이름의 requiredType에 지정한 타입으로 Bean 인스턴스를 생성해서 반환한다.
Class<?> getType(String name) | 이름을 통해 Bean의 type을 반환한다.
ListableBeanFactory 제공 메서드
빈의 목록과 관련된 메서드를 정의하고 있다.
|메서드명|설명|
|—|—|
int getBeanDefinitionCount() | 전체 빈의 개수를 반환
String[] getBeanDefinitionNames() | 전체 빈의 이름 목록을 배열로 반환
String[] getBeanNamesForType(Class<?> type) | 지정한 타입의 빈의 이름 목록을 배열로 반환
<T> Map<String, T> getBeansOfType(Class<T> type) | 지정한 타입을 가진 빈 객체를 맵으로 반환, 키는 빈의 이름, 값은 빈 객체
String[] getBeanNamesForAnnotation(Class<? extends Annotation> anntationType) | 클래스가 지정한 어노테이션을 가진 빈 이름 목록을 배열로 반환
Map<String, Object> getBeansWithAnnotation(Class<? extensd Annotation> annotationType) | 지정한 어노테이션을 가진 빈 객체를 맵으로 반환
스프링 컨테이너 라이프 사이클
스프링 컨테이너의 생명주기는 다음과 같다.
- 컨테이너 생성
- Bean 메타 정보(XML, 자바기반 설정)을 이용한 빈 객체 생성
- 컨테이너 사용
- 컨테이너 종료 (Bean 객체 제거)
1번과 2번은 GenericXmlApplicationContext AnnotationConfigApplicationContext등의 객체를 사용해 스프링 컨테이너를 생성할 때 같이 진행됨.
3번 과정은 getBeans()메서드를 사용해 스프링 컨테이너에 생성된 빈 객체를 사용 사용
스프링 컨테이너를 다 사용했다면 .close()메서드를 사용해 제거, 빈 객체들도 같이 소멸된다.
스프링 빈 객체 라이프 사이클
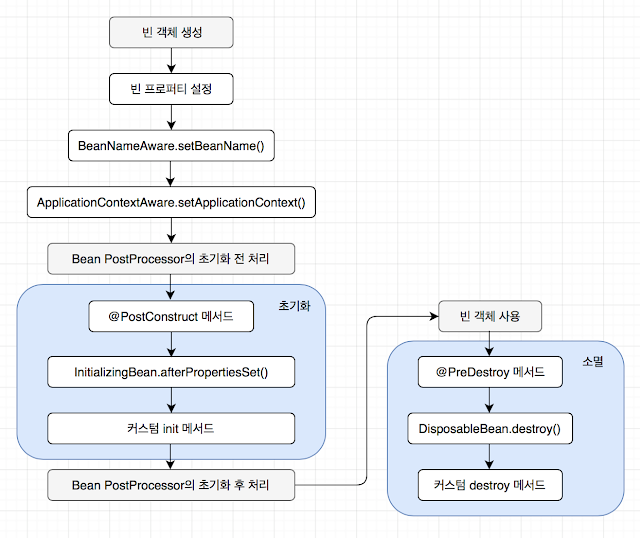
빈 객체 생성과 프로퍼티 설정은 스프링 컨테이너가 xml설정 혹은 자바코드 설정 파일을 통해 수행한다.
그 이후로 이루어 지는 BeanNameAware인터페이스의 setBeanNames()메서드, ApplicationContextAware인터페이스의 setApplicationContext()메서드는 만약 빈 객체가 BeanNameAware과 ApplicationContextAware 인터페이스를 구현하고 있다면 생성후 호출되는 메서드들이다.
InitializingBean.afterPropertiesSet()또한 마찬가지.
전체적인 흐름은 객체생성/프로퍼티 설정 -> 초기화 -> 사용 -> 소멸
4단계를 거친다.
InitializingBean, DisposableBean 인터페이스
public interface InitializingBean {
  public void afterPropertiesSet() throws Exception;
}
public interface DisposableBean {
  public void destroy() throws Exception;
}
각각 빈 객체의 초기화, 소멸 단계에서 실행될 메서드의 구현을 필요로 할 때 사용되는 인터페이스이다.
지금까지 초기화, 소멸과정에서 특별한 작업을 하는 스프링 빈 객체를 정의한 적이 없지만
DB 커넥션 풀 기능을 가지는 빈 객체는 별도의 초기화, 소멸 과정이 필요하다.
커넥션 풀을 생성하기 위해 초기화시 미리 커넥션을 생성해 두어야 하고
더이상 커넥션이 필요 없을 때 생성한 커넥션을 모두 닫는 소멸 과정이 필요하다.
@PostConstruct, @PreDestroy 어노테이션
InitializingBean, DisposableBean 인터페이스에서 구현한 메서드들과 같은 기능을 하는 어노테이션
메서드 위에 어노테이션을 정의해 두면 빈 초기화, 소멸시 호출된다.
public class ConnectionPool {
	@PostConstruct
	public void initPool() {
		...
	}

	@PreDestroy
	public void destroyPool() {
		...
	}
}
어노테이션을 사용하기 위해 xml설정에서 <context:annotation-config>태그를 필요로한다.
커스텀 init, destroy 메서드
InitializingBean, DisposableBean 인터페이스도 구현하기 싫고 @PostConstruct, @PreDestroy 어노테이션도 사용하기 싫고
내가 지정한 메서드를 초기화, 소멸시 호출시키고 싶을 때
빈 객체를 생성하는 xml설정 혹은 자바코드 설정으로 커스텀 init, destroy메서드를 정의 가능하다.
<bean id="connectionPool" class="spring.dbconn.ConnectionPool" init-method="init" destroy-method="destroy"/>
@Bean(initMethod="init", destroyMethod="destroy")
public ConnectionPool connectionPool() {
	return new ConnectionPool();
}
BeanNameAware, ApplicationContextAware 인터페이스
빈 객체 초기화시 스프링 컨테이너를 사용해 다른 빈 객체를 가져와 작업을 한다던가
생성된 빈 객체의 이름을 사용해 로그를 남기는 작업을 한다던가
스프링 컨테이너, 빈 객체 이름이 필요하다면 BeanNameAware, ApplicationContextAware 인터페이스의 메서드를 구현
public interface ApplicationContextAware extends Aware {
	void setAppliactionContext(ApplicationContext applicationContext) throws BeansException;
}

public interface BeanNamesAware extends Aware {
	void setBeanNames(String name);
}
setAppliactionContext메서드를 사용해 필드에 스프링 컨테이너를 참조시킬 수 있다.
setBeanNames메서드를 사용해 필드에 빈 객체 이름을 참조시킬 수 있다.
같은 타입의 빈 객체가 여러개일 때 이름을 사용해 로그를 남기는 편….
빈 객체 범위(scope)
스프링의 범위는 총 2가지.
- 싱글톤 범위
- 프로토타입 범위
사실 request, session 범위가 존재하지만 잘 사용되지 않음으로 생략….
스프링은 기본(deafult)로 싱글톤 범위를 사용한다. 아래와 같이 빈 객체를 생성하고
<bean id="connPoll" class="spring.dbconn.ConnectionPool" />
AbstractApplicationContext ctx = new GenericXmlApplicationContext(configLocation);
ConnectionPool p1 = ctx.getBean("connPoll", ConnectionPool.class);
ConnectionPool p2 = ctx.getBean("connPoll", ConnectionPool.class);
위와 같이 ConnectionPool 객체를 2개 생성하면 모두 같은 인스턴스를 가리킨다.
이는 기본적으로 스프링 컨테이너가 빈 객체를 싱글톤 방식으로 생성하기 때문…
만약 해당 빈 객체가 싱글톤 객체로 생성되는 것을 명시하고 싶다면 아래 설정 참고
//<bean id="connPoll" class="spring.dbconn.ConnectionPool" scope="singleton"/>
@Bean
@Scope("singleton")
public ConnectionPool connectionPool() {
	return new ConnectionPool();
}
반면 프로토 타입으로 scope를 설정할 경우 여러개의 인스턴스 생성이 가능
단 스프링 컨테이너는 프로토 타입 scope 빈 객체의 초기화 까지만 관리하고 소멸과정을 따로 관리하지 않는다.(스프링 컨테이너 종료시 같이 소멸되지 않음)
일반적으로 사용되는 Scope는 싱글톤이고 만약 같은 타입의 객체를 여러개 생성해야 한다면 프로토 타입보만 팩토리 클래스를 만들어 사용하는 것이 좋다.