Spring 개요
Java 어노테이션문법과 자바 리플렉션을 사용해 만들어진 웹서버 프레임워크
스프링은 다음 그림처럼 의존관계(DI)로 이루어 진다.
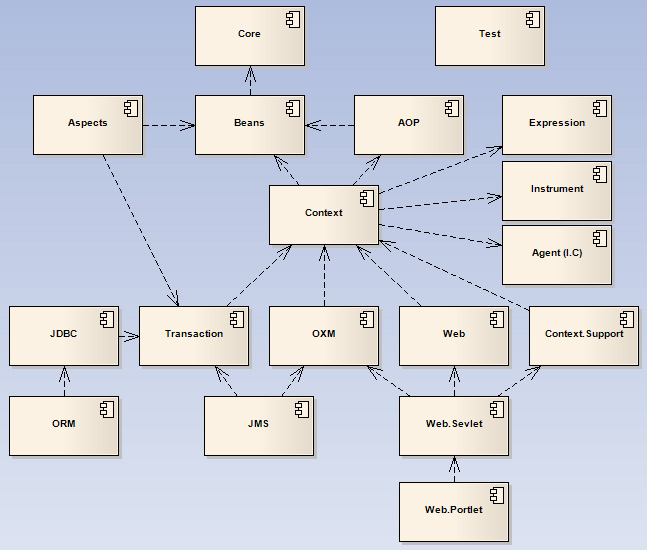
의존관계란 A기능을 사용하려면 B기능이 필요하고, B기능을 사용하려면 C기능이 필요한 것 처럼 서로 연관되어 의존하고 있는 관계를 뜻한다.
위 그림처럼 대부분의 모듈이 spring-context모듈을 필요로 하는데
스프링 프레임워크를 사용할때 자주 사용하는 모듈인 spring-context을 포함해
spring-beans, spring-context, spring-aop 모듈은 항상 함께 사용된다.
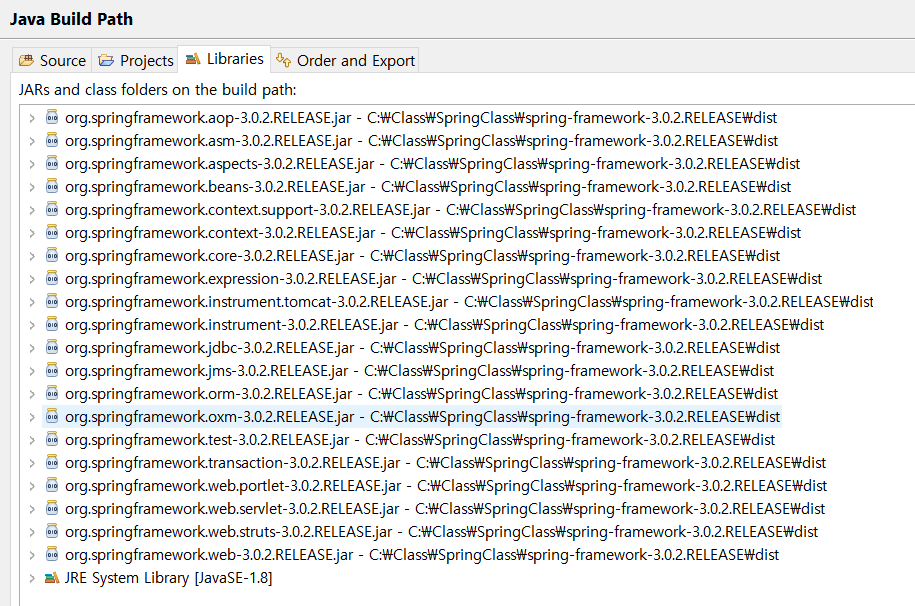
스프링 프레임워크를 사용할때 보통 maven 또는 graddle (빌드 관리도구)을 사용해 관리한다.
maven을 사용할 경우 pom.xml을 통해 사용하고 싶은 jar파일을 인터넷에 있는 중앙 관리 시스템에서 원격으로 다운 받지만
지금은 maven으로 하지 않고 직접 jar파일을 다운받아 build path에 추가하여 Spring프레임웤을 사용하자.
https://spring.io/
스프링 사이트에서spring-framework-3.0.2.RELEASE-dependencies,spring-framework-3.0.2.RELEASE를 다운받고spring-framework-3.0.2.RELEASE\dist위치의 모든 jar파일을 build path에 포함시키자.
Spring 주요 모듈
| 모듈 | 설명 |
|---|---|
spring-beans |
스프링 컨테이너를 이용해서 객체를 생성하는 기본 기능을 제공한다 |
spring-context |
객체생성, 라이프 사이클 처리, 스키마 확장 등의 기능을 제공한다. |
spring-aop |
AOP (Aspect Oriented Programming) 기능을 제공한다. |
spring-web |
REST 클라이언트, 데이터 변환 처리, 서블릿 필터, 파일업로드 지원 등 웹 개발에 필요한 기반 기능을 제공 |
spring-webmvc |
스프링 기반의 MVC 프레임워크이다. |
spring-websocket |
스프링 MVC에서 웹 소켓 연동을 처리하기 위한 API를 제공한다. |
spring-oxm |
XML과 자바 객체 간의 맵핑을 처리하기 위한 API를 제공한다. |
spring-xm |
트랜잭션 처리를 위한 추상 레이어를 제공한다. |
spring-jdbc |
JDBC 프로그래밍을 보다 쉽게 할 수 있는 템플릿을 제공한다. |
spring-orm |
하이버네이트, JPA, MyBatis 등과의 연동을 지원한다. |
spring-jms |
Java Message Service 서버(ActiveMQ, RabbitMQ 등)와 메시지를 쉽게 주고 받을 수 있도록 하기 위한 템플릿(annotation 등) 제공한다. |
spring-context-support |
스케줄링, 메일 발송, 캐시 연동, 벨로시티 등 부가 기능을 제공 |
Spring Container
GenericXmlApplicationContext객체를 사용해 Spring Container를 관리할 수 있는 객체를 생성할 수 있다.
컨테이너는 xml에 설정된 정보를 사용해 객체를 생성하고 관리한다.
이렇게 xml 에 설정된 정보로 생성된 객체를 Spring Bean 객체라 하고 Spring Container 관리된다.
기존에 객체를 생성 및 필드 초기화시 xml의 여러 태그를 사용해 처리할 수 있다.
즉 스프링 컨테이너는 Bean 객체를 생성하고 Bean 객체를 조립하여 의존성 관계를 형성해주는
설정을 통해 객체를 생성, 관리해주는 것 이라 할 수 있다.
Spring 에서 객체생성
기존에 서블릿만 사용할 경우 프로젝트 관리 객체 생성은 아래처럼 생성자로 생성하였다.
public interface BuildRunner {
	public void build(List<String> srcDirs, String binDir);
}

public class Project {
	private List<String> srcDirs;
	private String binDir;
	private BuildRunner buildRunner;

	public void build() {
		buildRunner.build(srcDirs, binDir);
	}
	public void setSrcDirs(List<String> srcDirs) {
		this.srcDirs = srcDirs;
	}
	public void setBinDir(String binDir) {
		this.binDir = binDir;
	}
	public void setBuildRunner(BuildRunner buildRunner) {
		this.buildRunner = buildRunner;
	}
}
Project 내에서 BuildRunner 클래스를 사용해 각종 Bean 객체들을 생성함
public class ProjectBuildRunner implements BuildRunner {

	private String projectPath;

	@Override
	public void build(List<String> srcDirs, String binDir) {
		String info = "프로젝트 경로: " + projectPath + "\n";
		for (String srcDir : srcDirs)
			info += "소스 경로: " + srcDir + "\n";

		info += "클래스파일 경로: " + binDir + "\n";
		System.out.printf("ProjectBuildRunner.build() 실행\n%s", info);
	}
	public void setProjectPath(String projectPath) {
		this.projectPath = projectPath;
	}
}
프로젝트 경로를 설정하고 List<String>로 소스경로를 넘겨 build()메서드로 출력하는 간단한 클래스와 인터페이스이다.
public class Main {
	public static void main(String[] args) {
		ProjectBuildRunner buildRunner = new ProjectBuildRunner();
		Project sampleProject = new Project();

		buildRunner.setProjectPath("C:\\upload\\program.exe");
        List<String> srcDirs = new ArrayList<>();
		srcDirs.add("src");
		srcDirs.add("srcResources");

        sampleProject.setSrcDirs(srcDirs);
		sampleProject.setBinDir("bin");
		sampleProject.setBuildRunner(buildRunner);
		sampleProject.build();
        // ProjectBuildRunner.build() 실행
        // 프로젝트 경로: C:\upload\program.exe
        // 소스 경로: src
        // 소스 경로: srcResources
        // 클래스파일 경로: bin
	}
}
buildRunner, sampleProject 모두 생성자 메스드로 생성된다.
Spring FrameWork에선 Bean 객체로 생성하며 생성되는 과정 xml파일을 통해 이루어 진다.
아래 예제에서 하는 작업은 MAVEN 을 사용하지 않고 스프링 프레임워크에서 사용하는 jar 파일이 모두 build path 저장해두고 사용한다.
지금은 간단히 Spring Framework에서 객체 생성방법을 배우는 목적으로
일반 java 프로젝트에 프레임워크에 필요한 jar 를 수동으로 추가해서 객체를 생성한다.
만약 org.apache.commons.logging.LogFactory를 사용하고 싶다면 아래 ₩ 파일을 build path에 추가로 포함해야 한다.
spring-framework-3.0.2.RELEASE-dependencies\org.apache.commons\com.springsource.org.apache.commons.logging\1.1.1\com.springsource.org.apache.commons.logging-1.1.1.jar
나중에
maven으로 프로젝트를 관리하면pom.xml에Spring Framework를 사용하겠다는 태그 하나만 추가해도 자동으로jar파일이 추가된다.
applicationContext.xml 파일을 src폴더에 생성후 아래내용을 붙여넣는다.
<?xml version="1.0" encoding="UTF-8"?>
<beans xmlns="http://www.springframework.org/schema/beans"
       xmlns:xsi="http://www.w3.org/2001/XMLSchema-instance"
       xsi:schemaLocation="http://www.springframework.org/schema/beans
           http://www.springframework.org/schema/beans/spring-beans-3.0.xsd">
  <bean id="..." class="...">
    <!-- collaborators and configuration for this bean go here -->
  </bean>
  <bean id="..." class="...">
    <!-- collaborators and configuration for this bean go here -->
  </bean>
  <!-- more bean definitions go here -->
</beans>
spring-framework-3.0.2.RELEASE\docs\spring-framework-reference\htmlsingle\spring-framework-reference.html파일의 목차3.2.1 Configuration metadata에서 구할 수 있다.
위의 xml파일에 days01.MavenBuildRunner.buildRunner 클래스, days01.MavenBuildRunner.sampleProject 클래스를 생성하는 코드를 작성해보자.
<?xml version="1.0" encoding="UTF-8"?>
<beans xmlns="http://www.springframework.org/schema/beans"
       xmlns:xsi="http://www.w3.org/2001/XMLSchema-instance"
       xsi:schemaLocation="http://www.springframework.org/schema/beans
           http://www.springframework.org/schema/beans/spring-beans-3.0.xsd">
	<!-- MavenBuildRunner buildRunner = new MavenBuildRunner();
		bean태그 class속성 안에 패키지명도 포함되어야 한다.-->
	<!-- buildRunner.setMavenPath("c:\\apache-maven-3.1.1");
		EL태그 사용했던 것 처럼 set키워드는 생략된다. 당연히 set함수는 정의되어있어야 한다.-->
	<bean id="buildRunner" class="days01.MavenBuildRunner">
		<property name="mavenPath">
			<value>C:\apache-maven-3.1.1</value>
		</property>
	</bean>

	<!--Project sampleProject = new Project(buildRunner);     -->
	<!--sampleProject.setBinDir("bin");            -->
	<bean id="sampleProject" class="days01.Project">
		<property name="binDir" value="bin"/>

		<!--List<String> srcDirs = new ArrayList<>();  -->
		<!--srcDirs.add("src");                        -->
		<!--srcDirs.add("srcResources");               -->
		<!--sampleProject.setSrcDirs(srcDirs);         -->
		<property name="srcDirs">
			<list>
				<value>src</value>
				<value>srcResources</value>
			</list>
		</property>
		<!--sampleProject.setBuildRunner(buildRunner); -->
		<property name="buildRunner" ref="buildRunner">
		</property>
	</bean>
</beans>
<bean>, <property>, <value>, <list>를 통해 객체 생성을 위한 설정을 할 수 있다.
public static void main(String[] args) {
  String configLocation = "applicationContext_record.xml";
  AbstractApplicationContext ctx_record = new GenericXmlApplicationContext(configLocation);
  RecordViewImpl service = ctx_record.getBean("service", RecordViewImpl.class);
  service.input();
  service.output();
}
GenericXmlApplicationContext를 생성하고 getBean()메서드를 통해 xml에 설정한 대로 컨테이너가 생성한 객체를 가져올 수 있다.
결과값
ProjectBuildRunner.build() 실행
프로젝트 경로: C:\upload\program.exe
소스 경로: src
소스 경로: srcResources
클래스파일 경로: bin
정상적으로 동작한다.
이번엔 국, 영, 수 점수를 입력받아 합과 평균을 출력하는 클래스와 메서드를 작성하자.
public interface Record {
	int total();
	double avg();
}
public class RecordImpl implements Record{
	private int kor;
	private int mat;
	private int eng;

	@Override
	public int total() {
		return kor+mat+eng;
	}
	@Override
	public double avg() {
		return (kor+mat+eng)/3.0;
	}
  //get..set 메서드들 자동 생성

	public RecordImpl(int kor, int mat, int eng) {
		this.kor = kor;
		this.mat = mat;
		this.eng = eng;
	}
	public RecordImpl() {
	}
}
public interface RecordView {
	//성적 입출력
	void input();
	void output();
}
public class RecordViewImpl implements RecordView{
	private RecordImpl record = null;
	public RecordViewImpl() {}
	public RecordViewImpl(Record record) {
		this.record = (RecordImpl) record;
	}
	// getter
	public RecordImpl getRecord() {
		return record;
	}
	// setter
	public void setRecord(RecordImpl record) {
		this.record = record;
	}
	@Override
	public void input() {
		try(Scanner scanner = new Scanner(System.in);){
			System.out.print("> kor,eng,mat input ? ");
			this.record.setKor(scanner.nextInt());
			this.record.setEng(scanner.nextInt());
			this.record.setMat(scanner.nextInt());
		} catch (Exception e) {
			e.printStackTrace();
		}
	}
	@Override
	public void output() {
		System.out.printf(
				"> kor:%d, eng:%d, mat:%d, tot=%d, avg=%.2f\n"
				,this.record.getKor()
				,this.record.getEng()
				,this.record.getMat()
				,this.record.total()
				,this.record.avg()
				);
	}
}
매우 간단한 인터페이스와 클래스.
public static void main(String[] args) {
  Record record = new RecordImpl();
  RecordViewImpl service = new RecordViewImpl(record);
  service.input();
  service.output();
}
결과값
> kor,eng,mat input ? 10 20 30
> kor:10, eng:20, mat:30, tot=60, avg=20.00
위의 생성방식을 Spring Framework에 맞게 xml을 설정해 스프링 컨테이너로 객체 생성해보자.
<!-- applicationContext_record.xml -->
<?xml version="1.0" encoding="UTF-8"?>
<beans xmlns="http://www.springframework.org/schema/beans"
       xmlns:xsi="http://www.w3.org/2001/XMLSchema-instance"
       xsi:schemaLocation="http://www.springframework.org/schema/beans
           http://www.springframework.org/schema/beans/spring-beans-3.0.xsd">
  <bean id="record" class="di.RecordImpl">
  </bean>
	<bean id="service" class="di.RecordViewImpl">
    	<property name="record">
    		<ref bean="record"/>
    	</property>
    </bean>
</beans>
<ref>태그를 사용해서 위에서 설정된 스프링 빈 객체를 참조시킬 수 있다.(의존관계 설정)
xml설정에 따라서 main함수에서 다음과 같이 객체생성을 할 수 있다.
public static void main(String[] args) {
  String configLocation = "applicationContext_record.xml";
  AbstractApplicationContext ctx_record = new GenericXmlApplicationContext(configLocation);
  RecordViewImpl service = ctx_record.getBean("service", RecordViewImpl.class);
  service.input();
  service.output();
}
만들어진 스프링 컨테이너 객체의 getBean()메서드를 통해 xml에 설정한 식별자에 해당하는 빈 객체를 가져온다.
뒤에 클래스 타입
RecordViewImpl.class을 적지 않으면 형변환 필요
스프링 컨테이너 종류
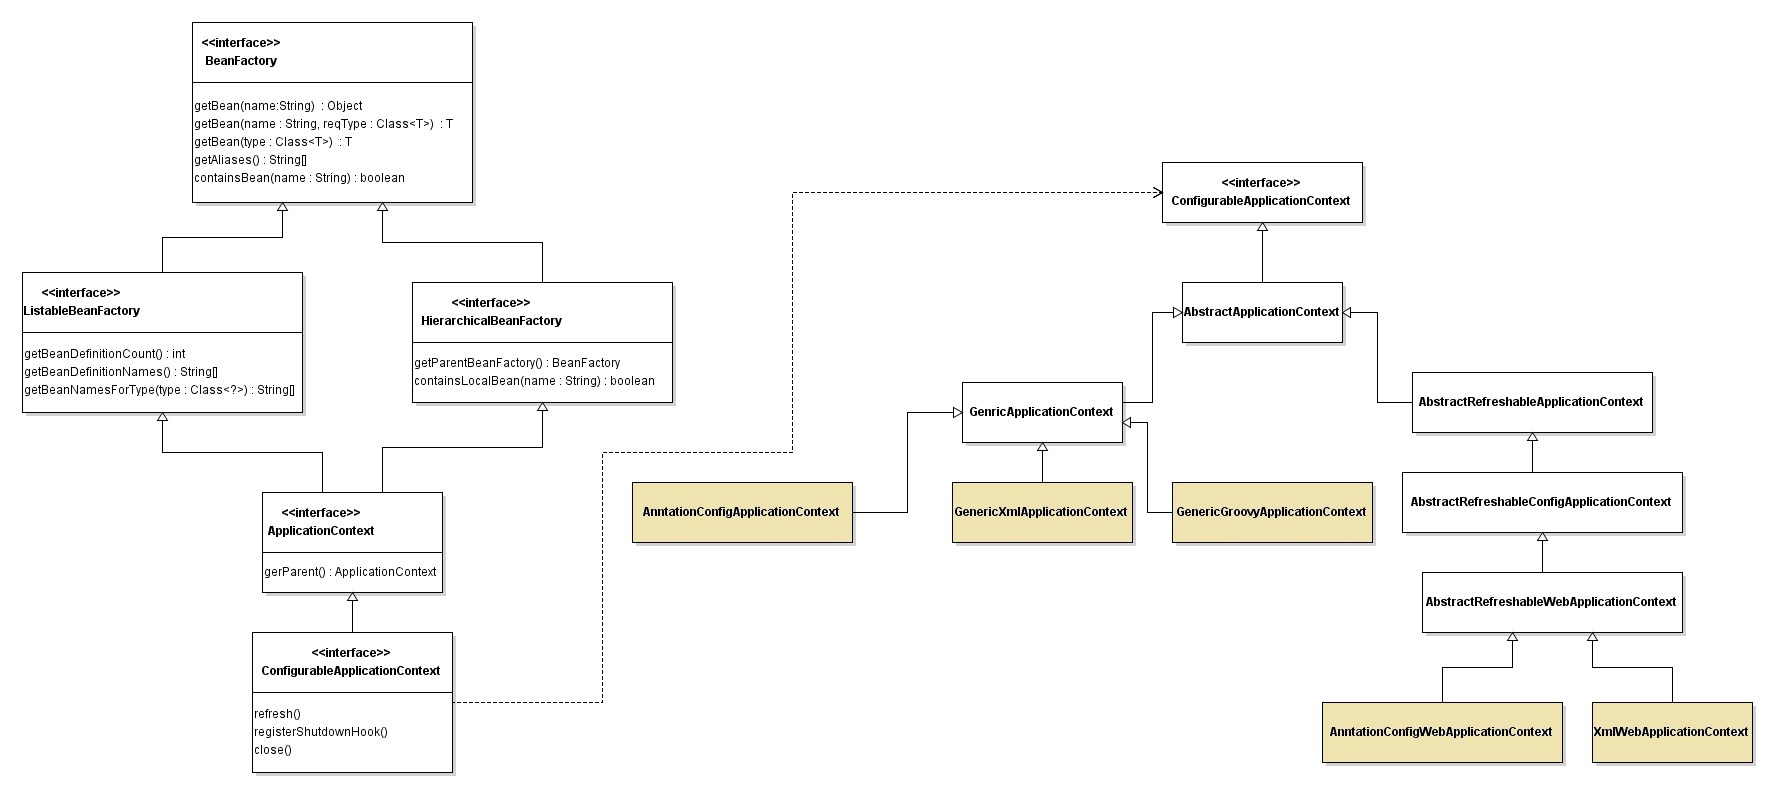
스프링은 두가지 타입의 컨테이너는 제공한다.
좀더 자세히 말하면
BeanFactory를 구현한 클래스로 컨테이너에 접근할 수 있고
ApplicationContext까지 구현한 클래스로 컨테이너에 접근할 수 있다.
보통 BeanFactory계열의 인터페이스만 구현한 클래스로는 컨테이너에 접근하진 않는다.
스프링이 제공하는 다양한 기능(트랜잭션 처리, 자바코드 기반 스프링 설정, 어노테이션 등)을 사용하지 못하고 객체를 생성하고 DI처리밖에 하지 못한다.
따라서 ApplicationContext 인터페이스를 구현한 클래스로 스프링 컨테이너에 접근하는데 색이 칠해진 5가지 클래스를 사용한다.
| 클래스명 | 사용 방법 |
|---|---|
GenericXmlApplicationContext |
XML파일을 설정정보로 사용해 스프링 컨테이너를 구현하는 클래스, 독립형 어플리케이션을 개발할 때 사용. |
AnnotationConfigApplicationContext |
자바코드를 설정정보로 사용해 스프링 컨테이너를 구현하는 클래스, 독립형 어플리케이션을 개발할 때 사용. |
GenericGroovyApplicationContext |
그루비 언어로 작성된 설정정보로 사용해 스프링 컨테이너를 구현하는 클래스, 독립형 어플리케이션을 개발할 때 사용. |
XmlWebApplicationContext |
웹 어플리케이션을 개발할 때 사용, XML파일을 설정정보로 사용해 스프링 컨테이너를 구현하는 클래스. |
AnnotationConfigWebApplicationContext |
웹 어플리케이션을 개발할 때 사용, 자바코드를 설정정보로 사용해 스프링 컨테이너를 구현하는 클래스. |
지금까지 위에서 GenericXmlApplicationContext와 xml설정파일을 통해 스프링 빈 객체를 생성해 왔다.
아직은 GenericXmlApplicationContext 사용한 xml설정에 대해 좀더 자세히 알아보자.
XML을 이용한 DI설정
의존관계(DI) 를 위한 xml설정을 통해 특정 클래스에 원하는 클래스를 싱글톤 패턴으로 필드에 주입시킬 수 있다.
태그
<bean> 태그는 생성할 스프링 빈 객체에 대한 정보를 지정할 때 사용한다.
일단 빈 객체를 생성해야 의존관계를 형성할 수 있기 때문에 가장 기본적으로 사용되는 태그.
주요속성으로 식별자를 지정할수있는 id, 어떤 클래스 타입으로 생성할지 정하는 class속성이 있다.
class속성에는 패키지 명을 포함한 풀 클래스 네임이 요구된다.
태그
객체를 생성할때 생성자에 대한 설정을 할 수 있는 태그이다.
위의 Record 클래스를 필드로 가지는 Student클래스를 다음과 같이 정의.
public class Student {
	private String name;
	private int std_num;
	private RecordView service;

  //get, set 생략....

	public void inputStdScore() {
		this.service.input();
	}
	public void displayStdInf() {
		System.out.println("> name : " + this.name);
		System.out.println("> std_num : " + this.std_num);
		this.service.output();
	}
	public Student(String name, int std_num, RecordView service) {
		super();
		this.name = name;
		this.std_num = std_num;
		this.service = service;
	}
}
이 Student클래스를 xml을 통해 생성, 생성자를 통해 초기화 해보자.
<?xml version="1.0" encoding="UTF-8"?>
<beans xmlns="http://www.springframework.org/schema/beans"
       xmlns:xsi="http://www.w3.org/2001/XMLSchema-instance"
       xsi:schemaLocation="http://www.springframework.org/schema/beans
           http://www.springframework.org/schema/beans/spring-beans-3.0.xsd">

    <bean id="record" class="di.RecordImpl">
    </bean>
	<bean id="service" class="di.RecordViewImpl">
    	<property name="record">
    		<ref bean="record"/>
    	</property>
    </bean>
    <bean id="student" class="di.Student">
    	<constructor-arg><value>\홍"길"동\</value></constructor-arg>
    	<constructor-arg value="190618001"/>
    	<constructor-arg ref="service"/>
    	<!-- <constructor-arg><ref bean="service"/></constructor-arg> -->
    </bean>
</beans>
public class StudentMain {
	public static void main(String[] args) {
		String configLocation = "applicationContext_student.xml";
		AbstractApplicationContext ctx = new GenericXmlApplicationContext(configLocation);
		Student student = ctx.getBean("student", Student.class);
		student.inputStdScore();
		student.displayStdInf();
	}
}
출력값
> kor,eng,mat input ? 10 20 30
> name : \홍"길"동\
> std_num : 190618001
> kor:10, eng:20, mat:30, tot=60, avg=20.00
특이한점은 value태그 안의 백슬레시나 쌍따옴표가 별도처리 없이 바로 출력 가능하단점.
이는 <constructor-arg>태그안 value속성을 쓸 때도 마찬가지 이다.
(단 속성으로 설정할 경우 쌍따옴표는 사용하지 못한다)
쌍따옴표를 출력하고 싶다면
value를 태그로 사용하자.
일반형 타입의 파리미터를 초기화 할때는 value태그 혹은 속성을 사용하고
참조형 타입의 파리미터를 초기화 할때는 ref태그 혹은 속성을 사용한다.
개인적으로 속성을 사용하는 것 을 추천…
c네임 스페이스를 사용한 생성자 방식 설정
<constructor-arg>만 사용하면 생성자의 어떤 파라미터를 초기화 하는지 순서값을 알고있어야만 가능하다.
c네임스페이스를 사용하면 순서를 몰라도 파라미터 식별자명을 알고있으면 초기화 가능하다.
먼저 최상단의 <beans>태그에 c네임 스페이스 사용을 위해 문구를 추가.
xmlns:c="http://www.springframework.org/schema/c"
접두어로 'c'를 사용하고 c:파라미터이름으로 일반형 타입의 파라미터를, c:파라미터이름-ref으로 빈객체를 생성자 파라미터로 전달 가능하다.
순서(index)로 초기화 하고 싶다면 c:_인덱스, c:_인덱스-ref 사용 (첫번째 인덱스는 0부터 시작한다)
위의 student객체를 생성하는 xml코드를 c네임스페이스를 사용한 방식으로 변경해보자.
<?xml version="1.0" encoding="UTF-8"?>
<beans 	xmlns="http://www.springframework.org/schema/beans"
	xmlns:c="http://www.springframework.org/schema/c"
	xmlns:xsi="http://www.w3.org/2001/XMLSchema-instance"
	xsi:schemaLocation="http://www.springframework.org/schema/beans
	http://www.springframework.org/schema/beans/spring-beans-3.0.xsd">

	<bean id="record" class="di.RecordImpl">
	</bean>
	<bean id="service" class="di.RecordViewImpl">
		<property name="record">
			<ref bean="record"/>
		</property>
	</bean>
	<bean id="student" class="di.Student"
		c:name="홍길동"
		c:std_num="190618001"
		c:service-ref="service">
	</bean>
</beans>
c네임스페이스는 3.x spring버전에선 사용할 수 없다. 4.0 버전으로 사용해야 한다.
p네임 스페이스를 사용한 프로퍼티 설정
좀더 간편하게 빈 객체의 필드값을 설정하기 위한 라이브러리로
상단의 <beans>태그에 p네임 스페이스 사용을 위해 다음 문구를 추가하면 사용할 수 있다.
xmlns:p="http://www.springframework.org/schema/p"
기존에 빈 객체를 생성하고 의존관계를 주입 (인스턴스 필드 초기화) 하려면 아래와 같이 <property>태그를 통해 xml설정을 해야 했다.
<bean id="service" class="di.RecordViewImpl">
	<property name="record">
		<ref bean="record"/>
	</property>
</bean>
p네임 스페이스를 사용하면 좀더 간편하게 처리할 수 있다.
<bean id="service" class="di.RecordViewImpl"
	p:record-ref="record"
	/>
일반형 필드의 경우 -ref를 생략 가능하며 자바 빈 객체를 참조시킬 경우 위의 키워드를 붙여야한다.
List, Map, Set 타입의 콜렉션 설정
요소가 일반형 타입의 변수 (int, String, double 등) 경우 <value>태그를 사용해 설정 가능하고
요소가 참조향 타입의 변수일 경우 <ref>태그를 통해 설정 가능하다.
콜렉션 타입의 필드를 설정할 경우 다음과 같이 설정한다
List<Integer> 형의 설정의 경우
<list>
  <value>1</value>
  <value>2</value>
</list>
Set<Integer>도 다를 건 없다. 단 중복허용 안하기 때문에 아래와 같이 설정할 경우 3개만 들어가게 된다.
<set>
  <value>1</value>
  <value>2</value>
  <value>3</value>
  <value>3</value>
</set>
요소값으로 기본형이 아닌 스프링 빈 객체를 사용하고 싶다면
value-ref태그나 속성을 사용하면 된다.
Map<Integer>콜렉션 객체의 경우 <entry>, <key>, <value> 태그를 통해 콜렉션을 초기화 할 수 있다.
<map>
  <entry>
    <key><value>1</value></key>
    <value>"jone"</value>
  </entry>
  <entry key="2">
    <value>"benni"</value>
  </entry>
  <entry key="3" value="metu"/>
</map>
콜렉션을 설정했다면 빈 객체의 <property>태그를 사용해 필드를 만들어진 콜렉션 객체로 초기화 하면 된다.
<bean id="moniter" class="di.Monitor">
  <propertiy name="field_Map">
    <map>
    ...
    ...
    </map>
  </propertiy>
</bean>
생성되는 콜렉션 객체의 타입은 ArrayList, LinkedHashMap, LinkedHashSet이지만 버전에 따라 달라질 수 있다.
Properties 콜렉션 설정
서버 설정 정보가 저장되는 Properties콜렉션 또한 스프링 컨테이너와 xml파일로 설정 가능하다.
Properties prop = new Properties();
prop.setProperty("threshold", "1500");
prop.setProperty("retry", "5");
위의 자바코드를 xml로 변경하면 아래와 같다.
<props>
  <prop key="threshold">1500</prop>
  <prop key="retry">5</prop>
</props>
<bean id="propertyTest" class="di.PropertyTest">
  <property name="field_prop">
    <value>
      threshold=3000
      retry=5
    </value>
  </property>
</bean>
<prop>태그와 key속성을 사용하거나
<prop>태그를 생략하고 <value>태그로만 설정해 간편하게 사용할 수 있다.
GenricXmlApplicationContext 설정파일 지정
지금까지 하나의 xml파일만 new GenricXmlApplicationContext("파일경로 및 파일명") 을 통해 스프링 컨테이너로 객체 생성을 하였는데
여러개의 xml파일을 지정 가능하다.
new GenricXmlApplicationContext("파일1", "파일2", ..."파일n")
new GenricXmlApplicationContext("/파일경로/fileName-*.xml")
xml파일을 여러개 나열시켜 모두 읽어오거나 에스타링크를 사용해 "fileName-"으로 시작하는 모든 xml을 스프링 컨테이너에 적용 가능하다.
태그를 사용한 설정파일 포함
xml파일들이 여러개로 흩어져 있을경우 <import>태그로 포함시킬 수 있다.
<beans
	xmlns="http://www.springframework.org/schema/beans"
	xmlns:context="http://www.springframework.org/schema/context"
	xmlns:xsi="http://www.w3.org/2001/XMLSchema-instance"
	xsi:schemaLocation="http://www.springframework.org/schema/beans
	http://www.springframework.org/schema/beans/spring-beans-3.0.xsd
	http://www.springframework.org/schema/context
	http://www.springframework.org/schema/context/spring-context.xsd"
	>
	...
	...
	<import resource="....1.xml">
	<import resource="....2.xml">
</beans>
자바코드를 사용한 DI설정, AnnotationConfigApplicationContext
지금까지 xml파일과 GenericXmlApplicationContext 객체를 통해 Spring Container를 사용해 객체를 생성, 설정하였는데 자바코딩을 통해 객체를 생성, 설정해보자.
자바코드를 사용한 설정에선 @Configuration, @Bean 어노테이션을 사용한다.
위 Record예제의 xml 설정이다.
<bean id="record" class="di.RecordImpl">
</bean>
<bean id="service" class="di.RecordViewImpl">
  <property name="record">
    <ref bean="record"/>
  </property>
</bean>
자바 코드를 통해 설정하도록 해보자.
@Configuration //이 클래스를 스프링 설정으로 사용함을 의미
public class Config {
	@Bean //Bean객체를 만드는 함수임을 의미하며 함수명은 스프링 빈 객체 식별자로 사용한다.
	public RecordImpl record() {
		return new RecordImpl();
	}

	@Bean(name="service")
	public RecordViewImpl getService(RecordImpl record) {
		return new RecordViewImpl(record);
	}
	//함수명을 식별자로 주기 싫다면 @Bean어노태이션 뒤의 괄호에 식별자 지정이 가능하다.
}
public static void main(String[] args) {
  AbstractApplicationContext ctx_record = new AnnotationConfigApplicationContext(Config.class);
  RecordViewImpl service = ctx_record.getBean("service", RecordViewImpl.class);
  service.input();
  service.output();
}
위 그림에서 설명한 AnnotationConfigApplicationContext객체를 통해 자바코드로 만들어진 설정파일을 사용해 서블릿 컨테이너에 적용한다.
아무래도 자바코드로 설정하다 보니 xml보다 좀더 디테일한 설정이 가능하다.
아무런 설정 없이 실행하면 다음과 같은 오류가 출력된다.
6월 18, 2019 4:15:05 오후 org.springframework.context.support.AbstractApplicationContext prepareRefresh
정보: Refreshing org.springframework.context.annotation.AnnotationConfigApplicationContext@2e817b38: startup date [Tue Jun 18 16:15:05 KST 2019]; root of context hierarchy
Exception in thread "main" java.lang.IllegalStateException: CGLIB is required to process @Configuration classes. Either add CGLIB to the classpath or remove the following @Configuration bean definitions: [config]
at org.springframework.context.annotation.ConfigurationClassPostProcessor.enhanceConfigurationClasses(ConfigurationClassPostProcessor.java:214)
at org.springframework.context.annotation.ConfigurationClassPostProcessor.postProcessBeanFactory(ConfigurationClassPostProcessor.java:145)
at org.springframework.context.support.AbstractApplicationContext.invokeBeanFactoryPostProcessors(AbstractApplicationContext.java:640)
at org.springframework.context.support.AbstractApplicationContext.invokeBeanFactoryPostProcessors(AbstractApplicationContext.java:630)
at org.springframework.context.support.AbstractApplicationContext.refresh(AbstractApplicationContext.java:405)
at org.springframework.context.annotation.AnnotationConfigApplicationContext.<init>(AnnotationConfigApplicationContext.java:65)
at di.Ex02.main(Ex02.java:9)
AnnotationConfigApplicationContext객체를 사용하려면
spring-framework-3.0.2.RELEASE-dependencies\net.sourceforge.cglib\com.springsource.net.sf.cglib\2.2.0 위치의 com.springsource.net.sf.cglib-2.2.0.jar 파일을 build path에 추가해야한다.
jsp/servlet에서 jsp파일은 수정해도 서버가 재시작 안하고 java파일을 수정하면 서버가 다시 컴파일 되며 초기화된다.
Spring에서도 java파일의 설정을 수정하면 재컴파일이 필요하고 xml의 경우 바로 적용된다.
실제 2개를 같이 사용하는 경우가 많다.
변화가 별로 없을 경우 java를 사용하고 변화가 많은 서비스라면 xml을 사용한다.
@import 어노테이션을 이용한 설정 자바코드 포함
xml에서 <import> 태그를 사용해 흩어져 있는 xml파일들을 합칠 수 있었던 것 처럼
자바 설정파일 또한 @import어노테이션으로 흩어져있는 자바 설정파일을 합칠 수 있다.
@Configuration
public class Config1 {
	@Bean
	public RecordImpl record() {
		return new RecordImpl();
	}
}

---------

@Configuration
public class Config2 {
	@Bean
	public RecordViewImpl service() {
		return new RecordViewImpl();
	}
}
위와 같은 2개의 자바 설정파일이 있을 때 아래와 같이 합칠 수 있음.
@Configuration
@import({Config1.class, Config2.class})
public class Config3 {
	...
	...
}
xml설정에서 자바코드 설정 사용하기
xml에서 자바코드 설정파일을 사용하려면 <context:annotation-config/>설정을 추가
설정파일을 같이 사용할 뿐 아니라 java코드에 쓰여있는 어노테이션을 xml에서 사용하려면 위와같은 context네임스페이스를 사용해야하기 때문에 거의 모든 xml설정파일에서 <context:annotation-config/>설정을 사용한다.
context 네임스페이스를 사용하려면 <beans>태그에 다음과 같이 설정을 추가해야 사용 가능하다.
<beans
	xmlns="http://www.springframework.org/schema/beans"
	xmlns:context="http://www.springframework.org/schema/context"
	xmlns:xsi="http://www.w3.org/2001/XMLSchema-instance"
	xsi:schemaLocation="http://www.springframework.org/schema/beans
	http://www.springframework.org/schema/beans/spring-beans-3.0.xsd
	http://www.springframework.org/schema/context
	http://www.springframework.org/schema/context/spring-context.xsd"
	>
	<context:annotation-config/>
	...
	...
</beans>
위의 3개의 코드가 추가되었다.
Config 클래스파일을 xml에 포함시켜 동작시키도록 해보자.
<beans
	xmlns="http://www.springframework.org/schema/beans"
	xmlns:context="http://www.springframework.org/schema/context"
	xmlns:xsi="http://www.w3.org/2001/XMLSchema-instance"
	xsi:schemaLocation="http://www.springframework.org/schema/beans
	http://www.springframework.org/schema/beans/spring-beans-3.0.xsd
	http://www.springframework.org/schema/context
	http://www.springframework.org/schema/context/spring-context.xsd">
	<context:annotation-config/>
	<bean class="spring.config.Config1"/>
	<bean class="spring.config.Config2"/>
	<bean class="spring.config.Config3"/>
	...
	...
</beans>
자바 설정파일에서 xml 설정 사용하기
자바코드설정을 주로 사용하고 xml을 가져와 사용하고 싶을 수 도 있다.
@ImportResource어노테이션을 사용하면 된다.
@Configuration
@ImportResource({"applicationContext_record.xml", "applicationContext_student.xml"}) //경로 설정 필요
public class Config {
	@Bean
	public RecordImpl record() {
		return new RecordImpl();
	}
}