Rest API
클라이언트가 특정 서비스로부터 HTTP 프로토콜을 통해 json 형식의 데이터를 가져오는 너무나도 당연한 형식의 코드를 Flutter 로 작성해보자.
http
https://flutter.dev/docs/cookbook#networking
Dart와 Flutter가 제공하는 http package 를 사용해 네트워크에서 데이터를 읽어와 보자.
아래 Url 에서 패키지 설치
https://pub.dev/packages/http
아래 형식으로 사용할 수 있다.
Future<http.Response> fetchPost() {
  return http.get('https://jsonplaceholder.typicode.com/posts/1');
}
URL이 반환하는 JSON 데이터
{
  "userId": 1,
  "id": 1,
  "title": "sunt aut facere repellat provident occaecati excepturi optio reprehenderit",
  "body": "quia et suscipit\nsuscipit recusandae consequuntur expedita et cum\nreprehenderit molestiae ut ut quas totam\nnostrum rerum est autem sunt rem eveniet architecto"
}
http.get() 메서드
Future<Response> get (dynamic url, {Map<String, String> headers})
url을 입력하면 Future<Response> 데이터 타입을 반환한다.
Future<T> class가 등장하는데 데이터를 위한 작은 선물상자로 생각하면 된다.
안에는 특정 value혹은 error가 있을 수 있다.
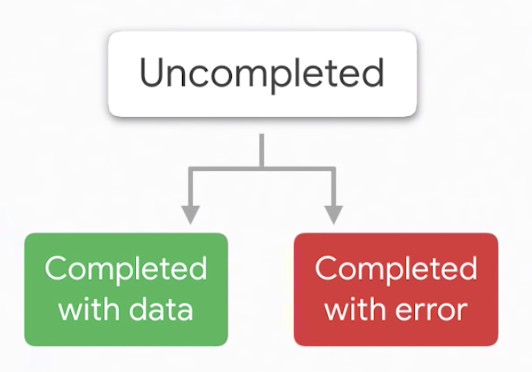
Future는 위 3가지 상태를 가지며 코드가 아직 실행되지 않은 Uncompleted상태, 코드가 실행된 Complete상태가 있다.
어쨋건 http.get으로 받은 http.Response객체를 우리가 원하는 데이터 형식으로 변환하면 된다.
http.get()외에도put,post,delete메서드를 지원한다.
Future<http.Response> updateAlbum(String title) {
  return http.put(
    'https://jsonplaceholder.typicode.com/albums/1',
    headers: <String, String>{
      'Content-Type': 'application/json; charset=UTF-8',
    },
    body: jsonEncode(<String, String>{
      'title': title,
    }),
  );
}
json to Dart
Dart에선 JSON 데이터로 바로 사용하지 않고 별도의 객체를 정의하고 http.Response를 Post로 형변환 하자.
https://javiercbk.github.io/json_to_dart/
위 사이트를 통해 json 데이터와 매칭되는 클래스를 자동생성할 수 있다.
class Post {
  int userId;
  int id;
  String title;
  String body;

  Post({this.userId, this.id, this.title, this.body});

  Post.fromJson(Map<String, dynamic> json) {
    userId = json['userId'];
    id = json['id'];
    title = json['title'];
    body = json['body'];
  }

  Map<String, dynamic> toJson() {
    final Map<String, dynamic> data = new Map<String, dynamic>();
    data['userId'] = this.userId;
    data['id'] = this.id;
    data['title'] = this.title;
    data['body'] = this.body;
    return data;
  }
}
Future<Post> fetchPost() async {
  final response = await http.get('https://jsonplaceholder.typicode.com/posts/1');

  if (response.statusCode == 200) {
    return Post.fromJson(json.decode(response.body));
  } else {
    throw Exception('Failed to load post');
  }
}
json.decode 를 사용하려면 아래 패키지를 import 해야한다.
import 'dart:convert';
mockito
간단히 Rest API를 테스트 하기위해 mockito 패키지를 사용할 수 있다.
https://pub.dev/packages/mockito
mockito 의 경우 dev_dependencies에서 추가한다.
dev_dependencies:
  flutter_test:
    sdk: flutter
  mockito: ^4.1.1
test 디렉토리에 간단한 테스트 메서드 작성
http 패키지를 사용해 response를 가져오는 테스트 진행
// widget_test_http.dart
void main() {
  test("http 통신 테스트", () async {
    var response = await http.get("https://api.airvisual.com/v2/nearest_city?key=");
    expect(response.statusCode, 200);

    AirResult result = AirResult.fromJson(json.decode(response.body));
    expect(result.status, "success");
  });
}
Http status 가 200이 출력되는지 확인
전달받은 json 데이터 response.body를 AirResult dart객체로 변환하고 status 값이 success 문자열인지 확인
FutureBuilder
이제 전달받은 데이터를 페이지 위젯에 출력하기만 하면 된다.
이쯤에서 전체코드를 한번 봐보자.
import 'dart:async';
import 'dart:convert';

import 'package:flutter/material.dart';
import 'package:http/http.dart' as http;

Future<Post> fetchPost() async {
  final response =
      await http.get('https://jsonplaceholder.typicode.com/posts/1');

  if (response.statusCode == 200) {
    return Post.fromJson(json.decode(response.body));
  } else {
    throw Exception('Failed to load post');
  }
}

class Post {
  final int userId;
  final int id;
  final String title;
  final String body;

  Post({this.userId, this.id, this.title, this.body});

  factory Post.fromJson(Map<String, dynamic> json) {
    return Post(
      userId: json['userId'],
      id: json['id'],
      title: json['title'],
      body: json['body'],
    );
  }
}

void main() => runApp(MyApp(post: fetchPost()));

class MyApp extends StatelessWidget {
  final Future<Post> post;

  MyApp({Key key, this.post}) : super(key: key);

  @override
  Widget build(BuildContext context) {
    return MaterialApp(
      title: 'Fetch Data Example',
      theme: ThemeData(
        primarySwatch: Colors.blue,
      ),
      home: Scaffold(
        appBar: AppBar(
          title: Text('Fetch Data Example'),
        ),
        body: Center(
          child: FutureBuilder<Post>(
            future: post,
            builder: (context, snapshot) {
              if (snapshot.hasData) {
                return Text(snapshot.data.title);
              } else if (snapshot.hasError) {
                return Text("${snapshot.error}");
              }
              return CircularProgressIndicator();
            },
          ),
        ),
      ),
    );
  }
}
여기서 FutureBuilder<Post>라는 위젯을 통해 페이지를 생성하는데
async가 정의된 fetchPost()메서드는 동기화작업이 필요해도 페이지 위젯을 생성하고 화면에 띄우는 작업은 굳이 동기화 될 때 까지 기다릴 필요가 없다.
맨 처음 생성될 때에는 Future<Post>가 uncompleted상태임으로 return CircularProgressIndicator();가 수행되며 로딩 이미지를 출력한다.
snapshot.data를 통해 future속성에 설정된 post인스턴스에 접근이 가능하고 Future<Post>가 complete상태가 되면 다시한번 호출되며 post의 title을 출력한다.
snapshot은 AsyncSnapshot<T>로 데이터, 에러, 연결 상태 등을 확인할 수 있다.
https://api.flutter.dev/flutter/widgets/AsyncSnapshot-class.html
compute - Parse JSON in the background
사용자 인터페이스를 방해하지 않고 많은 양의 데이터를 백그라운드에서 처리할때 compute 메서드를 사용한다.
Future<http.Response> fetchPhotos(http.Client client) async {
  return client.get('https://jsonplaceholder.typicode.com/photos');
}
http.get 메서드는 사실
http.Client생성후client의get메서드를 호출하는 것이다.
위 url 요청시 5000장에 해당하는 이미지 JSON 데이터를 반환한다.
[
  {
    "albumId": 1,
    "id": 1,
    "title": "accusamus beatae ad facilis cum similique qui sunt",
    "url": "https://via.placeholder.com/600/92c952",
    "thumbnailUrl": "https://via.placeholder.com/150/92c952"
  },
  ...
  ...
  {
    "albumId": 100,
    "id": 5000,
    "title": "error quasi sunt cupiditate voluptate ea odit beatae",
    "url": "https://via.placeholder.com/600/6dd9cb",
    "thumbnailUrl": "https://via.placeholder.com/150/6dd9cb"
  }
]
이 JSON데이터를 사용하기 편하도록 Photo라는 우리가 정의한 객체로 형변환하는 작업을 compute 메서드를 사용해 처리해보자.
JSON Array -> List<Photo>
먼저 Photo클래스 정의,
class Photo {
  final int id;
  final String title;
  final String thumbnailUrl;

  Photo({this.id, this.title, this.thumbnailUrl});

  factory Photo.fromJson(Map<String, dynamic> json) {
    return Photo(
      id: json['id'] as int,
      title: json['title'] as String,
      thumbnailUrl: json['thumbnailUrl'] as String,
    );
  }
}
위의 JSON Arraey를 List<Photo>로 형변환
List<Photo> parsePhotos(String responseBody) {
  final parsed = json.decode(responseBody).cast<Map<String, dynamic>>();
  return parsed.map<Photo>((json) => Photo.fromJson(json)).toList();
}
이 형변환 과정 parsePhotos 메서드를 compute 를 통해 별도의 스레드가 백그라운드에서 콜백형식으로 일을 맡아 수행한다.
Future<List<Photo>> fetchPhotos(http.Client client) async {
  final response = await client.get('https://jsonplaceholder.typicode.com/photos');
  return compute(parsePhotos, response.body);
}
Work with WebSockets
웹 소켓 서버와 연결하려면 web_socket_channel package가 필요하다.
https://pub.dev/packages?q=web_socket_channel
pubspec.yaml에 dependencies를 추가.
import 'package:web_socket_channel/io.dart';
import 'package:web_socket_channel/web_socket_channel.dart';
...
...
final channel = IOWebSocketChannel.connect('ws://echo.websocket.org');
서버와 연결된 WebSocketChannel 객체가 생성된다.
생성된 WebSocketChannel객체로 message를 송, 수신하며
StreamBuilder 위젯을 통해 message를 수신하여 처리할 수 있다.
https://api.flutter.dev/flutter/widgets/StreamBuilder-class.html
StreamBuilder(
  stream: widget.channel.stream,
  builder: (context, snapshot) {
    return Text(snapshot.hasData ? '${snapshot.data}' : '');
  },
);
stream객체는 IOWebSocketChannel.connect() 메서드로 생성한 WebSocketChannel에서 가져올 수 있으며 builder속성에 메세지를 받으면 호출하는 콜백함수 역할을 할 메서드를 정의한다.
snapshot을 통해 받은 데이터, 연결상태, 에러발생 여부를 체크할 수 있다.
데이터를 서버에 전송하거나 연결을 종료할 때에는 WebSocketChannel 안의 WebSocketSink 객체를 사용한다. \
channel.sink.add('Hello!');
channel.sink.close();
전체코드
import 'package:flutter/foundation.dart';
import 'package:web_socket_channel/io.dart';
import 'package:flutter/material.dart';
import 'package:web_socket_channel/web_socket_channel.dart';

void main() => runApp(MyApp());

class MyApp extends StatelessWidget {
  @override
  Widget build(BuildContext context) {
    final title = 'WebSocket Demo';
    return MaterialApp(
      title: title,
      home: MyHomePage(
        title: title,
        channel: IOWebSocketChannel.connect('ws://echo.websocket.org'),
      ),
    );
  }
}

class MyHomePage extends StatefulWidget {
  final String title;
  final WebSocketChannel channel;

  MyHomePage({Key key, @required this.title, @required this.channel})
      : super(key: key);

  @override
  _MyHomePageState createState() => _MyHomePageState();
}

class _MyHomePageState extends State<MyHomePage> {
  TextEditingController _controller = TextEditingController();

  @override
  Widget build(BuildContext context) {
    return Scaffold(
      appBar: AppBar(
        title: Text(widget.title),
      ),
      body: Padding(
        padding: const EdgeInsets.all(20.0),
        child: Column(
          crossAxisAlignment: CrossAxisAlignment.start,
          children: <Widget>[
            Form(
              child: TextFormField(
                controller: _controller,
                decoration: InputDecoration(labelText: 'Send a message'),
              ),
            ),
            StreamBuilder( //stream에 변화가 발생할때 마다 호출되는 메서드 정의
              stream: widget.channel.stream,
              builder: (context, snapshot) {
                return Padding(
                  padding: const EdgeInsets.symmetric(vertical: 24.0),
                  child: Text(snapshot.hasData ? '${snapshot.data}' : ''),
                );
              },
            )
          ],
        ),
      ),
      floatingActionButton: FloatingActionButton(
        onPressed: _sendMessage,
        tooltip: 'Send message',
        child: Icon(Icons.send),
      ), // This trailing comma makes auto-formatting nicer for build methods.
    );
  }

  void _sendMessage() {
    if (_controller.text.isNotEmpty) {
      widget.channel.sink.add(_controller.text);
    }
  }

  @override
  void dispose() {
    widget.channel.sink.close();
    super.dispose();
  }
}