Spring Boot - Security!
Spring Security
Spring doc : https://spring.io/projects/spring-security
https://spring.io/guides/topicals/spring-security-architecture/
Spring Security 에서 보편적으로 사용하는 설정에 대해 학습한다.
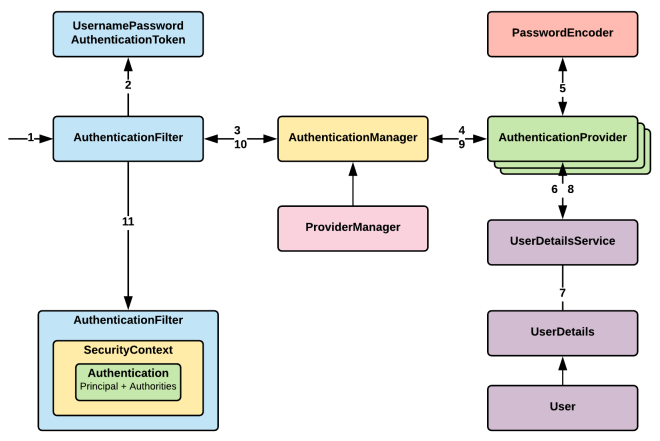
- AuthenticationFilter(인증 필터)
Spring Security 백본, 전반적인 HTTP 요청을 처리, 하위 Security 객체들과 협력하여 인증처리를 진행한다.
최종적으로Authentication인증객체를 수신받아 관리하고UsernamePasswordAuthenticationToken도 인증객체중 하나.
아래 SecurityFilterChain 그림에서 Filter Chain 확인 - AuthenticationManager(인증 매니저)
사용자 신원 확인하는 핵심 구성요소.
providerManager는AuthenticationManager의 구현체 - AuthenticationProvider(인증 제공자)
AuthenticationManager의 요청을 수행하는 클래스,AuthenticationManager에 등록되어 인증을 수행한다.
[DB, LDAP, JWT]등 여러AuthenticationProvider정의가 가능하다. - UserDetailsService
인증자의 세부정보를 검색하는 인터페이스, 빈 객체로 존재할 경우
DaoAuthenticationProvider가 조건에 의해 생성됨.
DaoAuthenticationProvider가UserDetailsService를 통해 사용자 검색 및Authentication인증객체를 생성.- UserDetails, User 인증자의 신원객체
<dependency>
  <groupId>org.springframework.boot</groupId>
  <artifactId>spring-boot-starter-security</artifactId>
</dependency>
dependency 만 추가하고 컨트롤러를 아무거나 추가해서 실행하면 아래와 같은 password 메세지가 출력된다.
default 아이디
user, 비밀번호는 아래security password
Using generated security password: 60e8b37d-147a-4174-9003-3ca02800aada
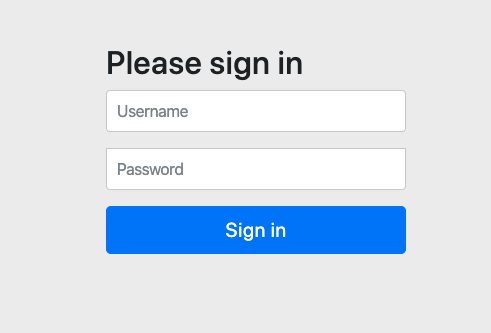
생성한 컨트롤러에 접근하면 아래의 이미지처럼 /login url 로 redirect 되고
로그인하면 security session 을 위한 쿠키가 설정된다.
PasswordEncoder
PasswordEncoder를 통해 해시 인코딩 후 비교
@Bean
public PasswordEncoder passwordEncoder () {
    return new BCryptPasswordEncoder();
}
BCryptPasswordEncoder 가 가장 무난하게 사용 가능, 특징은 아래와 같다.
- 코스트 팩터(WorkFacfor) 를 사용해 해싱 반복
- 항상 랜덤한 솔트값을 생성하고 해시값 앞에 salt 값을 붙여 관리한다
- slow hashing 을 통해 고의적으로 느리계 해시값을 출력해 무작위 대입을 방지
$2a$cost$salt&hash
cost: 해시 반복 횟수
salt: 솔트값
hash: 해시값

$2a$10$vQlFworGFqSGg/i7CSxYSunD2RQw4aYJHe8KNlVf0HP3MzstXxXyG
2a - BCrypt 버전 정보
vQlFworGFqSGg/i7CSxYSu - 솔트값, 첫 22자리(16byte salt) 값
nD2RQw4aYJHe8KNlVf0HP3MzstXxXyG - 해시값
솔트값 없이 단순 해시함수를 통과한 값을 사용하면 사전에 사용할 수 있는 문자열들을 해시화해 놓고, 그 해시 값을 실제 해시 값과 비교하여 비밀번호를 알아내는 공격인 레인보우 테이블 공격(Rainbow Table Attack)에 취약하다.
솔트값을 사용하더라도 $2a$cost$salt&hash 값이 전부 유출되면 레인보우 테이블 에 있는 값들은 시간이 걸릴뿐 결국 복호화될 수 있다.
이미 유출되었던 데이터(전화번호, 주민번호, 이름) 등을 관리할 때에는 외부 인증용(서명)으로 해시를 제공하고 솔트값은 내부에서 안전하게 관리하는것을 권장한다.
DelegatingPasswordEncoder
DelegatingPasswordEncoder 를 사용하면 다양한 PasswordEncoder 구현체를 동시에 사용할 수 있다.
BCryptPasswordEncoderPbkdf2PasswordEncoderSCryptPasswordEncoderArgon2PasswordEncoder
private static final int ITERATIONS = 10000;
private static final int HASH_LENGTH = 256;
private static final SecureRandom random = new SecureRandom();
private static byte[] salt = new byte[16];

static {
    random.nextBytes(salt);
    Base64.getEncoder().encodeToString(salt);
}

@Bean
public DelegatingPasswordEncoder delegatingPasswordEncoder() {
    Map encoders = new HashMap<>();
    encoders.put("bcrypt", new BCryptPasswordEncoder());
    encoders.put("pbkdf2", new Pbkdf2PasswordEncoder(new String(salt), ITERATIONS, HASH_LENGTH, PBKDF2WithHmacSHA256));
    encoders.put("sha256", new StandardPasswordEncoder());
    return new DelegatingPasswordEncoder("bcrypt", encoders);
}

public static String hashPbkdf2Password(String rawPassword, String salt) {
    Pbkdf2PasswordEncoder encoder = new Pbkdf2PasswordEncoder(new String(salt), ITERATIONS, HASH_LENGTH, PBKDF2WithHmacSHA256);
    return encoder.encode(rawPassword);
}

// 비밀번호 검증
public static boolean checkPbkdf2Password(String rawPassword, String encodedPassword, String salt) {
    Pbkdf2PasswordEncoder encoder = new Pbkdf2PasswordEncoder(salt, ITERATIONS, HASH_LENGTH, PBKDF2WithHmacSHA256);
    return encoder.matches(rawPassword, encodedPassword);
}
일반적으로 password 해싱에는 BCrypt 를 사용하고 그외 표준 해싱 방식을 사용해야할 경우 다른 알고리즘을 사용하는 편이다.
EnableWebSecurity
Spring Security 는 DSL 형식의 언어로 구성이 가능하며
자주 사용하는 설정은 아래와 같다.
@Slf4j
@Configuration
@EnableWebSecurity
@EnableMethodSecurity
public class RestSecurityConfig {

    @Bean
    @Order(1)
    public SecurityFilterChain securityFilterChain(HttpSecurity http) throws Exception {
        http
                .csrf(AbstractHttpConfigurer::disable) // CSRF 보호 비활성화
                .cors(AbstractHttpConfigurer::disable) // CORS 비활성화
                .httpBasic(AbstractHttpConfigurer::disable) // HTTP Basic 로그인 비활성화
                .formLogin(AbstractHttpConfigurer::disable) // Form Login 비활성화
                .sessionManagement(session -> session.sessionCreationPolicy(SessionCreationPolicy.STATELESS)) // 세션 관리 비활성화
                .authorizeHttpRequests(auths -> auths
                        .requestMatchers("/boards/random").hasAnyRole("BASIC", "MANAGER")
                        .requestMatchers("/boards/list").permitAll()
                        .anyRequest().authenticated()
                )
                .exceptionHandling(exceptions -> exceptions
                        .authenticationEntryPoint(authenticationEntryPoint())
                        .accessDeniedHandler(accessDeniedHandler())
                );
        return http.build();
    }

    @Bean
    @Order(2)
    public SecurityFilterChain jwtSecurityFilterChain(HttpSecurity http) throws Exception {
        http.addFilterBefore(new JwtFilter(), UsernamePasswordAuthenticationFilter.class); // JWT 필터 추가
        return http.build();
    }


    @Bean
    public WebSecurityCustomizer webSecurityCustomizer() {
        return (web) -> web.ignoring() // 해당 경로는 보안 필터를 완전히 무시
                .requestMatchers("/auth/login_demo")
                .requestMatchers("/error")
                .requestMatchers("/h2-console/**");
    }

    private AuthenticationEntryPoint authenticationEntryPoint() {
        return new AuthenticationEntryPoint() {
            @Override
            public void commence(HttpServletRequest request, HttpServletResponse response, AuthenticationException authException) throws IOException, ServletException {
                response.sendError(HttpServletResponse.SC_UNAUTHORIZED);
            }
        };
    }

    private AccessDeniedHandler accessDeniedHandler() {
        return new AccessDeniedHandler() {
            @Override
            public void handle(HttpServletRequest request, HttpServletResponse response, AccessDeniedException accessDeniedException) throws IOException, ServletException {
                response.sendError(HttpServletResponse.SC_FORBIDDEN);
            }
        };
    }
}
XSS(Cross-site Scripting): 악성 스크립트가 담긴 게시물을 올린 뒤 사용자나 관리자가 해당 게시글을 읽으면서 악성 스크립트 실행, 세션탈취, 쿠키탈취 등의 동작을 수행
사이트 차원에서 악성스크립트를 올리지 못하도록 특수문자 필터링 필요.
서버가 반환하는 HTML 의 HTTP Header 에 CSP 정책을 설정, 브라우저에서 타 사이트 호출을 막도록 지정.
CSRF(Cross-site Request Forgery): XSS 와 동일하게 사용자가 악성 스크립트를 실행하도록 함, 웹사이트에 의도치 않은 요청을 수행하도록 함, 세션 로그인시 세션ID 가 쿠키에 남아있기에 이를 악용하는 방법. CSRF 토큰을 통해 세션내에서 요청/응답을 주고 받을 때 해당 토큰을 추적하여 CSRF 공격을 방지한다.
WebSecurity ignoring 과 HttpSecurity permitAll 의 차이는 SecurityFilterChain 을 거치는지 아닌지 차이
인증, 인가 모두 필요없는 리소스의 경우 WebSecurity ignoring 사용이 성능상 유리하다.
인증은 필요하지만 인가는 필요없는 경우 HttpSecurity permitAll 를 사용하면 된다.
위 설정처럼 antMatchers("...").hasAnyRole("...") 접근제한이 가능하지만
메서드에 어노테이션을 지정하는 것으로도 접근제한이 가능하다.
SecurityFilterChain
@EnableWebSecurity 사용과 동시에 기본적으로 SecurityFilterChain 빈 객체가 생성되고,
그림과 같이 Spring Security Filter 내부 수많은 Filter 들이 객체요청에 대응한다.
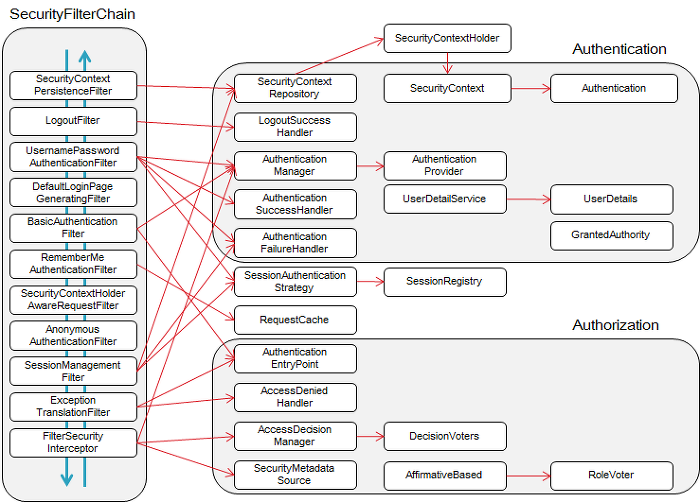
아무것도 설정하지 않고 spring-boot-starter-security 의존성만 넣었을 때 적용되는 HttpSecurity 의 설정은 아래와 같다.
@Configuration(proxyBeanMethods = false)
public class WebSecurityConfiguration implements ImportAware, BeanClassLoaderAware {
    ...
    @Bean(name = AbstractSecurityWebApplicationInitializer.DEFAULT_FILTER_NAME)
    public Filter springSecurityFilterChain() throws Exception {
        boolean hasFilterChain = !this.securityFilterChains.isEmpty();
        if (!hasFilterChain) {
            this.webSecurity.addSecurityFilterChainBuilder(() -> {
                this.httpSecurity.authorizeHttpRequests((authorize) -> authorize.anyRequest().authenticated());
                this.httpSecurity.formLogin(Customizer.withDefaults());
                this.httpSecurity.httpBasic(Customizer.withDefaults());
                return this.httpSecurity.build();
            });
        }
        for (SecurityFilterChain securityFilterChain : this.securityFilterChains) {
            this.webSecurity.addSecurityFilterChainBuilder(() -> securityFilterChain);
        }
        for (WebSecurityCustomizer customizer : this.webSecurityCustomizers) {
            customizer.customize(this.webSecurity);
        }
        return this.webSecurity.build();
    }

}
formLogin: 세션기반 로그인- UsernamePasswordAuthenticationFilter
- 아래에서 소개할 UserDetailService 와 연동
httpBasic: Basic 헤더 기반 인증- BasicAuthenticationFilter
위 @EnableWebSecurity 설정에선 2개 SecurityFilterChain 을 등록하였는데, 여러 개의 SecurityFilterChain이 정의된 경우, 각 요청은 여러 필터 체인 중에서 가장 적합한 하나에 의해 처리된다, /api/** 과 같은 패턴매칭, 정확한 일치(Exact Match) 이 있으며 정확한 일치SecurityFilterChain 을 우선으로 찾는다.
실제 Spring Security Filter 에 등록된 Filter 들을 출력하면 아래와 같다.
private final FilterChainProxy filterChainProxy;

@PostConstruct
public void printSecurityFilters() {
    List<SecurityFilterChain> filterChains = filterChainProxy.getFilterChains();
    for (SecurityFilterChain chain : filterChains) {
        var filters = chain.getFilters();
        System.out.println("Security Filter Chain: " + chain);
        for (var filter : filters) {
            System.out.println(filter.getClass());
        }
    }
}
/*
Security Filter Chain: DefaultSecurityFilterChain [RequestMatcher=any request, Filters=[...]]
class org.springframework.security.web.session.DisableEncodeUrlFilter
class org.springframework.security.web.context.request.async.WebAsyncManagerIntegrationFilter
class org.springframework.security.web.context.SecurityContextHolderFilter
class org.springframework.security.web.header.HeaderWriterFilter
class org.springframework.web.filter.CorsFilter
class org.springframework.security.web.csrf.CsrfFilter
class org.springframework.security.web.authentication.logout.LogoutFilter
class org.springframework.security.web.authentication.UsernamePasswordAuthenticationFilter
class org.springframework.security.web.authentication.ui.DefaultLoginPageGeneratingFilter
class org.springframework.security.web.authentication.ui.DefaultLogoutPageGeneratingFilter
class org.springframework.security.web.authentication.www.BasicAuthenticationFilter
class org.springframework.security.web.savedrequest.RequestCacheAwareFilter
class org.springframework.security.web.servletapi.SecurityContextHolderAwareRequestFilter
class org.springframework.security.web.authentication.AnonymousAuthenticationFilter
class org.springframework.security.web.access.ExceptionTranslationFilter
class org.springframework.security.web.access.intercept.AuthorizationFilter
*/
마지막에 정의된 AuthorizationFilter 에서 Spring Security Context 에 저장되어 있는 Authentication 객체를 확인, URL 등과 매칭 후 인가여부를 확인하고 비인가 요청일 경우 AccessDeniedException(401) 에러를 발생시킨다.
ExceptionTranslationFilter 에는 예외를 처리할 수 있는 핸들러 함수를 사용해 에러를 조치한다(redirect OR error reponse)
@Bean
@Order(1)
public SecurityFilterChain securityFilterChain(HttpSecurity http) throws Exception {
    http
        .securityMatcher("/auth/**") // URL 패턴 매칭
        .csrf(AbstractHttpConfigurer::disable) // CSRF 보호 비활성화
        .cors(AbstractHttpConfigurer::disable) // CORS 비활성화
        ...
    return http.build();
}

@Bean
@Order(2)
public SecurityFilterChain jwtSecurityFilterChain(HttpSecurity http) throws Exception {

    http.addFilterBefore(new JwtFilter(), UsernamePasswordAuthenticationFilter.class); // JWT 필터 추가
    http.securityMatcher("/api/**")
    ...
    return http.build();
}
여러개 SecurityFilterChain 존재하더라도 하나의 요청이 모든 Filter Chain 을 거치진 않는다.
- FilterChainProxy가 요청을 받고 리스트 형태로 관리하는 SecurityFilterChain 중 요청 URL 패턴과 매칭되는 하나의 SecurityFilterChain를 선택한다.
- URL 패턴 매칭이 여러개 될 경우 우선순위에 따라 첫번째 SecurityFilterChain 를 매칭한다.
- Order 가 낮을수록 우선순위가 높음
대부분의 Filter 에서 filterChain.doFilter(request, response) 함수를 호출한다.
아래는 사용자 로그인요청을 수행하는 UsernamePasswordAuthenticationFilter 의 부모클래스인 AbstractAuthenticationProcessingFilter
주석의 경우 UsernamePasswordAuthenticationFilter 에서 실행하는 doFilter 의 동작을 설명.
public class AbstractAuthenticationProcessingFilter extends AbstractAuthenticationProcessingFilter {
    private void doFilter(HttpServletRequest request, HttpServletResponse response, FilterChain chain)
            throws IOException, ServletException {
        if (!requiresAuthentication(request, response)) {
            // 로그인 요청 url 이 아니라면
            chain.doFilter(request, response);
            return;
        }
        try {
            // UsernamePasswordAuthenticationFilter의 인증 프로세스 수행
            Authentication authenticationResult = attemptAuthentication(request, response);
            if (authenticationResult == null) {
                // 로그인 실패시 filter 종료
                return;
            }
            this.sessionStrategy.onAuthentication(authenticationResult, request, response);
            // 로그인 성공, 이후 filter 들 수행
            if (this.continueChainBeforeSuccessfulAuthentication) {
                chain.doFilter(request, response);
            }
            //
            successfulAuthentication(request, response, chain, authenticationResult);
        }
        catch (InternalAuthenticationServiceException failed) {
            this.logger.error("An internal error occurred while trying to authenticate the user.", failed);
            unsuccessfulAuthentication(request, response, failed);
        }
        catch (AuthenticationException ex) {
            // Authentication failed
            unsuccessfulAuthentication(request, response, ex);
        }
    }
}
filterChain.doFilter 를 사용하는 경우와 사용하지 않는 경우는 아래와 같다.
- 사용하는 경우
- 다음 필터로 요청을 전달: 요청이 필터 체인을 따라 다음 필터로 전달. 최종적으로 서블릿 또는 컨트롤러에 도달할 수 있도록함, 대부분의 필터에서는 요청을 중단하지 않고, 다른 필터가 요청을 처리할 수 있도록 이 메서드를 호출한다.
- 사용하지 않는 경우
- 보안 검증 실패 시: 인증이 실패하거나 사용자 권한이 부족한 경우, 필터에서 응답을 직접 처리하고 필터 체인을 중단한다. 이 경우 필터에서 최종 응답을 생성하고 요청을 끝낸다. 데이터를 직접 반환하거나 특정 경로로 리디렉션한다.
AuthenticationManager
AuthenticationManager 는 인증객체를 검증하는 하는 AuthenticationProvider 객체를 관리하는 클래스, 빈으로 관리되며 여러개의 SecurityFilterChain 에서 사용된다.
여러개의 SecurityFilterChain 에 각각의 AuthenticationProvider 를 설정할 수 도 있다.
// 첫 번째 필터 체인 (API 경로 처리)
@Bean
public SecurityFilterChain apiFilterChain(HttpSecurity http) throws Exception {
    http.securityMatcher("/api/**")
        .authenticationProvider(apiAuthenticationProvider()) // 특정 Provider 사용
        .authorizeHttpRequests(authorize ->
            authorize.anyRequest().hasRole("API_USER")
        )
        .httpBasic();
    return http.build();
}

// 두 번째 필터 체인 (Admin 경로 처리)
@Bean
public SecurityFilterChain adminFilterChain(HttpSecurity http) throws Exception {
    http.securityMatcher("/admin/**")
        .authenticationProvider(adminAuthenticationProvider()) // 특정 Provider 사용
        .authorizeHttpRequests(authorize ->
            authorize.anyRequest().hasRole("ADMIN")
        )
        .formLogin();
    return http.build();
}
인증을 수행하는 Spring Security Filter 에서 AuthenticationManager 에게 Authentication 인증객체를 전달하면 알맞는 AuthenticationProvider 객체를 찾아 인증을 수행하고 반환한다.
아래는 Spring Security 의 AuthenticationManager 기본 구현객체인 ProviderManager 가 Authentication 인증객체에 맞는 AuthenticationProvider 를 찾아 인증을 수행하는 코드.
AuthenticationProvider 객체는 순서에 맞춰 iterator 형태로 묶여있다.
public interface AuthenticationManager {
    Authentication authenticate(Authentication authentication) throws AuthenticationException;
}
public class ProviderManager implements AuthenticationManager, MessageSourceAware, InitializingBean {
    ...
    public Authentication authenticate(Authentication authentication) throws AuthenticationException {
        ...
        Iterator var9 = this.getProviders().iterator();

        while(var9.hasNext()) {
            AuthenticationProvider provider = (AuthenticationProvider)var9.next();
            Class<? extends Authentication> toTest = authentication.getClass();
            ...
            // provider 가 Authentication 인증객체를 지원하는지 확인
            if (provider.supports(toTest)) {
                ...
                try {
                    // 인증 수행
                    result = provider.authenticate(authentication);
                    if (result != null) {
                        this.copyDetails(authentication, result);
                        break;
                    }
                    ...
                } catch (AuthenticationException var15) {
                    AuthenticationException ex = var15;
                    lastException = ex;
                }
            }
        }
        // 해당 AuthenticationManager 에서 인증객체를 찾을 수 없다면
        // 이전 SecurityFilterChain 에 등록된 AuthenticationManager 에서 인증을 수행
        if (result == null && this.parent != null) {
            try {
                parentResult = this.parent.authenticate(authentication);
                result = parentResult;
            } catch (AuthenticationException var13) {
                parentException = var13;
                lastException = var13;
            }
        }

    }
}
Spring Security Filter 과 AuthenticationManager 가 여러개일 경우 @Order 순서에 맞춰 parent, child 관계를 맺으며 AuthenticationProvider 를 공유한다.
BasicAuthenticationFilter 에서 Http Request 의 인증을 AuthenticationManager 를 통해 수행하는 코드
// BasicAuthenticationFilter
@Override
protected void doFilterInternal(HttpServletRequest request, HttpServletResponse response, FilterChain chain)
        throws IOException, ServletException {
    try {
        // UsernamePasswordAuthenticationToken 으로 convert
        Authentication authRequest = this.authenticationConverter.convert(request);
        ...
        String username = authRequest.getName();
        if (authenticationIsRequired(username)) {
            // UsernamePasswordAuthenticationToken 인증객체를 알맞는 AuthenticationProvider 를 찾아서 인증을 수행한다.
            Authentication authResult = this.authenticationManager.authenticate(authRequest);
            SecurityContext context = this.securityContextHolderStrategy.createEmptyContext();
            context.setAuthentication(authResult);
            this.securityContextHolderStrategy.setContext(context);
            if (this.logger.isDebugEnabled()) {
                this.logger.debug(LogMessage.format("Set SecurityContextHolder to %s", authResult));
            }
            this.rememberMeServices.loginSuccess(request, response, authResult);
            this.securityContextRepository.saveContext(context, request, response);
            onSuccessfulAuthentication(request, response, authResult);
        }
    }
    catch (AuthenticationException ex) {
        this.securityContextHolderStrategy.clearContext();
        this.logger.debug("Failed to process authentication request", ex);
        this.rememberMeServices.loginFail(request, response);
        onUnsuccessfulAuthentication(request, response, ex);
        if (this.ignoreFailure) {
            chain.doFilter(request, response);
        }
        else {
            this.authenticationEntryPoint.commence(request, response, ex);
        }
        return;
    }

    chain.doFilter(request, response);
}
AuthenticationProvider
AuthenticationManagr 를 직접 정의하는 방식을 제한적인 환경(제공받은 메서드로만 구성해야함)으로 인해 잘 사용하지 않는다.
위와 같이 테스트용도로 inMemory, jdbc SQL 를 직접 정의하여 사용할 때에나 사용한다.
대부분 AuthenticationProvider 을 Bean 으로 등록하고 AuthenticationManager 에서 자동으로 선택받아 사용되도록 구성한다.
UserDetailsService
사용자 테이블로 부터 커스텀하게 로그인처리를 구현하는 경우가 많아 UserDetailService 를 사용해서 AuthenticationProvider 를 구성한다.
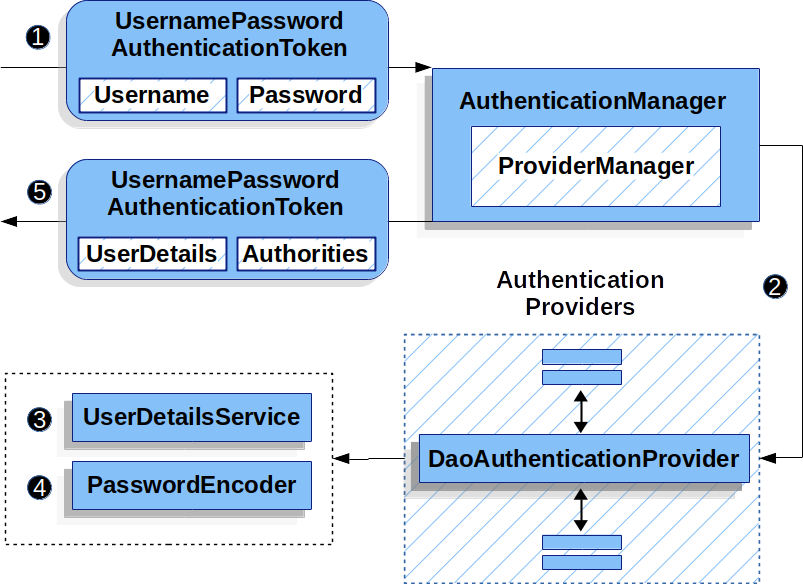
DaoAuthenticationProvider가UserDetailService를 사용하기 위해 만들어진 객체임.
먼저 간단히 사용할 사용자 클래스 정의
@Table(name = "tbl_members")
public class Member {
    @Id
    @GeneratedValue(strategy = GenerationType.IDENTITY)
    private Long uid;
    private String uname;
    private String upw;

    @OneToMany(cascade = {CascadeType.PERSIST, CascadeType.REMOVE}, fetch = FetchType.EAGER)
    @JoinColumn(name = "uid")
    List<MemberRole> roles;

    @CreationTimestamp
    private LocalDateTime regdate;
    @UpdateTimestamp
    private LocalDateTime updatedate;
}

@Table(name = "tbl_member_role")
public class MemberRole {
    @Id
    @GeneratedValue(strategy = GenerationType.IDENTITY)
    private Long fno;

    private String roleName;
}
@Service
@RequiredArgsConstructor
public class CustomSecurityUsersService implements UserDetailsService {

    private final MemberRepository memberRepository;
    private final PasswordEncoder passwordEncoder;

    @PostConstruct
    private void init() {
        if (memberRepository.findByUname("basic").isEmpty()) {
            memberRepository.save(new Member("basic", passwordEncoder.encode("basic"), "BASIC"));
        }
        if (memberRepository.findByUname("manager").isEmpty()) {
            memberRepository.save(new Member("manager", passwordEncoder.encode("manager"), "MANAGER"));
        }
        if (memberRepository.findByUname("admin").isEmpty()) {
            memberRepository.save(new Member("admin", passwordEncoder.encode("admin"), "ADMIN"));
        }
    }

    @Override
    public UserDetails loadUserByUsername(String username) throws UsernameNotFoundException {
        Member member = memberRepository.findByUname(username)
                .orElseThrow(() -> new IllegalArgumentException());
        return new CustomSecurityUser(member);
    }
}

@Getter
@Setter
public class CustomSecurityUser extends User {

    private static final String ROLE_PREFIX = "ROLE_";

    private Member member;

    public CustomSecurityUser(Member member) {
        super(member.getUname(), member.getUpw(), makeGrantedAuth(member.getRoles()));
        this.member = member;
    }

    private static List<GrantedAuthority> makeGrantedAuth(List<MemberRole> roles) {
        List<GrantedAuthority> list = new ArrayList<>();
        roles.forEach(memberRole ->
                list.add(new SimpleGrantedAuthority(ROLE_PREFIX + memberRole.getRoleName())));
        return list;
    }
}
UserDetailsService, User 객체가 Spring Security 의 핵심 클래스
User클래스는UserDetails의 구현체.
AuthenticationManager 가 알아서 Bean 으로 등록된 UserDetailService 을 사용함으로 별다른 설정을 하지 않아도 된다.
직접 설정하려면 아래처럼 SecurityConfig 에 해당 userDetailService 를 사용해 인증객체를 생성하도록 설정
@Autowired
private UserDetailsService userDetailsService;

@Override
protected void configure(AuthenticationManagerBuilder auth) throws Exception {
    auth.userDetailsService(userDetailsService);
}
Authentication
Spring Security 는 [inMemory, jdbc, DAO, LDAP] 등 다양한 인증서비스를 제공한다.
이에 맞는 AuthenticationProvider 를 정의해야 하며, 이러한 다양한 인증과정에서 Authentication 구현객체를 표준으로 사용한다.
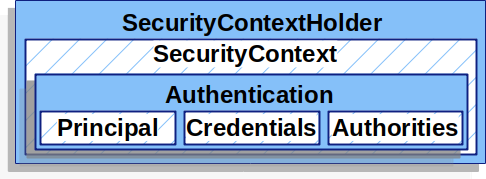
- Credential: 자격, 인증서
- Pincipal: 주체
- Authorities: Role & Authority, 권한
public interface Authentication extends Principal, Serializable {
    Collection<? extends GrantedAuthority> getAuthorities();
    Object getCredentials();
    Object getPrincipal();
    ...
}
Credential, Pincipal 모두 Object 이기 때문에 로직에 맞는 보안객체를 할당하면 된다.
위에서 사용한 DaoAuthenticationProvider 가 Authentication 을 구현한 UsernamePasswordAuthenticationToken 을 지원하기 때문에 해당 객체를 Authentication 객체로 자주 사용한다.
Crendential 에 username, Principal 에 password 를 자주 설정한다.
// 미인증 Authentication 객체
UsernamePasswordAuthenticationToken authRequest =
    new UsernamePasswordAuthenticationToken(username, password);

/*
public UsernamePasswordAuthenticationToken(Object principal, Object credentials) {
    super(null);
    this.principal = principal;
    this.credentials = credentials;
    setAuthenticated(false);
}

public UsernamePasswordAuthenticationToken(Object principal, Object credentials,
        Collection<? extends GrantedAuthority> authorities) {
    super(authorities);
    this.principal = principal;
    this.credentials = credentials;
    super.setAuthenticated(true); // must use super, as we override
}
*/
Spring Security 내부 코드에서 Role 과 Authority 를 처리하는 방법은 동일하다.
둘다 권한을 뜻하는 개념이고 SimpleGrantedAuthority 클래스를 사용한다.
그리고 AbstractAuthenticationToken 객체에 권한(Role, Authority) 들이 들어간다.
Spring Security 설정에 따라 authorities 내부를 검사하는데
hasAnyRole('ADMIN') 과 같은 코드가 있다면 ROLE_ADMIN 과 같은 문자열이 있는지 탐색,
hasAuthority('getBoard') 과 같은 코드가 있다면 getBoard 문자열이 있는지 탐색한다.
실제 비밀번호를 가진 UsernamePasswordAuthenticationToken 객체의 인증은 UsernamePasswordAuthenticationFilter 가 DaoAuthenticationProvider 의 인증 메서드를 호출하면서 수행된다.
DaoAuthenticationProvider 는 UserDetailService 로부터 UsernamePasswordAuthenticationToken 의 username 을 사용해 사용자를 검색하고 password 를 비교해서 인증을 수행한다.
AuthenticationEntryPoint
401, 403 에러와 같이 비인가 요청을 처리하기 위한 객체.
package org.springframework.security.web;

public interface AuthenticationEntryPoint {
    void commence(HttpServletRequest request,
                  HttpServletResponse response,
                  AuthenticationException authException) throws IOException, ServletException;
}
Spring Security사용시 기본적으로AccessDenied예외 발생시LoginUrlAuthenticationEntryPoint가 처리한다.- 로그인 실패시 해당 요청 url 을 session 에 SAVED_REQUEST key 값으로 임시 저장한다
- 로그인 후 이동시키기 위해
Login페이지로Redirect시키는 역할을 수행한다.
public class LoginUrlAuthenticationEntryPoint implements AuthenticationEntryPoint, InitializingBean {

    private static final Log logger = LogFactory.getLog(LoginUrlAuthenticationEntryPoint.class);
    private PortMapper portMapper = new PortMapperImpl();
    private PortResolver portResolver = new PortResolverImpl();
    private boolean forceHttps = false;
    private boolean useForward = false;

    private String loginFormUrl;
    private final RedirectStrategy redirectStrategy = new DefaultRedirectStrategy();

    /**
     * @param loginFormUrl URL where the login page can be found. Should either be
     * relative to the web-app context path (include a leading {@code /}) or an absolute
     * URL.
     */
    public LoginUrlAuthenticationEntryPoint(String loginFormUrl) {
        Assert.notNull(loginFormUrl, "loginFormUrl cannot be null");
        this.loginFormUrl = loginFormUrl;
    }

    /**
     * Performs the redirect (or forward) to the login form URL.
     */
    @Override
    public void commence(HttpServletRequest request, HttpServletResponse response, AuthenticationException authException) throws IOException, ServletException {
        if (!this.useForward) {
            // redirect to login page. Use https if forceHttps true
            String redirectUrl = buildRedirectUrlToLoginPage(request, response, authException);
            this.redirectStrategy.sendRedirect(request, response, redirectUrl);
            return;
        }
        String redirectUrl = null;
        if (this.forceHttps && "http".equals(request.getScheme())) {
            // First redirect the current request to HTTPS. When that request is received,
            // the forward to the login page will be used.
            redirectUrl = buildHttpsRedirectUrlForRequest(request);
        }
        if (redirectUrl != null) {
            this.redirectStrategy.sendRedirect(request, response, redirectUrl);
            return;
        }
        String loginForm = determineUrlToUseForThisRequest(request, response, authException);
        logger.debug(LogMessage.format("Server side forward to: %s", loginForm));
        RequestDispatcher dispatcher = request.getRequestDispatcher(loginForm);
        dispatcher.forward(request, response);
        return;
    }

    protected String buildRedirectUrlToLoginPage(HttpServletRequest request, HttpServletResponse response,
            AuthenticationException authException) {
        String loginForm = determineUrlToUseForThisRequest(request, response, authException);
        if (UrlUtils.isAbsoluteUrl(loginForm)) {
            return loginForm;
        }
        int serverPort = this.portResolver.getServerPort(request);
        String scheme = request.getScheme();
        RedirectUrlBuilder urlBuilder = new RedirectUrlBuilder();
        urlBuilder.setScheme(scheme);
        urlBuilder.setServerName(request.getServerName());
        urlBuilder.setPort(serverPort);
        urlBuilder.setContextPath(request.getContextPath());
        urlBuilder.setPathInfo(loginForm);
        if (this.forceHttps && "http".equals(scheme)) {
            Integer httpsPort = this.portMapper.lookupHttpsPort(serverPort);
            if (httpsPort != null) {
                // Overwrite scheme and port in the redirect URL
                urlBuilder.setScheme("https");
                urlBuilder.setPort(httpsPort);
            }
            else {
                logger.warn(LogMessage.format("Unable to redirect to HTTPS as no port mapping found for HTTP port %s",
                        serverPort));
            }
        }
        return urlBuilder.getUrl();
    }

    /**
     * Builds a URL to redirect the supplied request to HTTPS. Used to redirect the
     * current request to HTTPS, before doing a forward to the login page.
     */
    protected String buildHttpsRedirectUrlForRequest(HttpServletRequest request) throws IOException, ServletException {
        int serverPort = this.portResolver.getServerPort(request);
        Integer httpsPort = this.portMapper.lookupHttpsPort(serverPort);
        if (httpsPort != null) {
            RedirectUrlBuilder urlBuilder = new RedirectUrlBuilder();
            urlBuilder.setScheme("https");
            urlBuilder.setServerName(request.getServerName());
            urlBuilder.setPort(httpsPort);
            urlBuilder.setContextPath(request.getContextPath());
            urlBuilder.setServletPath(request.getServletPath());
            urlBuilder.setPathInfo(request.getPathInfo());
            urlBuilder.setQuery(request.getQueryString());
            return urlBuilder.getUrl();
        }
        // Fall through to server-side forward with warning message
        logger.warn(
                LogMessage.format("Unable to redirect to HTTPS as no port mapping found for HTTP port %s", serverPort));
        return null;
    }

    /**
     * Set to true to force login form access to be via https. If this value is true (the
     * default is false), and the incoming request for the protected resource which
     * triggered the interceptor was not already <code>https</code>, then the client will
     * first be redirected to an https URL, even if <tt>serverSideRedirect</tt> is set to
     * <tt>true</tt>.
     */
    public void setForceHttps(boolean forceHttps) {
        this.forceHttps = forceHttps;
    }

    protected boolean isForceHttps() {
        return this.forceHttps;
    }

    public String getLoginFormUrl() {
        return this.loginFormUrl;
    }

    public void setPortMapper(PortMapper portMapper) {
        Assert.notNull(portMapper, "portMapper cannot be null");
        this.portMapper = portMapper;
    }

    protected PortMapper getPortMapper() {
        return this.portMapper;
    }

    public void setPortResolver(PortResolver portResolver) {
        Assert.notNull(portResolver, "portResolver cannot be null");
        this.portResolver = portResolver;
    }

    protected PortResolver getPortResolver() {
        return this.portResolver;
    }

    /**
     * Tells if we are to do a forward to the {@code loginFormUrl} using the
     * {@code RequestDispatcher}, instead of a 302 redirect.
     * @param useForward true if a forward to the login page should be used. Must be false
     * (the default) if {@code loginFormUrl} is set to an absolute value.
     */
    public void setUseForward(boolean useForward) {
        this.useForward = useForward;
    }

    protected boolean isUseForward() {
        return this.useForward;
    }

}
아래와 같이 Filter 마다 각자의 구현객체가 적용되어 인증/인가 예외 발생시 호출된다.
AuthenticationEntryPoint 는 BasicAuthenticationFilter 과정에서 바로처리되기도 하고
public class BasicAuthenticationEntryPoint implements AuthenticationEntryPoint, InitializingBean {

    private String realmName;

    @Override
    public void afterPropertiesSet() {
        Assert.hasText(this.realmName, "realmName must be specified");
    }

    @Override
    public void commence(HttpServletRequest request, HttpServletResponse response,
    AuthenticationException authException) throws IOException {
        response.setHeader("WWW-Authenticate", "Basic realm=\"" + this.realmName + "\"");
        response.sendError(HttpStatus.UNAUTHORIZED.value(), HttpStatus.UNAUTHORIZED.getReasonPhrase());
    }
}

public class BasicAuthenticationFilter extends OncePerRequestFilter {

    private AuthenticationEntryPoint authenticationEntryPoint;
    ...

    @Override
    protected void doFilterInternal(HttpServletRequest request, HttpServletResponse response, FilterChain chain)
            throws IOException, ServletException {
        try {
            Authentication authRequest = this.authenticationConverter.convert(request);
            if (authRequest == null) {
                this.logger.trace("Did not process authentication request since failed to find "
                        + "username and password in Basic Authorization header");
                chain.doFilter(request, response);
                return;
            }
            ...
        }
        catch (AuthenticationException ex) {
            this.securityContextHolderStrategy.clearContext();
            this.logger.debug("Failed to process authentication request", ex);
            this.rememberMeServices.loginFail(request, response);
            onUnsuccessfulAuthentication(request, response, ex);
            if (this.ignoreFailure)
                chain.doFilter(request, response);
            else
                this.authenticationEntryPoint.commence(request, response, ex);
            return;
        }
        chain.doFilter(request, response);
    }
    ...
}
최종 Authentication 처리를 진행하는 ExceptionTranslationFilter 과정에서 처리되기도 한다.
public class ExceptionTranslationFilter extends GenericFilterBean implements MessageSourceAware {
    private AuthenticationEntryPoint authenticationEntryPoint;
    ...

    private void doFilter(HttpServletRequest request, HttpServletResponse response, FilterChain chain)
            throws IOException, ServletException {
        try {
            chain.doFilter(request, response);
        }
        catch (IOException ex) {
            throw ex;
        }
        catch (Exception ex) {
            // Try to extract a SpringSecurityException from the stacktrace
            Throwable[] causeChain = this.throwableAnalyzer.determineCauseChain(ex);
            RuntimeException securityException = (AuthenticationException) this.throwableAnalyzer
                .getFirstThrowableOfType(AuthenticationException.class, causeChain);
            ...
            if (response.isCommitted()) {
                throw new ServletException("Unable to handle the Spring Security Exception "
                        + "because the response is already committed.", ex);
            }
            handleSpringSecurityException(request, response, chain, securityException);
        }
    }
    private void handleSpringSecurityException(HttpServletRequest request, HttpServletResponse response,
        FilterChain chain, RuntimeException exception) throws IOException, ServletException {
        if (exception instanceof AuthenticationException) {
            handleAuthenticationException(request, response, chain, (AuthenticationException) exception);
        }
        else if (exception instanceof AccessDeniedException) {
            handleAccessDeniedException(request, response, chain, (AccessDeniedException) exception);
        }
    }

    private void handleAuthenticationException(HttpServletRequest request, HttpServletResponse response,
            FilterChain chain, AuthenticationException exception) throws ServletException, IOException {
        this.logger.trace("Sending to authentication entry point since authentication failed", exception);
        sendStartAuthentication(request, response, chain, exception);
    }

    protected void sendStartAuthentication(HttpServletRequest request, HttpServletResponse response, FilterChain chain,
            AuthenticationException reason) throws ServletException, IOException {
        // SEC-112: Clear the SecurityContextHolder's Authentication, as the
        // existing Authentication is no longer considered valid
        SecurityContext context = this.securityContextHolderStrategy.createEmptyContext();
        this.securityContextHolderStrategy.setContext(context);
        this.requestCache.saveRequest(request, response);
        this.authenticationEntryPoint.commence(request, response, reason);
    }
Spring Security Filter 마다 다른 AuthenticationEntryPoint 를 가질 수 있으며 구현체인 DelegatingAuthenticationEntryPoint 에서 통합 관리한다.
package org.springframework.security.web.authentication;

public class DelegatingAuthenticationEntryPoint implements AuthenticationEntryPoint, InitializingBean {

    private static final Log logger = LogFactory.getLog(DelegatingAuthenticationEntryPoint.class);

    private final LinkedHashMap<RequestMatcher, AuthenticationEntryPoint> entryPoints;

    private AuthenticationEntryPoint defaultEntryPoint;

    public DelegatingAuthenticationEntryPoint(LinkedHashMap<RequestMatcher, AuthenticationEntryPoint> entryPoints) {
        this.entryPoints = entryPoints;
    }

    @Override
    public void commence(HttpServletRequest request, HttpServletResponse response,
            AuthenticationException authException) throws IOException, ServletException {
        for (RequestMatcher requestMatcher : this.entryPoints.keySet()) {
            logger.debug(LogMessage.format("Trying to match using %s", requestMatcher));
            if (requestMatcher.matches(request)) {
                AuthenticationEntryPoint entryPoint = this.entryPoints.get(requestMatcher);
                logger.debug(LogMessage.format("Match found! Executing %s", entryPoint));
                entryPoint.commence(request, response, authException);
                return;
            }
        }
        logger.debug(LogMessage.format("No match found. Using default entry point %s", this.defaultEntryPoint));
        // No EntryPoint matched, use defaultEntryPoint
        this.defaultEntryPoint.commence(request, response, authException);
    }
}
GenericFilterBean, OncePerRequestFilter
Spring Security 에서 제공하는 대부분의 Filter 는 GenericFilterBean 의 구현체이다.
public abstract class GenericFilterBean implements Filter, BeanNameAware, EnvironmentAware,
        EnvironmentCapable, ServletContextAware, InitializingBean, DisposableBean {

    private String beanName;
    private Environment environment;
    private ServletContext servletContext;
    private FilterConfig filterConfig;

    private final Set<String> requiredProperties = new HashSet<>(4);
    ...
}
스프링 웹서버 동작시에 필요한 Context 정보를 가지고 있는 Filter 객체,
서블릿 및 각종 환경변수등을 미리 설정하여 Spring Security 동작에 필요한 코드를 수행한다.
OncePerRequestFilter 는 GenericFilterBean 의 구현체로 한번만 Filter 를 수행하고 필터를 수행하지 않을 각종 조건을 설정할 수 있다.
- shouldNotFilter(HttpServletRequest request) 조건 검사를 통해 수행 여부 결정
- shouldNotFilterErrorDispatch() 에러가 발생한 요청의 수행 여부 결정, default true(수행 X)
- shouldNotFilterAsyncDispatch() CompletableFuture, DeferredResult 등 비동기로 동작하는 요청에 대해 수행 여부 결정, default true(수행 X)
EnableMethodSecurity
@EnableMethodSecurity 어노테이션 설정, 다른 클래스에서도 시큐리티 어노테이션을 사용할 수 있도록 설정한다.
@Configuration
@EnableWebSecurity
@EnableMethodSecurity(prePostEnabled = true, securedEnabled = true)
public class DefaultSecurityConfig {
    ...
}
@EnableMethodSecurity 속성
- prePostEnabled:
@PreAuthorize, @PostAuthorize활성화. - securedEnabled:
@Secured활성화.
권한/역할 기반 어노테이션
- @PreAuthorize: 메서드 실행 전에 권한 검사, SpEL 사용.
- @PostAuthorize: 메서드 실행 후에 결과를 기반 권한 검사, SpEL 사용.
- @Secured: 간단한 Role 기반 검사, SpEL 사용.
- @RolesAllowed: Role 기반 검사, JSR-250 표준 사용.
@Service
public class SampleService {

    @PreAuthorize("hasRole('ADMIN')")
    public String adminOnly() {
        return "This is an admin-only service.";
    }

    @PreAuthorize("hasAuthority('WRITE_PRIVILEGE')")
    public String writePrivilegeOnly() {
        return "This service requires WRITE_PRIVILEGE.";
    }

    @Secured("ROLE_USER")
    public String userOnly() {
        return "This is a user-only service.";
    }

    @RolesAllowed({"ROLE_ADMIN", "ROLE_USER"})
    public String adminOrUser() {
        return "This service is accessible to admin or user.";
    }
}
내부에선 UserDetails.getAuthorities 에 들어간 role, auth 의 존재여부를 검사하는 어노테이션들이다.
hasRole, hasAuthority 차이는 앞에 ROLE_ prefix 를 붙이는 여부임으로 hasAuthority 에 ROLE_ 를 붙여 혼용 사용해도 상관없다.
@PostAuthorize 의 경우 아래와 같이 Service 로직에서 응답 객체에 대한 권한 확인용으로 많이 사용.
삭제나 수정을 위해 사전에 조회작업을 수행할 떄 권한체크를 동시에 수행가능.
@Transactional(readOnly = true)
@PostAuthorize("returnObject.isPresent() && returnObject.get().uname == authentication.name && returnObject.get().uname == #uname")
public Optional<MemberEntity> findByUnameSecurity(String uname) {
    return repository.findByUname(uname);
}
커스텀 검증 로직로직
복잡한 권한검증코드의 경우 별도의 Bean 을 작성해서 처리하면 편하다.
아래는 JWT 로부터 변환한 CustomSecurityUser 객체의 uid 와 입력받은 uid 가 일치하는지 판단하는 과정이다.
@Slf4j
@Service("cssecu")
public class CustomSecurityService {

    public boolean hasAccess(Authentication authentication, Long uid) {
        CustomSecurityUser user  = (CustomSecurityUser) authentication.getPrincipal();
        log.info("cssecu hasAccess invoked, username:{}, uid:{}", user.getUsername(),  user.getUid());
        return uid.equals(user.getUid());
    }
}
@GetMapping("/custom/{id}")
@PreAuthorize("@cssecu.hasAccess(authentication, #id)")
public String accessResource(@PathVariable Long id) {
    return "Resource with ID: " + id;
}
PermissionEvaluator 구현체를 Bean 으로 등록하면 hasPermission SpEL 를 사용하여 커스텀한 검증코드 작성이 가능하다.
@Component
@RequiredArgsConstructor
public class CustomPermissionEvaluator implements PermissionEvaluator {
    private final MemberRepository repository;

    @Override
    public boolean hasPermission(Authentication authentication, Object targetDomainObject, Object permission) {
        if (targetDomainObject == null) return false;
        String username = authentication.getName();
        String requiredPermission = (String) permission;
        // member entity 에 대한 사용자 확인 및 권한 확인
        if (targetDomainObject instanceof MemberEntity entity) {
            return entity.getUname().equals(username) && "READ".equals(requiredPermission);
        }
        return false;
    }

    @Override
    public boolean hasPermission(Authentication authentication, Serializable targetId, String targetType, Object permission) {
        if ("MemberEntity".equalsIgnoreCase(targetType)) {
            Long id = (Long) targetId;
            String requiredPermission = (String) permission;
            return repository.findById(id)
                    .filter(entity -> entity.getUname().equals(authentication.getName()) && "READ".equalsIgnoreCase(requiredPermission))
                    .isPresent();
        }
        return false;
    }
}
위와 같이 구현체 작성 후 MethodSecurityExpressionHandler 에 Bean 으로 등록
@Bean
public MethodSecurityExpressionHandler createExpressionHandler(PermissionEvaluator customPermissionEvaluator) {
    DefaultMethodSecurityExpressionHandler expressionHandler = new DefaultMethodSecurityExpressionHandler();
    expressionHandler.setPermissionEvaluator(customPermissionEvaluator);
    return expressionHandler;
}
컨트롤레 메서드에서 들어갈때 @PreAuthorize 를 통해 한번 검증하고
/**
 * PermissionEvaluator 구현체인 CustomPermissionEvaluator.hasPermission 함수 사용
 * */
@PostMapping("/user/{id}")
@PreAuthorize("hasPermission(#id, 'MemberEntity', 'READ')")
public MemberEntity updateResource(@PathVariable Long id) {
    return service.findById(id);
}
서비스 메서드에서 나올때 @PostAuthorize 를 통해 다시 한번 검증
@Transactional(readOnly = true)
@PostAuthorize("hasPermission(returnObject, 'READ')")
public MemberEntity findById(Long id) {
    return repository.findById(id).orElseThrow();
}
RoleHierarchy
Role 계층 정의를 통해 상위 Role 은 하위 Role 접근을 가능하게 설정한다.
@Bean
public RoleHierarchy roleHierarchy() {
    RoleHierarchyImpl roleHierarchy = new RoleHierarchyImpl();
    roleHierarchy.setHierarchy("""
                ROLE_ADMIN > ROLE_MANAGER
                ROLE_MANAGER > ROLE_USER
            """);
    return roleHierarchy;
}
@Service
public class SampleService {

    @PreAuthorize("hasRole('ADMIN')")
    public String adminOnly() {
        return "Accessible by ROLE_ADMIN.";
    }

    @PreAuthorize("hasRole('MANAGER')")
    public String managerAndAbove() {
        return "Accessible by ROLE_MANAGER or higher (including ROLE_ADMIN).";
    }

    @PreAuthorize("hasRole('USER')")
    public String userAndAbove() {
        return "Accessible by ROLE_USER or higher.";
    }
}
Authority 의 경우 계층정의가 없어 위에 이야기 했던 @PreAuthorize 커스텀 로직으로 처리할 수 있다.
세션 기반 스프링 시큐리티
formLogin 과 세션기반의 Spring Security 설명
로그인폼 설정
별도의 SecurityFilterChain 빈 객체 설정을 하지 않을경우 formLogin, httpBasic 가 설정된 기본 Spring Security Config 를 사용한다.
/login 을 호출하면 AuthenticationManager 에 따라 로그인 절차가 이루어지고 세션에 로그인정보가 남게된다.
/logout 을 호출하면 세션을 초기화하는 과정을 진행한다.
@Bean
public SecurityFilterChain securityFilterChain(HttpSecurity http) throws Exception {
    http
        .httpBasic(AbstractHttpConfigurer::disable) // Basic Authorization 비활성화
        .csrf(AbstractHttpConfigurer::disable) // CSRF 보호 비활성화
        .authorizeHttpRequests(auths -> auths
            .requestMatchers("/boards/random").hasAnyRole("BASIC", "MANAGER")
            .requestMatchers("/boards/list").permitAll()
            .anyRequest().authenticated()
        )
        // login config
        .formLogin(formLogin -> formLogin
            .usernameParameter("username_demo") // default: username
            .passwordParameter("password_demo") // default: password
            .loginPage("/auth/login_demo") // default: /login[GET]
            .loginProcessingUrl("/auth/login_demo_process") // default: /login[POST]
            //.successForwardUrl("/auth/login_success") // login success redirect url
            .successHandler(new CustomLoginSuccessHandler("/boards/list"))
            .failureUrl("/auth/login_demo?error=true") // login failed redirect url
        )
        // logout config
        .logout(logout -> logout
            .logoutUrl("/auth/logout_demo") // default: /logout[GET, POST]
            .logoutSuccessUrl("/boards/list") // logout success redirect url
            .invalidateHttpSession(true) // logout 후 세션삭제여부, default: true
        )
        // exception config
        .exceptionHandling(exceptions -> exceptions
            .accessDeniedPage("/auth/access_denied") // access denied redirect url
        )
        // remember me 설정
        .rememberMe(rememberMe -> rememberMe
            .rememberMeParameter("remember-me") // default: remember-me
            .key("spring-demo-security-key")
            .tokenValiditySeconds(60 * 60 * 24) // 24 hour, default  2week
            .alwaysRemember(false) // default: false
            //.tokenRepository(getJDBCRepository()) // use PersistentTokenBasedRememberMeServices
            .userDetailsService(userDetailsService) // use TokenBasedRememberMeServices
        )
    ;
    return http.build();
}
rememberMe
서버 session 에 로그인 데이터를 저장해놓고 로그인을 유지하는 방법,
쿠키에 로그인토큰을 저장해 로그인을 유지하는 방법이 있다.
위와 같이 rememberMe config 를 설정하면 RememberMeAuthenticationFilter 가 추가 Security Filter Chain 에 추가된다.
TokenBasedRememberMeServices 객체가 userDetailsService 를 사용하 사용자정보를 가져와 로그인토큰을 만들수 있도록 설정한다.
로그인 폼에 remember-me 파라미터를 추가
<form method="post">
  <p> <label for="username">Username</label> <input type="text" id="username" name="username" value="user88" /> </p>
  <p> <label for="password">Password</label> <input type="password" id="password" name="password" value="pw88" /> </p>
  <p> <label for="remember-me">Remember-Me</label> <input type="checkbox" id="remember-me" name="remember-me" /> </p>
  <button type="submit" class="btn">Log in</button>
  </form>
로그인후 쿠키에서 remember-me 를 확인
YmFzaWM6MTY4MDIzMDczNDgwMDo1OWMyYjI0NjU0ZGUzYzQ3OWZjMjFjMzQ3OTdkN2UwNg
username:expiryTime:Md5(username:expiryTime:password:key)
브라우저를 종료하더라도 로그인토큰이 쿠키값으로 유지되기에 로그인이 유지되며
서버 세션이 없어저도 TokenBasedRememberMeServices 가 전달받은 로그인토큰 기반으로 재 로그인처리를 진행한다.
서버가 재실행되거나 동시에 여러대의 서버가 실행되어도 로그인이 풀리지 않는다.
영구적으로 토큰관리하는 방법도 있다, PersistentTokenBasedRememberMeServices 를 사용하면 별도의 토큰용 DB 를 사용태 remember-me 쿠키를 비교한다.
@Autowired
DataSource datasource;

private PersistentTokenRepository getJDBCRepository() {
    JdbcTokenRepositoryImpl jdbcTokenRepository = new JdbcTokenRepositoryImpl();
    jdbcTokenRepository.setDataSource(datasource);
    return jdbcTokenRepository;
}
http.rememberMe()
    .rememberMeParameter("remember-me") // default: remember-me
    .key("spring-demo-security-key") // secret key
    .tokenValiditySeconds(60 * 60 * 24) // 24 hour, default  2week
    .alwaysRemember(false) // default: false
    .tokenRepository(getJDBCRepository())
;
아래와 같이 로그인토큰 관리용 테이블 생성
persistent_logins테이블명이 하드코딩되어있음으로 테이블명 변경 불가능
@Getter
@Setter
@Table(name = "persistent_logins")
@Entity
public class PersistentLogin {
    @Id
    private String series;

    private String username;
    private String token;
    private LocalDateTime lastUsed;
}
로그인 정보 표시
현재 thymeleaf를 통해 뷰 페이지를 출력하고 있으며 시큐리티에 대한 태그를 사용하려면 thymeleaf-extras-springsecurity5 의존성을 추가해야 한다.
<dependency>
  <groupId>org.thymeleaf.extras</groupId>
  <artifactId>thymeleaf-extras-springsecurity5</artifactId>
  <version>3.0.4.RELEASE</version>
</dependency>
<div class="panel panel-default">
    <div sec:authorize="isAuthenticated()">
        <h3>LOGIN USER INFO</h3>
        <div sec:authentication="name">Spring seucurity username</div>
        <div>[[${#authentication.name}]]</div>
        <div sec:authorize="hasRole('ROLE_ADMIN')">This Conetent Only For ADMIN</div>
        <div sec:authorize="hasRole('ROLE_MANAGER')">This Conetent Only For MANAGER</div>
        <div sec:authorize="hasRole('ROLE_BASIC')">This Conetent Only For BASIC</div>
        <div sec:authorize="hasAnyRole('ROLE_ADMIN', 'ROLE_MANAGER', 'ROLE_BASIC')">This Content For Everyone</div>
        <div>[[${#authentication.principal}]]</div>
        <div th:with="member=${#authentication.principal.member}">
            <div>[[${member.uid}]]</div>
            <div>[[${member.upw}]]</div>
            <div>[[${member.uname}]]</div>
        </div>
    </div>
</div>
로그인 후 페이지 이동
로그인 후 기존 url 로 다시 이동시키려면 단순 redirect 형식으로는 불가능하고
referer 헤더에 저장된 이전 url 을 세션에 저장해두었다가 login success handler 가 세션에서 데이터를 꺼내어 redirect 하는 방식을 사용한다.
직접
/loginurl로 로그인시에는 루트 디렉토리로 이동
다음과 같이 successForwardUrl 대신 successHandler 를 사용
http
    ...
    .formLogin() // login config
    //.successForwardUrl("/auth/login_success") // login success redirect url
    .successHandler(new CustomLoginSuccessHandler("/boards/list"))
    ...
;
public class CustomLoginSuccessHandler extends SavedRequestAwareAuthenticationSuccessHandler {
    //
    public CustomLoginSuccessHandler(String defaultTargetUrl) {
        setDefaultTargetUrl(defaultTargetUrl);
    }

    @Override
    public void onAuthenticationSuccess(HttpServletRequest request, HttpServletResponse response, Authentication authentication) throws ServletException, IOException {
        HttpSession session = request.getSession();
        if (session != null) {
            String redirectUrl = (String) session.getAttribute("prevPage");
            if (redirectUrl != null) {
                session.removeAttribute("prevPage");
                getRedirectStrategy().sendRedirect(request, response, redirectUrl);
            } else {
                super.onAuthenticationSuccess(request, response, authentication);
            }
        } else {
            super.onAuthenticationSuccess(request, response, authentication);
        }
    }
}
세션에 prevPage 데이터를 넣는 과정은 아래 login[GET] 과정에서 진행한다.
@GetMapping("/login_demo")
public void login(HttpServletRequest request) {
    String referrer = request.getHeader("Referer");
    request.getSession().setAttribute("prevPage", referrer);
    // /resource/template/auth/login_demo.html 생성 필요
}
만약 로그인버튼에 /auth/login_demo?prefPage 형식처럼 파라미터를 붙일 수 있다면
아래처럼 /auth/login_demo 에 인터셉터를 걸어서도 사용가능하다.
@Configuration
public class InterceptorConfig implements WebMvcConfigurer {
    @Override
    public void addInterceptors(InterceptorRegistry r   egistry) {
        registry.addInterceptor(new LoginCheckInterceptor()).addPathPatterns("/auth/login_demo");
        WebMvcConfigurer.super.addInterceptors(registry);
    }
}

public class LoginCheckInterceptor extends HandlerInterceptorAdapter {
    @Override
    public boolean preHandle(HttpServletRequest request, HttpServletResponse response, Object handler) throws Exception {
        String prevPage = request.getParameter("prevPage");
        if (prevPage != null)
            request.getSession().setAttribute("prevPage", prevPage); // 목적지가 있었다면 세션에 저장
        return super.preHandle(request, response, handler);
    }
}
Rest API 기반 스프링 시큐리티
Spring Boot 가 Rest API 위주의 서비스 지원 서버가 되면서 JWT 기반의 session less 한 방식을 주로 사용한다.
remember-me 와 비슷하게 JWT 라는 로그인토큰을 발급해서 인증한다.
JWT(JSON Web Token)
https://jwt.io/
스프링 시큐리티 + JWT
참고: https://www.javainuse.com/spring/boot-jwt java jwt library: https://github.com/jwtk/jjwt#install-jdk-gradle
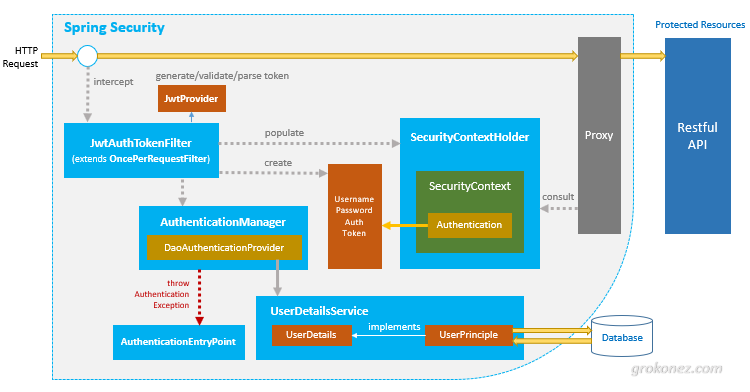
Spring Security 에서 공식적으로 제공하는 JWT 관련 AuthenticationProvider 을 제공하지 않음으로 인증시에 생성해야할 클래스가 많다.
로그인은 직접 JWT 토큰을 발급하는 Rest API 를 작성해야 하고,
session less 함으로 매 요청마다 filter 를 통해 Authentication 객체를 Security Context 에 집어넣어줘야 한다.
해당 역할을 수행하는 filter 역시 직접 생성행야 한다.
jwt 토큰 생성을 위해 아래 dependency 포함
dependencies {
    implementation 'io.jsonwebtoken:jjwt-api:0.11.5'
    runtimeOnly 'io.jsonwebtoken:jjwt-impl:0.11.5',
    // Uncomment the next line if you want to use RSASSA-PSS (PS256, PS384, PS512) algorithms:
    //'org.bouncycastle:bcprov-jdk15on:1.70',
    'io.jsonwebtoken:jjwt-jackson:0.11.5' // or 'io.jsonwebtoken:jjwt-gson:0.11.5' for gson
}
로그인시 jwt 토큰을 생성 및 반환하는 구조는 아래 사진과 같다.
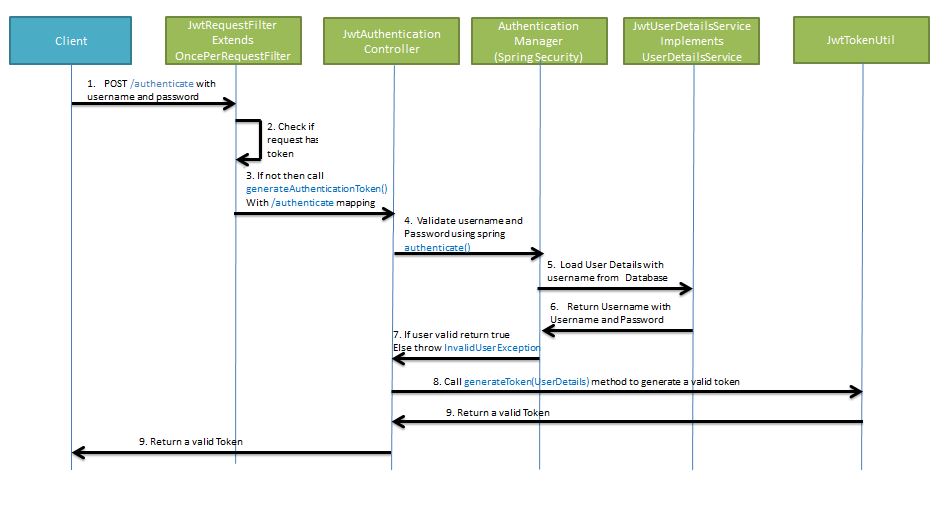
/authenticateurl 로username,password정보와 함께jwt토큰 요청- 이미 토큰 데이터를 가지고 있지 않은지 확인
- 없다면
generateAuthenticateToken()메서드 호출 authenticate()를 사용해username,password를 검증- 검증을 위해
username을 DB 에서 검색,Userdetails를 요청 UserdetailsService로부터 로그인정보 수신- 반환값을 토대로 성공/실패 결정
generateToken()메서드 호출, 로그인정보로 JWT 토큰 생성요청- 토큰값 반환
JwtTokenUtil
먼저 JWT 토큰을 생성가능한 JwtTokenUtil 정의
public class JwtTokenUtil implements Serializable {

    public static final long JWT_TOKEN_VALIDITY_SEC = 5 * 60; //5분
    public static Random random = new Random();
    private static SecretKey secretKey;


    static {
        byte[] data = new byte[255];
        random.nextBytes(data);
        String secret = "tM6S1ERulKlPWSsvzZa3Kun9vpH3YbikZpospKYhYS97vtUKiNDFFXFnyTqJX1bL";
        secretKey = Keys.hmacShaKeyFor(secret.getBytes()); //or HS384 or HS512
    }

    // jwt 생성
    public static String generateToken(CustomSecurityUser customSecurityUser) {
        Map<String, Object> claims = customSecurityUser.getClaims();
        String subject = customSecurityUser.getUsername();
        long currentTimeMillis = System.currentTimeMillis();
        return Jwts.builder()
                .setClaims(claims)
                .setSubject(subject)
                .setIssuedAt(new Date(currentTimeMillis))
                .setExpiration(new Date(currentTimeMillis + JWT_TOKEN_VALIDITY_SEC * 1000))
                .signWith(SignatureAlgorithm.HS512, secretKey)
                .compact();
    }

    // Claims expiration date 혹은 username 를 가져오기 위해 호출
    // 모든 값은 verify signature 부분에서 가져온다.
    private static <T> T getClaimFromToken(String token, Function<Claims, T> claimsResolver) {
        final Claims claims = getAllClaimsFromToken(token);
        return claimsResolver.apply(claims);
    }

    //jwt 로부터 username get
    private static String getUsernameFromToken(String token) {
        return getClaimFromToken(token, Claims::getSubject);
    }

    //jwt 로부터 exp get
    private static Date getExpirationDateFromToken(String token) {
        return getClaimFromToken(token, Claims::getExpiration);
    }

    // 토큰의 각종 데이터를 되찾아 오기 위해 시크릿 키가 필요
    public static Claims getAllClaimsFromToken(String token) {
        return Jwts.parserBuilder().setSigningKey(secretKey).build()
                .parseClaimsJws(token)
                .getBody();
    }

    // 토큰 시간 초과 확인
    public static Boolean isTokenExpired(String token) {
        final Date expiration = getExpirationDateFromToken(token);
        return expiration.before(new Date());
    }

    // validate token
    public static Boolean validateToken(String token, UserDetails userDetails) {
        final String username = getUsernameFromToken(token);
        return (username.equals(userDetails.getUsername()) && !isTokenExpired(token));
    }
}
JwtRequestFilter
토큰으로부터 유저 아이디를 확인하고 해당 토큰이 로그인시에 암호화해서 발급했던 토큰이 맞는지 확인
@Slf4j
public class JwtFilter extends OncePerRequestFilter {
    private static final String AUTHORIZATION_HEADER = "Authorization";
    private static final String BEARER = "Bearer";
    private final List<String> ignoreUrls;

    public JwtFilter(List<String> ignoreUrls) {
        this.ignoreUrls = ignoreUrls;

    }

    @Override
    protected boolean shouldNotFilter(HttpServletRequest request) {
        return ignoreUrls.contains(request.getRequestURI());
    }

    @Override
    protected void doFilterInternal(HttpServletRequest request, HttpServletResponse response, FilterChain chain) throws ServletException, IOException {
        // check request header JWT
        final String authorization = request.getHeader(AUTHORIZATION_HEADER);
        if (authorization == null || !authorization.startsWith(BEARER)) {
            log.warn("JWT Token does not begin with Bearer String, url:{}", request.getRequestURL());
            request.setAttribute("exception", "INVALID AUTHORIZATION HEADER"); //
        } else {
            // generate auth object & save at security context
            String jwtToken = authorization.substring(7);
            Map<String, Object> claims = JwtTokenUtil.getAllClaimsFromToken(jwtToken);
            Authentication authentication = getAuthentication(claims); // generate auth object
            SecurityContextHolder.getContext().setAuthentication(authentication);
        }
        chain.doFilter(request, response);
    }

    private Authentication getAuthentication(Map<String, Object> claims) {
        Long uid = Long.valueOf(claims.getOrDefault("uid", 0).toString());
        String subject = claims.getOrDefault("sub", "").toString();
        List<String> roles = (List<String>) claims.get("roles");
        UserDetails userDetails = new CustomSecurityUser(uid, subject, roles);
        return new UsernamePasswordAuthenticationToken(userDetails, "", userDetails.getAuthorities());
    }
}
doFilterInternal 에 jwt 기반으로 DB검색을 통해 authentication 를 생성해도 되지만
DB 연결이 발생함으로 민감하지 않은 정보만 가지고 authentication 객체를 생성, 사용해도 된다.
jwt 토큰 해시검증을 통해 로그인한 사용자임은 알 수 있음으로 패스워드와 같은 정보를 비교할 필요가 없다.
CustomSecurityUser 객체는 아래와 같이 jwt 토큰으로 생성할 수 있도록 변경
@Getter
@Setter
public class CustomSecurityUser extends User {

    private static final String ROLE_PREFIX = "ROLE_";

    private final Long uid;
    private final String uname;

    // create by login
    public CustomSecurityUser(Member member) {
        super(member.getUname(), member.getUpw(), makeGrantedAuth(member.getRoles()));
        this.uid = member.getUid();
        this.uname = member.getUname();
    }

    // create by jwt
    public CustomSecurityUser(Long uid, String subject, List<String> roles) {
        super(subject, "", roles.stream().map(role -> new SimpleGrantedAuthority(role)).collect(Collectors.toList()));
        this.uid = uid;
        this.uname = subject;
    }

    // make auth from login
    private static List<GrantedAuthority> makeGrantedAuth(List<MemberRole> roles) {
        List<GrantedAuthority> list = new ArrayList<>();
        roles.forEach(memberRole ->
                list.add(new SimpleGrantedAuthority(ROLE_PREFIX + memberRole.getRoleName())));
        return list;
    }

    public Map<String, Object> getClaims() {
        Map<String, Object> claims = new HashMap<>();
        claims.put("uid", uid);
        claims.put("uname", uname);
        claims.put("roles", getAuthorities().stream()
                .map(GrantedAuthority::getAuthority)
                .collect(Collectors.toList()));
        return claims;
    }
}
SecurityContextRepository
위에서 정의한 JwtRequestFilter 처럼 직접 SecurityContextHolder 에 접근해서 Authentication 객체를 삽입하였는데
SecurityContextRepository 를 사용하면 좀더 Spring Security 표준스럽게 작성 가능하다.
JwtFilter 에선 JWT 의 검증에만 집중하고 SecurityContextRepository 에선 Authentication 객체를 생성하도록 코드의 책임 분리가 가능하다.
Spring Boot 3.x 부터 SecurityContextHolderFilter 가 SecurityContextRepository 를 사용해 보안 컨텍스트를 load 하고 save 하는 역할을 수행한다.
saveContext 는 호출설정을 직접 명시해야 마지막 Filter 인 AuthenticationFilter 에서 호출된다.
JwtTokenFilter 대신 SecurityContext 에 Authentication 객체를 저장해줄 JwtSecurityContextRepository 정의
@Slf4j
public class JwtSecurityContextRepository implements SecurityContextRepository {
    private static final String AUTHORIZATION_HEADER = "Authorization";
    private static final String BEARER = "Bearer";
    private final List<String> ignoreUrls;

    public JwtSecurityContextRepository(List<String> ignoreUrls) {
        this.ignoreUrls = ignoreUrls;
    }

    // Spring Security 6.x 부터 loadDeferredContext 를 사용하며 실제 SecurityContext 를 호출하기 전까지 loadContext 는 deferred 됨,
    @Override
    public SecurityContext loadContext(HttpRequestResponseHolder requestResponseHolder) {
        HttpServletRequest request = requestResponseHolder.getRequest();
        SecurityContext context = SecurityContextHolder.createEmptyContext();

        // Ignore URLs check
        if (ignoreUrls.contains(request.getRequestURI())) {
            return context;
        }

        // Check JWT token
        String authorization = request.getHeader(AUTHORIZATION_HEADER);
        if (authorization == null || !authorization.startsWith(BEARER)) {
            log.warn("JWT Token does not begin with Bearer String, url:{}", request.getRequestURL());
            request.setAttribute("exception", "INVALID AUTHORIZATION HEADER");
            return context;
        }

        // Validate JWT and create Authentication
        String jwtToken = authorization.substring(7);
        Map<String, Object> claims = JwtTokenUtil.getAllClaimsFromToken(jwtToken);
        Authentication authentication = CustomSecurityUser.getAuthentication(claims);
        context.setAuthentication(authentication);

        return context;
    }

    @Override
    public void saveContext(SecurityContext context, HttpServletRequest request, HttpServletResponse response) {
        // Stateless이므로 SecurityContext를 저장하지 않음\
        log.info("saveContext invoked");
    }

    @Override
    public boolean containsContext(HttpServletRequest request) {
        // Authorization 헤더가 있는 경우에만 SecurityContext 가 있다고 간주
        String authorization = request.getHeader(AUTHORIZATION_HEADER);
        return authorization != null && authorization.startsWith(BEARER);
    }
}
@Bean
public SecurityFilterChain securityFilterChain(HttpSecurity http) throws Exception {
    http
            ...
            //.addFilterBefore(new JwtFilter(List.of("/login")), UsernamePasswordAuthenticationFilter.class); // JWT 필터 추가
            .securityContext(context -> context
                    .securityContextRepository(new JwtSecurityContextRepository(List.of("/login")))
                    .requireExplicitSave(true) // default true, saveContext 생략처리됨
            )
    ;
    return http.build();
}
Login Controller
@RestController
@RequiredArgsConstructor
@RequestMapping("/auth")
public class RestAuthController {

    private final AuthenticationManagerBuilder authenticationManagerBuilder;

    @PostMapping("/login_demo")
    public LoginResponseDto login(@RequestBody LoginRequestDto requestDto) {
        Authentication authentication = new UsernamePasswordAuthenticationToken(requestDto.getUsername(), requestDto.getPassword());
        authentication = authenticationManagerBuilder.getObject().authenticate(authentication);
        String jwtToken = JwtTokenUtil.generateToken((CustomSecurityUser) authentication.getPrincipal());
        return new LoginResponseDto(jwtToken);
    }
}
Spring Security cors 에러 이슈
spring-security를 사용하지 않는경우 CorsRegistry 등록하여 cors 에러 이슈 처리방식을 사용해왔다.
@Configuration
@RequiredArgsConstructor
public class WebAdminConfig implements WebMvcConfigurer, Filter {

    // WebMvcConfigurer 에서 cors 에러
    @Override
    public void addCorsMappings(CorsRegistry registry) {
        registry.addMapping("/**")
            .allowedOrigins("*")
            .allowedMethods("*")
            .allowedHeaders("*")
            .allowCredentials(true)
            .maxAge(3600);
    }
}
spring-security 를 사용한다면 configure 에 해당 필터를 등록해준다.
public class CorsFilter implements Filter {

    @Override
    public void doFilter(ServletRequest request, ServletResponse response, FilterChain chain) throws IOException, ServletException {
        HttpServletResponse resp = (HttpServletResponse) response;
        resp.setHeader("Access-Control-Allow-Origin", "*");
        resp.setHeader("Access-Control-Allow-Methods", "POST, GET, OPTIONS, DELETE");
        resp.setHeader("Access-Control-Max-Age", "3600");
        resp.setHeader("Access-Control-Allow-Headers", "Content-Type,XFILENAME,XFILECATEGORY,XFILESIZE,X-Token");
        chain.doFilter(request, resp);
    }
}
.addFilterBefore(new CorsFilter(), ChannelProcessingFilter.class)
최신 spring-security 사용시에 CorsConfiguration 를 사용한 cors 이슈 처리
@EnableWebSecurity
@EnableGlobalMethodSecurity(prePostEnabled = true)
public class SecurityConfig extends WebSecurityConfigurerAdapter {
    ...
    ...

    @Override
    protected void configure(HttpSecurity http) throws Exception {
        http
                ...
                .cors().configurationSource(corsConfigurationSource())
                ...
        ;
    }

    @Bean
    public CorsConfigurationSource corsConfigurationSource() {

        CorsConfiguration configuration = new CorsConfiguration();
        configuration.setAllowedOrigins(Arrays.asList("*"));
        configuration.setAllowedMethods(Arrays.asList("HEAD", "GET", "POST", "PUT", "DELETE"));
        configuration.setAllowCredentials(false);
        configuration.setAllowedHeaders(Arrays.asList("Authorization", "TOKEN_ID", "X-Requested-With", "Authorization", "Content-Type", "Content-Length", "Cache-Control"));
        UrlBasedCorsConfigurationSource source = new UrlBasedCorsConfigurationSource();
        source.registerCorsConfiguration("/**", configuration);
        return source;
    }
}
주의 :
WebSecurity의web.ignoring()사용시에spring-security filter에서 아예 제외됨으로CORS설정을 사용하지 않는다.
HttpSecurity와permitAll()을 통해 진행하는 것을 권장 CORS는 응답이 Access-Control-Allow-Credentials: true 을 가질 경우, Access-Controll-Allow-Origin의 값으로 *를 사용하지 못하게 막고 있다.
HandlerMethodArgumentResolver
템플릿용 @Controller 의 메서드에선 Authentication 를 파라미터로 사용시 org.springframework.security.web.method.annotation 패키지의 AuthenticationPrincipalArgumentResolver 를 통해 주입해준다.
@Controller
@RequestMapping("/boards")
@RequiredArgsConstructor
public class BoardController {

    private final BoardService boardService;

    @GetMapping("/list")
    public void list(Authentication authentication, Model model) {
        log.info(authentication.toString()); // UsernamePasswordAuthenticationToken
        Pageable page = PageRequest.of(0, 1000, Sort.by("bno"));
        Page<Board> result = boardService.findAll(page);
        model.addAttribute("result", result);
    }
}
RestController 에는 해당 기능사용하기 위해 별도로 HandlerMethodArgumentResolver 를 작성해야 한다.
@Target(ElementType.PARAMETER)
@Retention(RetentionPolicy.RUNTIME)
public @interface LoginUser {
}


public class LoginUserArgumentResolver implements HandlerMethodArgumentResolver {

    @Override
    public boolean supportsParameter(MethodParameter parameter) {
        boolean isLoginUserAnnotation = parameter.getParameterAnnotation(LoginUser.class) != null;
        boolean isUserClass = CustomSecurityUser.class == parameter.getParameterType();
        return isLoginUserAnnotation && isUserClass;
    }

    @Override
    public Object resolveArgument(MethodParameter parameter,
                                  ModelAndViewContainer mavContainer,
                                  NativeWebRequest webRequest,
                                  WebDataBinderFactory binderFactory) throws Exception {
        Authentication authentication = SecurityContextHolder.getContext().getAuthentication();
        if (authentication == null || !(authentication.getPrincipal() instanceof UserDetails)) {
            return null;
        }
        return authentication.getPrincipal();
    }
}
코드 가독성을 위해 어노테이션 클래스를 하나 정의하여 사용하는 것을 권장.
@Configuration
@RequiredArgsConstructor
public class WebConfig implements WebMvcConfigurer {
    @Override
    public void addArgumentResolvers(List<HandlerMethodArgumentResolver> resolvers) {
        resolvers.add(new LoginUserArgumentResolver());
    }
}
@GetMapping("/list")
public List<Board> list(@LoginUser CustomSecurityUser user) {
    log.info(user.toString());
    return boardService.findAll(PageRequest.of(0, 1000)).getContent();
}