Spring Boot - MTQQ, AMQP!
MTQQ
Message Queuing Telemetry Transport, 많은 IoT 에 최적화된 가벼운 메세징 프로토콜.
기존에 통신 프로토콜보다 제한적이고 특수한 상황에서 사용할 수 있는 모바일 특화 프로토콜.
특히 IoT 영역에서 주목받고 있다.
MTQQ 구성
MQTT 프로토콜은 메시지를 해당 Topic에 발행(Publish) 하고 해당 Topic에 구독(Subscribe)하는 모양으로 이루어진다.
개설된 Topic에 message를 발행하면 해당 Topic을 구독하는 client 들에게 message를 전송,
따라서 one to multi 또는 one to one message 전송을 모두 지원할 수 있다.
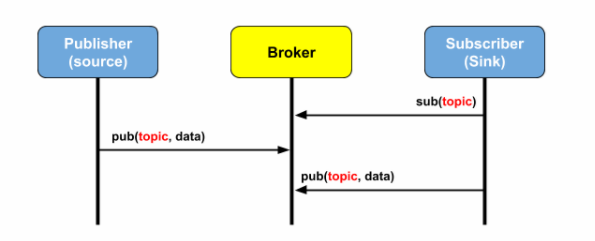
MQTT 에선 서버역할로 Borker가 존재.
발행자(Publisher)가 지정된 Topic에 대한 메세지를 Broker에게 전달하면 Broker에 붙어있는 여러 구독자(Subscriber)에게 해당 메세지를 전달한다.
토픽은 /로 구분된 계층구조를 갖으며 와일드카드문자를 지원한다.
computer/part/cpucomputer/part/ramcomputer/part/gpucomputer/part/cooler
만약 하위의 토픽들을 모두 선택하고 싶다면 #을 사용
+는 1레벨의 모든 토픽을 의미한다.
computer/part/#
computer/+/gpu
QOS
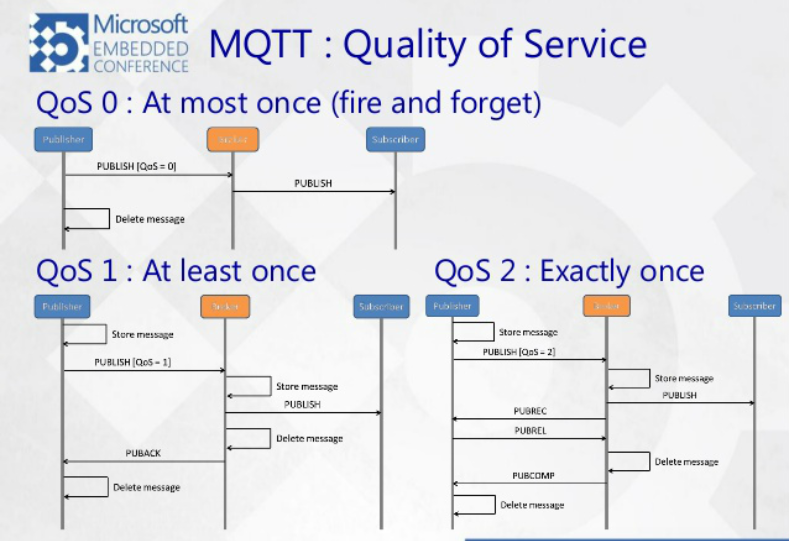
그림과 같이 총 3개 레벨의 QOS가 있다.
- Level 0 (At most once)
- 최대 한 번 전달, Fire and Forget, 실행 후 삭제.
- 한번만 전달하지만 전달여부는 확인하지 않는 레벨.
- Level 1 (At least once)
- 최소 한 번 전달, 대부분 브로커, 라이브러리는
Level 1까지 지원한다 - 메시지를 성공적으로 전달하면
Broker가Publisher에게PUBACK을 보내어 전달 성공을 알린다, - 만약 전달이 이루어지지 않을 경우
Publisher는PUBACK을 받지 못하여 적정 시간 후 실패로 알고 다시 메시지를 보낸다. Subscribe는 중복메시지를 받는 경우가 생기게 된다.
- 최소 한 번 전달, 대부분 브로커, 라이브러리는
- Level 2 (Exactly once)
- 아래 3가지 과정으로 메시지는 반드시 한번 전달된다.
- Publish received (PUBREC)
- Publish released (PUBREL)
- Publish complete (PUBCOMP)
Publisher가PUBREC을 전달받지 못할 경우 메세지를 특정횟수만큼 재전송하고, 브로커는 메세지 id 를 기반으로 한번만 전송한다.Publisher가PUBCOMP를 전달받지 못할 경우PUBREL를 특정횟수 만큼 재전송하고, 결국 전달받지 못하면Loss처리한다.
MQTT Broker
브로커 종류는 굉장히 많지만 rabbitMQ를 사용
https://www.rabbitmq.com/download.html
https://www.rabbitmq.com/install-generic-unix.html
https://www.rabbitmq.com/mqtt.html
rabbitMQ는 저전력모델을 위한 MQTT 브로커가 아닌 단순 메세지 브로커 역할로 AMQP 라는 프로토콜을 지원하는 브로커이다.
플러그인을 사용하면 MQTT 프로토콜을 지원할 수 있다.
설치방법은 아래 데모코드 참고
MQTT Client 프로그램으로 mosquitto 설치하고 간단히 topic 을 지정해 message 을 발행, 구독 가능
brew install mosquitto

mosquitto_sub -h 127.0.0.1 -p 1883 -t test_topic -q 2

mosquitto_pub -h 127.0.0.1 -p 1883 -t test_topic -m "Hello RabbitMQ"
mosquitto_sub 를 통해 test_topic 이름으로 구독
다른 터미널을 띄우고 mosquitto_pub 을 통해 test_topic 이름으로 메세지 발행
rabbitMQ 대시보드에서 MQTT Client 연결 확인 가능
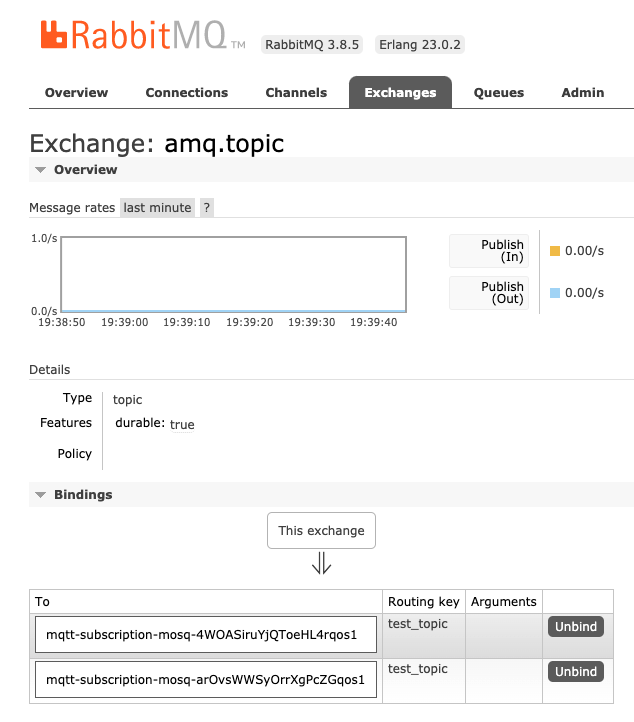
mosquitto_sub 을 2개 실행해 두면 위처럼 바인딩된 큐가 2개 생성된것을 확인할 수 있다.
Paho client
MQTT는 c/c++, python, java 등 여러 언어를 지원하고 수많은 엔드포인트 디바이스가 사용가능한 프로토콜.
Java 의 paho 클라이언트로 MQTT 구독자, 발행자를 만들고 브로커와의 연결 테스트 진행.
<dependency>
    <groupId>org.eclipse.paho</groupId>
    <artifactId>org.eclipse.paho.client.mqttv3</artifactId>
    <version>1.2.0</version>
</dependency>
@Slf4j
@Component
public class MqttComponent {

    private String brokerAddress = "tcp://localhost";

    private String id = "guest";

    @PostConstruct
    public void init() {
        log.info("MQTT init begin.");
        MemoryPersistence persistence = new MemoryPersistence();
        try {
            MqttClient mqttClient = new MqttClient(brokerAddress, "spring boot", persistence);
            MqttConnectOptions connOpts = new MqttConnectOptions();
            connOpts.setCleanSession(false); //기존에 있던 세션을 지움(구독중인 메세지, 구독옵션등 모두 사라짐)
            connOpts.setConnectionTimeout(10); //10초동안 연결되지 않을경우 타임아웃
            connOpts.setKeepAliveInterval(3);
            connOpts.setAutomaticReconnect(true); //클라이언트가 서버를 찾지 못할경우 자동 재연결
            connOpts.setUserName(id);
            connOpts.setPassword(id.toCharArray());
            mqttClient.setCallback(new MqttMessageCallback());
            mqttClient.connect(connOpts);
            String[] topics = {
                    "/computer/part/cpu",
                    "/computer/part/monitor",
                    "/computer/part/keyboard",
                    "/computer/part/gpu",
                    "/computer/part/ram",
            };
            int[] qos = {1, 1, 1, 1, 1};
            mqttClient.subscribe(topics, qos); //모든 구독에 대해서 qos 레벨 1로 설정
            log.info("MQTT init success.");
        } catch (MqttException e) {
            log.error("MQTT init failed BROKER_ADDRESS = " + brokerAddress + " error :" + e.getMessage());
            log.error(" error : " + e.getCause());
        }
    }
}
@Slf4j
public class MqttMessageCallback implements MqttCallback {
    @Override
    public void connectionLost(Throwable cause) {
        log.info("connection lost.....");
    }

    @Override
    public void messageArrived(String topic, MqttMessage message) throws Exception {
        log.info("message arrived, id:" + message.getId() + ", payload: " + new String(message.getPayload(), "UTF-8"));
    }

    @Override
    public void deliveryComplete(IMqttDeliveryToken token) {
        log.info("delivery complete....");
    }
}
cli환경에서 mosquitto 클라이언트를 사용해서 topic에 해당하는 MQTT 메세지 발행
> mosquitto_pub -h 127.0.0.1 -p 1883 -t /computer/part/cpu -q 1 -m "intel cpu"
> mosquitto_pub -h 127.0.0.1 -p 1883 -t /computer/part/keyboard -q 1 -m "ducky"
> mosquitto_pub -h 127.0.0.1 -p 1883 -t /computer/part/gpu -q 1 -m "amd"
> mosquitto_pub -h 127.0.0.1 -p 1883 -t /computer/part/ram -q 1 -m "samsung"
출력값
message arrived intel cpu
message arrived ducky
message arrived amd
message arrived samsung
데모 코드
https://github.com/Kouzie/spring-boot-demo/tree/main/mqtt-demo
AMQP
https://www.rabbitmq.com/tutorials/tutorial-four-java.html RabbitMQ 의 기본제공 프로토콜이 AMQP
Advanced Message Queing Protocol, 메시지 큐를 사용하는 네트워크 프로토콜
Exchanges and Exchange Types

전체적인 구조는 위와 같다.
Exchange : 발행한 모든 메시지가 처음 도달하는 지점으로 메시지가 목적지에 도달할 수 있도록 라우팅 규칙 적용
Queue : 메시지가 소비되기 전 대기하고 있는 최종 지점으로 Exchange 라우팅 규칙에 의해 단일 메시지가 복사되거나 다수의 큐에 도달
Binding : Exchange 와 Queue 간의 가상 연결
Channel : 발행자와 소비자, Broker 사이의 논리적인 연결, 하나의 Connectoin 내에 다수의 Channel 설정 가능
라우트 규칙은 exchange type에 의해 결정되며 bindings라고도 부른다. exchange type 에 따라 몇가지씩 위 그림에서 추가된다.
Direct exchange type
라우팅 와 바인딩 키가 완벽하게 일치하는 경우에 전달
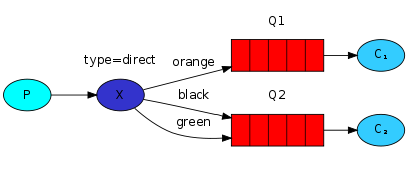
큐는 클라이언트(Channel)가 연결될 때 마다 생성된다.
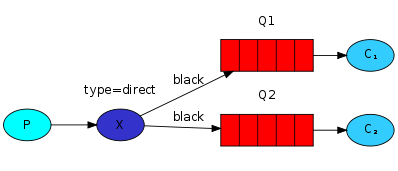
만약 2개의 클라이언트가 동일한 라우팅키로 연결시에 exchange 는 2개의 큐에 메세지를 모두 전달하게 되고
2개의 클라이언트가 모두 메세지를 받는다.
만약 메세지에 대한 중복처리를 하고 싶다면 아래 그림처럼 consumer group 을 설정해 하나의 큐에 2개 이상의 channel 을 구성하도록 설정하면 된다.

Fanout exchange type
1:N 관계로 메시지를 브로드캐스트, Exchange에 바인딩 된 모든 Queue에 라우팅키 상관없이 메시지를 전달

Topic exchange type
Topic 의 경우 조금 아래 그림처럼 조금 특별한 라우팅 키를 사용한다.
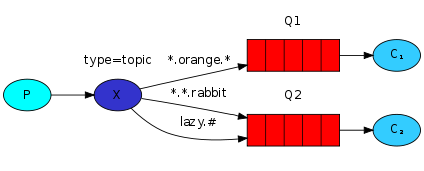
Multicast 방식, Exchange에 바인딩 된 Queue 중에서 메시지의 라우팅 키가 패턴에 맞는 Queue에게 모두 메시지를 전달
Queue 속성
- Durable
브로커가 재시작되어도 queue 가 남아있음 - Exclusive
하나의 연결만 허용, 연결이 끊기면 queue 는 삭제됨 - Auto-delete
모든 consumer 가 떠나면 queue 는 자동 삭제됨
AMQP 클라이언트
아래에 쓰이는 각종 메서드는 위의 API문서에 자세히 나와있다.
java 의 amqp-client 라이브러리를 사용하거나
<dependency>
  <groupId>com.rabbitmq</groupId>
  <artifactId>amqp-client</artifactId>
  <version>5.17.0</version>
</dependency>
spring-boot-starter 라이브러리를 사용해도 좋다.
<dependency>
    <groupId>org.springframework.boot</groupId>
    <artifactId>spring-boot-starter-amqp</artifactId>
</dependency>
RabbitMQ 와 Spring 모두 VMware 에서 만들었기 때문에 연동성이 좋음
데모 코드
https://github.com/Kouzie/spring-boot-demo/tree/main/amqp-demo