Spring Boot - Kafka!
개요
카프카는 과거 링크드인의 제이 크렙스, 준 라오, 네하 나크헤데에 의해 탄생한 스칼라로 개발한 오픈 소스 메시지 브로커 프로젝트이다
기존의 end to end 방식의 연결 구조에서 messaging broker 방식으로 변경하기 위한 메세지 브로커 오픈소스
기존의 복잡한 파이프 라인 구조를 아래와 같이 kafka 를 통해 간편화 시킨다.


카프카를 사용함으로 얻을수 있는 장점은 아래와 같다.
- 높은 처리량
- 순서 보장
- 적어도 한 번 (at least once) 전송 방식
- 강력한 파티셔닝
- 자연스러운 백 프레셔 핸들링
- 로그 컴팩션
이번 포스트에선 스프링 부트에서 카프카를 사용하는 방법을 알아보는 것임으로 카프카의 간단한 구성요소만 알아보고 바로 라이브러리 사용법을 살펴볼 예정이다.
용어
Broker: 카프카 애플리케이션 서버 단위Topic: 데이터 분리 단위. 다수 파티션 보유Partition: 레코드 저장소. 컨슈머 요청시 레코드 전달Offset: 각 레코드당 파티션에 할당된 레코드 고유 번호Consumer: 레코드를 가져가는(polling) 애플리케이션Consumer group: 다수 컨슈머 묶음Consumer offset: 특정 컨슈머가 가져간 레코드의 번호Producer: 레코드를 브로커로 전송하는 레코드 저장 애플리케이션
파티션(메세지 저장소) 의 복제(고가용성) 를 위해 일반적으로 3개 이상의 broker 를 운영하며
확장(스케일 아웃), fall out 발생시 메세지 백업등의 안정성 제공은 덤이다.
파티션
다른 브로커와는 다르게 파티션이라는 저장공간을 제공하며 저장되는 리소스(메세지)의 백업, 복제 등을 제공한다.
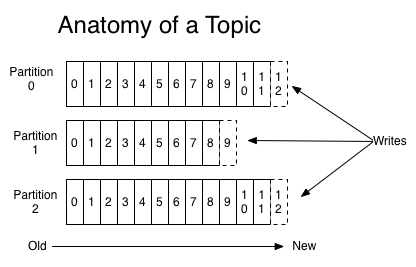
파티션을 나눔으로 여러개의 클라이언트(consumer) 가 각 파티션에 연결하여 동시에 처리할 수 있다.
파티션 개수마다
consumer를 사용해야한다. 물론 하나의consumer가 여러개의 파티션을 담당할 수 있다.
파티션과 consumer 가 N:1 관계를 맺기에 consumer 끼리 경쟁할 필요가 없으며
어떤 consumer 가 데이터를 어디까지 가져갔는지 파악가능하다.
트래픽이 많아질수록 파티션과 consumer 를 늘리는 전략으로 스케일 아웃이 가능하다.
단 파티션은 한번 늘리면 줄이는 것은 불가능함으로 파티션을 늘리기전 충분한 테스트 과정이 필요하다.
반대로 파티션 개수보다 consumer 가 많아지면 추가생성된 consumer는 동작하지 않는다.
복제
여러개의 브로커를 구성하고 하나의 토픽에 여러개의 파티션을 지정하면 브로커별로 파티션을 나누어 저장한다.
아래 그림의 경우 3개의 브로커에 3개의 파티션을 지정한 경우이다.
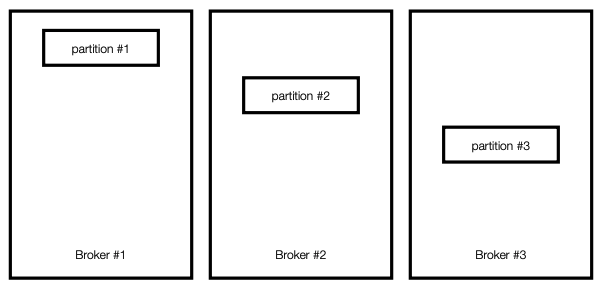
모종이 이유로 셋중 하나의 브로커가 중단된다면 데이터 손실이 발생함으로 카프카에선 아래와 같이 복제정책을 사용한다.
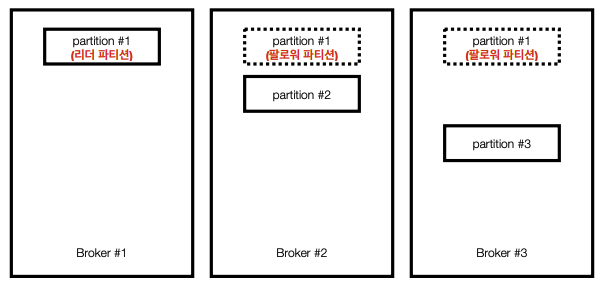
파티션이 많아질수록 동기화에 많은 리소스(네트워크, 저장소 등)가 사용됨으로 사용량에 따른 적절한 브로커 개수를 설정해야 한다.
컨슈머 그룹
다른 메세지 브로커 역할을 수행하는 어플리케이션이 그렇듯
여러개의 인스턴스가 동일한 topic 을 구독하고 있을때 중복처리를 방지하기 위한 그룹설정이 필요하다.
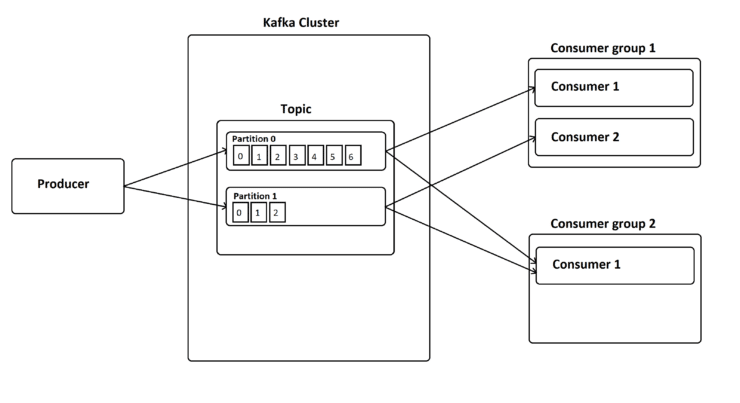
그룹을 지정하고 consumer 생성후 파티션에서 레코드를 읽어가면 읽은 부분까지 offset 을 kafka 서버에 기록(commit)한다.
그룹별로 offset 을 지정하기 때문에 같은 topic 에 대한 여러가지 로직을 수행하고 싶다면
해당 레코드를 처리하는 여러 consumer 그룹을 생성하면 된다.
zookeeper
주키퍼는 Yahoo에서 처음 개발되어 Apache License로 오픈소스 된 프로젝트로 로드밸런스, 시스템 간의 정보 공유, 상태 체크, 서버들 간의 동기화 등을 처리해준다.
카프카 역시 수많은 데이터를 관리하는 분산 데이터 시스템이기에 분산, 복제된 데이터의 충돌을 막고 데이터 동기화를 진행해야 하는데 이를 처리하는 분산 코디네이션 서비스가 주키퍼이다.
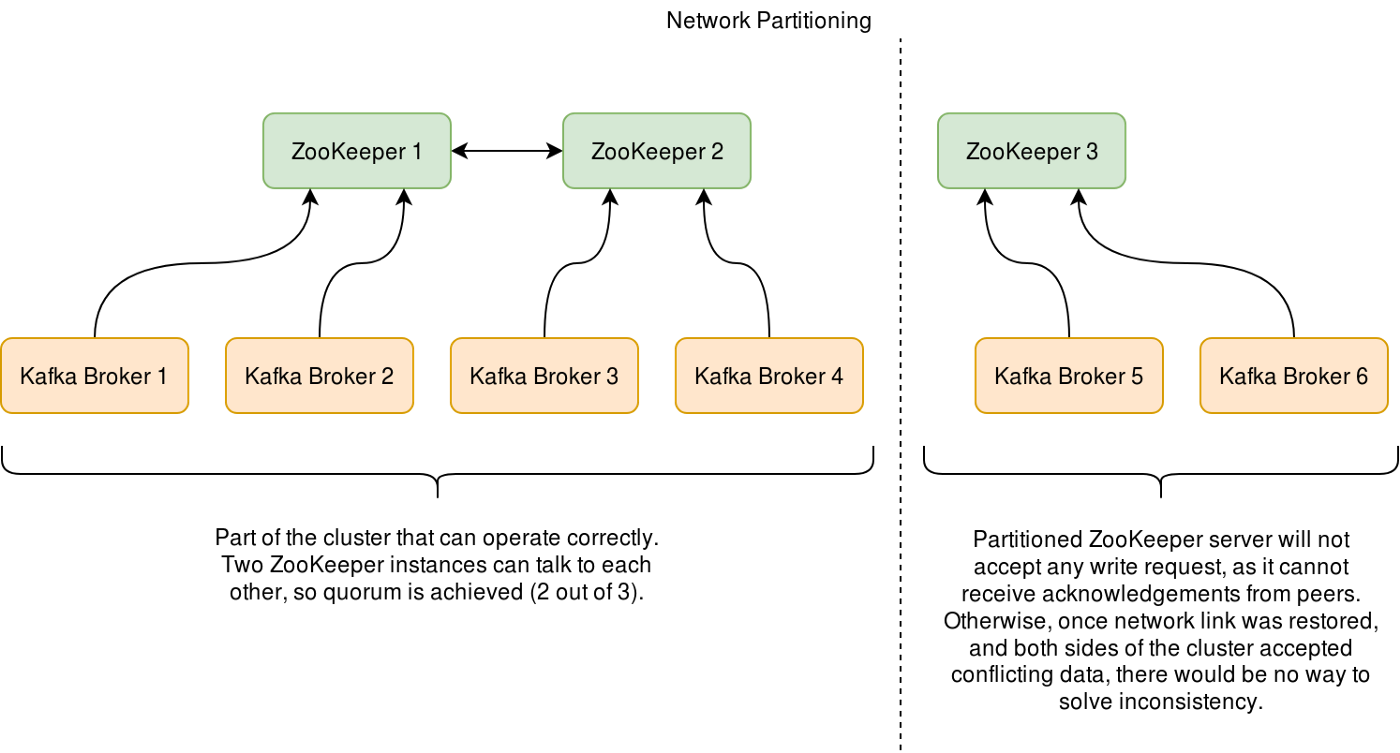
초록색 박스가 주키퍼 서버역할이고 카프카 노드는 주키퍼 클라이언트 역할이다.
주키퍼는 카프카의 데이터를 엑세스 하여 데이터를 동기화하고 카프카 노드에 대한 메타데이터도 관리하는데
카프카가 성장하면서 zookeeper 의 성능한계가 드러나면서 향후 zookeeper 는 제외되고 카프카 라프트(KRaft) 가 대체할 예정
설치
https://github.com/onlybooks/kafka2/blob/main/appendix_C/single_zk_kafka/docker-compose.yml
간단히 로컬에 싱글 클러스터로 설치한다.
version: "3.5"
services:
  zk:
    image: confluentinc/cp-zookeeper:5.5.1
    restart: always
    hostname: zk
    container_name: zk
    ports:
      - "2181:2181"
    environment:
      - ZOOKEEPER_SERVER_ID=1
      - ZOOKEEPER_CLIENT_PORT=2181
      - ZOOKEEPER_TICK_TIME=2000
      - ZOOKEEPER_INIT_LIMIT=5
      - ZOOKEEPER_SYNC_LIMIT=2
      - ZOOKEEPER_SERVERS=zk:2888:3888

  kafka:
    image: confluentinc/cp-kafka:5.5.1
    restart: always
    hostname: kafka
    container_name: kafka
    ports:
      - "9092:9092"
      - "9999:9999"
    environment:
      KAFKA_BROKER_ID: 1
      KAFKA_ZOOKEEPER_CONNECT: zk:2181
      KAFKA_LISTENERS: INTERNAL://kafka:9092
      KAFKA_ADVERTISED_LISTENERS: INTERNAL://kafka:9092
      KAFKA_LISTENER_SECURITY_PROTOCOL_MAP: INTERNAL:PLAINTEXT
      KAFKA_INTER_BROKER_LISTENER_NAME: INTERNAL
      KAFKA_OFFSETS_TOPIC_REPLICATION_FACTOR: 1
      KAFKA_TRANSACTION_STATE_LOG_MIN_ISR: 1
      KAFKA_TRANSACTION_STATE_LOG_REPLICATION_FACTOR: 1
      KAFKA_JMX_PORT: 9999

  kafka_manager:
    image: hlebalbau/kafka-manager:stable
    container_name: cmak
    ports:
      - "9000:9000"
    environment:
      ZK_HOSTS: "zk:2181"
      APPLICATION_SECRET: "random-secret"
    command: -Dpidfile.path=/dev/null
생성후 컨테이너 안으로 들어가 각종 kafka cli 툴들을 사용할 수 있다.
docker exec -it kafka bash
root@kafka:/# kafka-topics --version

5.5.1-ccs (Commit:3c4783aac9e33249)
kafka 테스트
docker 컨테이너 내부에서 cli 툴을 사용해도 되지만
로컬 PC 에 cli 툴을 설치해서 테스트 진행
위 사이트에서 카프카 설치를 위한 바이너리를 받을 수 있다.
/bin 에 있는 kafka 클라이언트 sh 파일만 사용할 예정
파티션 3개로 test 토픽 생성
./kafka-topics.sh --create \
 --bootstrap-server 192.168.10.234:9092 \
 --replication-factor 1 \
 --partitions 3 \
 --topic test

Created topic test.
replication-factor는 현제kafka브로커가 하나뿐임으로 1개 밖에 설정 불가능하다.
test 토픽 producer 생성
./kafka-console-producer.sh \
 --bootstrap-server 192.168.10.234:9092 \
 --topic test

>hello
>kafka
>hello
test 토픽 consumer 생성
from-beginning 는 파티션에 저장된 모든 데이터를 처음부터 가져옴
./kafka-console-consumer.sh \
 --bootstrap-server 192.168.10.234:9092 \
 --from-beginning \
 --topic test

kafka
hello
hello
받아오는 데이터를 보면 입력한 순서가 다른데 파티션 3개에서 데이터를 가져오다 보니 순서가 다르다.
test 토픽의 컨슈머 그룹 testgroup 생성
./kafka-console-consumer.sh \
 --bootstrap-server 192.168.10.234:9092 \
 --from-beginning \
 --group testgroup \
 --topic test

kafka
hello
hello
그룹으로 가져올 경우 중복처리 방지를 위해 이미 앞에서 해당 그룹으로 데이터를 가져왔다면 다음부턴 그 이후의 데이터만 가져온다.
다시한번 위의 명령을 실행시 아무 데이터도 가져오지 않는다
접속중인 컨슈머 그룹 확인, 현재 콘솔을 통해 하나의 컨슈머가 연결된 상태이다.
./kafka-consumer-groups.sh \
 --bootstrap-server 192.168.10.234:9092 \
 --list

console-consumer-14607
생성된 컨슈머 그룹 모니터링, 각 파티션당 어느 레코드까지 데이터를 읽어왔는지 확인 가능하다.
./kafka-consumer-groups.sh \
 --bootstrap-server 192.168.10.234:9092  \
 --group testgroup \
 --describe

Consumer group 'testgroup' has no active members.

GROUP           TOPIC           PARTITION  CURRENT-OFFSET  LOG-END-OFFSET  LAG             CONSUMER-ID     HOST            CLIENT-ID
testgroup       test            1          2               2               0               -               -               -
testgroup       test            0          1               1               0               -               -               -
testgroup       test            2          2               2               0               -               -               -
각 파티션마다 현재 OFFSET, 마지막 OFFSET, 일지못한 개수(LAG) 등을 알수있다.
LAG 이 늘어날수록 해당 consumer 그룹이 데이터 처리를 하지 못한것임으로 관리가 필요하다.
컨슈머 그룹 오프셋으로 초기화
./kafka-consumer-groups.sh \
 --bootstrap-server 192.168.10.234:9092 \
 --reset-offsets \
 --to-earliest \
 --execute \
 --group testgroup \
 --topic test
testgroup 의 오프셋 초기화.
해당 명령 수행후 모니터링 명령(--describe) 수행시 LAG 와 LOG-END-OFFSET 가 동일해진다.
특정 파티션만 특정 offset 지정도 가능하다.
./kafka-consumer-groups.sh \
 --bootstrap-server 192.168.10.234:9092 \
 --reset-offsets \
 --to-offset 10 \
 --execute \
 --group testgroup \
 --topic test:1
test 토픽의 1번 파티션의 offset 을 10으로 지정한다
java kafka client
kafka producer
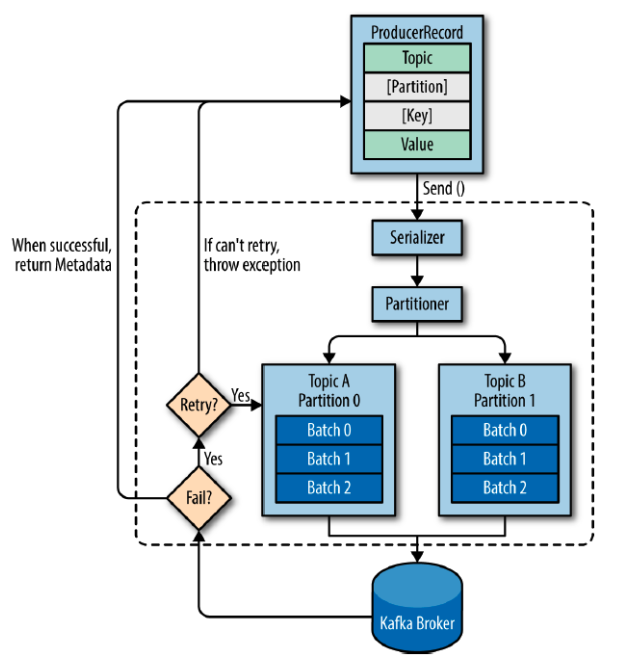
producer 내부에서 일련의 작업들을 진행 후 임시로 메세지들을 모아두었다
배치로 카프카 서버로 전송되게 된다.
ProducerRecord 는 카프카로 보내기 위한 데이터, 4가지로 분류된다.
topicpartition[optional]key[optional]value
partition 은 저장시에, key 는 정렬시에 사용되는 optional 값이다.
지정하지 않으면 라운드로빈으로 각 파티션에 순서대로 저장된다.
중복처리를 위해 key 를 지정해서 여러개의 consumer 에서 한번만 처리되도록 설정도 가능하다.
// tooic, value
ProducerRecord<String, String> record = new ProducerRecord<>(TOPIC_NAME, data);
// topic, key, value
ProducerRecord<String, String> record = new ProducerRecord<>(TOPIC_NAME, Integer.toString(index), data);
// topic, partition, key, value
ProducerRecord<String, String> record = new ProducerRecord<>(TOPIC_NAME, PARTITION_NUMBER, Integer.toString(index), data);
내부에서 지정된 횟수만큼 재시도하며 실패, 성공 결과가 리턴된다.
카프카 producer 는 3가지 전송 방식으로 나뉜다.
-
acks=0
가장 속도가 빠름, 유실 가능성 큼
메세지를 보낸 즉시 성공으로 간주, 리더 팔로우 파티션에 저장되었는지 확인 하지 않음
센서와 같은 일부 유실되더라도 흐름이 유지되는 경우acks=0을 사용 -
acks=1(default)
속도 보통 유실 가능성 있음
리더 파티션에는 저장되었는지 확인, 확인후 성공처리
복제되기 전에 죽게된다면 유실될 가능성이 있다. 만약 브로커가 하나라면 유실가능성 없다. -
acks=-1속도 느림, 유실가능성 없음
all 옵션이라 부르며 리더, 팔로우 파티션에 모두 저장 성공되었는지 확인
모든 파티션에 저장되었는지 확인하기에 속도가 가장 느리다
public KafkaProducer<String, String> kafkaProducer() {
    Properties configs = new Properties();
    configs.put(ProducerConfig.BOOTSTRAP_SERVERS_CONFIG, bootstrapServersConfig); // bootstrap.servers
    configs.put(ProducerConfig.KEY_SERIALIZER_CLASS_CONFIG, StringSerializer.class); // key.deserializer
    configs.put(ProducerConfig.VALUE_SERIALIZER_CLASS_CONFIG, StringSerializer.class); // value.deserializer
    configs.put(ProducerConfig.ACKS_CONFIG, "1"); // acks
    // configs.put(ProducerConfig.ACKS_CONFIG, "0");
    // configs.put(ProducerConfig.ACKS_CONFIG, "all");
    KafkaProducer<String, String> producer = new KafkaProducer<>(configs);
    return producer;
}
@Scheduled(fixedDelay = 1000) // 10초마다 실행
public void producerSchedule() {
    String data = "This is record " + index++;
    ProducerRecord<String, String> record = new ProducerRecord<>(topic, data);
    Future<RecordMetadata> sendResult = producer.send(record);
}
send 메서드는 에러가 없다면 RecordMetadata 객체를 반환한다.
Future 메서드를 핸들링해도 되고 send 에 callback 함수를 등록해도 된다.
public class ProducerCallback implements org.apache.kafka.clients.producer.Callback {

    @Override
    public void onCompletion(RecordMetadata metadata, Exception exception) {
        if (exception != null) {
            exception.printStackTrace();
        } else {
            log.info("onCompletion invoked, {}", metadata.toString());
        }
    }
}
producer.send(record, new ProducerCallback());
kafka consumer
kafka consumer 로 메세지를 가져오는 방법은 아래 3가지
- 오토 커밋
- 동기 가져 오기
- 비동기 가져오기
@Bean
public KafkaConsumer<String, String> kafkaConsumer() {
    Properties configs = new Properties();
    configs.put(ConsumerConfig.BOOTSTRAP_SERVERS_CONFIG, bootstrapServersConfig); // bootstrap.servers
    configs.put(ConsumerConfig.GROUP_ID_CONFIG, groupId); // group.id
    configs.put(ConsumerConfig.KEY_DESERIALIZER_CLASS_CONFIG, StringDeserializer.class); // key.deserializer
    configs.put(ConsumerConfig.VALUE_DESERIALIZER_CLASS_CONFIG, StringDeserializer.class); // value.deserializer
    configs.put(ConsumerConfig.AUTO_OFFSET_RESET_CONFIG, "latest"); // auto.offset.reset
    configs.put(ConsumerConfig.ENABLE_AUTO_COMMIT_CONFIG, true); // enable.auto.commit
    KafkaConsumer<String, String> consumer = new KafkaConsumer<>(configs);
    consumer.subscribe(Arrays.asList(topic));
    return consumer;
}
auto.offset.reset 은 offset 을 지정하지 않으면 latest 메세지를 가져오도록 설정
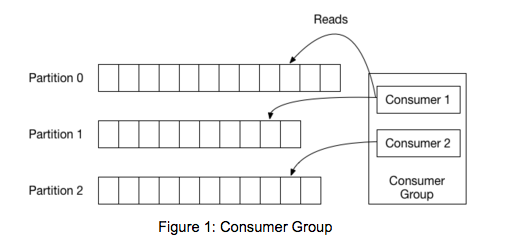
kafka consumer 는 그림처럼 각 파티션마다 전담 클라이언트가 있으며
consumer group 이 있을경우 각 파티션마다 어떤 offset 까지 읽었는지 확인 가능하다.
커밋이란 작업은 이 offset 위치를 옮기는 작업을 뜻한다.
오토커밋
private void init() {
    new Thread(() -> {
        while (true) {
            ConsumerRecords<String, String> records = consumer.poll(Duration.ofSeconds(1));
            for (ConsumerRecord<String, String> record : records) {
                log.info(record.toString());
                //  ConsumerRecord(topic = test, partition = 0, leaderEpoch = 0, offset = 0, CreateTime = 1681974934012, serialized key size = -1, serialized value size = 4, headers = RecordHeaders(headers = [], isReadOnly = false), key = null, value = TEST)
            }
        }
    }).start();
}
개발자가 언제 커밋할지 지정하지 않기 때문에 오류가 발생하면 어떤 메세지까지 처리했는지 알 수 없다.
커밋 과정에서 오류가 발생해 offset 업데이트 실패시 메세지 중복수신 장애가 발생가능하다.
또한 offset 업데이트 했지만 미처 처리하지 못한 메세지들은 모두 유실가능성 있는 메세지들이 된다.
이슈가 많이 발생하는 방법이지만 메세지 서비스로 빡빡한 트랜잭션 처리를 주로 하지 않기때문에 오토 커밋을 가장 많이 사용한다.
동기 가져오기
configs.put(ConsumerConfig.ENABLE_AUTO_COMMIT_CONFIG, false); // enable.auto.commit
@PostConstruct
private void init() {
    if (consumeType.equals("auto-commit")) {
        new Thread(() -> {
            while (true) {
                ConsumerRecords<String, String> records = consumer.poll(Duration.ofSeconds(1));
                for (ConsumerRecord<String, String> record : records) {
                    log.info(record.toString());
                }
                consumer.commitSync();
            }
        }).start();
    }
}
records 처리가 끝난 후 consumer.commitSync() 메서드로 메세지를 가져온다.
메세지 처리 완료 후 커밋과정을 진행하기 때문에 메세지 손실 가능성은 거의 없다.
하지만 오토 커밋과 마찬가지로 offset 을 옮기기전 오류가 발생하면 메세지 중복처리 장애가 발생할 수 있다.
비동기 가져오기
@PostConstruct
private void init() {
    if (consumeType.equals("auto-commit")) {
        new Thread(() -> {
            while (true) {
                ConsumerRecords<String, String> records = consumer.poll(Duration.ofSeconds(1));
                for (ConsumerRecord<String, String> record : records) {
                    log.info(record.toString());
                }
                consumer.commitAsync();
            }
        }).start();
    }
}
비동기 가져오기는 consumer.commitSync() 대신 consumer.commitAsync() 를 사용한다.
consumer.commitAsync() 은 실패하더라도 재시도 과정 없이 바로 다음 코드를 진행한다.
메세지 중복장애는 커밋순서에도 영향이 가는데 2번 커밋이 5번 커밋보다 나중에 실행되면 최종적으로 offset 은 2번을 가리키게 된다.
커밋순서의 불일치는 커밋 실패시 재실행 과정에서 많이 발생함으로 consumer.commitAsync() 는 커밋순서의 불일치 가능성을 많이 낮춘다고 볼수 있다.
kakfa admin
consumer, producer 연결이 생기는 순간 partition 0개 consumer group 이 자동으로 생성된다.
자동 생성말고 직접 지정해서 사용하고 싶다면 kakfa admin 를 사용해야 한다.
다음과 같이 AdminClient 객체 생성
@Bean
public AdminClient kafkaConfig() {
    Map<String, Object> conf = new HashMap<>();
    conf.put(AdminClientConfig.BOOTSTRAP_SERVERS_CONFIG, bootstrapServersConfig);
    conf.put(AdminClientConfig.REQUEST_TIMEOUT_MS_CONFIG, "5000");
    AdminClient client = AdminClient.create(conf);
    return client;
}
아래와 같이 정의된 API 메서드들을 호출해서 사용하면 된다.
public ListTopicsResult listTopics() {
    ListTopicsResult ltr = client.listTopics();
    return ltr;
}

public DescribeConfigsResult describeTopicConfigs(String topic) {
    ConfigResource resource = new ConfigResource(ConfigResource.Type.TOPIC, topic);
    // get the current topic configuration
    DescribeConfigsResult dcr = client.describeConfigs(Collections.singleton(resource));
    return dcr;
}

public CreateTopicsResult createTopics(String topic, Integer numPartitions, Short replicationFactor) {
    NewTopic newTopic = new NewTopic(topic, numPartitions, replicationFactor);
    CreateTopicsResult ctr = client
            .createTopics(
                    Collections.singleton(newTopic),
                    new CreateTopicsOptions().timeoutMs(10000) // create topic timeout
            );
    return ctr;
}

public DeleteTopicsResult deleteTopics(List<String> topics) {
    DeleteTopicsResult dtr = client.deleteTopics(topics);
    return dtr;
}

public AlterConfigsResult alterTopicConfigs(String topic) {
    ConfigResource resource = new ConfigResource(ConfigResource.Type.TOPIC, topic);
    // create a new entry for updating the retention.ms value on the same topic
    ConfigEntry retentionEntry = new ConfigEntry(TopicConfig.RETENTION_MS_CONFIG, "60000");
    Map<ConfigResource, Config> updateConfig = new HashMap<>();
    updateConfig.put(resource, new Config(Collections.singleton(retentionEntry)));
    AlterConfigsResult acr = client.alterConfigs(updateConfig);
    return acr;
}