Spring Boot - DB Sharding!
Sharding

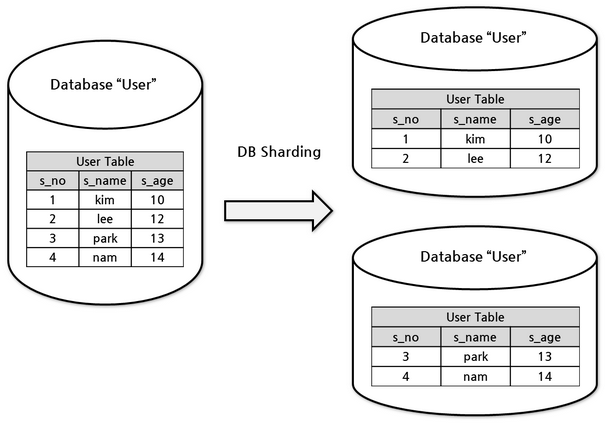
그림처럼 테이블을 분할하여 물리적으로 떨어진 노드에서 동작시켜 분산처리가 가능토록 하는 방법. 샤딩을 이야기 할 때 대부분 수평샤딩을 뜻함.
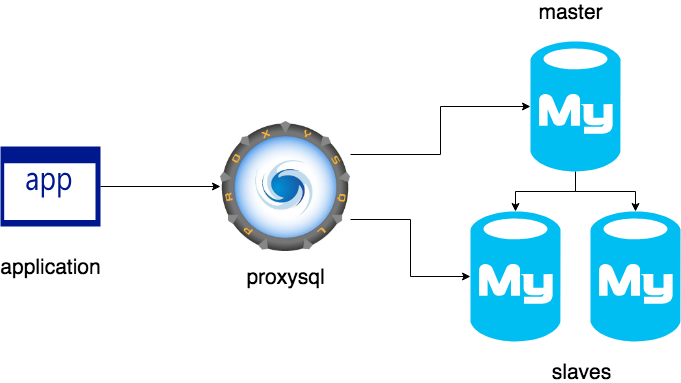
물리적으로 분할되어 있기 떄문에 어플리케이션에서 모든 물리적 분할되어 있는 DB 노드에 접속하 수 있도록 구성하거나 proxy 를 통해 접근할 수 있음.
- sharing 은 어플리케이션이 직접하고 fialover 만 db proxy 아래에서 처리
- db proxy 를 구성하고 샤딩과 failover 모두 proxy 아래에서 처리
개인적인 생가으로는 1번 과정을 사용하고 아래 그림과 같이 proxy-sql 과 같은 서드파티를 사용하는것이 백엔드 개발자 관점에선 가장 트레이드 오프가 좋아보인다.

AbstractRoutingDataSource
https://www.baeldung.com/spring-abstract-routing-data-source
샤딩에 대한 처리를 직접 구현하고 싶다면 AbstractRoutingDataSource 를 Bean 으로 등록하여 DataSource 를 선택하는 부분을 구현하면 된다.
여러개의 DataSource 와 DataSource Key 를 함께 Map<Object, Object> 형태로 구성하고,
매번 DB 접근하기 전에 DataSource Key 를 사용해 AbstractRoutingDataSource 에 DataSource 를 질의하는 방식이다.
DataSource Key 매핑
먼저 DB 의 key 값으로 사용할 문자열 혹은 enum 을 정의한다.
public enum DemoDatabase {
    demo_ds_0, demo_ds_1,
}
그리고 각 DataSource Key 를 매핑시킨 Map<Object, Object> 구성.
private Map<Object, Object> createDataSourceMap() {
    Map<Object, Object> dataSourceMap = new HashMap<>();
    HikariDataSource dataSource0 = new HikariDataSource();
    dataSource0.setDriverClassName("com.mysql.cj.jdbc.Driver");
    dataSource0.setJdbcUrl("jdbc:mysql://localhost:3306/demo_ds_0");
    dataSource0.setUsername("root");
    dataSource0.setPassword("root");
    dataSource0.setMaximumPoolSize(20); // default 10
    dataSource0.setMinimumIdle(5);

    HikariDataSource dataSource1 = new HikariDataSource();
    dataSource1.setDriverClassName("com.mysql.cj.jdbc.Driver");
    dataSource1.setJdbcUrl("jdbc:mysql://localhost:3307/demo_ds_1");
    dataSource1.setUsername("root");
    dataSource1.setPassword("root");
    dataSource1.setMaximumPoolSize(20); // default 10
    dataSource1.setMinimumIdle(5);

    dataSourceMap.put(DemoDatabase.demo_ds_0, dataSource0);
    dataSourceMap.put(DemoDatabase.demo_ds_1, dataSource1);

    return dataSourceMap;
}
AbstractRoutingDataSource 의 구현체인 DemoDataSourceRouter 에다 위에서 생성했던 Key - DataSource 매핑객체인 Map<Object, Object> 를 삽입하고,
DataSource 가 라우팅되지 않았을 때 사용할 default DataSource 도 지정한다.
@Bean // AbstractRoutingDataSource
public DataSource datasource() {
    Map<Object, Object> targetDataSources = createDataSourceMap();
    DataSource defaultDataSource = createDefaultDataSource();
    DemoDataSourceRouter sourceRouter = new DemoDataSourceRouter();
    sourceRouter.setTargetDataSources(targetDataSources);
    sourceRouter.setDefaultTargetDataSource(defaultDataSource);
    return sourceRouter;
}

private DataSource createDefaultDataSource() {
    HikariDataSource defaultDataSource = new HikariDataSource();
    defaultDataSource.setDriverClassName("com.mysql.cj.jdbc.Driver");
    defaultDataSource.setJdbcUrl("jdbc:mysql://localhost:3306/demo_ds_0");
    defaultDataSource.setUsername("root");
    defaultDataSource.setPassword("root");
    defaultDataSource.setMaximumPoolSize(20); // default 10
    defaultDataSource.setMinimumIdle(5);
    return defaultDataSource;
}
DataSource Router
JPA 나 JDBC 나 DB 쿼리 요청을 날리기 전에 어떤 DataSource 를 선택사용할 것인지 항상 AbstractRoutingDataSource 에 DataSource Key 값을 사용하여 질의한다.
보통 ThreadLocal 클래스를 사용해서 실행중인 스레드에서 어떤 DataSource Key 를 사용할지 설정하는 코드를 사용한다.
public class ThreadLocalDatabaseContextHolder {

    private static ThreadLocal<DemoDatabase> CONTEXT = new ThreadLocal<>();
    public static DemoDatabase getClientDatabase() {
        return CONTEXT.get();
    }

    // 샤딩을 위해 id 값이 홀수/짝수 인지에 따라 DataSource 변경
    public static void setById(long id) {
        int idx = (int) (id % 2);
        DemoDatabase demoDatabase = DemoDatabase.values()[idx];
        CONTEXT.set(demoDatabase);
    }
    // 외부에서 직접 DataSource 키값을 설정
    public static void set(DemoDatabase demoDatabase) {
        Assert.notNull(demoDatabase, "clientDatabase cannot be null");
        CONTEXT.set(demoDatabase);
    }
ThreadLocal 에서 DataSource Key 값을 설정했다면 아래 AbstractRoutingDataSource 의 상속 클래스를 정의해서 해당 실행중인 스레드에서 설정된 DataSource Key 값을 반환할 수 있도록 처리한다.
@Slf4j
@RequiredArgsConstructor
public class DemoDataSourceRouter extends AbstractRoutingDataSource {

    @Override
    protected Object determineCurrentLookupKey() {
        boolean isReadOnly = TransactionSynchronizationManager.isCurrentTransactionReadOnly()
        DemoDatabase datasource = ThreadLocalDatabaseContextHolder.getClientDatabase();
        log.info(">>>>>> current data source : {}, isReadOnly : {}", datasource, isReadOnly);
        return datasource;
    }
}
JpaTransactionManager 와의 호환 불량
JPA 와 AbstractRoutingDataSource 를 같이 사용할 경우 JpaTransactionManager 의 호환 문제로 인해 추가 설정 없이 read replica 분리는 어려울 수 있다.
DataSource 를 가져오는 과정은 @Transaction 으로 인한 AOP 로 인하여 정의 함수 실행 전 인터셉터되어 수행된다.
아래는 AOP로 수행되는 JpaTransactionManager 의 doBegin 함수인데 Datasource 를 가져오는 beginTransaction 코드가 먼저 실행되고,
// JpaTransactionManager.class
@Override
protected void doBegin(Object transaction, TransactionDefinition definition) {
  JpaTransactionObject txObject = (JpaTransactionObject) transaction;
  ...
  EntityManager em = txObject.getEntityManagerHolder().getEntityManager();

  // Delegate to JpaDialect for actual transaction begin.
  int timeoutToUse = determineTimeout(definition);
  // 여기서 Datasource 를 가져옴
  Object transactionData = getJpaDialect().beginTransaction(em,
      new JpaTransactionDefinition(definition, timeoutToUse, txObject.isNewEntityManagerHolder()));
  txObject.setTransactionData(transactionData);
  ...
}
Datasource 를 가져오고 난 뒤 한참 뒤에 SQL 문을 실행하기 직전 prepareSynchronization 를 통해 readOnly 를 true 로 변경한다.
private void prepareSynchronization(DefaultTransactionStatus status, TransactionDefinition definition) {
  if (status.isNewSynchronization()) {
    TransactionSynchronizationManager.setActualTransactionActive(status.hasTransaction());
    TransactionSynchronizationManager.setCurrentTransactionIsolationLevel(
        definition.getIsolationLevel() != TransactionDefinition.ISOLATION_DEFAULT ?
            definition.getIsolationLevel() : null);
    // 여기서 TransactionSynchronizationManager 의 readOnly 를 True 로 설정함
    TransactionSynchronizationManager.setCurrentTransactionReadOnly(definition.isReadOnly());
    TransactionSynchronizationManager.setCurrentTransactionName(definition.getName());
    TransactionSynchronizationManager.initSynchronization();
  }
}
JPA 에선 트랜잭션 진입과 동시에 DataSource 를 가져오기 위해 determineCurrentLookupKey 를 호출하였기 때문에 TransactionSynchronizationManager.isCurrentTransactionReadOnly() 는 항상 false 로 출력된다.
이를 해결하기 위한 방법은 아래 3가지.
ThreadLocal에readOnly값을 포함시킨Datasource Key를 저장하기LazyConnectionDataSourceProxy사용하기 -AbstractRoutingDataSource로직을@Transaction으로 인한 AOP 뒤에 실행되도록 설정하는 방법.JDBC사용하기 -JDBC가 사용하는DatasourceTransactionManager의 경우 실행 직전에 다시 Connection 을 가져옴으로 위와같은 문제가 발생하지 않음.
DataSourceTransactionManager를 JPA 에서 사용하면 간단한 쿼리는 정상동작 하겠지만 영속성 관리, Lazy loading 등에서 문제가 발생할 수 있음으로JpaTransactionManager사용을 권장한다.
LazyConnectionDataSourceProxy
@Bean
@Primary
public DataSource lazyDataSource(DataSource routingDataSource) {
    LazyConnectionDataSourceProxy lazyConnectionDataSourceProxy =
            new LazyConnectionDataSourceProxy(routingDataSource);
    return lazyConnectionDataSourceProxy;
}
Proxy Connection 객체를 사용해 실제 Connection 을 사용시 AbstractRoutingDataSource 를 통해 진짜 Connection 객체를 가져오도록 하는 방법이다.
// org.springframework.jdbc.datasource.LazyConnectionDataSourceProxy
@Override
public Connection getConnection(String username, String password) throws SQLException {
  checkDefaultConnectionProperties();
  return (Connection) Proxy.newProxyInstance(
      ConnectionProxy.class.getClassLoader(),
      new Class<?>[] {ConnectionProxy.class},
      new LazyConnectionInvocationHandler(username, password));
}
JpaTransactionManager 는 LazyConnectionDataSourceProxy 가 만든 Proxy Connection 객체를 진짜 Connection 으로 알고 있기 때문에 트랜잭션 진입 시점에 전처리 과정을 문제없이 수행하고,
향후 ThreadLocal 에서 Connection 객체를 가져다 사용하는 repository 메서드들은 Proxy Connection 객체를 통해 실제 Connection 객체를 가져오게 된다.
이때 AbstractRoutingDataSource 로직이 수행되기에 prepareSynchronization 가 실행 뒨 후 AbstractRoutingDataSource 의 determineCurrentLookupKey 메서드가 실행된다.
데모코드
https://github.com/Kouzie/spring-boot-demo/tree/main/sharding-demo/abstract-routing
Apache Sharding Sphere
https://shardingsphere.apache.org/document/5.4.0/en/user-manual/shardingsphere-jdbc/yaml-config/jdbc-driver/
https://www.baeldung.com/java-shardingsphere
https://www.slideshare.net/slideshow/ss-183100083/183100083
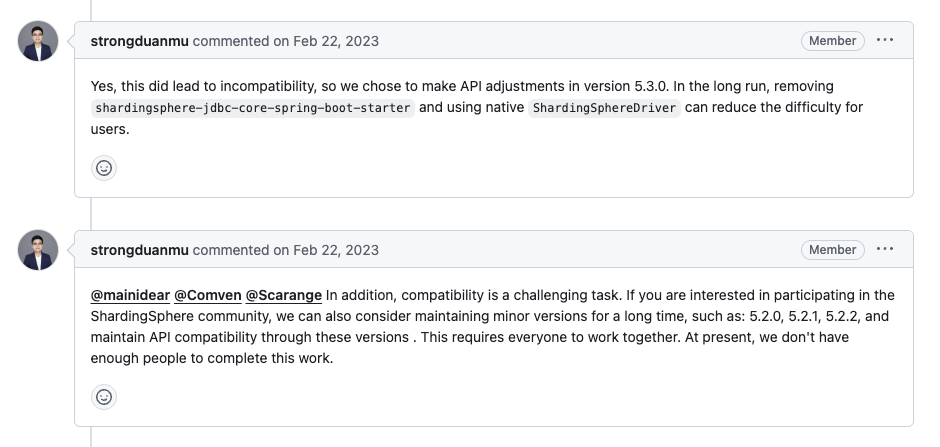
사전에 알아야할 부분이 Spring Boot 3.x 최신버전을 사용중이라면 shardingsphere-jdbc-core 를 사용해야 한다.
기존의 마이너한 shardingsphere dependency 들은 업데이트 되고있지 않다.
Apache Sharding Sphere 의 샤딩을 위한 개념을 알아야한다.
- DataSource
- Rules
- Algorithm(Rules 에 적용되는 알고리즘)
DataSource
JDBC 기반으로 하는 커넥션 풀을 지원하는 DataSource 생성이 가능하다.
dataSources:
  ds_1:
    dataSourceClassName: com.zaxxer.hikari.HikariDataSource
    driverClassName: com.mysql.jdbc.Driver
    jdbcUrl: jdbc:mysql://localhost:3306/ds_1
    username: root
    password: root
  ds_2:
    dataSourceClassName: com.zaxxer.hikari.HikariDataSource
    driverClassName: com.mysql.jdbc.Driver
    jdbcUrl: jdbc:mysql://localhost:3306/ds_2
    username: root
    password: root
Sharding Sphere 에서는 ShardingSphereDataSource 를 사용하여 DataSource Key 와 매핑된 ShardingSphereConnection(logic_db) 객체를 가져온다.
@Transaction AOP 로 인해 트랜잭션이 시작할 때에는 logic_db 라는 래핑된 Connection 을 가져와 사용하기에 의존성 분리가 되어있다.
실제 hibernate 에서 prepareQueryStatement 메서드가 logic_db 의 Connection.prepareStatement 메서드를 호출할 때 물리적 HikariDataSource 의 Connection 객체를 가져온다.
라우팅 처리하는 코드가 궁금하다면
org.apache.shardingsphere.infra.connection.kernel.KernelProcessor클래스의generateExecutionContext,route메서드를 확인하면 된다.참고로
AbstractRoutingDataSource를 사용하던ShardingSphere를 사용하던 2개의 DB 에서의 트랜잭션을 합치려면 별도의XA 트랜잭션소프트웨어를 사용해야한다.
Rules
샤딩 기능을 포함하여 Sharding Sphere 에서 설정할 수 있는 각종 rule 들을 설정.
하지만 여기선
Sharding에 필요한rule들만 다룰 예정.
rules.tables
샤딩에 대한 기본적인 전략을 설정하는 config
rules.tables.{table_name}.actualDataNodes
사용할 DataSource 와 테이블 명을 기술하는 설정. 아래 databaseStrategy, tableStrategy 값과 INLINE 문법을 통해 결정됨.rules.tables.{table_name}.databaseStrategy.{strategy}
DB 선택 전략, standard, complex, hint, none 중 택 1rules.tables.{table_name}.tableStrategy.{strategy}
테이블 선택 전략, standard, complex, hint, none 중 택 1rules.tables.{table_name}.keyGenerateStrategy
테이블의 키 생성 전략, 아래keyGenerators에서 자세히 확인rules.tables.{table_name}.auditStrategy
감사(audit) 전략, 아래 audit algorithm 에서 자세히 확인
rules:
- !SHARDING
  tables: # Sharding table configuration
    <logic_table_name> (+): # Logic table name
      actualDataNodes (?): # Describe data source names and actual tables (refer to Inline syntax rules)
      databaseStrategy (?): # Databases sharding strategy, use default databases sharding strategy if absent. sharding strategy below can choose only one.
        standard: # For single sharding column scenario
          shardingColumn: # Sharding column name
          shardingAlgorithmName: # Sharding algorithm name
        complex: # For multiple sharding columns scenario
          shardingColumns: # Sharding column names, multiple columns separated with comma
          shardingAlgorithmName: # Sharding algorithm name
        hint: # Sharding by hint
          shardingAlgorithmName: # Sharding algorithm name
        none: # Do not sharding
      tableStrategy: # Tables sharding strategy, same as database sharding strategy
      keyGenerateStrategy: # Key generator strategy
        column: # Column name of key generator
        keyGeneratorName: # Key generator name
      auditStrategy: # Sharding audit strategy
        auditorNames: # Sharding auditor name
          - <auditor_name>
          - <auditor_name>
        allowHintDisable: true # Enable or disable sharding audit hint
  ...
  ...
rules.autoTables
개발 초기에 간단히 설정할 때 사용하며 DB 와 테이블 샤딩을 한번에 처리하고 standard 샤딩 전략만 사용 가능하다.
rules.autoTables.{table_name}.actualDataSources
사용할 DataSource 와 테이블 명을 기술하는 설정. DB 와 테이블 샤딩을 아래shardingStrategy하나로만 INLINE 문법을 통해 결정한다.rules.autoTables.{table_name}.shardingStrategy.standard
샤딩 전략으로 standard 만 사용 가능
rules:
- !SHARDING
  tables: # Sharding table configuration
  ...
  autoTables: # Auto Sharding table configuration
    t_order_auto: # Logic table name
      actualDataSources (?): # Data source names
      shardingStrategy: # Sharding strategy
        standard: # For single sharding column scenario
          shardingColumn: # Sharding column name
          shardingAlgorithmName: # Auto sharding algorithm name
  ...
  ...
rules.bindingTables
동일한 컬럼을 기준으로 샤딩될 경우 테이블을 바인딩 테이블로 설정하여 조인 쿼리를 수행할 수 있도록 설정.
rules:
- !SHARDING
  tables: # Sharding table configuration
  ...
  bindingTables: # Binding tables
    - t_order,t_order_item
rules.default
아래 4개 설정에 대해선 모든 테이블에 기본적으로 적용될 수 있도록 default 설정을 할 수 있다.
- defaultDatabaseStrategy
- defaultTableStrategy
- defaultKeyGenerateStrategy
- defaultShardingColumn
내부 상세 설정에 대해서는 rules.tables 의 설정과 동일하니 참고
rules:
- !SHARDING
  tables: # Sharding table configuration
    ...
  autoTables: # Auto Sharding table configuration
    ...
  defaultDatabaseStrategy: # Default strategy for database sharding
  defaultTableStrategy: # Default strategy for table sharding
  defaultShardingColumn: # Default sharding column name
  defaultKeyGenerateStrategy: # Default Key generator strategy
Sharding Algorithm
Rules 에서 아래 샤딩처리에 사용될 Algorithms 들을 정의 할 수 있다.
대부분 비즈니스 로직에서 사용가능한 알고리즘이 내장되어 있다.
rules:
- !SHARDING # 샤딩 설정 시작
  tables: # 샤딩할 테이블 목록 정의 시작
    # ...
    # ...
  autoTables: # Auto Sharding table configuration
    # ...
    # ...

  # Sharding algorithm configuration
  shardingAlgorithms:
    <sharding_algorithm_name> (+): # Sharding algorithm name
      type: # Sharding algorithm type
      props: # Sharding algorithm properties
      # ...

  # Key generate algorithm configuration
  keyGenerators:
    <key_generate_algorithm_name> (+): # Key generate algorithm name
      type: # Key generate algorithm type
      props: # Key generate algorithm properties
      # ...

  # Sharding audit algorithm configuration
  auditors:
    <sharding_audit_algorithm_name> (+): # Sharding audit algorithm name
      type: # Sharding audit algorithm type
      props: # Sharding audit algorithm properties
      # ...
shardingAlgorithms
shardingAlgorithms: https://shardingsphere.apache.org/document/current/en/dev-manual/sharding/#shardingalgorithm
주석에 써있는대로 type 에 설정된 sharding algorithm 종류는 아래가 있다.
- MOD
Modulo Sharding Algorithm, 숫자 id 의 모듈러 연산을 통해 샤딩 - HASH_MOD
Hash Modulo Sharding Algorithm, 숫자 id 의 해시 연산을 통해 샤딩 - VOLUME_RANGE
Volume Based Range Sharding Algorithm, 숫자 id 의 range 를 통해 샤딩 - BOUNDARY_RANGE
Boundary Based Range Sharding Algorithm - AUTO_INTERVAL
Mutable interval sharding algorithm, 시간값을 기준으로 샤딩 - INTERVAL
Fixed interval sharding algorithm - CLASS_BASED
Class based sharding algorithm - INLINE Inline sharding algorithm
- COMPLEX_INLINE
Complex inline sharding algorithm - HINT_INLINE Hint inline sharding algorithm
직접 샤딩 로직을 구현하고 싶다면 CLASS_BASED 를 사용할 수 있도록 StandardShardingAlgorithm 를 구현한 클래스를 정의하고 yaml 에 등록하면 된다.
// 커스텀 샤딩 로직을 구현.
public class SnowflakeShardingAlgorithm implements StandardShardingAlgorithm<Long> {

    private static final int DATACENTER_ID_BITS = 5;
    private static final int WORKER_ID_BITS = 5;
    private static final int SEQUENCE_BITS = 12;

    private static long toDatacenterId(long id) {
        long maskDatacenterId = ((1L << DATACENTER_ID_BITS) - 1) << (WORKER_ID_BITS + SEQUENCE_BITS);
        long datacenterId = (id & maskDatacenterId) >> (WORKER_ID_BITS + SEQUENCE_BITS);
        return datacenterId;
    }

    @Override
    public String doSharding(Collection<String> availableTargetNames, PreciseShardingValue<Long> shardingValue) {
        Long datacenterId = toDatacenterId(shardingValue.getValue());
        for (String targetName : availableTargetNames) {
            if (targetName.endsWith(String.valueOf(datacenterId))) {
                return targetName;
            }
        }
        throw new UnsupportedOperationException("No target found for value: " + datacenterId);
    }
    @Override
    public Collection<String> doSharding(Collection<String> availableTargetNames, RangeShardingValue<Long> shardingValue) {
        Set<String> result = new HashSet<>();
        Range<Long> valueRange = shardingValue.getValueRange();
        Long lowerEndpoint = valueRange.lowerEndpoint();
        Long upperEndpoint = valueRange.upperEndpoint();

        Long lowerDatacenterId = toDatacenterId(lowerEndpoint);
        Long upperDatacenterId = toDatacenterId(upperEndpoint);

        for (String targetName : availableTargetNames) {
            for (Long datacenterId = lowerDatacenterId; datacenterId <= upperDatacenterId; datacenterId++) {
                if (targetName.endsWith(String.valueOf(datacenterId))) {
                    result.add(targetName);
                }
            }
        }

        if (result.isEmpty()) {
            throw new UnsupportedOperationException("No target found for range: " + lowerDatacenterId + " to " + upperDatacenterId);
        }

        return result;
    }
}
dataSources:
  ds_0:
    dataSourceClassName: com.zaxxer.hikari.HikariDataSource
    driverClassName: com.mysql.jdbc.Driver
    jdbcUrl: jdbc:mysql://localhost:3306/demo_ds_0?serverTimezone=UTC&useSSL=false&useUnicode=true&characterEncoding=UTF-8
    username: root
    password: root
  ds_1:
    dataSourceClassName: com.zaxxer.hikari.HikariDataSource
    driverClassName: com.mysql.jdbc.Driver
    jdbcUrl: jdbc:mysql://localhost:3307/demo_ds_1?serverTimezone=UTC&useSSL=false&useUnicode=true&characterEncoding=UTF-8
    username: root
    password: root

rules:
  - !SHARDING
    tables:
      t_order:
        actualDataNodes: ds_${0..1}.t_order_${0..1}
        tableStrategy:
          standard:
            shardingColumn: order_id
            shardingAlgorithmName: t_order_inline
        auditStrategy:
          auditorNames:
            - sharding_key_required_auditor
          allowHintDisable: true
      t_order_item:
        actualDataNodes: ds_${0..1}.t_order_item_${0..1}
        tableStrategy:
          standard:
            shardingColumn: order_id
            shardingAlgorithmName: t_order_item_inline
      t_account:
        actualDataNodes: ds_${0..1}.t_account
        tableStrategy:
          none:
    defaultShardingColumn: account_id
    bindingTables:
      - t_order,t_order_item
    defaultDatabaseStrategy:
      standard:
        shardingColumn: account_id
        shardingAlgorithmName: database_inline
    defaultTableStrategy:
      none:

    shardingAlgorithms:
      database_inline:
        type: CLASS_BASED
        props:
          strategy: STANDARD
          algorithmClassName: 'com.example.sharding.sphere.demo.config.SnowflakeShardingAlgorithm'
      t_order_inline:
        type: INLINE
        props:
          algorithm-expression: t_order_${order_id % 2}
      t_order_item_inline:
        type: INLINE
        props:
          algorithm-expression: t_order_item_${order_id % 2}
    auditors:
      sharding_key_required_auditor:
        type: DML_SHARDING_CONDITIONS
  - !BROADCAST
    tables: # Broadcast tables
      - t_address

props:
  sql-show: true
keyGenerators
keyGenerators: https://shardingsphere.apache.org/document/current/en/dev-manual/infra-algorithm/#keygeneratealgorithm
기본 제공되는 알고리즘은 아래 2개.
- SNOWFLAKE
Snowflake key generate algorithm - UUID
UUID key generate algorithm
아래와 같이 @GeneratedValue(strategy = GenerationType.IDENTITY) 어노테이션을 사용하면 자동으로 알고리즘에서 제공하는 ID 를 설정해준다.
@Getter
@Entity
@Table(name = "t_account")
public class AccountEntity {
    @Id
    @GeneratedValue(strategy = GenerationType.IDENTITY)
    @Column(name = "account_id")
    private Long accountId;
    private String userName;
    private OffsetDateTime createTime;

    protected AccountEntity() {
    }

    public AccountEntity(String userName) {
        this.userName = userName;
        this.createTime = OffsetDateTime.now();
    }
}
auditors
auditors: https://shardingsphere.apache.org/document/current/en/dev-manual/sharding/#shardingauditalgorithm
요청되는 모든 SQL을 모니터링, 감사를 수행한다.
기본 제공되는 알고리즘은 아래 1개
- DML_SHARDING_CONDITIONS
샤딩 조건이 없는 DML을 금지하는 감사 알고리즘
샘플 yaml
위 url 에서 t_account 의 테이블 샤딩 부분만 수정하였다.
dataSources:
  ds_0:
    dataSourceClassName: com.zaxxer.hikari.HikariDataSource
    driverClassName: com.mysql.jdbc.Driver
    jdbcUrl: jdbc:mysql://localhost:3306/demo_ds_0?serverTimezone=UTC&useSSL=false&useUnicode=true&characterEncoding=UTF-8
    username: root
    password: root
  ds_1:
    dataSourceClassName: com.zaxxer.hikari.HikariDataSource
    driverClassName: com.mysql.jdbc.Driver
    jdbcUrl: jdbc:mysql://localhost:3307/demo_ds_1?serverTimezone=UTC&useSSL=false&useUnicode=true&characterEncoding=UTF-8
    username: root
    password: root

rules:
  - !SHARDING
    tables:
      t_order:
        actualDataNodes: ds_${0..1}.t_order_${0..1}
        tableStrategy:
          standard:
            shardingColumn: order_id
            shardingAlgorithmName: t_order_inline
        keyGenerateStrategy:
          column: order_id
          keyGeneratorName: snowflake
        auditStrategy:
          auditorNames:
            - sharding_key_required_auditor
          allowHintDisable: true
      t_order_item:
        actualDataNodes: ds_${0..1}.t_order_item_${0..1}
        tableStrategy:
          standard:
            shardingColumn: order_id
            shardingAlgorithmName: t_order_item_inline
        keyGenerateStrategy:
          column: order_item_id
          keyGeneratorName: snowflake
      t_account:
        actualDataNodes: ds_${0..1}.t_account
        tableStrategy:
          none:
        keyGenerateStrategy:
          column: account_id
          keyGeneratorName: snowflake
    defaultShardingColumn: account_id
    bindingTables:
      - t_order,t_order_item
    defaultDatabaseStrategy:
      standard:
        shardingColumn: account_id
        shardingAlgorithmName: database_inline
    defaultTableStrategy:
      none:

    shardingAlgorithms:
      database_inline:
        type: INLINE
        props:
          algorithm-expression: ds_${account_id % 2}
      t_order_inline:
        type: INLINE
        props:
          algorithm-expression: t_order_${order_id % 2}
      t_order_item_inline:
        type: INLINE
        props:
          algorithm-expression: t_order_item_${order_id % 2}
    keyGenerators:
      snowflake:
        type: SNOWFLAKE
        props:
          worker-id: 123
    auditors:
      sharding_key_required_auditor:
        type: DML_SHARDING_CONDITIONS

  - !BROADCAST
    tables: # Broadcast tables
      - t_address

props:
  sql-show: true
Rules 기타 기능
Sharding 외에도 Rules 를 통해 기타기능을 설정가능하다.
각 기능에 필요한 커스텀한 알고리즘들이 내장되어 있다.
BROADCAST
모든 데이터 노드에 동일하게 복제하여 저장하는 테이블 아래 용도로 사용한다.
- 공통 참조 데이터 저장
- 조인 성능 향상
- 간단한 데이터 일관성 유지
rules:
- !BROADCAST
  # https://shardingsphere.apache.org/document/current/en/user-manual/shardingsphere-jdbc/yaml-config/rules/broadcast/
  tables: # Broadcast tables
    - <table_name>
    - <table_name>
dataSources:
  ds_0:
    dataSourceClassName: com.zaxxer.hikari.HikariDataSource
    driverClassName: com.mysql.jdbc.Driver
    jdbcUrl: jdbc:mysql://localhost:3306/demo_ds_0?serverTimezone=UTC&useSSL=false&useUnicode=true&characterEncoding=UTF-8
    username: root
    password:
  ds_1:
    dataSourceClassName: com.zaxxer.hikari.HikariDataSource
    driverClassName: com.mysql.jdbc.Driver
    jdbcUrl: jdbc:mysql://localhost:3306/demo_ds_1?serverTimezone=UTC&useSSL=false&useUnicode=true&characterEncoding=UTF-8
    username: root
    password:

rules:
- !BROADCAST
  tables:
    - t_address
READWRITE_SPLITTING
read/write replica 의 요청을 분리해주는 설정.
rules:
- !READWRITE_SPLITTING
  # loadBalancerName is specified by users, and its property has to be consistent with that of loadBalancerName in read/write splitting rules.
  loadBalancers:
      # type and props, please refer to the built-in read/write splitting algorithm load balancer: https://shardingsphere.apache.org/document/current/en/user-manual/common-config/builtin-algorithm/load-balance/
      type: xxx
      props:
        xxx: xxx
rules:
- !READWRITE_SPLITTING
  dataSourceGroups:
    readwrite_ds:
      writeDataSourceName: write_ds
      readDataSourceNames:
        - read_ds_0
        - read_ds_1
      transactionalReadQueryStrategy: PRIMARY
      loadBalancerName: random
  loadBalancers:
    random:
      type: RANDOM
MASK
민감한 데이터를 보호하기 위해 데이터를 마스킹,
rules:
- !MASK
  # maskAlgorithmName is specified by users, and its property should be consistent with that of maskAlgorithm in mask rules.
  maskAlgorithms:
    <maskAlgorithmName>:
      # type and props, please refer to the built-in mask algorithm: https://shardingsphere.apache.org/document/current/en/user-manual/common-config/builtin-algorithm/mask/
      type: xxx
      props:
        xxx: xxx
rules:
- !MASK
  tables:
    t_user:
      columns:
        password:
          maskAlgorithm: md5_mask
        email:
          maskAlgorithm: mask_before_special_chars_mask
        telephone:
          maskAlgorithm: keep_first_n_last_m_mask

  maskAlgorithms:
    md5_mask:
      type: MD5
    mask_before_special_chars_mask:
      type: MASK_BEFORE_SPECIAL_CHARS
      props:
        special-chars: '@'
        replace-char: '*'
    keep_first_n_last_m_mask:
      type: KEEP_FIRST_N_LAST_M
      props:
        first-n: 3
        last-m: 4
        replace-char: '*'
ENCRYPT
저장되는 데이터 암호화를 지원, AES, RSA 등의 암호화 알고리즘을 지원한다.
rules:
- !ENCRYPT
  # encryptorName is specified by users, and its property should be consistent with that of encryptorName in encryption rules.
  encryptors:
    <encryptorName>:
      # type and props, please refer to the built-in encryption algorithm: https://shardingsphere.apache.org/document/current/en/user-manual/common-config/builtin-algorithm/encrypt/
      type: xxx
      props:
      # ...
rules:
- !ENCRYPT
  tables:
    t_user:
      columns:
        username:
          cipher:
            name: username
            encryptorName: name_encryptor
          assistedQuery:
            name: assisted_username
            encryptorName: assisted_encryptor
  encryptors:
    name_encryptor:
      type: AES
      props:
        aes-key-value: 123456abc
    assisted_encryptor:
      type: MD5
      props:
        salt: 123456
SHADOW
프로덕션 환경과 동일한 테스트DB(shadow DB)을 구성해놓았다면 shadowAlgorithms 을 사용해 동일한 어플리케이션 실행 환경에서 shadow DB 테스트가 가능하다.
테이블 칼럼값이나 SQL 힌트를 사용해 분기처리를 위한 알고리즘을 설정한다.
rules:
- !SHADOW
  # shadowAlgorithmName is specified by users, and its property has to be consistent with that of shadowAlgorithmNames in shadow DB rules.
  shadowAlgorithms:
    <shadowAlgorithmName>:
      # type and props, please refer to the built-in shadow DB algorithm: https://shardingsphere.apache.org/document/current/en/user-manual/common-config/builtin-algorithm/shadow/
      type: xxx
      props:
        xxx: xxx
  # discoveryTypeName is specified by users, and its property has to be consistent with that of discoveryTypeName in the database discovery rules.
  discoveryTypes:
    type: # Database discovery type, such as: MGR、openGauss
    props:
      # ...
데모코드
https://github.com/Kouzie/spring-boot-demo/tree/main/sharding-demo/sharding-sphere
