JSP/Servlet - 커스텀 태그, 계층형 게시판 !
커스텀 태그
개발자가 필요에 의해 새로운 태그를 만들어 사용할 수 있도록 JSP가 지원한다.
스크립트 요소가 많이 사용될수록 복잡해지고 유지보수가 힘들어지기 때문에 커스텀 태그가 사용된다.
JSTL 코어태그의 시작도 자주 사용되는 커스텀 태그들이 표준화 된 것이다.
JSP가 지원하는 커스텀 태그에 대해 알아보자.
커스텀 태그를 만드는 방법은 아래 3가지
- JSP 1.2 스타일로 구현된 커스텀 태그
- JSP 2.0 또는 그 이상 버전의 SimpleTag를 사용한 커스텀 태그
- JSP 2.0 또는 그 이상 버전의 태그파일을 사용한 커스텀 태그
우리는 3번째 방법인 태그파일을 사용한 커스텀 태그를 사용한다.
커스텀 태그 환경설정
태그파일은 /WEB-INF/tags폴더나 그 하위폴더에 추가시켜야 인식한다.
확장자는 .tag, .tagx 확장자명을 사용해야 한다.
그리고 만들어진 커스텀 태그(태그파일)를 사용하고 싶다면 아래와 같이 taglib 디렉티브를 추가시켜야 한다.
<%@ taglib prefix="tf" tagdir="/WEB-INF/tags/util" %>
(접두사는 원하는대로 설정 가능)
간단한 날짜를 출력하는 커스텀 태그파일을 만들어보자.
먼저 커스텀 태그 없이 날짜를 출력하려면 아래와 같은 코딩이 필요하다.
<%@page import="java.util.Calendar"%>
<%@ page language="java" contentType="text/html; charset=UTF-8" pageEncoding="UTF-8"%>
<%
Calendar cal = Calendar.getInstance();
int year = cal.get(Calendar.YEAR);
int month = cal.get(Calendar.MONTH) + 1;
int day = cal.get(Calendar.DAY_OF_MONTH);
%>
<!DOCTYPE html>
<html>
<head>
<meta charset="UTF-8">
<title>JSP / Servelet Class - kouzie(2019. 5. 16.-오전 10:03:09)</title>
</head>
<body>
<%= year %>년 <%= month %>월 <%= day %>일
</body>
</html>
출력값
2019년 5월 16일
날짜하나 찍기 위해 Calender선언 및 각종 변수초기화, body태그안에 출력구문을 사용하였다.
만약 많은 jsp파일에서 날짜를 출력해야 한다면
날짜 출력하는 커스텀 태그를 하나 만들어보자.
<%@ tag import="java.util.Calendar"%>
<%@ tag body-content="empty" language="java" pageEncoding="UTF-8"%>

<%
Calendar cal = Calendar.getInstance();
int year = cal.get(Calendar.YEAR);
int month = cal.get(Calendar.MONTH) + 1;
int day = cal.get(Calendar.DAY_OF_MONTH);
%>
<%= year %>년 <%= month %>월 <%= day %>일
시작태그와 닫기태그 사이에 값이 아무것도 안들어갈 경우 body-content는 empty로 설정한다.
<%@ page language="java" contentType="text/html; charset=UTF-8" pageEncoding="UTF-8"%>
<%@ taglib prefix="tf" tagdir="/WEB-INF/tags/util" %>
<!DOCTYPE html>
<html>
<head>
<meta charset="UTF-8">
<title>JSP / Servelet Class - kouzie(2019. 5. 16.-오전 10:03:09)</title>
</head>
<body>
<tf:now/>
</body>
</html>
출력값
2019년 5월 16일
태그파일에서 사용 가능한 기본 객체
jspContext : JSP 페이지의 pageContext기본객체가 제공하는 setAttribute(), getAttribute()메서드를 사용 가능.
request : JSP 페이지의 request 기본객체와 똑같다.
response : JSP 페이지의 response 기본객체와 똑같다.
session : JSP 페이지의 session 기본객체와 똑같다.
application : JSP 페이지의 application 기본객체와 똑같다.
out : JSP 페이지의 out 기본객체와 똑같다.
태그파일에서도 스크립트릿과 jsp에서 제공하는 기본객체들을 사용가능하다.
태그파일에서 사용가능한 디렉티브 <%@ tag ... %>
| 디렉티브 | 설명 |
|---|---|
<%@ tag ... %> |
JSP 페이지의 page 디렉티브와 동일하다. page 디렉티브가 JSP 페이지에 대한 설정정보 들을 명시하는 것처럼 tag 디렉티브는 태그 파일의 정보를 명시한다 |
<%@ taglib .... %> |
태그 파일에서 사용할 태그 라이브러리를 명시할 때 사용한다(코어태그, 함수태그, 국제화태그). 문법은 JSP 페이지와 완전히 동일하다 |
<%@ include .... %> |
JSP 페이지와 마찬가지로 태그 파일에 특정한 파일을 포함시킬때 사용한다. 단, 태그 파일에 포함되는 파일은 태그 파일에 알맞은 문법으로 작성되어야한다. |
<%@ attribute .... %> |
태그 파일이 커스텀 태그로 사용될 때 입력받을 속성을 명시한다 |
<%@ variable ... %> |
EL 변수로 사용될 변수에 대한 정보를 지정한다 |
JSP의 page디렉티브에서도 사용하는 속성이 많은데
태그파일의 tag디렉티브에서 사용할 수 있는 속성이 많다.
<%@ tag ... %> 에서 어떤 속성들을 사용하는지 알아보자.
| 속성 | 설명 |
|---|---|
display-name |
태그 파일을 도구에서 보여줄때 사용될 이름을 지정한다. 기본값은 확장자 .tag를 제외한 태그 파일의 나머지 이름이다 |
body-content |
몸체 내용의 종류를 입력한다. empty, tagdependent, scriptless의 세가지 값중 한가지를 사용할수 있다. 기본값은 scriptless 이다 |
dynamic-attributes |
동적 속성을 사용할때, 속성의 <이름, 값>을 저장하는 Map 객체를 page범위 의 속성에 저장할 때 사용할 이름을 명시한다.(태그 파일은 jsp 페이지의 pageContext 기본 객체와 비슷하게 jspContext 기본 객체를 지원하고 있으며, 이 jspContext 기본 객체에 저장될 속성명을 지정한다)EL에서 변수 이름으로 사용할수 있다. |
description |
태그에 대한 설명을 입력한다 |
import |
page 디렉티브의 import 속성과 동일한다 |
pageEncoding |
page 디렉티브의 pageEncoding 속성과 동일하다 |
isELIgnore |
page 디렉티브의 isELIgnore 속성과 동일하다 (EL 비활성화) |
deferredSytaxAllowedAsLiteral |
page 디렉티브의 deferredSyntaxAllowedAsLiteral 속성과 동일하다 (#{EL} 비활성화) |
trimDirectiveWhitespaces |
page 디렉티브의 trimDirectiveWhitespaces 속성과 동일하다 (계행 공백제거) |
위의 날짜 추가를 위해 사용했던 tag디렉티브를 다시한번 봐보자…
<%@ tag body-content="empty" language="java" pageEncoding="UTF-8"%>
body-content가 empty인데 이는 <tf:now></tf:now> 시작태그와 닫기태그 사이에 값이 empty이기 때문이다.
scriptless의 경우 시작태그와 닫기태그 사이에 값이 있는경우, <jsp:doBody/>액션태그를 사용해서 태그 사이의 값을 가져올 수 있다.
tagdependent의 경우 태그 사이의 값을 EL, 스크립트릿, 액션태그를 처리하지 않고 텍스트 값으로 읽어온다.
태그 속성값 설정 <%@ attribute ... %>
코어태그에 여러가지 속성들이 들어갔었다.
begin, end, items, varStatus, value 등등
우리가 만든 커스텀태그에도 속성을 설정하고 사용할 수 있다.
<%@ attribute ... %>태그에도 여러가지 속성값을 지정할 수 있다….
| **속성 ** | **설명 ** |
|---|---|
description |
속성에 대한 설명 (선택) |
name |
속성의 이름. 각각의 attribute 디렉티브는 name 속성의 값이 서로 달라야한다. name 속성의 값이 tag 디렉티브의 dynamic-attributes 속성의 값과 같거나 또는 variable 디렉티브의 name-given 속성의 값과 같으면 에러가 발생한다 |
required |
속성의 필수 여부를 지정한다. 필수일 경우 true, 아닌 경우 false를 값으로 지정한다. 기본값은 false |
rtexprvalue |
속성 값으로 표현식을 사용할 수 있는지의 여부를 지정한다. 기본값은 true |
type |
속성 값의 타입을 명시한다. java.lang.Interger와 같은 래퍼 타입을 사용한다. 기본값은 String |
fragment |
<jsp:attribute> 액션 태그로 속성값을 전달할 때 이 값을 true로 지정한다. fragment 속성의 값을 true로 지정하면 rtexprvalue 속성은 자동으로 true로 되고 속성의 type값은 java.servlet.jsp.tagext.JspFrgment가 된다. |
name속성 말고는 다 생략해도 된다.
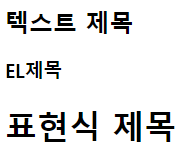
header.tag파일을 만들어 title값을 level에 맞는 <hn> 태그로 출력하도록 해보자.
<tf:header title="텍스트 제목" level="2"></tf:header>
<tf:header title="${ 'EL제목' }" level="3"/>
<tf:header title='<%= "표현식 제목" %>' level="1"/>
<tf:header>에 title, level 속성을 사용할 수 있게 <%@ attribute ... %>태그를 태그파일에 추가하자.
<%@ tag body-content="empty" language="java" pageEncoding="UTF-8"%>
<%@ attribute name="title" required="true"  %>
<%@ attribute name="level" type="java.lang.Integer" rtexprvalue="true" %>

<%
String headStartTag = null;
String headEndTag = null;
if(level >=1 && level <= 6)
{
	headStartTag = "<h"+level+">";
	headEndTag = "</h"+level+">";
}
else
{
	headStartTag = "<h1>";
	headEndTag = "</h1>";
}

%>
<%= headStartTag %>
${ title }
<%= headEndTag %>
<%@ attribute ... %> - fragment속성
fragment를 true로 설정하면
<!-- fragment.tag -->
<%@ tag body-content="empty" language="java" pageEncoding="UTF-8"%>
<%@ tag trimDirectiveWhitespaces="true" %>
<%@ attribute name="title" fragment="true"%>
<jsp:invoke fragment="title"></jsp:invoke>
더이상 아래와 같이 title 속성값을 <tf:header>태그안에서 지정할 수 없다.
<tf:fragment title="${ 'EL제목' }" /> ← 에러발생!
속성값을 지정하려면 <jsp:attribute>액션태그를 사용해야 한다.
<tf:fragment>
	<jsp:attribute name="title">testsetset</jsp:attribute>
</tf:fragment>
<jsp:attribute>액션태그로 받은 변수 title은 타입이 JspFrgment이기 때문에
<jsp:invoke fragment="title"/> 액션태그를 사용해 출력하거나
<jsp:invoke fragment="title" var="title" scope="request"/>형식으로 영역에 저장할 수 있다.
여러모로 불편하기 때문에 fragment속성은 사용할 일이 별로 없다.
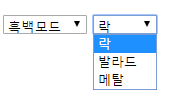
태그파일에 동적으로 속성 전달 - tag 디렉티브 dynamic-attributes속성
태그에 속성을 추가할때 속성명, 추가할 속성 개수가 정해져있지 않다면 동적으로 속성을 추가하는 tag 디렉티브의 dynamic-attributes속성을 사용하자.
<select> html태그를 커스텀 태그를 사용해 추가해보자.
option의 개수와 값이 정해지지 않았다면 dynamic-attributes속성을 사용해야 한다. option태그의 개수와 값을 그때그때 달라질 수 있음로 출력할 option태그 데이터 배열을 자바스크립트로 전달해 select태그에 추가한적이 많은데
아래와 같은 커스텀 태그를 만들어 놓으면 서버에서 작업해서 출력해주면 된다.
<tf:select name="code" rgb="RGB 모드" wb="흑백모드"/>
<tf:select name="genre" rock="락" ballad="발라드" metal="메탈"/>
/* select.tag */
<%@ tag body-content="empty" language="java" pageEncoding="UTF-8"%>
<%@ tag trimDirectiveWhitespaces="true" %>
<%@ attribute name="name" required="true" %>
<%@ taglib prefix="c" uri="http://java.sun.com/jsp/jstl/core" %>
<%@ tag dynamic-attributes="optionsMap" %>
<select name="${ name }" >
	<c:forEach items="${ optionsMap }" var="op">
		<option value="${ op.key }">${ op.value }</option>
	</c:forEach>
</select>
<%@ tag dynamic-attributes="optionsMap" %>의 뜻은 <tf:select>커스텀 태그를 사용할 때 설정한 속성들을 optionsMap란 Map객체로 받는다는 뜻이다.
몸체 내용 전달
<c:if test="true"> ... </c:if> 태그도 test값이 true면 몸체의 내용을 출력한다.
몸체 내용을 데이터로 사용할수 있고 반복적으로 몸체내용을 출력할 수 도 있다.
몸체내용을 커스텀 태그로 보내는 2가지 방법이 있다.
- 시작태그와 닫기태그 사이에 값을 넣기
<jsp:body>액션 태그 사용하기
당연히 태그 사이에 값을 넣는 방법을 주로 사용한다.
커스텀 태그에선 몸체 내용을 사용하려면 body-content="empty"이면 안된다.
그리고 <jsp:doBody> 액션태그를 이용해서 몸체내용을 출력, EL변수로 저장할 수 있다.
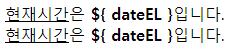
<tf:out>
	<jsp:body><u>현재시간</u>은 <b>${ dateEL }</b>입니다.</jsp:body>
</tf:out>

<tf:out>
	<u>현재시간</u>은 <b>${ dateEL }</b>입니다.
</tf:out>
안타깝게도 몸체안에 JSP표현식(<% %>)은 사용하지 못한다.
오직 EL태그와 jsp액션태그만 위치할 수 있다.
<!-- out.tag -->
<%@ tag body-content="scriptless" language="java" pageEncoding="UTF-8"%>
<%@ tag trimDirectiveWhitespaces="true" %>
<%@ taglib prefix="c" uri="http://java.sun.com/jsp/jstl/core" %>
<jsp:doBody />
<tf:out>
	<jsp:body><u>현재시간</u>은 <b>${ dateEL }</b>입니다.</jsp:body>
</tf:out>
<br><br><br><br>
<tf:out>
	<u>현재시간</u>은 <b>${ dateEL }</b>입니다.
</tf:out>

body-content속성을 scriptless값에서 tagdependent로 변경하면 아래와 같이 출력된다.
<!-- out.tag -->
<%@ tag body-content="tagdependent" language="java" pageEncoding="UTF-8"%>
<%@ tag trimDirectiveWhitespaces="true" %>
<%@ taglib prefix="c" uri="http://java.sun.com/jsp/jstl/core" %>
<jsp:doBody />
<%@ tag body-content="scriptless" language="java" pageEncoding="UTF-8"%>
<%@ tag trimDirectiveWhitespaces="true" %>
<%@ taglib prefix="c" uri="http://java.sun.com/jsp/jstl/core" %>
<jsp:doBody var="bodyText"/>
<c:out value="${ bodyText }" escapeXml="false"/>
<c:out value="${ bodyText }" escapeXml="true"/>

html태그를 다 제거해야 하는 상황이 있다면 위와같은 커스텀 태그를 만들어 처리하면 효율적이다.
<jsp:doBody var="bodyText"/>로 바로 출력하지 않고 bodyText라는 EL변수로 만든 뒤 escapeXml="true"속성과 함께 <c:out>코어 태그를 사용하면 html에서 사용하는 특수문자를 변환된 문자로 출력한다.
커스텀 태그 변수 밖에서 사용하기 <%@ variable ... %>
커스텀 태그 안에서 사용했던 변수를 밖에서 쓰고 싶다면 <%@ variable ... %> 지시자를 사용한다.
물론 <c:set>으로 scope에 다른값을 추가하여 유지하는것도 가능하지만 딱 커스텀 태그 안에서 출력만 하고 사용하지 않을 변수라면 <%@ variable ... %>을 사용하자.
만약 jsp파일에서 ${ sum }이란 EL변수를 <c:set var="sum" value="100" /> 생성하면 커스텀 태그 안에서 사용되는 ${ sum }과는 다른 변수이다.
<c:set var="sum" value="100" />
<tf:sum begin="1" end="10">
1~10까지의 합: ${ sum }
</tf:sum>
<br>
유지되는가?: ${ sum }
위와 같은 상황에서 begin ~ end까지의 총합을 sum에 계산후 반환하는 커스텀 태그<tf:sum> 를 <%@ variable ... %>지시자를 사용해 만들어보자.
<!-- sum.tag -->
<%@ tag body-content="scriptless" language="java" pageEncoding="UTF-8"%>
<%@ attribute name="begin" required="true" type="java.lang.Integer"%>
<%@ attribute name="end" required="true" type="java.lang.Integer"%>
<%@ variable name-given="sum" variable-class="java.lang.Long" scope="NESTED" %>
<%@ taglib prefix="c" uri="http://java.sun.com/jsp/jstl/core" %>

<c:set var="sum" value="${ 0 }"/>
<c:forEach var="num" begin="${ begin }" end="${ end }">
	<c:set var="sum" value="${ sum+num }"/>
</c:forEach>
<jsp:doBody/>
출력값
1~10까지의 합: 55
유지되는가?: 100
보다 싶이 유지되지 않는다. 맨처음 100으로 설정했던 sum EL변수가 복원되어 출력된다.
<jsp:doBody/>가 실행되면서 sum값이 밖으로 튀어나가게 되는것…
<%@ variable ... %>지시자의 scope="NESTED" 속성때문인데 NESTED는 태그 사이에서만 sum값을 유지하고 기존의 sum값을 커스텀 닫기 태그에서 복구해준다.
복구가 싫다면!? 변경된 sum값을 계속 유지하고 싶다면?
scope="AT_BEGIN"을 사용하자.
참고로 복원될때 태그안에서 사용된 sum EL변수값이 밖의 sum EL변수에 캐스팅 되는 것 이기 때문에 같은 자료형이여야 한다.
밖에서 <c:set var="sum" value="100" />로 생성한 sum은 Long형이기 때문에
커스텀 태그 안에서 variable-class속성을 java.lang.Long으로 설정해야 한다.
<%@ variable name-given="sum" variable-class="java.lang.Long" scope="AT_BEGIN" %>
처음안 사실:
<c:set var="sum" value="100" />만들어진 EL변수 sum은 Long형이다.
태그안에서도 기존 밖의 sum값을 사용하고 싶다면? 그리고 커스텀 태그가 끝나고 sum값을 복구시키고 싶지 않다면?
이상한 조건이지만 scope="AT_END" 를 사용하면 된다.
<%@ tag body-content="scriptless" language="java" pageEncoding="UTF-8"%>
<%@ attribute name="begin" required="true" type="java.lang.Integer"%>
<%@ attribute name="end" required="true" type="java.lang.Integer"%>
<%@ variable name-given="sum" variable-class="java.lang.Long" scope="AT_END" %><!-- 시작태그, 닫기태그사이에서 사용 가능 -->
<%@ taglib prefix="c" uri="http://java.sun.com/jsp/jstl/core" %>

<c:set var="sum" value="${ 0 }"/>
<c:forEach var="num" begin="${ begin }" end="${ end }">
	<c:set var="sum" value="${ sum+num }"/>
</c:forEach>
<jsp:doBody/>
위와 같이 설정하면 아래와 같은 결과를 출력한다.
<c:set var="sum" value="100" />
<tf:sum begin="1" end="10">
1~10까지의 합: ${ sum }
</tf:sum>
<br>
유지되는가?: ${ sum }
출력값
1~10까지의 합: 100
유지되는가?: 55
| 구분 | AT _BEGIN | NESTED | AT_END |
|---|---|---|---|
| 태그시작 | 아무것도 안함 | EL변수백업 | 아무것도 안함 |
<jsp:doBody>수행전 |
태그→페이지복사 | 태그→페이지 복사 | 아무것도 안함 |
| 태그끝 | 태그→페이지복사 | EL변수복원 | 태그→페이지 복사 |
계층형 게시판
답글이 달릴수 있는 게시글을 구축해보자.
기존 게시글에서 칼럼이 몇개 추가될뿐 크게 다르지 않다.
계층형 게시판을 구현하는 로직 1
그룹넘버, 그룹순번, 그룹깊이
3개의 칼럼을 기존 게시글에서 추가해야 한다.
먼저 그룹넘버는 답글이 아닌 새글이라면 게시글의 기본키인 글 번호와 같도록 설정한다.
그리고 새글의 경우 그룹순번과 그룹깊이는 0으로 설정한다.
| 글번호 | 작성자 | 제목 | 그룹 | 그룹순번 | 그룹깊이 |
|---|---|---|---|---|---|
| 1 | 홍길동 | 첫번째글 | 1 | 0 | 0 |
| 2 | 둘리 | 두번째글 | 2 | 0 | 0 |
여기서 첫번째 게시글에 답글을 달 경우 그룹은 부모의 그룹번호를 가지고 가고
그룹 순번과 그룹 깊이는 부모의 값에서 +1 한 값을 가진다.
| 글번호 | 작성자 | 제목 | 그룹 | 그룹순번 | 그룹깊이 |
|---|---|---|---|---|---|
| 1 | 홍길동 | 첫번째글 | 1 | 0 | 0 |
| 2 | 둘리 | 두번째글 | 2 | 0 | 0 |
| 3 | 또치 | 첫글의 답글 | 1 | 1 | 1 |
실제 DB에 위와같은 형식으로 들어간다.
답글의 답글 역시 마찬가지로 부모의 답글에서 그룹순번과 그룹깊이를 +1한 값을 가진다.
| 글번호 | 작성자 | 제목 | 그룹 | 그룹순번 | 그룹깊이 |
|---|---|---|---|---|---|
| 1 | 홍길동 | 첫번째글 | 1 | 0 | 0 |
| 2 | 둘리 | 두번째글 | 2 | 0 | 0 |
| 3 | 또치 | 첫글의답글 | 1 | 1 | 1 |
| 4 | 마이클 | 답글의답글 | 1 | 2 | 2 |
그리고 이를 그룹 오름차순(asc), 그룹순번을 모두 내림차순(desc)하여 정렬하면 다음과 같이 줄력된다.
| 글번호 | 작성자 | 제목 | 그룹 | 그룹순번 | 그룹깊이 |
|---|---|---|---|---|---|
| 2 | 둘리 | 두번째글 | 2 | 0 | 0 |
| 1 | 고길동 | 첫번째글 | 1 | 0 | 0 |
| 3 | 또치 | 첫글의 답글 | 1 | 1 | 1 |
| 4 | 마이클 | 또치의 답글 | 1 | 2 | 2 |
깊이에 따라 들여쓰기 작업만 해주면 계층형 게시판 구실을 할 수 있다.
주의할점은 여기서 또 첫번째 글에 다시 답글을 달 경우인데
그럼 아래와 같은 값의 답글이 생성된다.
| 글번호 | 작성자 | 제목 | 그룹 | 그룹순번 | 그룹깊이 |
|---|---|---|---|---|---|
| 5 | 도우너 | 첫글답글2 | 1 | 1 | 1 |
도우너의 답글은 또치의 답글과 그룹, 그룹순번, 그룹깊이가 완벽히 일치하기 때문에 내침차순 정렬해도 의미가 없다.
따라서 기존에 자신의 같은 그룹의 모든 답글의 그룹순번을 모두 1씩 더해주어야 한다.
그리고 그룹 오름차순, 그룹순번을 기준으로 내림차순 정렬하자
| 글번호 | 작성자 | 제목 | 그룹 | 그룹순번 | 그룹깊이 |
|---|---|---|---|---|---|
| 2 | 둘리 | 두번째글 | 2 | 0 | 0 |
| 1 | 고길동 | 첫번째글 | 1 | 0 | 0 |
| 5 | 도우너 | 첫글답글2 | 1 | 1 | 1 |
| 3 | 또치 | 첫글의답글 | 1 | 2 | 1 |
| 4 | 마이클 | 답글의답글 | 1 | 3 | 2 |
그룹 깊이에 따라 들여쓰기만 하면 계층형 게시판 완성이다!
계층형 게시판을 구현하는 로직 2
2번째 방법은 thread칼럼, 그룹깊이 칼럼을 추가하여 계층형 게시판을 구현하는 방법이다.
일단 칼럼을 2개만 추가하면 된다는 것이 매력적이다.
thread칼럼은 새글의 경우 글번호 * 1000을 한 값이다.
| 글번호 | 작성자 | 제목 | thread | 그룹깊이 |
|---|---|---|---|---|
| 1 | 홍길동 | 첫번째글 | 1000 | 0 |
| 2 | 둘리 | 두번째글 | 2000 | 0 |
여기서 첫번째 게시글에 답글은 단다면
thread는 부모글의 thread - 1, 그룹깊이는 부모글의 depth + 1이 된다.
| 글번호 | 작성자 | 제목 | thread | 그룹깊이 |
|---|---|---|---|---|
| 1 | 홍길동 | 첫번째글 | 1000 | 0 |
| 2 | 둘리 | 두번째글 | 2000 | 0 |
| 3 | 마이클 | 첫글답글 | 999 | 1 |
만약 답글에 대한 답글을 달 때 에도 thread는 부모글의 thread - 1, 그룹깊이는 부모글의 depth + 1이 된다.
| 글번호 | 작성자 | 제목 | thread | 그룹깊이 |
|---|---|---|---|---|
| 1 | 홍길동 | 첫번째글 | 1000 | 0 |
| 2 | 둘리 | 두번째글 | 2000 | 0 |
| 3 | 마이클 | 첫글 답글 | 999 | 1 |
| 4 | 또치 | 답글의 답글 | 998 | 2 |
thread는 올림차순으로 정렬하고 , 그룹깊이는 들여쓰기하는데 사용된다.
정렬하면 아래와 같이 출력된다.
| 글번호 | 작성자 | 제목 | thread | 그룹깊이 |
|---|---|---|---|---|
| 2 | 둘리 | 두번째글 | 2000 | 0 |
| 1 | 홍길동 | 첫번째글 | 1000 | 0 |
| 3 | 마이클 | 첫글 답글 | 999 | 1 |
| 4 | 또치 | 답글의 답글 | 998 | 2 |
계층형 구현하는 로직 1과 마찬가지로 위 상황에서 첫번째 글에 또 답글이 달리게 된다면 자신 아래의 모든 글을 -1 해주어야 한다.
첫번째 글에 또 답글을 달면 다음 데이터가 추가될 것이다.
| 글번호 | 작성자 | 제목 | thread | 그룹깊이 |
|---|---|---|---|---|
| 5 | 도우너 | 첫글답글2 | 999 | 1 |
도우너와 마이클의 답글의 thread값이 똑같아 지기 때문에 로직2도 로직1과 마찬가지로
본래있던 1 ~ 999까지의 모든 글의 thread를 -1 해줘야 한다.
도우너의 글을 추가하고 오름차순하면 아래와 같다.
| 글번호 | 작성자 | 제목 | thread | 그룹깊이 |
|---|---|---|---|---|
| 2 | 둘리 | 두번째글 | 2000 | 0 |
| 1 | 홍길동 | 첫번째글 | 1000 | 0 |
| 5 | 도우너 | 첫글 답글2 | 999 | 1 |
| 3 | 마이클 | 첫글 답글 | 998 | 1 |
| 4 | 또치 | 답글의 답글 | 997 | 2 |
만약 여기서 도우너의 글에 답글을 달게된다면 도우너의 thread -1 한 998을 가지며
그룹깊이 2의 댓글이 추가된다.
| 글번호 | 작성자 | 제목 | thread | 그룹깊이 |
|---|---|---|---|---|
| 6 | 희동이 | 도우너답글 | 998 | 2 |
마찬가지로 기존에 존재하는 1 ~ 998까지의 모든 글의 thread를 -1해준다.
희동이의 답글을 추가하고 thread 기준으로 오름차순해보자.
| 글번호 | 작성자 | 제목 | thread | 그룹깊이 |
|---|---|---|---|---|
| 2 | 둘리 | 두번째글 | 2000 | 0 |
| 1 | 홍길동 | 첫번째글 | 1000 | 0 |
| 5 | 도우너 | 첫글 답글2 | 999 | 1 |
| 6 | 희동이 | 도우너답글 | 998 | 2 |
| 3 | 마이클 | 첫글 답글 | 997 | 1 |
| 4 | 또치 | 답글의 답글 | 996 | 2 |
이 방법은 thread칼럼 하나로 그룹번호와 그룹순번 칼럼을 대신하는 효과를 가지고 있다.
대신 답글을 1000개이상 못단다는 단점이 있다.
계층형 게시판 구현
위에서 설명한 계층형 게시판을 구현하는 로직 1로 구현할 것이다.
계층형 게시판은 지금까지 만든 게시판에서 입력과정이 좀 특별할 뿐 다를게 없다.
DB생성
create table replyboard16
(
   num number not null primary key
  ,writer varchar2(12) not null
  ,email  varchar2(30) not null
  ,subject varchar2(50) not null
  ,pass varchar2(10) not null
  ,readcount number(5,0) default 0 not null
  ,regdate date default sysdate not null
  ,content clob not null
  ,ip varchar2(20) not null
  ,ref number(5,0) default 0 not null
  ,step  number(3,0) default 0 not null
  ,depth number(3,0) default 0 not null
);


create sequence seq_replyboard16
start with 1
increment by 1
nomaxvalue
nocache
nocycle;
컨트롤러 - 핸들러 관계
commandHandler.properties파일은 아래와 같이 설정되어 있다.
/replyboard/list.do=days16.replyboard.handler.ListHandler
/replyboard/write.do=days16.replyboard.handler.WriteHandler
/replyboard/view.do=days16.replyboard.handler.ContentHandler
#somecmd=anySomeHandler
목록출력, 쓰기, 읽기 3가지 기능이 있며 각각 ListHandler, WriteHandler, ContentHandler가 이벤트를 처리한다.
먼저 목록출력, 쓰기, 읽기 기능을 위한 SQL쿼리가 작성되어 있는 ReplyBoardDAO객체를 먼저 보고가자.
ReplyBoardDTO - 게시글 데이터 전송객체
public class ReplyBoardDTO {
	private int num;
	private String writer;
	private String email;
	private String subject;
	private String pass;
	private int readcount;
	private Date regdate;
	private String content;
	private String ip;
	private int ref;
	private int step;
	private int depth;
	// 새로 게시된 글앞에 new 이미지 붙이기 위한 필드
	private boolean newImg;

  // getter, setter
  ...
}
정말 별거 없다. 그냥 게시글용 DTO에서 그룹화를 위한 필드 3개 ref,step,depth가 생겼고 new 이미지를 붙이기 위한 boolean타입 필드가 생겼다.
목록 출력
/replyboard/list.do url을 요청하면 ListHandler가 처리하는데 DB에서 게시글을 SELECT해서 list.jsp에서 뿌린다.
<!-- list.jsp -->
<%@ page contentType="text/html; charset=UTF-8" pageEncoding="UTF-8"%>
<%@ taglib prefix="c" uri="http://java.sun.com/jsp/jstl/core"%>
<!DOCTYPE html>
<html>
<head>
<meta charset="UTF-8">
<title>글목록</title>
<meta name="viewport" content="width=device-width, initial-scale=1.0">
<link rel="stylesheet" type="text/css" href="">
<style>
a {
	text-decoration: none;
	color: black;
}

table, tr, td {
	border: solid 1px gray;
	border-radius: 3px;
	padding: 5px;
	font-size: 12px;
}
</style>
</head>
<body>
<table style="width: 700px; margin: 50px auto" border="1">
	<tr>
		<td align="right" colspan="6">
			<a href="write.do">글쓰기</a>
		</td>
	</tr>
	<tr style="background: gray; color: white; font-weight: bold">
		<td width="50" align="center">번호</td>
		<td width="280" align="center">제 목</td>
		<td width="100" align="center">작성자</td>
		<td width="120" align="center">작성일</td>
		<td width="50" align="center">조회</td>
		<td width="100" align="center">IP</td>
	</tr>
	<tbody>
		<c:if test="${ empty list }">
			<tr class="data">
				<td align="center" colspan="6">
					<h3>작성된 게시글이 없습니다.</h3>
				</td>
			</tr>
		</c:if>
		<c:if test="${ not empty list }">
			<c:forEach items="${ list }" var="dto">
				<tr class="data">
					<td align="center">${ dto.num }</td>
					<td>
						<c:if test="${ dto.depth gt 0 }">
							<img width="${ dto.depth*10 }px" />
							<img src="/jspPro/days16/replyboard/images/arr.gif" alt="" />
						</c:if>
						<a href="<%= request.getContextPath() %>/replyboard/view.do?num=${ dto.num }">
							${ dto.subject }
						</a>
						<c:if test="${ dto.newImg }">
							<img src="/jspPro/days16/replyboard/images/ico-new.gif" alt="" />
						</c:if>
					</td>
					<td>
						<c:if test="${ dto.writer eq 'admin' }">
							<img src="/jspPro/days16/replyboard/images/star.gif" alt="" />
						</c:if>
						<a href="mailto:${ dto.email }">${ dto.writer }</a>
					</td>
					<td>${ dto.regdate }</td>
					<td>${ dto.readcount }</td>
					<td>${ dto.ip }</td>
				</tr>
			</c:forEach>
		</c:if>
	</tbody>
</table>
</html>
따로 페이징 처리는 하지 않았다.
여기서 중요한 점은 <c:if test="${ dto.depth gt 0 }"> 만약 게시글의 deptho칼럼이 0보다 크다면 10px공백과 화살표 그림을 제목 앞에 삽입한다.
그리고 <c:if test="${ dto.newImg }"> DTO객체의 newImg 필드가 true라면 new이미지를 글 뒤에 붙이는데 이건 DAO의 게시글 검색에서 알아보자.
ReplyBoardDAO - selectList()
DAP의 여러 함수중 목록조회 SELECT쿼리가 어떤식으로 구성되어 있는지 알아보자.
public class ReplyBoardDAO {
	private static ReplyBoardDAO replyBoardDAO = new ReplyBoardDAO();
	public static ReplyBoardDAO getInstance()
	{
		return replyBoardDAO;
	}
	private ReplyBoardDAO() {}

	public int insert(Connection conn, ReplyBoardDTO dto) {
    ...
  }

	public List<ReplyBoardDTO> selectList(
			Connection conn){
		StringBuffer sql = new StringBuffer();
		sql.append(" SELECT num, writer, email, subject, pass, regdate, readcount, ref, step, depth, content, ip, ");
		sql.append(" CASE WHEN ( sysdate - regdate ) < 0.041667  then 1 else 0 end new ");
		sql.append(" FROM replyboard16 ");
		sql.append(" ORDER BY ref DESC, step ASC");
		PreparedStatement pstmt = null;
		ResultSet rs = null;
		ArrayList<ReplyBoardDTO> list = new ArrayList<>();
		try {
			pstmt = conn.prepareStatement(sql.toString());
			rs = pstmt.executeQuery();
			ReplyBoardDTO dto = null;
			while(rs.next()) {
				dto =  new ReplyBoardDTO();
				dto.setNum( rs.getInt("num") );
				dto.setWriter( rs.getString("writer"));
				dto.setEmail( rs.getString("email"));
				dto.setSubject( rs.getString("subject"));
				dto.setReadcount( rs.getInt("readcount"));
				dto.setRegdate(rs.getDate("regdate"));
				dto.setIp( rs.getString("ip"));
				dto.setStep( rs.getInt("step"));
				dto.setDepth(rs.getInt("depth"));

				dto.setNewImg(rs.getBoolean("new"));
				list.add(dto);
			}
		} catch (SQLException e) {
			e.printStackTrace();
		} finally {
			try { pstmt.close();} catch (SQLException e) {	e.printStackTrace();	}
			try {rs.close();    } catch (SQLException e) {	e.printStackTrace();}
			try {conn.close();  } catch (SQLException e) {	e.printStackTrace();}
		}
		return list;
	}
	// 조회수 증가
	public int updateReadcount(Connection conn, int num) {
    ...
	}

	// 게시글 얻어오기
	public ReplyBoardDTO selectOne(Connection conn, int num) {
		...
	}
}
위의 로직 1의 방식대로 ref(그룹번호)를 최신순으로 출력되도록 내림차순하고 step(그룹순서)를 오름차순한다.
0.041667이란 숫자는 1시간을 뜻하며 현재시간 - 작성시간이 1시간보다 작다면 1을 반환, 크다면 0을 반환한다.
(new이미지를 붙이기 위한 작업)
계층형 게시판 목록조회 기능은 다른 게시판 목록 조획와 다른게 없다.
그룹 관련된 칼럼이 조금 늘어나도 new이미지를 붙이기 위한 별동의 작업이 추가됐을뿐….
중요한건 글쓰기 작업에서 그룹 관련된 칼럼값을 어떻게 INSERT하느냐이다.
ListHandler와 ListService 설명은 생략하겠다.
그저 요청이 들어오면 ListService는 DAO의 selectList()메서드를 호출해 얻은 ArrayList<ReplyBoardDTO>를 핸들러에 반환할 뿐 별다를 작업이 없다.
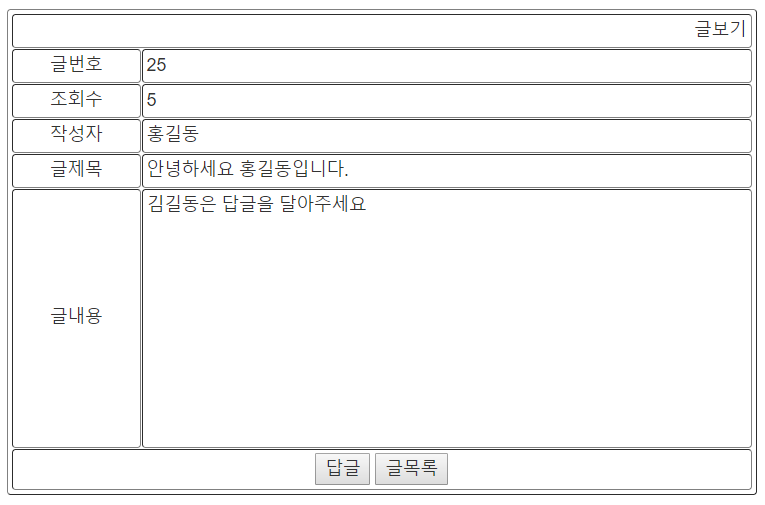
글보기 작업
list.jsp의 글제목에 a태그로 /replyboard/view.do?num=${ dto.num } url을 링크해두었다.
당연히 ContentHandler에 이벤트 처리를 맡기게 되고 DAO의 selectOne()이란 메서드에서 게시글 번호에 해당하는 레코드를 SELECT해와 content.jsp에서 출력하는 작업을 한다.
<!-- content.jsp -->
<%@ page language="java" contentType="text/html; charset=UTF-8" pageEncoding="UTF-8"%>
<!DOCTYPE html>
<html>
<head>
<meta charset="UTF-8">
<title>글보기</title>

<style>
a {
	text-decoration: none;
	color: black;
}

table {
	border-spacing: 1px;
	border-collapse: separate;
}

table, tr, td {
	border-radius: 3px;
	padding: 3px;
}
</style>

</head>
<body>
	<table width="600" style="margin: 50px auto" border="1">
		<tr>
			<td colspan="2" align="right">글보기</td>
		</tr>
		<tr>
			<td width="70" align="center">글번호</td>
			<td width="330">${ dto.num }</td>
		</tr>
		<tr>
			<td width="70" align="center">조회수</td>
			<td width="330">${ dto.readcount }</td>
		</tr>
		<tr>
			<td width="70" align="center">작성자</td>
			<td width="330">${ dto.writer }</td>
		</tr>
		<tr>
			<td width="70" align="center">글제목</td>
			<td width="330">${ dto.subject }</td>
		</tr>
		<tr>
			<td width="70" align="center">글내용</td>
			<td width="330">
				<div style="width: 100%; height: 200px; overflo: scroll;">${ dto.content }
				</div>
			</td>
		</tr>
		<tr>
			<td colspan="2" align="center"><input type="button" value="답글"
				onclick="location.href='write.do?num=${ dto.num }&ref=${dto.ref }&step=${ dto.step }&depth=${ dto.depth }'">
				<input type="button" value="글목록"
				onclick="location.href='list.do?'">
			</td>
		</tr>
	</table>
</body>
</html>
글 수정, 삭제 기능은 없다….
여기서 중요한건 “답글” 버튼을 누를때 요청하는 url주소이다.
<td colspan="2" align="center"><input type="button" value="답글"
  onclick="location.href='write.do?num=${ dto.num }&ref=${dto.ref }&step=${ dto.step }&depth=${ dto.depth }'">
답글은 부모의 그룹을 이어받으며 step+1, depth+1 해야하기 때문에 파라미터로 넘겨받는다.
dto.ref 필드값은 만약 새글이라면 자신의 게시글 넘버로 값을 가지겠지만 답글이라면 최상위 답글의 값을 가지게 된다.
ReplyBoardDAO - selectOne(), updateReadcount()
간단하게 조회 쿼리와 조회수 증가 쿼리를 보고 게시글 조회기능은 넘어가자.
Handler와 Service역시 단순히 num값을 파라미터로 받아 조회한 ReplyBoardDTO를 넘겨줄 뿐이다.
public class ReplyBoardDAO {
	private static ReplyBoardDAO replyBoardDAO = new ReplyBoardDAO();
	public static ReplyBoardDAO getInstance()
	{
		return replyBoardDAO;
	}
	private ReplyBoardDAO() {}

	public int insert(Connection conn, ReplyBoardDTO dto) {
    ...
  }

	public List<ReplyBoardDTO> selectList(Connection conn){
    ...
	}
	// 조회수 증가
	public int updateReadcount(Connection conn, int num) {
		String sql = "UPDATE replyboard16 "
				+" SET readcount = readcount +1 "
				+" WHERE num = ?";

		PreparedStatement pstmt = null;
		int result = 0;
		try {
			pstmt = conn.prepareStatement(sql);
			pstmt.setInt(1, num);
			result = pstmt.executeUpdate();
		} catch (SQLException e) {
			e.printStackTrace();
		} finally {
			try { pstmt.close();} catch (SQLException e) {	e.printStackTrace();	}
			//try {conn.close();  } catch (SQLException e) {	e.printStackTrace();}
		}
		return result;
	}

	// 게시글 얻어오기
	public ReplyBoardDTO selectOne(Connection conn, int num) {
		String sql = "select * from replyboard16 "
				+" where num = ?";
		PreparedStatement pstmt = null;
		ResultSet rs = null;
		ReplyBoardDTO dto = null;
		try {
			pstmt = conn.prepareStatement(sql);
			pstmt.setInt(1, num);
			rs = pstmt.executeQuery();

			if(rs.next()) {
				dto =  new ReplyBoardDTO();

				dto.setNum( rs.getInt("num") );
				dto.setWriter( rs.getString("writer"));
				dto.setEmail( rs.getString("email"));
				dto.setSubject( rs.getString("subject"));
				dto.setReadcount( rs.getInt("readcount"));
				dto.setRegdate(rs.getDate("regdate"));
				dto.setIp( rs.getString("ip"));
				dto.setStep( rs.getInt("step"));
				dto.setDepth(rs.getInt("depth"));

				dto.setRef(rs.getInt("ref"));
				dto.setPass(rs.getString("pass"));
				dto.setContent(rs.getString("content"));

			}
		} catch (SQLException e) {
			e.printStackTrace();
		} finally {
			try { pstmt.close();} catch (SQLException e) {	e.printStackTrace();	}
			try {rs.close();    } catch (SQLException e) {	e.printStackTrace();}
			//try {conn.close();  } catch (SQLException e) {	e.printStackTrace();}
		}
		return dto;
	}
}
글쓰기 작업
글쓰기의 경우 게시글/replyboard/write.do url을 요청하면 컨트롤러는 WriteHandler의 process()메서드를 호출하고
WriteHandler는 get방식의 경우 writeForm.jsp로 포워딩,
post방식의 경우 게시글을 삽입하고 /replyboard/list.do 로 리다이렉트 시킨다.
글쓰기 요청은 새글을 쓸 때, 답글을 쓸 때 요청이 발생하는데
새글의 경우 그룹번호를 게시글 넘버로 설정하고 step과 depth모두 0으로 설정하면 된다.
반면 답글의 경우 그룹번호는 최상위 댓글의 게시글넘버, step과 depth는 부모의 +1 값으로 설정해야 한다.
<!-- writeForm.jsp -->
<%@ page contentType="text/html; charset=UTF-8" pageEncoding="UTF-8"%>
<!DOCTYPE html>
<html>
<head>
<meta charset="UTF-8">
<title>2018. 9. 10. 오전 11:06:16</title>
<style>
a {
	text-decoration: none;
	color: black;
}

table, tr, td {
	border-radius: 3px;
}
</style>
</head>
<body>
<form action="" method="post">
	<table width="600px" style="margin: 50px auto" border="1">
		<tr>
			<td colspan="2" align="right"><a href="list.do">글목록</a></td>
		</tr>
		<tr>
			<td width="70" align="center">작성자</td>
			<td width="330"><input type="text" name="writer" size="12">
			</td>
		</tr>
		<tr>
			<td width="70" align="center">이메일</td>
			<td width="330"><input type="text" name="email" size="30">
			</td>
		</tr>
		<tr>
			<td width="70" align="center">제목</td>
			<td width="330"><input type="text" name="subject" size="50"
				value='<c:if test="${ not empty param.ref }">[답글]</c:if>'>
			</td>
		</tr>
		<tr>
			<td width="70" align="center">내용</td>
			<td width="330"><textarea rows="13" cols="50" name="content"></textarea>
			</td>
		</tr>
		<tr>
			<td width="70" align="center">비밀번호</td>
			<td width="330"><input type="password" name="pass" size="10">
			</td>
		</tr>
		<tr>
			<td colspan="2" align="center"><input type="submit" value="글쓰기">
				<input type="reset" value="다시작성"> <input type="button"
				value="글목록" onclick="location.href='list.do'"></td>
		</tr>
	</table>
	<input type="hidden" name="p_ref" value="${ param.ref }" />
</form>
</body>
</html>
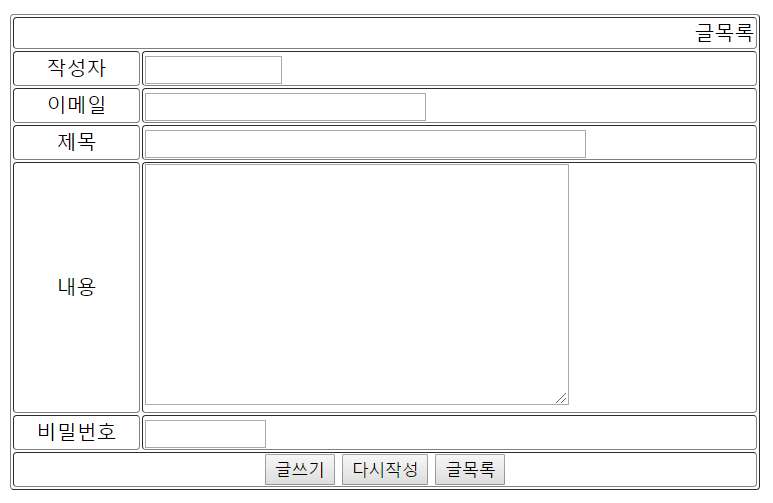
여기서 중요한건 숨겨져 있는 input태그 p_ref
<input type="hidden" name="p_ref" value="${ param.ref }" />
만약 답글버튼을 눌러 write.do?ref=... url을 요청해 포워딩해 왔다면 ref값 유지를 위해 같이 post요청으로 넘긴다.
ReplyBoardDAO - insert()
위에 작성한 로직대로 작성하려면 상황에 따라 별도의 쿼리를 날려야 한다.
새글의 경우 그냥 시퀀스가 만들어준 값으로 INSERT하고 그룹관련 칼럼도 별도 연산 할 필요가 없다.
문제는 답글의 경우이다.
요청쿼리가 write.do?ref=...형식의 ref값으로 넘어온게 있다면 답글을 단다는 요청임으로 ref칼럼은 최상위 부모의 ref로, step과 depth는 +1해주어야 한다.
public class ReplyBoardDAO {
	private static ReplyBoardDAO replyBoardDAO = new ReplyBoardDAO();
	public static ReplyBoardDAO getInstance()
	{
		return replyBoardDAO;
	}
	private ReplyBoardDAO() {}

	public int insert(Connection conn, ReplyBoardDTO dto) {
		System.out.println("ReplyBoardDAO insert");
		System.out.println(conn);
		PreparedStatement pstmt = null;
		int result = 0;
		// 1. 새글쓰기
		if (dto.getRef() == 0) {

			StringBuffer sql = new StringBuffer();
			sql.append(" INSERT INTO replyboard16 ");
			sql.append(" ( num, writer, email, subject, pass, ref, step, depth, content, ip ) ");
			sql.append(" values ");
			sql.append(" ( seq_replyboard16.nextval, ?, ?, ?, ?, seq_replyboard16.currval, ?, ?, ?, ? ) ");
			try {
				pstmt =  conn.prepareStatement(sql.toString());

				pstmt.setString(1, dto.getWriter());
				pstmt.setString(2, dto.getEmail());
				pstmt.setString(3, dto.getSubject());
				pstmt.setString(4, dto.getPass());
				pstmt.setInt(5, dto.getStep());
				pstmt.setInt(6, dto.getDepth());
				pstmt.setString(7, dto.getContent());
				pstmt.setString(8, dto.getIp());
				System.out.println("ReplyBoardDAO insert3");

				result = pstmt.executeUpdate();
				System.out.println("result: "+ result);

			}catch (SQLException e) {
				e.printStackTrace();
			} finally {
				try { pstmt.close();} catch (SQLException e) {	e.printStackTrace();	}
			}
		}
		else {
			//같은 그룹이면서 부모 step보다 큰 답글들 모두 1씩 증가
			StringBuffer sql = new StringBuffer();
			sql.append(" UPDATE replyboard16 ");
			sql.append(" SET step = step + 1 ");
			sql.append(" WHERE ref = ? AND step > ? ");
			try {
				pstmt =  conn.prepareStatement(sql.toString());
				pstmt.setInt(1, dto.getRef());
				pstmt.setInt(2, dto.getStep());
				result = pstmt.executeUpdate();
				System.out.println("Update -1 result: " + result);

				StringBuffer sql2 = new StringBuffer();
				sql2.append(" INSERT INTO replyboard16 ");
				sql2.append(" ( num, writer, email, subject, pass, ref, step, depth, content, ip ) ");
				sql2.append(" values ");
				sql2.append(" ( seq_replyboard16.nextval, ?, ?, ?, ?, ?, ?, ?, ?, ? ) ");

				pstmt =  conn.prepareStatement(sql2.toString());

				pstmt.setString(1, dto.getWriter());
				pstmt.setString(2, dto.getEmail());
				pstmt.setString(3, dto.getSubject());
				pstmt.setString(4, dto.getPass());
				System.out.println("dto.getRef(): " + dto.getRef());
				pstmt.setInt(5, dto.getRef()); //기존 curval에서 이제 부모의 ref를 넣는다.

				pstmt.setInt(6, dto.getStep());
				pstmt.setInt(7, dto.getDepth());
				pstmt.setString(8, dto.getContent());
				pstmt.setString(9, dto.getIp());

				result = pstmt.executeUpdate();

				System.out.println("INSERT reply result: " + result);

			}catch (SQLException e) {
				e.printStackTrace();
			} finally {
				try { pstmt.close();} catch (SQLException e) {	e.printStackTrace();	}
			}
		}
		return result;
  }
  ...
  (목록조회, 조회, 조회수 증가 등...)
}
답글의 경우 아래와 같은 쿼리가 껴있는 것 을 볼 수 있다.
sql.append(" UPDATE replyboard16 ");
sql.append(" SET step = step + 1 ");
sql.append(" WHERE ref = ? AND step > ? ");
...
pstmt.setInt(1, dto.getRef());
pstmt.setInt(2, dto.getStep());
글의 같은 level (같은 깊이)의 답글이 2개 이상 달릴 경우 기존의 댓글들을 모두 한칸씩 밀어주어야 한다.
즉 최신 답글이 부모댓글의 바로 밑에, 이전 댓글들은 최신댓글 뒤로 한칸씩 밀려나야 한다는 뜻이다.
따라서 UPDATE쿼리를 사용해 자신과 같은 ref에 해당하는 모든 레코드의 step을 + 1한다.