java IO!
Java 입출력
IO |
NIO |
|---|---|
| 스트림방식 Non-buffer | 버퍼방식 |
| 동기방식 | 동기/비동기 모두 지원 |
| 블로킹 방식 | 블록킹/논블록킹 모두 지원 |
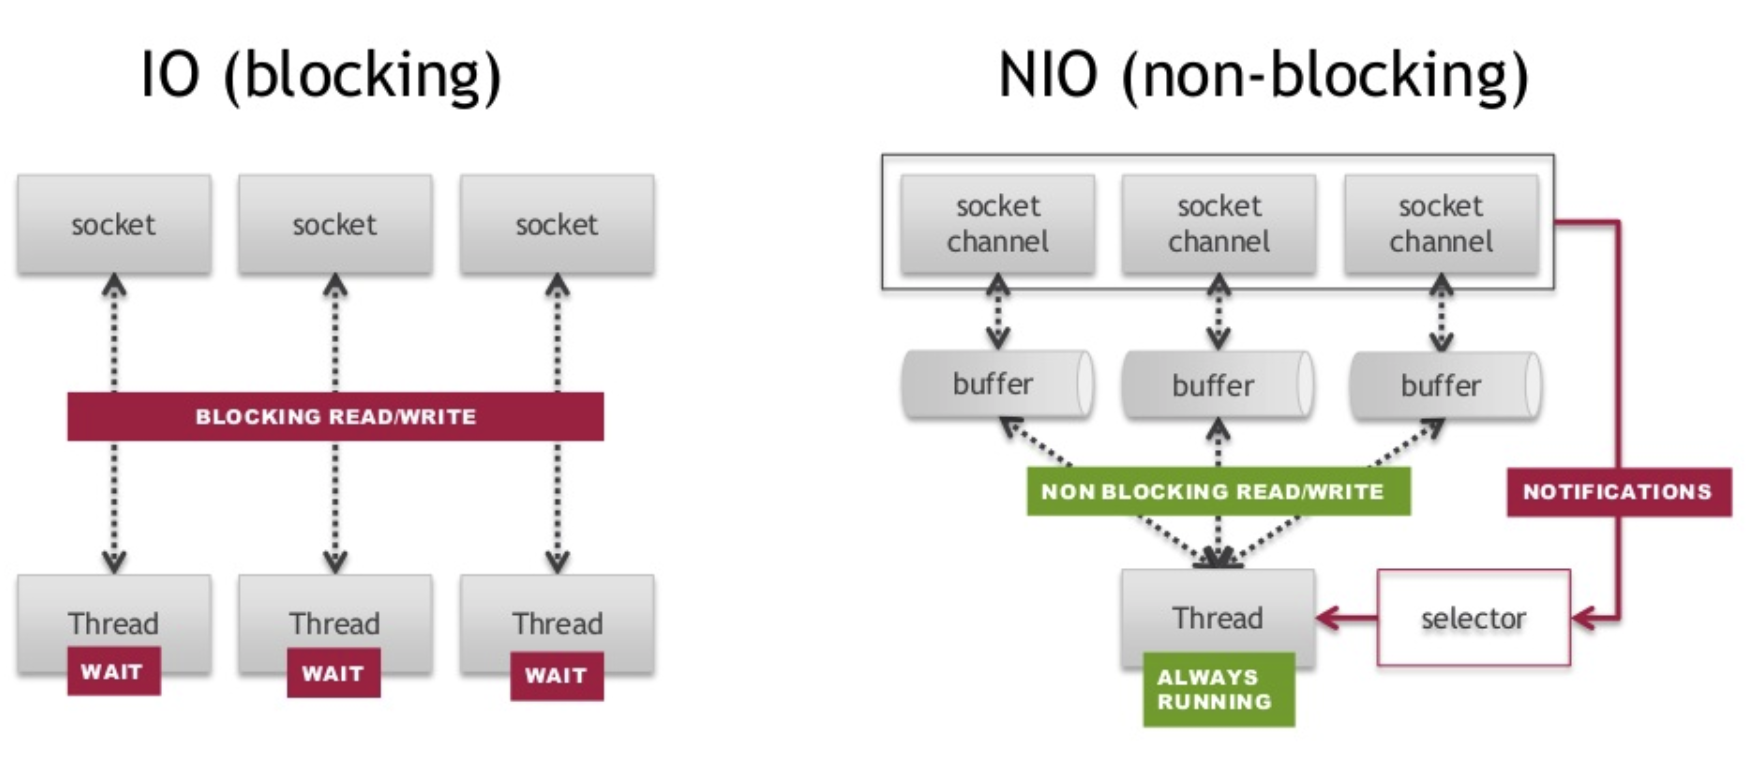
IO는 스트림(Stream)이라는 단방향 통로를 생성해서 외부 데이터와 통신, 연결 클라이언트 수가 적고 대용량, 순차처리에 적합
NIO는 채널(Channel)이라는 양방향 통로를 생성해서 외부 데이터와 통신, 연결 클라이언트 수가 많고 소규모 빠른 대응에 적합
https://www.slideshare.net/kslisenko/networking-in-java-with-nio-and-netty-76583794
java io
java IO 에선 입력 출력과정이 각각의 스트림(stream)에서 이루어진다.
스트림은 항상 단방향으로 이루어지기에 서버와 클라이언트간 통신을 위해 입력스트림, 출력스트림 2가지 스트림이 필요하다.
java io 의 특징은 스트림으로 데이터를 전송받기에 버퍼 역할을 하는 저장소에 저장해두지 않으면 데이터 재활용이 불가능하다.
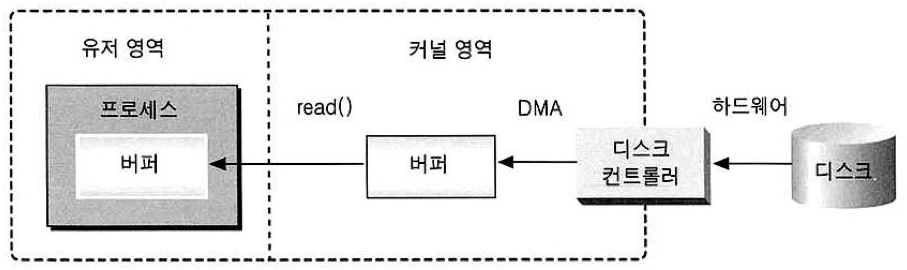
또한 send(), read(), write(), recv(), recvfrom() 등의 메서드를 사용해 커널 버퍼 <-> 유저버퍼 데이터 접근, 읽기, 쓰기를 진행하면 시스템콜이 발생하며
해당 작업을 수행하는 동안 스레드는 블로킹되어 더이상의 코드진행이 불가능하다.
클라이언트 연결이 많으면 빠른 대응을 위해 더 많은 스레드가 생성되고 시스템 부하가 걸릴 확률이 높아진다.
하지만 적은 연결의 경우 최적화된 병렬 연산 진행이 가능하기에 빠른 처리가 가능하다.
입력 스트립
| 문자 스트림 클래스 | 설명 | 바이트 스트림 클래스 |
|---|---|---|
Reader |
문자/바이트 입력 스트림을 위한 추상클래스 | InputStream |
BufferedReader |
문자/바이트 버퍼 입력, 라인 해석 | BufferedInputStream |
LineNumberReader |
문자/바이트 입력 시, 라인 번호를 유지 | LineNumberInputStream |
CharArrayReader |
문자/바이트 배열에서 읽어들임 | ByteArrayInputStream |
InputStreamReader |
바이트 스트림을 문자 스트림으로 변환 | 없음 |
FileReader |
파일에서 바이트로 읽어들어 문자/바이트 스트림으로 변환 | FileInputStream |
FilterReader |
필터적용 문자/바이트 입력을 위한 추상클래스 | FilterInputStream |
PushBackReader |
읽어들인 문자/바이트를 되돌림(Push back) | PushbackInputStream |
PipedReader |
PipedWriter, PipedOutputStream 에서 읽어들임 |
PipedInputStream |
StringReader |
문자열에서 읽어들임 | SgringBUfferedInputStream |
출력 스트림
| 문자 스트림 클래스 | 설명 | 바이트 스트림 클래스 |
|---|---|---|
Writer |
문자 출력 스트림을 위한 추상클래스 | OutputStream |
BufferedWriter |
문자/바이트 스트림에 버퍼출력, | BufferedOutputStream |
CharArrayWriter |
문자/바이트 스트림에 문자/바이트 배열 출력 | ByteArrayOutputStream |
FilterWriter |
필터적용 문자/바이트 출력을 위한 추상클래스 | FilterOuputStream |
OutputStreamWriter |
문자 스트림을 바이트 스트림으로 변환 | 없음 |
FileWriter |
문자/바이트 스트림을 바이트 파일로 변환 | FileOutputStream |
PrintWriter |
Writer/Stream 값과 객체를 프린트 |
PrintStream |
PipedWriter |
PipedReader/PipedOutputStream 에 출력 |
PipedOutputStream |
없음 |
자바 기본형 데이터를 읽을 때 유용 | DataInputStream |
없음 |
자바 기본형 데이터를 출력할 때 유용 | DataOutputStream |
StringWriter |
문자열 출력 | 없음 |
바이트 기반 스트림은 데이터를 주고받을때 기본단위가 1byte. 바이트, 바이트 배열, 정수를 주고받기 편하게 구성됨.
바이트 스트림 최상위 부모는 InputStream, OutputStream 이며 바이트 기반 하위 객체들도 해당 suffix 를 가진다.
문자 기반 스트림은 데이터를 주고받을때 기본단위가 2byte이다. 문자, 문자열, 문자배열을 주고받기 편하게 구성됨.
문자 스트림 최상위 부모는 Reader, Wirter 이며 문자 기반 하위 객체들도 해당 suffix 를 가진다.
보통 텍스트파일은 문자가 들어가있어 문자 스트림으로,
실행파일의 경우 문자가 아닌 byte가 들어있어 바이트 스트림으로,
이미지나 동영상도 마찬가지로 바이트 스트림으로 읽어와야한다.
FileInputStream
InputStream 클래스를 상속하는 파일 입력 클래스
public class FileInputStream extends InputStream {...}
파일 입력시 사용하는 바이트 스트림으로 사진, 동영상 등의 바이너리 파일을 위의 스트림 객체를 사용해서 IO 할 수 있다.
String path = "자바IO.PNG"; //사진 파일
try(FileInputStream fs = new FileInputStream(path)) {
	int b=0;
	while ((b=fs.read())!= -1)
		System.out.println(b);
} catch (FileNotFoundException e) {
	e.printStackTrace();
} catch (IOException e) {
	e.printStackTrace();
}
FileInputStream 의 read는 3개로 오버로딩 되어있다
int read()-1byte씩 읽어서 0~255 10진수 int형으로 반환한다.int read(byte[] b)- 배열 크기만큼 읽어 배열에 저장하고 읽어들인 바이트 길이를 반환한다.int read(byte[] b, int off, int len)-offset,len을 사용해 위치지정 가능. 읽은 바이트 길이를 반환한다.
2번째 read 를 사용해 하번에 1024byte 씩 읽어오면 빠른 입출력 스트림 open 횟수가 줄어들면서 빠른 처리가 가능하다.
byte[] buffer = new byte[1024];
String path = "자바IO.PNG";
try (FileInputStream fs = new FileInputStream(path))
{
	int n=0;
	while ((n = fs.read(buffer)) != -1)
		System.out.println(Arrays.toString(buffer));
} catch (FileNotFoundException e) {
	e.printStackTrace();
} catch (IOException e) {
	e.printStackTrace();
}
FileOuputStream
OutputStream 클래스를 상속하는 파일 입출력 클래스
public class FileOutputStream extends OutputStream {...}
파일명을 인자로 받는 생성자는 2종류가 있다.
FileOutputStream(String name) // defualt append false
FileOutputStream(String name, boolean append) // true: 이어쓰기, false: reset
문자열을 파일에 바이트 스트림으로 변경하여 msg.ini 파일에 저장
String message = "안녕하세요";
String path = "msg.ini";
byte[] buffer;
try (FileOutputStream fos = new FileOutputStream(path, true)) {
	buffer = message.getBytes(); //문자열을 byte배열로 변환
	fos.write(buffer);
} catch (IOException e) {
	e.printStackTrace();
}
msg.ini 안에는 실행할때마다 “안녕하세요”가 들어간다.
바이트 스트림과 바이트 배열로 문자열 저장이 가능하지만 번거롭다.
FileWriter를 사용하면 문자 2byte씩 입력할 수 있기때문에 byte배열로 변경할 필요없이 바로 입력 가능하다.
String message = "안녕하세요";
String path = "msg.ini";
try (FileWriter fw = new FileWriter(path, true))
{
	fw.write(message);
} catch (IOException e) {
	e.printStackTrace();
}
문자열을 입출력 할때는 FileReader/FileWriter를 사용하는것이 효율적이다.
바이너리 파일을 입출력 할때는 FileInputStream/FileOutputStream을 사용하지 않으면 파일이 깨진다.
보조스트림
효율을 위해 일정수준 모아서 처리, 특정 작업을 별도로 하기위해 보조스트림을 사용한다.
데이터를 모았다가 처리하는 버퍼가 있는 BufferedReader, BufferedInputStream
바이트 단위로 저장하는 ByteArrayInputStream, ByteArrayOutputStream
데이터 타입 단위로 저장하는 DataInputStream, DataOutputStream
객체 단위로 저장하는 ObjectInputStream, ObjectOutputStream
등 이 있다.
보조스트림 - ByteArrayInputStream, ByteArrayOutputStream
스트림에서 한번에 모았다 입출력 하는 read(byte[] b)를 사용하는것이 효율적이고 이런 버퍼를 기본적으로 탑재한 보조 스트림 이 존재한다.
입출력 대상이 메모리(바이트 배열) 이므로 close 를 할 필요없다.
public class ByteArrayInputStream extends InputStream {
    // The buffer where data is stored.
    protected byte buf[];
    // The index of the next character
    protected int pos;
}

public class ByteArrayOutputStream extends OutputStream {
    // The buffer where data is stored.
    protected byte buf[];
    // The number of valid bytes in the buffer.
    protected int count;
}
바이트 배열을 read해서 지정한 buffer에 저장.
byte [] inSrc = {0,1,2,3,4,5,6,7,8,9};
byte[] temp = new byte[3];
ByteArrayInputStream bis = new ByteArrayInputStream(inSrc); // 생성자에서 사용할 버퍼를 요구
while (bis.read(temp) > 0) {
    System.out.println(Arrays.toString(temp));
    // 버퍼로부터 read 하기 때문에 속도가 빠르다.
    // [0, 1, 2]
    // [3, 4, 5]
    // [6, 7, 8]
    // [9, 7, 8]
}

ByteArrayOutputStream bos = new ByteArrayOutputStream(5); // default size 32
bos.write(inSrc, 0, 8); // 0 ~ 8 까지 데이터를 내부 buf 에 저장
System.out.println(Arrays.toString(bos.toByteArray())); // [0, 1, 2, 3, 4, 5, 6, 7]
자기 버퍼보다 큰 배열을 write할 경우 2배씩(left shift) 늘려나간다.
writeTo 메서드를 통해 아래처럼 파일에 출력할 수 도 있다.
File fin = new File("uml.png");
InputStream in = new FileInputStream(fin);
File fout = new File("uml_copy.png");
OutputStream out = new FileOutputStream(fout);
byte[] buff = new byte[8000];
int bytesRead = 0;
ByteArrayOutputStream bao = new ByteArrayOutputStream();
while ((bytesRead = in.read(buff)) != -1) {
    bao.write(buff, 0, bytesRead); // 버퍼에 저장
}
bao.writeTo(out);
넓은 크기의 메모리 버퍼를 확보해두고 읽고 쓰기 때문에 속도는 빠르지만 많은 메모리를 필요로 한다.
문자열 전용 보조 스트림으로 CharArrayReader, CharArrayWriter 가 있다.
보조스트림 - PrintWriter
// 쓰기
String name = "박길동";
int kor = 54, mat = 35, eng = 89, tot = kor + mat + eng;
double avg = tot / 3.;
String gender = "남자";

String fileName = "./student.txt";
FileWriter fw = new FileWriter(fileName, true); // append true
PrintWriter pw = new PrintWriter(fw);
pw.printf("%s,%d,%d,%d,%d,%.2f,%b\n",
        name, kor, mat, eng, tot, avg, gender.equals("남자") ? true : false);
pw.close();
fw.close();
// student.txt 파일 생성, "박길동,54,35,89,178,59.33,true" 문자열 저장
// 읽기
String name = null;
int kor, mat, eng, tot;
double avg;
String gender = null;
String fileName = ".\\src\\Student.txt";
FileReader fw = new FileReader(fileName); //append가 true임으로 덮어씌우는게 아닌 추가
Scanner sc = new Scanner(fw);
sc.useDelimiter("\\s*[,\\n]\\s*");
name = sc.next();
kor = sc.nextInt();
eng = sc.nextInt();
mat = sc.nextInt();
tot = sc.nextInt();
avg = sc.nextDouble();
gender = sc.nextBoolean()?"남자":"여자";
System.out.printf("%s,%d,%d,%d,%d,%.2f,%s\n",
		name, kor, mat, eng, tot, avg, gender);

sc.close();
fw.close();
PrintWriter는 우리가 자주쓰는 System.out.println() 명령어에서 out에 해당하는 객체이다
출력 위치가 콘솔에서 파일로 변경되었다 FileWriter의 fw.write(String.format(...)) 방식으로 진행해도 똑같다.
위처럼 저장한후 다시 name, kor, avg, gender 등의 변수에 저장한값을 FileReader를 통해 읽어와 보자.
문자열로 저장했기 때문에 파싱하는 과정에서 정규표현식으로 틀을 지정해주어야 한다.
보조스트림 - DataInputStream, DataOutputStream
데이터 -> 문자열 -> 데이터 변경하는 과정에서 파싱이 필요한데
DataInputStream, DataOutputStream 을 사용하면 데이터 -> 데이터 형식으로 파일 입출력이 가능하다.
// 쓰기
String name = "최길동";
int kor = 80, eng = 79, mat = 97, tot = kor + eng + mat;
double avg = tot / 3.;
String gender = "남자";
String fileName = "./student.txt";
FileOutputStream fos = new FileOutputStream(fileName, true);
DataOutputStream dos = new DataOutputStream(fos);

dos.writeUTF(name);
dos.writeInt(kor);
dos.writeInt(eng);
dos.writeInt(mat);
dos.writeInt(tot);
dos.writeDouble(avg);
dos.writeBoolean(gender.equals("남자") ? true : false);
dos.close();
fos.close();

// 읽기
FileInputStream fis = new FileInputStream(fileName);
DataInputStream dis = new DataInputStream(fis);

String dis_name = dis.readUTF();
int dis_kor = dis.readInt();
int dis_eng = dis.readInt();
int dis_mat = dis.readInt();
int dis_tot = dis.readInt();
double dis_avg = dis.readDouble();
boolean dis_gen = dis.readBoolean();
System.out.printf("%s,%d,%d,%d,%d,%.2f,%s\n",
        dis_name, dis_kor, dis_mat, dis_eng, dis_tot, dis_avg, dis_gen?"남자":"여자");
// 최길동,80,97,79,256,85.33,남자
dis.close();
fis.close();
자료형에 따라 write하는 함수명이 다르지만 위의 단순 FileWriter, FileReader 를 사용하는 것 보단 편하다.
보조스트림 - ObjectInputStream, ObjectOutputStream
DataInputStream, DataOutputStream 이 기본 데이터형을 읽고 쓰는 보조스트림이라면
ObjectInputStream, ObjectOutputStream 은 객체를 데이터화(직렬화) 시켜서 스트림으로 저장, 읽어올때 사용하는 보조클래스이다.
Student클래스 객체를 만들고 직렬화, 파일 입출력이 가능한지 테스트
이 객체를 student.dat에 저장해보자.
@Getter
@Setter
@AllArgsConstructor
public class Student {
    String name;
    int kor;
    int eng;
    int mat;
    int tot;
    double avg;
    boolean gen;
}

Student student = new Student("홍길동", 98, 78, 100, 286, 286 / 3.0, true);
FileOutputStream out = new FileOutputStream("./Student.dat");
ObjectOutputStream oos = new ObjectOutputStream(out);
oos.writeObject(student);
직렬화 시키기 때문에 당연히 바이트 스트림을 사용한다.
ObjectOutputStream 보조스트림을 사용해서 writeObject() 메서드를 통해 데이터를 저장.
실제 dat파일을 메모장으로 열면
ы sr days28.Student덾?d? D avgI engZ genderI korI matI totL namet
Ljava/lang/String;xp@W?UUUU   N   b   d  t 	?띻만??
이런식으로 저장되어 있다.
직렬화 가능한 클래스로 만드려면 implements Serializable 구현이 필수 오버라이딩해야하는 메서드는 없지만 writeObject 에서 Serializable 구현한 객체만 매개변수로 받는다.
보조스트림 - BufferedReader, BufferedInputStream
이름처럼 별도의 메모리공간 Buffered에 읽은 데이터를 일정 수준까지 보관한다.
public static void fileCopy_byte(String original, String copy)
{
	try(FileInputStream fis = new FileInputStream(original);
			FileOutputStream fos = new FileOutputStream(copy);)
	{
		int b = 0;
		while ((b=fis.read())!=-1)
		{
			fos.write(b);
		}
		fos.flush();

	} catch (FileNotFoundException e) {
		// TODO Auto-generated catch block
		e.printStackTrace();
	} catch (IOException e) {
		// TODO Auto-generated catch block
		e.printStackTrace();
	}
}
버퍼 없이 한글자 읽어 파일에 저장하기 때문에 copy파일에도 한글자씩 저장된다.
파일에 실제 입출력이 계속 반복되기 때문에 비효율 적이다.
효율을 위해서 버퍼를 사용한 BufferedInputStream, BufferedOutputStream을 사용하면 된다.
public static void fileCopy_byte_buffer(String original, String copy) //25830900
{
	final int BUFFER_SIZE = 1024;
	byte[] buffer = new byte[BUFFER_SIZE];
	try(	FileInputStream fis = new FileInputStream(original);
			FileOutputStream fos = new FileOutputStream(copy);
			BufferedInputStream bis = new BufferedInputStream(fis, BUFFER_SIZE);
			BufferedOutputStream bos = new BufferedOutputStream(fos, BUFFER_SIZE);)
	{
		int n = 0;
		while((n=bis.read(buffer))!=-1)
		{
			bos.write(buffer, 0, n); //auto flush
		}
		bos.flush();
	}
	catch (FileNotFoundException e) {
		// TODO Auto-generated catch block
		e.printStackTrace();
	}
	catch (IOException e) {
		// TODO Auto-generated catch block
		e.printStackTrace();
	}
}
BufferedOutputStream 에서 파일출력은 write 한다고 바로 파일에 출력되지 않고 입력된 데이터 크기가 기존 가지고 있는 버퍼보다 크거나, 쌓인 데이터 + 입력 데이터가 버퍼보다 크게 될 경우 출력된다(auto flush).
혹은 flush 메서드를 호출하거나 close 하기 직전에도 출력이 이루어진다.
보조스트림 - RandomAccessFile
하나의 클래스로 입출력 모두 가능한 입출력 스트림 클래스.
DataInputStream 처럼 자료형에 바로 접근 가능하다.
이름처럼 파일을 순차적으로 읽어오거나 순차적으로 쓰는게 아닌 특정 위치에서 바로 읽기, 쓰기가 가능하다.
기본적으로 순차적으로 접근하는 다른 스트림에 반해 RandomAccessFile은 아무 곳이나 접근 가능하다
파일 시작에서 8byte 마다 영어점수가 입력됨을 알고 있다면 영어 점수 수정시 모든 데이터를 접근할 필요 없이 해당부분만 읽어오거나 덮어쓰기가 가능하다.
생성자에 파일명과 읽기, 쓰기, 실행 mode를 주어야 한다. (rwx)
String s = "I Love normal Java";
try (RandomAccessFile raf = new RandomAccessFile("./random.txt", "rw")) {
    raf.writeBytes(s);
} catch (Exception e) {
    e.printStackTrace();
}
실행시 random.txt 파일이 만들어지고 안에 I Love normal Java 문자열이 쓰여진다.
String q = "javabook";
try (RandomAccessFile raf = new RandomAccessFile("./random.txt", "rw")) {
    raf.seek(7);
    raf.writeBytes(q);
} catch (Exception e) {
    e.printStackTrace();
}
seek() 메서드를 통해 파일포인터 를 7번째 byte로 이동하고
I Love normal Java -> I Love javabookava 로 뒷 부분이 새로운 문자열로 덮어 씌어진다.
try (RandomAccessFile raf = new RandomAccessFile("./random.txt", "rw")) {
    raf.seek(2);
    String line = raf.readLine();
    System.out.println(line);
} catch (Exception e) {
    e.printStackTrace();
}
2번째 byte로 이동. 뒤의 문자열을 읽어 출력하면 "I " 가 빠진 "Love javabookava" 이 출력된다.
보통 DataInputStream, DataOutputStream과 같이 쓰이는 경우가 많다.
보조스트림 - InputStreamReader
바이트에서 문자 스트림으로 변환해주는 보조 스트림
InputStream is = System.in;
int one = is.read();
대부분의 InputStream 를 구현하는 read 메서드는 1byte를 읽어와 10진수로 반환한다(0 ~ 255).
UTF-8 인코딩을 사용하는 환경에서 키보드로 한글을 입력하면 한 글자가 3byte이기 때문에 read로 읽어오면 앞의 1byte만 잘라오기 때문에 알아볼 수 없다.
이를 온전히 문자단위로 읽어와서 자바에서 사용하는 UTF-16 인코딩으로 바꾸기 위해선
InputStreamReader 라는 바이트 스트림을 문자스트림으로 변환해주는 보조스트림이 필요하다.
char[] buffer = new char[BUFFER_SIZE];
InputStreamReader isr = new InputStreamReader(is);
int n = isr.read(buffer);
InputStreamReader 내부에서 StreamDecoder의 read() 메서드를 호출해서 키보드에 친 문자들을 읽는다.
3byte 문자를 자동으로 2byte로 변환해서 read()하고 buffer에 저장하는 방식이다.
우리가 예전에 사용했던 BufferedReader 로 키보드입력을 받는것도 InputStreamReader 보조클래스를 사용해서 받아온다.
BufferedReader br = new BufferedReader(new InputStreamReader(System.in));
InputStream을 보조스트림인 InputStreamReader 로 받아서 문자형태로 받을수 있도록 하고
Buffer가 있는 보조스트림인 BufferedReader 로 받아서 문자열형태로 받을 수 있도록 하여 입력이 빨라진다.
아래 링크에서 사용예제 확인
File 객체
파일의 정보를 갖고있는 File클래스
크기, 속성, 이름, 등의 정보를 메스돌 가져올 수 있음.
파일객체를 통해 디렉토리 생성, 삭제, 등등도 가능하다.
객체 생성은 보통 파일 이름을 문자열로 전달해서 생성한다.
File - separator, separatorChar
OS 마다 사용하는 이름 구분자가 다르다. 윈도우는 \ 리눅스는 /
separator, separatorChar static 메서드를 통해 구분자를 가져올 수 있다.
File - isFile, isDirectory, canExecute, canRead, canWrite, length, lastModified
생성된 File 객체가 디렉토리인지 파일인지 boolean 으로 반환
File f1 = new File("C:\\Users\\kgy19\\Desktop\\write_copy.exe"); //file
File f2 = new File("C:\\Users\\kgy19\\Desktop"); //directory
System.out.println(f1.isFile()); // true
System.out.println(f2.isDirectory()); // true
File f1 = new File("C:\\Users\\kgy19\\Desktop\\write_copy.exe");
File f2 = new File("C:\\Users\\kgy19\\Desktop");

System.out.println(f1.canExecute()); // true
System.out.println(f2.canExecute()); // true 디렉토리도 실행파일이라고 취급하는듯

System.out.println(f1.canRead()); // true
System.out.println(f1.canWrite()); // true
// 파일 속성탭에서 금지하지 않는한 true
Date date = new Date(f1.lastModified());
System.out.println(f1.length()); // 11264 byte 단위
System.out.println(f1.lastModified()); // 1536996564705
System.out.println(date.toLocaleString()); // 2018. 9. 15 오후 4:29:24
File - getName, getParent, getPath, getCanonicalPath, getAbsolutePath
파일명 얻어오기, 소속 디렉터리명 얻어오기
File f1 = new File("C:\\Users\\kgy19\\Desktop\\write_copy.exe");
File f2 = new File("C:\\Users\\kgy19\\Desktop");

System.out.println(f1.getName()); // write_copy.exe
System.out.println(f2.getName()); // Desktop
System.out.println(f1.getParent()); // C:\Users\user\Desktop
System.out.println(f2.getParent()); // C:\Users\user
단 File 객체를 처음에 상대경로로 지정시 getParent 에서 상대경로를 출력한다.
File f1 = new File(".\\src\\write.exe");
System.out.println(f1.getName()); // write.exe
System.out.println(f1.getParent()); // .\src
File f3 = f1.getParentFile(); 현재 디렉토리를 File 객체로 받을 수 도 있다.
File f1 = new File("/Users/user/Documents/java/nio-socket/uml.png"); //file
File f2 = new File("./uml.png"); //상대경로 표시
System.out.println(f1.getPath()); // /Users/user/Documents/java/nio-socket/uml.png
System.out.println(f2.getPath()); // ./uml.png
System.out.println(f1.getAbsolutePath()); // /Users/user/Documents/java/nio-socket/uml.png
System.out.println(f2.getAbsolutePath()); // /Users/user/Documents/java/nio-socket/./uml.png
System.out.println(f1.getCanonicalPath()); // /Users/user/Documents/java/nio-socket/uml.png
System.out.println(f2.getCanonicalPath()); // /Users/user/Documents/java/nio-socket/uml.png
f1 의 경우 어떤값을 쓰던 일정하게 절대경로가 출력된다.
f2 의 경우 상대경로로 File 객체를 생성했는데 getCanonicalPath를 사용해야 절대경로가 출력된다.
String pathname = "C:\\Class\\JavaClass\\javaPro";
File file = new File(pathname);

// 폴더 안에 있는 서브폴더+파일
String [] fileList = file.list();
for (int i = 0; i < fileList.length; i++) {
	//System.out.println( fileList[i]);
	File f = new File(fileList[i]);
	if( f.isDirectory()) {
		System.out.print("[폴더]");
	}else {
		System.out.print("[파일]");
	}

	System.out.printf(" %s  \t%s\t%d bytes\n"
			,  new Date( f.lastModified() ).toLocaleString()
			, f.getName(), f.length() );
}
출력값
[파일] 2018. 12. 24 오후 11:46:51  	.classpath	232 bytes
[폴더] 2019. 2. 12 오전 2:05:51  	.git	4096 bytes
[파일] 2018. 12. 24 오후 11:46:51  	.gitignore	6 bytes
[파일] 2019. 1. 2 오전 11:49:49  	.project	645 bytes
[폴더] 2018. 12. 28 오후 2:58:48  	.settings	0 bytes
[폴더] 2019. 2. 12 오전 1:10:37  	bin	4096 bytes
[파일] 2019. 2. 7 오후 2:20:17  	fos_save.dat	14 bytes
[파일] 2019. 2. 7 오후 4:11:58  	msg.ini	108 bytes
[파일] 2019. 2. 7 오후 12:25:01  	score2.dat	80 bytes
[폴더] 2019. 2. 11 오후 2:01:21  	src	4096 bytes
[파일] 2019. 1. 4 오전 10:22:09  	단축키 모음	7693 bytes
[파일] 2019. 2. 1 오전 9:36:29  	자바IO.PNG	39375 bytes
File - exists, mkdirs
exist는 파일이 이미 존재하는지 true, false로 반환.
mkdirs는 상위디렉토리까지 모두 생성.
바탕화면 test폴더 안에 20190212(화) 형식으로 폴더를 다시 만들어보자.
날짜를 위해 LocalDate를 사용, 날짜 출렷 포멧을 위해 DateTimeFormatter사용,
File의 생성자에 저장될 폴더 절대경로와 저장할 파일(폴더)명을
parent와 child로 전달.
LocalDate today = LocalDate.now();
LocalDate dt = LocalDate.now();
String pattern = "yyyyMMdd(E)";
DateTimeFormatter df = DateTimeFormatter.ofPattern(pattern);
System.out.println(dt.format(df)); 20190212(화)
String parent = "C:\\Users\\user\\Desktop\\test";
String child = dt.format(df);
File file = new File(parent, child );
if(file.exists())
{
	if(file.delete())
		System.out.println("폴더삭제...");
	else
		System.out.println("삭제 실패...");
}
if(file.mkdirs())
{
	System.out.println("성공");
}
출력값
20190212(화)
폴더삭제...
성공
기존에 폴더가 존재했다면 폴더를 삭제하고 다시 만든다.
자식 폴더, 파일 모두 출력하기
재귀함수를 사용, 디렉토리면 반복, 파일이면 출력하고 반환하여 파일 디렉토리 목록을 출력
public static void main(String[] arg) {
    String pathname = "C:\\Users\\kgy19\\Desktop";
    File file = new File(pathname);
    findInDiectory(file, 0);
}

private static void findInDiectory(File file, int gap) {
    File[] fileList = file.listFiles();
    SimpleDateFormat sdf = new SimpleDateFormat("yyyy-MM-dd HH:mma");

    for (int i = 0; i < fileList.length; i++) {
        File f = fileList[i];
        if( f.isDirectory()) {
            for (int j = 0; j < gap; j++) {
                System.out.print(" ");
            }
            System.out.printf("%s %3s %6s %s\n", sdf.format(new Date(f.lastModified())),
                    "DIR", f.length()+"byte", f.getName());
            findInDiectory(f, gap+2);
        }else {
            for (int j = 0; j < gap; j++) {
                System.out.print(" ");
            }
            System.out.printf("%s %3s %6s %s\n", sdf.format(new Date(f.lastModified())),
                    "FILE", f.length()+"byte", f.getName());
        }
    }
}
출력값
2018-12-16 15:53오후 FILE 436byte desktop.ini
2019-01-13 18:17오후 FILE 597byte eclipse.exe - 바로 가기.lnk
2019-02-07 15:30오후 DIR 4096byte sysinternals
  2019-01-17 03:09오전 FILE 3172062byte HxDSetup.exe
  2018-12-18 23:13오후 DIR  0byte ProcessExplorer
    2018-07-19 06:57오전 FILE 7490byte Eula.txt
    2018-11-17 08:22오전 FILE 72154byte procexp.chm
    2018-11-17 08:22오전 FILE 2703128byte procexp.exe
    2018-11-17 08:22오전 FILE 1449008byte procexp64.exe
  2018-12-18 23:12오후 DIR  0byte ProcessMonitor
    2017-11-16 11:34오전 FILE 7490byte Eula.txt
    2018-02-12 15:22오후 FILE 63582byte procmon.chm
    2018-02-12 15:30오후 FILE 2164360byte Procmon.exe
  2019-02-12 20:55오후 DIR  0byte VMMap
    2018-07-19 06:57오전 FILE 7490byte Eula.txt
    2018-11-08 05:08오전 FILE 51747byte Vmmap.chm
    2018-11-08 05:08오전 FILE 1270504byte vmmap.exe
2019-02-12 20:19오후 DIR  0byte test
  2019-02-12 20:19오후 DIR  0byte 20190212(화)
2018-12-04 11:17오전 FILE 1499byte Visual Studio 2017.lnk
2019-02-07 09:50오전 FILE 1178byte Visual Studio Code.lnk
2018-09-15 16:29오후 FILE 11264byte write_copy.exe
2019-02-01 16:23오후 FILE 13764byte 취업문제.txt
2019-02-11 12:19오후 FILE  0byte 취업문제_copy.txt
io.socket
작성 예정…