java 8 - 람다, 스트림!
Java 8 - 개요
Java5에서 제너릭이어 자바 역사상 가장 큰 변화가 일어난 업데이트,
이 포스트에선 자바 8 에서 추가된 새로운 문법들을 소개한다.
간단히 어떤 변화가 일어났는지 알아보자.
List<Apple> inventory = Arrays.asList(
  new Apple(80,"green"),
  new Apple(155, "green"),
  new Apple(120, "red"));
Apple 객체의 색, 무게를 필터링 하려면 함수를 작성해야 했다.
public static List<Apple> filterGreenApples(List<Apple> inventory){
  List<Apple> result = new ArrayList<>();
  for (Apple apple: inventory){
    if ("green".equals(apple.getColor())) {
      result.add(apple);
    }
  }
  return result;
}

public static List<Apple> filterHeavyApples(List<Apple> inventory){
  List<Apple> result = new ArrayList<>();
  for (Apple apple: inventory){
    if (apple.getWeight() > 150) {
      result.add(apple);
    }
  }
  return result;
}
겨우 필터링 몇개 하는 거지만 코드가 20줄이 넘어간다.
필터링 조건이 추가될 수록 함수는 많아지고 코드또한 길어진다.
Predicate 를 사용해 코드 자체를 인자로 전달할 수 있다.
public interface Predicate<T> {
  boolean test(T t);
}
인자값을 받아 참, 거짓 을 반환한는 간단한 함수하나 정의된 인터페이스
public static List<Apple> filterApples(List<Apple> inventory, Predicate<Apple> p){
  List<Apple> result = new ArrayList<>();
  for(Apple apple : inventory){
    if(p.test(apple)){
      result.add(apple);
    }
  }
  return result;
}
이러한 방식을 동작 파라미터 방식이라 하고 전략 디자인 패턴을 사용한 코드이다.
Predicate 가 필터링할 파라미터를 동적으로 전달해 필터링 할 수 있도록 하는 방식이다,
이제 필터링 조건만 추가정의하면 된다.
// 동작 파라미터들
public static boolean isGreenApple(Apple apple) {return "green".equals(apple.getColor());}
public static boolean isHeavyApple(Apple apple) {return apple.getWeight() > 150;}
......

List<Apple> greenApples = filterApples(inventory, FilteringApples::isGreenApple);
isGreenApple 메서드를 test 메서드의 구현메서드로 적용해 Predicate 의 구현 클래스 인스턴스가 생성되고 매개변수로 전달된다.
말 그대로 코드 자체를 인자로 전달하는 방식이다.
여기서 람다를 사용하면 좀더 간략화된다.
List<Apple> greenApples = filterApples(inventory, (Apple a) -> "green".equals(a.getColor())));
한번만 사용하는 메서드라면 굳이 정의할 필요 없이 람다로 적용해버리자.
어쩌면 위의 20줄 짜리 코드가 한줄로 끝날 수 도 있다.
멀티코어 CPU가 보급화되면서 위의 개념에서 병령개념이 추가된다.
스트림이다!
스트림 개념은 유닉스 명령어에서도 사용된다.
cat file1 file2 | tr "[A-Z] "[a-z]" | sort | tail -3
tr은 translate 의 약어로서, 지정한 문자를 바꾸어주거나 삭제하는 명령
대문자A-Z를 소문자a-z로 치환
sort 명령은 병렬형식으로 출력받은 file1, file2 문자열 데이터를 입력받고 출력한다.
cat, tr 명령이 완료되기 전에 sort 명령은 데이터를 전달받고 일하기 시작한다.
자동차 수리공장에 수십대의 자동차가 들어와도 각각의 엔지니어가 맡은 일을 처리하고 다음 부서로 넘겨주면서 수십대의 자동차를 동시에 수리하듯이
위와 같은 작업을 구성하려면 여러개의 스레드와 콜백 함수를 정의해야 하지만 자바의 추상 클레스를 통해 쉽게 병렬 구조를 구현할 수 있다.
List<Apple> greenApples = inventory
  .stream()
  .filter((Apple a) -> a.getColor().equals("green"))
  .collect(toList());
List<Apple> greenApples = inventory
  .parallelStream()
  .filter((Apple a) -> a.getColor().equals("green"))
  .collect(toList());
동작 파라미터
사과의 색, 무게를 모두 필터링 하려면 어떤 메서드를 정의해야 하는지, Java8 에선 어떤식으로 처리할 수 있는지 알아보자.
Java8 이전에 아래와 같은 코드로 필터링 할 수 있다.
public static List<Apple> filterApples(List<Apple> inventory, String color, int weight, boolean flag){
  List<Apple> result = new ArrayList<>();
  for(Apple apple : inventory){
    if ((flag && apple.getColor().equals(color)) || (!flag && apple.getWeight() > weight))
      result.add(apple);
  }
  return result;
}
flag 가 true 일땐 color, flag 가 false 일땐 weight 를 기준으로 필터링한다.
List<Apple> greenApples = filterApples(inventory, "green", 0, true);
List<Apple> heavyApples = filterApples(inventory, "", 150, false);
함수내부를 뜯어보지 않는한 절대로 알수 없는 코드이다.
Java8 의 동적파라미터를 사용하면 간결하고 유연성있는 코드 작성이 가능하다.
public static List<Apple> filterApples(List<Apple> inventory, ApplePredicate p){
  List<Apple> result = new ArrayList<>();
  for(Apple apple : inventory){
    if(p.test(apple)){
      result.add(apple);
    }
  }
  return result;
}
Predicate<Apple> p 가 동작 파라미터 역할을 하면 어떤 비교를 할건지 내부에 정의한다.
동작 파라미터로 사용될 수 있는 클래스 정의
public interface ApplePredicate {
  boolean test(Apple apple);
}
public static class AppleWeightPredicate implements ApplePredicate {
  public boolean test(Apple apple) {
    return apple.getWeight() > 150;
  }
}
public static class AppleGreenColorPredicate implements ApplePredicate {
  public boolean test(Apple apple) {
    return apple.getColor().equals("green");
  }
}
...
...
List<Apple> greenApples = filterApples(inventory, new AppleGreenColorPredicate());
이제 새로운 필터링 조건이 추가될때 마다 ApplePredicate 를 적절히 구현한 클래스만 정의하면 된다.
클래스, 익명클래스, 람다
동작 파라미터 타입으로 인터페이스가 들어가다 보니 이를 구현하는 인스턴스로 클래스, 익명클래스, 람다 를 사용 가능하다.
List<Apple> greenApples = filterApples(inventory, new AppleGreenColorPredicate());

List<Apple> greenApples = filterApples(inventory, new ApplePredicate() {
  public boolean test(Apple a) {
    return a.getColor().equals("green");
  }
});

List<Apple> greenApples = filterApples(inventory, (Apple a) -> a.getColors().equals("green"));
추상화 with 동작 파라미터
프로그램이 커질수록 사용 객체도 많아지며 필터링할 객체가 Apple 하나뿐이라는 건 장담할 수 없다.
public static <T> List<T> filter(List<T> list, Predicate<T> p) {
  List<T> result = new ArrayList<>();
  for(T elem : list) {
    if(p.test(elem))
      result.add(elem)
  }
  return result;
}
List 객체를 제너릭을 사용해 추상화 함으로
이제 Apple 뿐 아니라 Banana, Grape 와 같은 객체들도 필터링할 수 있게 되었다.
제너릭과 동작 파라미터를 사용하면 유연하고 가독성 좋은 코드를 쉽게 작성할 수 있다.
람다
동작 파라미터에 메서드를 전달할때 익명 함수 형식으로 좀더 간편하게 전달할 수 있도록 하는 문법
int method() {
  rturn (int) (Math.random() * 5) + 1;
}
() -> (int)(Math.random() * 5) + 1
매서드명을 생략하고 ->기호가 추가되며 연산된 값은 당연히 반환값이다.
특이한건 매개변수 타입, 반환값 타입이 모두 생략되는데 추론을 통해 타입이 결정된다.
public int bigger(int a, int b) {
  return a > b ? a : b
}
위의 메서드를 람다식으로 변경해보자.
(int a, int b) -> a > b ? a : b
(a, b) -> { return a > b ? a : b; }
(a, b) -> a > b ? a : b
위 3개 람다식은 모두 동작하며 같은 기능을 수행한다.
매개변수 타입 생략이 가능하며
람다식이 한줄로 끝날경우 중괄호와 세미콜론 생략이 가능한데 이를 표현식(expression) 이라 한다.
반대로 세미콜론과 같이 사용하는 구문(statement) 를 사용하려면 중괄호와 리턴문이 반드시 사용되어야 한다.
주의사항: 람다식에
return을 사용한다면 중괄호 생략은 불가능하다. 중괄호를 사용했다면 뒤에 세미콜론이 필요하다.
만약 매개변수를 단 하나만 타입을 추론해서 사용한다면 소괄호를 생략가능하다.
(a) -> a * a
a -> a * a
함수형 인터페이스, 익명 클래스, 람다
함수형 인터페이스란 Predicate<T> 와 같은 오직 하나의 추상메서드만 정의된 인터페이스이다.
Predicate<T>와 더불어 Comparator<T>, Runnable<T> 같은 인터페이스들을 함수형 인터페이스라 할 수 있다.
함수형 인터페이스는 @FunctionalInterface어노테이션으로 명시적으로 표기한다. 추상 메서드가 2개 이상 정의되면 에러를 반환한다.
@FunctionalInterface
interface MyFunction {
    void myMethod();
}
람다는 이런 함수형 인터페이스를 매개변수로 사용하는 모든 메서드에서 사용할 수 있다.
사실 람다식도 자바의 원칙인 모든 메서드는 클래스 내부에 정의되어야 하는 법칙에서 벗어날 수 없다.
함수형 인터페이스의 람다식을 생성하면 해당 인터페이스를 구현한 클래스가 정의되고 해당 인터페이스를 구현한 익명객체가 생성되어 익명객체의 메서드가 호출된다.
람다식을 사용 안한다면 아래 처럼 익명 객체를 new 연산자로 생성해야 한다.
@FunctionalInterface
interface MyFunction {
    void myMethod();
}

public class App
{
    public static void aMethod(MyFunction f) {
        f.myMethod();
    }

    public static void main( String[] args )
    {
        MyFunction f = new MyFunction(){
            public void myMethod() {
                 System.out.println("Hello ramda");
            }
        };
        aMethod(f);
    }
}
MyFunction를 구현한 객체를 생성하여 f에 대입, f객체를 aMethod()에 매개변수로 전달한다.
aMethod 는 전달받은 f 객체의 myMethod 를 호출하기에 익명객체로 구현한 println 이 실행된다.
람다를 사용하면 아래처럼 가능.
public static void main( String[] args )
{
    aMethod(() -> System.out.println("Hello ramda"));
}
파라미터도, 반환값도 없지만 람다가 알아서 추론해 MyFunction 구현객체로 반환한다.
이는 Collection.sort메서드 같이 요구하는 인터페이스 구현 클래스를 위해 일일이 @Override... 함수명(){...}형식을 지켜 익명객체를 생성할 필요 없이 람다식 한줄로 끝낼 수 있단 뜻이다.
기존에 Collection.sort를 사용해 리스트를 정렬하려면 Comparator<T> 함수형 인터페이스를 구현한 클래스를 sort의 매개변수로 전달해야 했다.
List<String> list = Arrays.asList("aaa", "abc", "bbb", "bbd", "ddd", "adb");
Collection.sort(list, new Comparator<String>() {
  public int compare(String s1, String s2) {
    return s2.compateTo(s1);
  }
});
람다식이 익명객체를 대체할 수 있기 때문에 아래와 같이 간결하게 변경 가능하다.
List<String> list = Arrays.asList("aaa", "abc", "bbb", "bbd", "ddd", "adb");
Collection.sort(list, (s1, s2) -> s2.compateTo(s1));
java 내부를 살펴보면
Comparator<T>역시 함수형 인터페이스를 뜻하는 어노테이션을 위에 달고 있다.@FunctionalInterface public interface Comparator<T>
람다식의 타입, 형변환
어쩃건 MyFunction 함수형 인터페이스를 구현한 익명객체를 람다식으로 만들어 변수에 매핑시키는 과정이기에 내부적으로 아래처럼 형변환 과정이 일어난다.(업 캐스팅이기에 생략가능하다)
public static void main( String[] args )
{
    MyFunction f = (MyFunction)() -> {System.out.println("Hello ramada");};
    aMethod(f);
}
그렇다면 모든 객체의 상위 객체인 Object에 함수형 인터페이스를 매칭할 수 있을까?
Object 에 함수형 인터페이스를 구현한 람다를 참조시켜 보자.

되지 않는다.
에러문구에선 오직 함수형 인터페이스로만 형변환이 가능하다고 출력된다.
이는 System.out.println()같이 Object를 매개변수로 받는 클래스에게 바로 람다식으로 만들어진 익명객체를 사용 불가능하다는 뜻이다.
또한 객체라면 모두 가지고 있을 toString과 같은 Object의 기본메서드 또한 사용할 수 없다.
자바 컴파일러에서 일반 익명객체를 생성하는 것과 다르게 람다식의 익명객체를 생성하기 때문…
공통 함수형 인터페이스
Object 클래스로 업캐스팅 하지 못하는 것은 자바 장점인 다형성에 위배된다.
람다식을 사용할 수 있는 메서드를 정의하기 위해서 항상 매개변수 1개, 매개변수 2개 짜리 함수형 인터페이스를 선 정의후 사용해야 할까?
이런 과정을 생략하기 위해 이미 java.util.function패키지에 해당 함수형 인터페이스를 모두 구현해 두었다.
| 함수형 인터페이스 | 메서드 | 설명 |
|---|---|---|
Predicate<T> |
boolean test(T t) |
매개변수는 하나, 반환값은 boolean |
Consumner<T> |
void accept(T t) |
매개변수는 있고 반환값은 없음 |
Function<T, R> |
R apply(T t) |
매개변수, 반환값 모두 있음, R은 반환값 타입 |
Supplier<T> |
T get() |
매개변수는 없고 반환값은 있음 |
Runnable |
void run() |
매개변수, 반환값 모두 없음 |
매개변수, 반환값 타입 또한 제너릭으로 정의되어 있기 때문에 동적으로 람다식을 작성할 수 있다.
물론 매개변수가 3개 이상인 특별한 람다식을 작성하고 Object로 업캐스팅까지 해야 한다면 직접 FunctionalInterface를 만들어야 한다.
이제 사과 색깔, 무게 필터링하자고 AppleWeightPredicate, AppleGreenPredicate 같은 함수형 인터페이스 정의를 할 필요가 없다.
메서드 레퍼런스
이미 정의된 메서드가 있다면 람다식을 새로 생성하는 것 보다 기존의 메서드를 재활용 하는게 효율적이다.
이미 위에서 한번 사용한 적이 있다.
List<Apple> greenApples = filterApples(inventory, FilteringApples::isGreenApple);
메서드 레퍼런스로 static 메서드, 상위객체의 메서드, 인스턴스 메서드 모두 사용 가능하며 아래와 같은 형식으로 사용할 수 있다.
List<String> strList = Arrays.asList("a", "b", "c", "d");
strList.sort((s1, s2)->s1.compareToIgnoreCase(s2));


List<String> strList = Arrays.asList("a", "b", "c", "d");
strList.sort(String::compareToIgnoreCase);
어차피 동작파라미터의 매개변수, 타입, 반환값 모두 이미 정의되어 있는 상황이기에 메서드 참조값만 전달한다.
람다식을 사용하면 기존의 익명 클래스 정의할 필요 없이 코드 간략화가 가능하였다.
inventory.sort(new AppleComparator() {
  public int compare(Apple a1, Apple a2) {
    return a1.getWeight().compareTo(a2.getWeight());
  }
});
inventory.sort((a1, a2) -> a1.getWeight().compareTo(a2.getWeight()));
여기서 Comparator 객체를 생성하는 comparing 메서드를 사용하면 좀더 간략화 할 수 있다.
import static java.util.Comparator.comparing;
inventory.sort(comparing((a) -> a.getWeight()));
여기서 메서드 레퍼런스를 사용하면 조금 더 간략화 할 수 있는데 아래와 같다.
import static java.util.Comparator.comparing;
inventory.sort(comparing(Apple::getWeight));
람다 표현식 조합 조합
람다 표현식을 사용해 익명 클래스를 쉽게 정의(구현)할 수 있는 방법을 알았다.
Predicate, Comparator, Function 3가지 함수는 각종 람다식을 조합해 익명클래스를 구현할 수 있다.
Predicate 조합
public class FilteringApples {
  public static boolean isRedApple(Apple apple) {
    return "red".equals(apple.getColor());
  }
  public static boolean isHeavyApple(Apple apple) {
    return apple.getWeight() > 150;
  }
  public static List<Apple> filterApples(List<Apple> inventory, Predicate<Apple> p) {
    List<Apple> result = new ArrayList<>();
    for (Apple apple : inventory) {
      if (p.test(apple)) {
        result.add(apple);
      }
    }
    return result;
    }
}

public class MainApplication {
  public static void main(String... args) {
    Predicate<Apple> redApple = FilteringApples::isRedApple;
    Predicate<Apple> redAndHeavyApple = redApple.and(FilteringApples::isHeavyApple);
    ...
    ...
    List<Apple> result = filterApples(inventory, redAndHeavyApple);
  }
}
and(), or() 메서드를 사용해 조합이 가능하다.
메서드 레퍼런스 없이 사용한다면 아래와 같이 정의할 수 있다.
Predicate<Apple> redAndHeavyApple =
  ((Predicate<Apple>) a -> a.getColor().equals("red"))
  .and(a -> a.getWeight() > 150);
Comparator 조합
기존 정렬 방식은 Comparator 객체를 람다나 메서드 레퍼런스로 구현하거나
해당 구역할을 하는 comparing 메서드를 사용하였다.
inventory.sort(comparing(Apple::getWeight));
여기서 reversed(), thenComparing() 메서드를 더해 역정렬, 추가 정렬 조건을 조합할 수 있다.
inventory.sort(
  comparing(Apple::getWeight)
    .reversed()
    .thenComparing(Apple::getColor)
);
무게별로 역정렬하고 서로 값이 같다면 색깔별로 추가정렬한다.
Function 조합
T를 받아 R을 반환하는 구조의 메서드를 정의할때 Function<T, R> 형식의 함수형 인터페이스를 사용한다.
andThen(), compose() 메서드를 조합해 두개 이상의 메서드를 하나로 합칠 수 있다.
Function<Integer, Integer> f = x -> x + 1;
Function<Integer, Integer> g = x -> x * 2;
Function<Integer, Integer> h = f.andThen(g);
h.apply(1); // 4
h(x) = g(f(x)) 형식으로 표현할 수 있다.
Function<Integer, Integer> f = x -> x + 1;
Function<Integer, Integer> g = x -> x * 2;
Function<Integer, Integer> h = f.compose(g);
h.apply(1); // 3
h(x) = f(g(x)) 형식으로 표현할 수 있다.
스트림
거의 모든 자바 어플리케이션은 컬렉션을 만들고 처리하는 과정을 포함한다.
그리고 거진 대부분의 반복잡업들이 지루하게 연속된다.
이런 반복 잡업을 병렬작업으로 처리하면서도 짧고 간결한 코드를 사용할 수 있도록 지원하는것이 스트림이다.
@Data
public class Dish {
  public enum Type {MEAT, FISH, OTHER}

  private final String name;
  private final boolean vegetarian;
  private final int calories;
  private final Type type;

  public static final List<Dish> menu =
    Arrays.asList(
      new Dish("pork", false, 800, Dish.Type.MEAT),
      new Dish("beef", false, 700, Dish.Type.MEAT),
      new Dish("chicken", false, 400, Dish.Type.MEAT),
      new Dish("french fries", true, 530, Dish.Type.OTHER),
      new Dish("rice", true, 350, Dish.Type.OTHER),
      new Dish("season fruit", true, 120, Dish.Type.OTHER),
      new Dish("pizza", true, 550, Dish.Type.OTHER),
      new Dish("prawns", false, 400, Dish.Type.FISH),
      new Dish("salmon", false, 450, Dish.Type.FISH)
    );
}
위와 같은 코드가 있을때 calories 가 400을 넘지 않고 calories 로 정렬된 요리 이름을 3개까지 List<String> 로 뽑아내려면 아래와 같은 과정을 거친다.
List<Dish> lowCaloricDishes = new ArrayList<>();
for(Dish d: Dish.menu){
  if(d.getCalories() > 400){
    lowCaloricDishes.add(d);
  }
}
lowCaloricDishes.sort(comparing(Dish::getCalories));
List<String> lowCaloricDishesName = new ArrayList<>();
for (int i = 0; i < 3 && i < lowCaloricDishes.size(); i++) {
  lowCaloricDishesName.add(lowCaloricDishes.get(i).getName());
}
return lowCaloricDishesName;
/* salmon
french fries
pizza */
이를 stream() 을 사용하면 아래와 같이 사용할 수 있다.
import static java.util.Comparator.comparing;
import static java.util.stream.Collectors.toList;
...
...
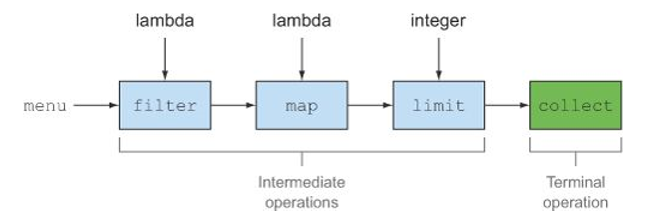
return Dish.menu.stream()
// return Dish.menu.parallelStream()
.filter(d -> d.getCalories() > 400) // 스트림에서 특정 요소를 제외
.sorted(comparing(Dish::getCalories)) //
.map(Dish::getName) // 람다를 이용해 다른 요소로 변환, 추출
.limit(3) // 스트림의 크기를 최대 3개로 축소
.collect(toList()); // stream 을 list 로 변경

각 함수가 파이프라인을 구성하여 데이터 처리연산을 진행한다.
linux 의
cat file1 | tr "[A-Z]" "[a-z]" | sort | tail -3명령어와 같이 파이프를 사용해 명령끼리 연결
스트림과 콜렉션
컬렉션과 스트림 모두 연속된 데이터를 순차적으로 접근한다.
이 둘의 차이를 시각적으로 표현하면 동영상을 DVD 로 보냐, 인터넷 스트리밍으로 보냐 로 구분지을 수 있다.
데이터를 언제 연산하느냐가 스트림과 콜렉션의 가장 큰 차이점이다.
컬렉션은 데이터를 사용하든 안하든 일단 모두 메모리상에 저장해두고 계산을 진행하고
스트림은 요청할 때만 요소를 계산할 수 있는 자료구조이다.(스트림에 요소를 추가하거나 제거할 수 없다)
콜렉션과 다르게 스트림은 단 한번만 탐색할 수있다. (Iterator 와 같다)
만약 다시 탐색하려면 초기데이터에서 새로운 스트림을 다시 만들어야 한다.
List<String> title = Arrays.asList("Java8", "In", "Action");
Stream<String> s = title.stream();
s.forEach(System.out::println);
s.forEach(System.out::println); // IllegalStateException 발생
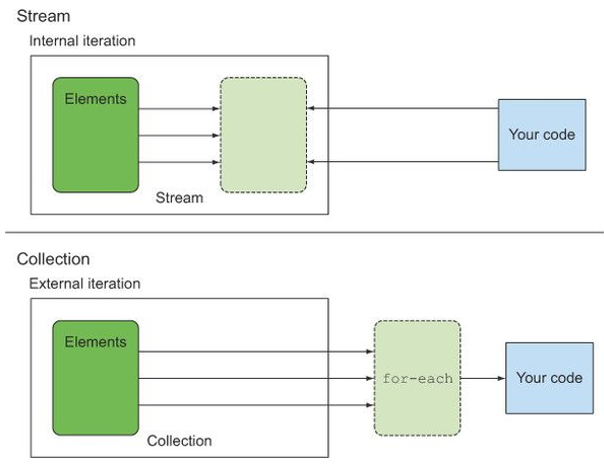
콜렉션은 외부반복, 스트림은 내부반복을 사용한다.
콜렉션을 탐색하려면 for 문등을 사용해 외부에서 루프를 돌지만
스트림은 파이프라인을 실행할 뿐 외부적으로 반복 구문을 표기하지 않는다.
내부반복을 통해 병렬 작업을 투명하게, 다양한 순서로 처리할 수 있다.
만약 외부 반복(forEach등)을 통해 병렬 작업을 진행 하려면 synchronize 구문을 사용해 복잡한 코드를 구성해야 한다.
스트림 중간/최종 연산
스트림을 통해 실제 연산(중간 연산과정)이 이루어 지는 타이밍은 최종연산 때이다.
실행 과정을 알기 위해 중간중간에 print 를 통해 요소를 출력
List<String> list = dishes.parallelStream()
  .limit(3)
  .filter(d -> {
    System.out.println("filtering: " + d.getName() + ", calories: " + d.getCalories());
    return d.getCalories() > 400;
  })
  .map(d -> {
    System.out.println("mapping: " + d.getName() + ", calories: " + d.getCalories());
    return d.getName();
  })
  .collect(toList());
  System.out.println(list);
- 출력 결과
filtering: beef, calories: 700
filtering: pork, calories: 800
filtering: chicken, calories: 400
mapping: pork, calories: 800
mapping: beef, calories: 700
[pork, beef]
쇼트 서킷 - limit 로 인해 첫째 조건에 해당하는 3가지 요소만 가져오고 더이상의 요소는 돌지 않는다.
루프 퓨전 - 중간 연산(filter, map) 을 한과정으로 병합
중간 연산
| 연산 | 반환형식 | 연산의 인수 | 함수 디스크립터 | 목적 |
|---|---|---|---|---|
filter |
Stream<T> |
Predicate<T> |
T -> boolean |
조건에 부합하는 요소 필터링 |
map |
Stream<T> |
Fcuntion<T, R> |
T -> R |
요소 변환/추출 |
limit |
Stream<T> |
n개 요소만 포함 | ||
sorted |
Stream<T> |
Comparator<T> |
(T, T) -> int |
요소 정렬 |
distinct |
Stream<T> |
중복 요소 필터링 | ||
skip |
Stream<T> |
첫 n개 요소 스킵 |
최종 연산
| 연산 | 목적 | 반환값 |
|---|---|---|
forEach |
스트림의 각 요소 소비(람다 사용) | 반환값 없음 |
count |
스트림의 각 요소 개수 반환 | long |
collect |
스트림을 리듀스, 리스트, 맵 등의 컬렉션 생성 | Collection |
anyMatch |
Predicate 가 적어도 한 요소와 일치하는지 확인 |
boolean |
allMatch |
Predicate 가 모든 요소와 일치하는지 확인 |
boolean |
noneMatch |
Predicate 가 모든 요소와 일치하지 않는지 확인 |
boolean |
findAny |
Predicate 가 일치하는 한 요소 반환 |
Optional<T> |
findFirst |
Predicate 가 일치하는 첫 요소 반환 |
Optional<T> |
병령 처리시에는 findAny 를 사용해야 하며 그 외의 경우는 findAny, findFirst 결과값은 같다.
anyMatch allMatch noneMatch findAny findFirst 모두 쇼트 서킷이 적용된다.
하나의 일치하는 요소를 찾으면 모든 stream 을 돌지 않고 끝낸다.
Optional
java 8 에 추가된 null 처리를 쉽게 해결하기 위해 만들어진 객체
isPresent() - 값의 존재 여부에 따라 boolean 값 반환
isPresent(Consumer<T> block) - 값이 존재하면 block의 구현 메서드 실행
T get() - 값이 존재하면 반환, 없으면 NoSuchElementException예외 발생
T orElse(T other) - 값이 존재하면 반환, 없으면 작성한 other 반환
기타 연산 메서드
flatMap
스트림을 통해 words 를 letters 처럼 변경하고 싶을 때
List<String> words = Arrays.asList("Hello", "World");
// word -> letters 로 변경
List<String> letters = Arrays.asList("H", "e", "l", "l", "o", "W", "o", "r", "l", "d");
Stream<List<String>> -> Stream<String[]> -> Stream<String>
위처럼 변환과정을 거쳐야한다.
단순하게 map() 을 사용해서도 해결될 것 같지만 결과는 그렇지 않다.
List<String> words = Arrays.asList("Hello", "World");
Stream<String[]> stream = words.stream().map(word -> word.split(""));
//[ ["H", "e", "l", "l", "o"], ["W", "o", "r", "l", "d"] ]
word.split("") 으로 인해 문자열이 쪼개지긴 한다. 하지만 각각의 배열에 배치될뿐 하나의 배열안의 데이터로 사용할 순 없다.
여기서 Stream<String[]>에 collect(toList()) 로 변환해 봤자 List<String[]> 가 반환될뿐 List<String> 이 반환되진 않는다.
반환된 Stream<String[]> 에 다시 map() 을 해봤자 List<Stream<String>> 가 반환된다.
List<String[]> 내부의 요소 자체를 Stream의 요소로 사용할 수 있어야 하는데
이때 flatMap 을 사용해야 한다.
List<String> result = words.stream()
  .map(word -> word.split(""))
  //.flatMap(word -> Arrays.stream(word))
  .flatMap(Arrays::stream)
  .distinct()
  .collect(toList());

System.out.println(result.toString());
// [H, e, l, o, W, r, d]
flatMap 을통해 각 배열안의 데이터 요소를 모두 꺼집어 내어 하나의 스트림으로 다시 생성한다.
reduce
reduce: 줄이다, 축소한다.
각 스트림 요소를 조합해 복잡한 연산을 해야할 경우 리듀싱 연산을 사용한다.
모든 요소를 더해야 할 경우 java 8 이전에 아래와 같이 for문을 사용해 순회한다.
List<Integer> numbers = Arrays.asList(1, 2, 3, 4, 5);
int sum = 0;
for (Integer number : numbers) {
  sum += number;
}
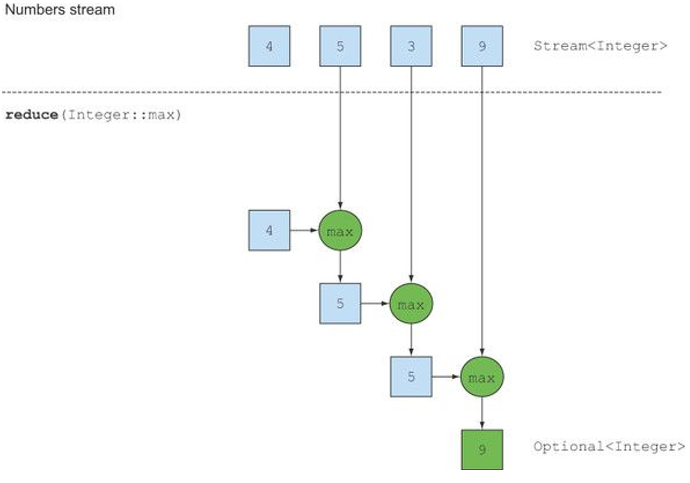
reduce() 를 사용하면 스트림의 모든 요소를 한번에 연산할 수 있다.
List<Integer> numbers = Arrays.asList(4, 5, 3, 9);
int sum = numbers.stream().reduce(0, (a, b) -> a + b);

reduce()의 매개변수로 초기값과 BinaryOperator<T> 구현 메서드 2가지를 필요로한다.
BinaryOperator<T>- 두 요소를 조합하여T를 반환하는 반환하는 함수형 인터페이스
List<Integer> numbers = Arrays.asList(4, 5, 3, 9);
Optional<Integer> sum = numbers.stream().reduce((a, b) -> a + b);
위처럼 초기값을 생략할 수 도 있지만 반환타입이 Optional<T>이 된다.
요소가 없을 경우도 있기 때문.
최소, 최대값을 구하는것도 쉽게 할 수 있다.
Optional<Integer> max = numbers.stream().reduce(Integer::max);
Optional<Integer> min = numbers.stream().reduce(Integer::min);
count()를 통해 개수를 구할 수도 있겠지만 아래와 같은 방식도 가능하다.
int count = Dish.menu.stream()
  .map(d -> 1)
  .reduce(0, (a, b) -> a + b);
기본형 특화 스트립
int calories = menu.stream()
  .map(Dish::getCalories)
  .reduce(0, Integer::sum);


int result = menu.stream()
  .mapToInt(Dish::getCalories) //IntStream
  //.average()
  //.max()
  //.min()
  .sum();
스트림 요소의 합계를 구할때 reduce 를 사용해 구할 수 있다.
자주 사용되는 기본형 스트림(IntStream)의 경우 평균, 합계, 최대, 최소값 같은 흔히 사용되는 reduce메서드들을 추가 구현해두었다.
IntStream 외에도 Double, Long 의 기본형 스트림을 지원한다.
collect
최종 연산 collect() 메서드와 Collectors.toList() 를 사용해 스트림의 결과값을 리스트 객체로 반환하였다.
collect()는 리스트 외에도 다양한 방법으로 결과값을 산출해 낼 수 있다.
public enum Currency {
  EUR, USD, JPY, GBP, CHF
}
@Data
public static class Transaction {
  private final Currency currency;
  private final double value;
}

public static List<Transaction> transactions = Arrays.asList(
  new Transaction(Currency.EUR, 1500.0),
  new Transaction(Currency.USD, 2300.0),
  new Transaction(Currency.GBP, 9900.0),
  new Transaction(Currency.EUR, 1100.0),
  new Transaction(Currency.JPY, 7800.0),
  new Transaction(Currency.CHF, 6700.0),
  new Transaction(Currency.EUR, 5600.0),
  new Transaction(Currency.USD, 4500.0),
  new Transaction(Currency.CHF, 3400.0),
  new Transaction(Currency.GBP, 3200.0),
  new Transaction(Currency.USD, 4600.0),
  new Transaction(Currency.JPY, 5700.0),
  new Transaction(Currency.EUR, 6800.0));
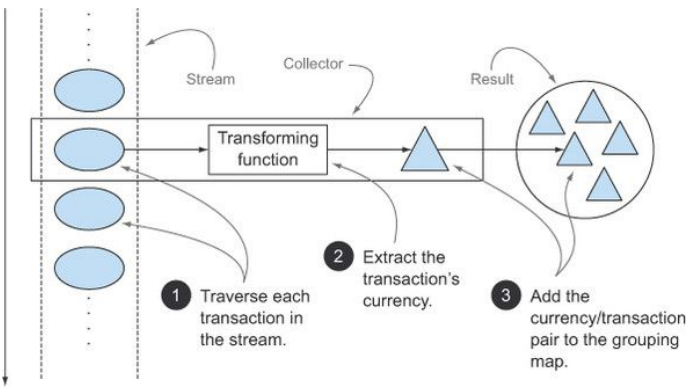
위와 같은 형태의 데이터가 있을때 Currency 별로 Transaction 객체를 List로 모아 Map으로 관리하고 싶을때
Map<Currency, List<Transaction>> transactionsByCurrencies = new HashMap<>();
for (Transaction transaction : transactions) {
  ...
  ...
}
최대한 간단하게 작성하려 해도 최소 6줄은 써야할 것 같다.
스트림과 collect 메서드를 사용하면 두줄이면 끝난다.
Map<Currency, List<Transaction>> transactionsByCurrencies =
  transactions.stream().collect(Collectors.groupingBy(Transaction::getCurrency));
collect, Collectors
위의 reduce 의 기능을 collect 최종연산과 Collectors 객체의 각종 메서드를 사용하면 그대로 구현할 수 있다.
int reduce_cnt = Dish.menu.stream().map(d -> 1).reduce(0, (a, b) -> a + b);

int collect_cnt = Dish.menu.stream().collect(Collectors.counting());
물론 바로 최종연산자인
count()컬렉션의size()메서드 를 호출하는게 제일 간단하다.
menu.stream().count(); menu.size()
Collectors 객체 내부에 각종 reduce 연산 방법들을 알아보자.
import static java.util.stream.Collectors.*;
...
...
/*최대값 찾기*/
Optional<Dish> collect = menu.stream().collect(maxBy(comparing(Dish::getCalories)));
Optional<Dish> reduce = menu.stream().reduce((d1, d2) -> d1.getCalories() > d2.getCalories() ? d1 : d2);
// minBy

/**합계 구하기*/
int collect = menu.stream().collect(summingInt(Dish::getCalories));
int reduce = menu.stream().mapToInt(Dish::getCalories).reduce(0, (d1, d2) -> d1 + d2);
// int reduce = menu.stream().mapToInt(Dish::getCalories).sum();
// summingDouble, summingLong

/*평균 구하기*/
double collect = menu.stream().collect(averagingDouble(Dish::getCalories));
OptionalDouble reduce = menu.stream().mapToInt(Dish::getCalories).average();
// averagingInt, averagingLong\

/*종합세트*/
IntSummaryStatistics summary = menu.stream().collect(summarizingInt(Dish::getCalories));
summary.getAverage();
summary.getCount();
summary.getMax();
summary.getMin();
summary.getSum();
// summarizingDouble, summarizingLong
reducing
public static <T, U> Collector<T, ?, U> reducing(
  U identity,
  Function<? super T, ? extends U> mapper,
  BinaryOperator<U> op)
연산 타입과 반환 타입이 자동으로 정해지는 reduce() 와 달리
Collectors.reducing 을 사용하면 자유자재로 지정할 수 있다.
int reduce = menu.stream().mapToInt(Dish::getCalories).reduce(0, (d1, d2) -> d1 + d2);
int reduce = menu.stream().collect(reducing(0, Dish::getCalories, (d1, d2) -> d1 + d2);
기존 reduce() 메서드와 달리 매개변수를 3개를 받는다.
reducing() 은 두번째 매개변수로 Fcuntion<T, R> 형식의 람다식을 받아 변환처리 후 연산할 수 있도록 지원한다.
(d1, d2) -> d1 + d2는Integer::sum으로 대체 가능하다.
menu.stream().collect(reducing(0, Dish::getCalories, Integer::sum);
Collectors.reducing과Stream.reduce의 차이 -reducing()의 경우mapper과정을 통해 데이터를 연산하기 좋은 값으로 한번 변환해서 사용한다. 때문에 변환을 해도 기존 시드 데이터에 영향이 가지 않는다.
반면recduce()의 경우 기존의 데이터를 바로 사용하기에 변환과정에서 아직 연산하지 못한 시드 데이터에 영향이 갈 수 있다. 병령이외의 경우는 별 차이점 없지만 병렬 과정에선reduce()는 문제가 발생할 수 있다.
collect, Collectors - groupingBy
위의 최종연산 과정은 굳이 collect 를 사용하지 않고도 충분히 간결하게 구성할 수 있지만
그룹핑은 collect 를 사용하는 것이 훨씬 수월하다.
public static <T, K> Collector<T, ?, Map<K, List<T>>>
  groupingBy(Function<? super T, ? extends K> classifier)
Map<Currency, List<Transaction>> transactionsByCurrencies =
  transactions.stream().collect(Collectors.groupingBy(Transaction::getCurrency));
groupingBy를 사용하면 위와같은 일반적인 1차원 그룹화도 가능하지만 n차원 그룹화도 쉽게 할 수 있다.
enum CaloricLevel { DIET, NORMAL, FAT };
enum Type { MEAT, FISH, OTHER }

Arrays.asList(
  new Dish("pork", false, 800, Type.MEAT),
  new Dish("beef", false, 700, Type.MEAT),
  new Dish("chicken", false, 400, Type.MEAT),
  new Dish("french fries", true, 530, Type.OTHER),
  new Dish("rice", true, 350, Type.OTHER),
  new Dish("season fruit", true, 120, Type.OTHER),
  new Dish("pizza", true, 550, Type.OTHER),
  new Dish("prawns", false, 400, Type.FISH),
  new Dish("salmon", false, 450, Type.FISH));
위의 데이터는 Dish.Type 별, 그안에서 calories 별로 그룹핑(2차원 그룹화) 해보자.
400 이하 칼로리는 DIET, 700 이하 칼로리는 NORMAL, 그외에는 FAT 으로 분류한다.
groupingBy 를 연덜아 사용하여 그룹핑
Map<Dish.Type, Map<CaloricLevel, List<Dish>>> goupTypeAndDish =
  menu.stream().collect(
    groupingBy(Dish::getType, //1번째 분류함수
      groupingBy((Dish dish) -> { //2번째 분류함수
        if (dish.getCalories() <= 400) return CaloricLevel.DIET;
        else if (dish.getCalories() <= 700) return CaloricLevel.NORMAL;
        else return CaloricLevel.FAT;
      })
    )
  );
두번째 매개변수로 Collectors.counting() 를 넣으면 각종 정보를 그룹핑할 수 있다.
Map<Dish.Type, Long> typesCount = menu.stream().collect(
  groupingBy(Dish::getType, Collectors.counting())
);
Map<Dish.Type, Dish> typesMax = menu.stream().collect(
  groupingBy(Dish::getType, Collectors.maxBy(ComparingInt(Dish::getColories), Optional::get))
);
사실 처음 사용한 매개변수 1개짜리 groupingBy(Function<T, K> classifier) 는 두번째 매개변수로 toList() 가 생략된 것이다. 실제는 아래와 같다.
groupingBy(Function<T, K> classifier, toList())
2번째 매개변수로 합계, 개수등 위에서 소개한 Collectors각종 메서드(최대, 최소, 합계, 평균)를 사용할 수 있다.
collect, Collectors - partitioningBy
분할은 특별한 방식의 그룹화라 할 수 있다.
return menu.stream().collect(partitioningBy(Dish::isVegetarian));
매개변수로 Predicate 를 받기 때문에 true ,false 로만 그룹화가 가능한 메서드이다.
커스텀 Collectors
지금까지 stream().collect() 내부에 Collectors 의 구현체를 집어넣어
그룹화, 리스트반환, 집계결과를 출력하였다.
groupingBy, toList 등과 같은 메서드가 모두 구현된 Collector 객체를 반환하였다.
정말 특별한 기능을 하고싶다면 기존 Collectors 에 이미 정의되어 있는 메서드가 아닌 직접 커스터마이징 한 메서드를 사용해야 할것이다.
public class CustomCollector implements Collector {
    @Override
    public Supplier supplier() {...}
    @Override
    public BiConsumer accumulator() {...}
    @Override
    public BinaryOperator combiner() {...}
    @Override
    public Function finisher() {...}
    @Override
    public Set<Characteristics> characteristics() {...}
}
Collector 를 구현하려면 기본적으로 위의 5가지 메서드를 구현해야 한다.
커스텀하기 전에 먼저 toList() 메서드가 반환하는 Collector 객체를 확인해보자.
public static <T> Collector<T, ?, List<T>> toList() {
      return new CollectorImpl<>(
          (Supplier<List<T>>) ArrayList::new,
          List::add,
          (left, right) -> { left.addAll(right); return left; },
          CH_ID);
}
위의 형식대로 커스터마이징할 객체를 정의하면 된다.
Supplier - supplier
Supplier 는 공통 함수형 인터페이스중 하나로 T get() 형식의 구조를 갖는다.
Supplier 는 수집과정에서 사용되는 빈 누적자를 반화하는 메서드
ArrayList::new 생성자 레퍼런스를 사용해 Supplier 를 구현하였다.
초기에 요소를 집어넣게 전에 비어있는 ArrayList 인스턴스를 생성하기 위해
커스텀을 하면 초기값에 이미 몇가지의 데이터가 삽입되어 있는 상태로 구성할 수 도 있다.
BiConsumer - accumulator
BiConsumer 함수형 인터페이스는 void accept(T t, U u) 형식의 구조를 갖는다.
리듀싱 연산을 수행하는 함수를 반환한다.
n-1 번까지 누적해둔 요소와 n번째 요소를 연산하는 메서드. toList는 List::add 메서드 레퍼런스를 사용한다.
아래와 같이 구현된다 보면 된다.
public BiConsumer<List<T>, T> accumulator() {
  return (list, item) -> list.add(item);
}
BinaryOperator - combiner
BinaryOperator<T> 함수 인터페이스는 T apply(T t1, T t2) 형식의 구조를 갖는다.
BiFunction 과 같은 구조이지만 매개변수 타입과 반환타입이 모든 같다.
스트림을 병렬로 처리할때 누적자가 이 결과를 어떻게 처리할 지 결정한다.
toList() 에선 아래의 람다식을 사용한다.
(left, right) -> { left.addAll(right); return left; }
그냥 단순히 2개의 리스트를 합치는 간단한 방식이다.
Function - finisher
Function<T, R> 함수 인터페이스는 R apply(T t) 형식의 구조를 갖는다.
스트림 탐색을 끝내고 누적자 객체를 최종 결과로 변환할 때 사용하는 메서드.
이상하게도 toList() 에선 매개변수가 4개밖에 없고 finisher 를 위한 구현 클래스는 생략되었다.
이는 뒤에 나오는 characteristics 과 연관이 있는데 누적자를 그대로 결과물로 사용할 수 있는경우 생략한다(CH_ID 사용).
생략할 경우 finisher 메서드는 아래와 같이 구현된다 보면된다.
public Function<List<T>, List<T>> finisher() {
  return function.identity();
}
...
...
static <T> Function<T, T> identity() {
    return t -> t;
}
위의 5가지 메서드를 합치면 최종적으로 아래와 같은 그림이 완성된다.
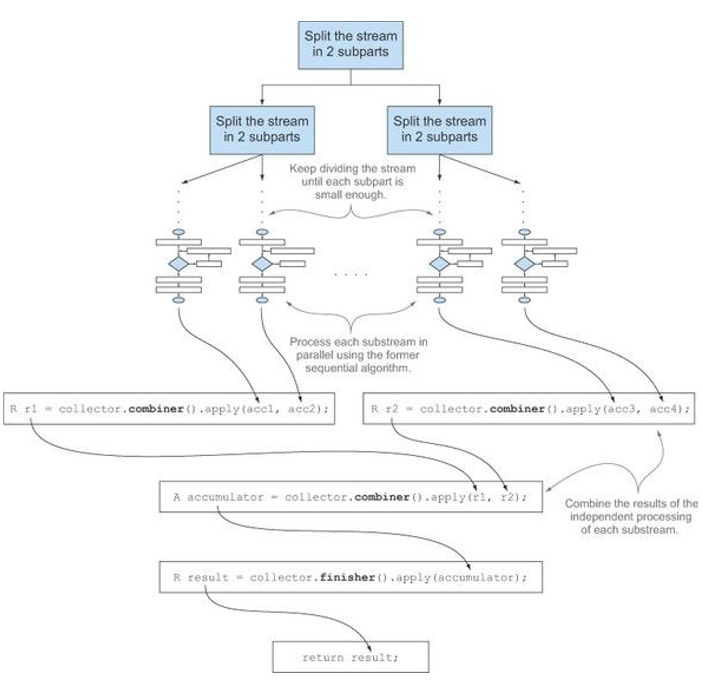
characteristics
컬렉터의 연산을 정의하는 Characteristics 형식의 불변집합을 반환.
스트림 병려 연산과정에서 어떤식으로 연산할지 정해주는 역할을 한다.
static final Set<Collector.Characteristics> CH_CONCURRENT_ID
  = Collections.unmodifiableSet(EnumSet.of(Collector.Characteristics.CONCURRENT,
                                            Collector.Characteristics.UNORDERED,
                                            Collector.Characteristics.IDENTITY_FINISH));
static final Set<Collector.Characteristics> CH_CONCURRENT_NOID
  = Collections.unmodifiableSet(EnumSet.of(Collector.Characteristics.CONCURRENT,
                                            Collector.Characteristics.UNORDERED));
static final Set<Collector.Characteristics> CH_ID
  = Collections.unmodifiableSet(EnumSet.of(Collector.Characteristics.IDENTITY_FINISH));
static final Set<Collector.Characteristics> CH_UNORDERED_ID
  = Collections.unmodifiableSet(EnumSet.of(Collector.Characteristics.UNORDERED,
                                            Collector.Characteristics.IDENTITY_FINISH));
static final Set<Collector.Characteristics> CH_NOID = Collections.emptySet();
Collectors 클래스에서 여러가지 형식의 Set<Characteristics> 데이터를 이미 정의해 두었다.
| 타입 | 설명 |
|---|---|
UNORDERED |
리듀싱 결과는 스트림의 요소 방문, 누적 순서에 영향을 받지 않는다. |
CONCURRENT |
다중 스레드에서 accumulator 함수를 동시에 호출 가능, UNORDERED와 같이 사용되지 않을경우 Set 과 같은 집합에서만 사용 가능하다. |
IDENTITY_FINISH |
finisher 메서드가 생략 가능. 리듀싱 최종 결과로 누적자 객체를 바로 사용한다는 뜻. |