Assertion Junit 의 Assertion 을 통해 결과값이 예상하는 값이랑 일치하는지, 동작이 일치하는지 검증할 수 있다.
Spring Boot Test
https://docs.spring.io/spring-boot/docs/current/reference/html/spring-boot-features.html#boot-features-testing
1
2
3
4
5
6
7
8
9
10
11
plugins { id 'org.springframework.boot' version '2.4.1' id 'io.spring.dependency-management' version '1.0.10.RELEASE' id 'java' } ... dependencies { testImplementation 'org.springframework.boot:spring-boot-starter-test' }
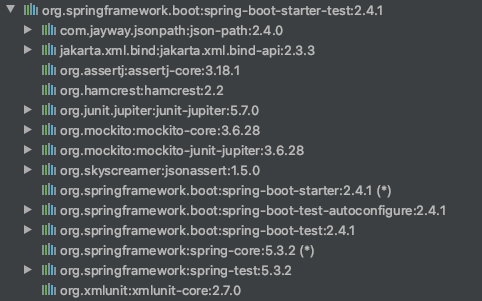
위와 같은 dependency 들이 포함되어 있다.
JUnit 5: The de-facto standard for unit testing Java applications. Spring Test & Spring Boot Test: Utilities and integration test support for Spring Boot applications. AssertJ: A fluent assertion library. Hamcrest: A library of matcher objects (also known as constraints or predicates). Mockito: A Java mocking framework. JSONassert: An assertion library for JSON. JsonPath: XPath for JSON.
아래와 같은 다양한 테스트 어노테이션 제공한다.
@SpringBootTest@JsonTest @RestTest @WebMvcTest @DataJpaTest @RestClientTest @BeforeAll @BeforeEach
@SpringBootTest end-to-end 테스트를 위한 어노테이션Spring Context 에 등록하고 실제 서버 port 까지 지정해서 실행시킨다.
보통 end-to-end 테스트의 경우 외부 접근 URL 부터 테스트하는 경우가 많음으로 @AutoConfigureMockMvc 를 함께 사용한다.
1
2
3
4
5
6
7
8
9
10
11
12
13
14
15
16
17
18
19
20
21
22
23
24
25
26
27
@SpringBootTest @AutoConfigureMockMvc public class UserControllerEndTests extends MysqlTestContainer { @Autowired ObjectMapper objectMapper; @Autowired UserRepository repository; @Autowired MockMvc mockMvc; @Test void patch_user_end_to_end () throws Exception { User user = createUser(); user = repository.save(user); MvcResult mvcResult = mockMvc.perform(MockMvcRequestBuilders.get("/user/{userId}" , user.getUserId())) .andExpect(MockMvcResultMatchers.status().isOk()) .andReturn(); UserDto sutUser = objectMapper.readValue(mvcResult.getResponse().getContentAsString(), UserDto.class); Assertions.assertEquals(user.getUserId(), sutUser.getUserId()); Assertions.assertEquals(user.getName(), sutUser.getName()); } }
@WebMvcTest Web Layer 에서 사용되는 Bean 들만을 등록하여 테스트.Present Layer 관련 컴포넌트만 스캔한다.
Intercepter WebMvcConfigurer HandlerMethodArgumentResolver …
@Controller @RestController @ControllerAdvice @Filter
그외의 [Service, Repository] 는 등록되지 않음으로 Mock 으로 대체하거나 직접 준비해야 한다.
1
2
3
4
5
6
7
8
9
10
11
12
13
14
15
16
17
18
19
20
21
22
23
24
25
26
27
28
29
30
31
32
33
34
35
36
37
38
@WebMvcTest(UserController.class) public class UserControllerTests { @MockBean UserService service; @MockBean EmailGateway emailGateway; @Autowired private MockMvc mockMvc; private static ObjectMapper objectMapper = new ObjectMapper (); @Test public void rename_user () throws Exception { String email = "test@test.com" ; UserType type = UserType.CUSTOMER; String name = "testName" ; Company company = new Company ("comp.com" , 10 ); User user = new User (email, type, name, company); Mockito.when (service.findById(1l )).thenReturn(user); Mockito.when (service.save(user)).thenReturn(user); UserPatchRequestDto requestDto = new UserPatchRequestDto (); requestDto.setRename("rename" ); MvcResult result = mockMvc.perform(patch("/user/1" ) .contentType(MediaType.APPLICATION_JSON) .content(objectMapper.writeValueAsString(requestDto)) ) .andExpect(status().isOk()) .andReturn(); System.out.println("result: " + result.getResponse().getContentAsString()); UserDto sut = objectMapper.readValue(result.getResponse().getContentAsString(), UserDto.class); Assertions.assertEquals(user.getName(), sut.getName()); } }
@DataJpaTest JPA 에서 사용하는 [Entity, Repository] 클래스 테스트.Service 클래스의 경우 Repository 만 의존함으로 @DataJpaTest 만으로 테스트 진행이 가능하다.
1
2
3
4
5
6
7
8
9
10
11
12
13
14
15
16
17
18
19
20
21
22
23
24
25
26
@DataJpaTest @AutoConfigureTestDatabase(replace = AutoConfigureTestDatabase.Replace.NONE) public class StoreServiceTests { @Autowired StoreRepository repository; static StoreService service; @BeforeAll static void beforeAll (@Autowired StoreRepository repository) { service = new StoreService (repository); } @Test void save_test () { Store store = new Store ("test store" ); store.addInventory(1l , 10 ); store.addInventory(2l , 10 ); store = repository.save(store); Long storeId = store.getStoreId(); Store sut = service.findById(storeId); Assertions.assertEquals(storeId, sut.getStoreId()); } }
@DataJpaTest 같은 DB 통합 테스트를 진행할 때, In-Memory DB 를 사용할지, 테스트 DB 에 접근할지를 결정해야 한다.@AutoConfigureTestDatabase 어노테이션을 통해 지정할 수 있다.
1 @AutoConfigureTestDatabase(replace = AutoConfigureTestDatabase.Replace.NONE)
기본적으로 아래와 같은 종류의 In-Memory DB([H2, DERBY, HSQLDB]) 들의 설정을 가지고 있다가 사용한다.Dependency 에 따라 어떤 In-Memory DB connection enum 을 사용할지 결정된다.
1
2
3
4
5
6
public enum EmbeddedDatabaseConnection { NONE(null , null , null , (url) -> false ), H2(EmbeddedDatabaseType.H2, DatabaseDriver.H2.getDriverClassName(), "jdbc:h2:mem:%s;DB_CLOSE_DELAY=-1;DB_CLOSE_ON_EXIT=FALSE" , (url) -> url.contains(":h2:mem" )), DERBY(EmbeddedDatabaseType.DERBY, DatabaseDriver.DERBY.getDriverClassName(), "jdbc:derby:memory:%s;create=true" , (url) -> true ), ... }
replace 속성
ANY: 설정된 DataSource 를 In-Memory DB DataSource 로 교체. AUTO_CONFIGURED: auto-configured 로 설정된 DataSource 만 교체, 만약 직접 DataSource Bean 을 설정했다면 교체되지 않음 NONE: Datasource 교체하지 않음
DB 다형성을 완벽히 지원하는 JPA 어플리케이션이라면 ANY 로 설정해서 테스트해도 큰 문제가 없다.
connection 속성
EmbeddedDatabaseConnection 에서 어떤 In-Memory DB 를 사용할건지 선택.
기본적으로 @DataJpaTest 사용시 @AutoConfigureTestDatabase 가 설정되며 H2 DB 가 자동 생성된다.
1
2
3
4
5
6
... @AutoConfigureDataJpa @AutoConfigureTestDatabase @AutoConfigureTestEntityManager @ImportAutoConfiguration public @interface DataJpaTest { ... }
하지만 대부분 datasource 를 직접 지정하여 테스트를 많이 지정하기 때문에, 위 코드와 같이 replace=...NONE 을 주로 사용한다.
1 spring.datasource.url=jdbc:h2:mem:testdb;MODE=MYSQL;
@RestClientTest 지정한 클래스의 RestTemplateBuilder, RestTemplate 등의 Bean 을 요청 시 내부 지정해둔 MockRestServiceServer 의 고정된 반환값을 사용하도록 설정
1
2
3
4
5
6
7
8
9
10
11
12
13
14
15
16
17
18
19
20
21
22
23
24
25
26
@RestClientTest(RestAdaptorImpl.class) public class RestAdaptorTests { @Autowired MockRestServiceServer server; @Autowired RestAdaptor adaptor; @Test void dummy_test_find_post_by_id () throws IOException { Long id = 1l ; ClassPathResource cpr = new ClassPathResource ("adaptor/RestUserPost.json" ); byte [] bdata = FileCopyUtils.copyToByteArray(cpr.getInputStream()); server .expect(MockRestRequestMatchers.requestTo("https://jsonplaceholder.typicode.com/posts/" + id)) .andRespond(MockRestResponseCreators.withSuccess(bdata, MediaType.APPLICATION_JSON)); RestUserPost sut = adaptor.findPostById(1l ); Assertions.assertEquals(1 , sut.getId()); } }
@BeforeAll, @AfterAll, @BeforeEach, @AfterEach @BeforeAll, @AfterAll
테스트 메서드들이 실행 전/실행 후 한번만 실행되는 static 메서드@Autowired 어노테이션으로 static 메서드 안에서 의존성을 주입받을 수 있다.
1
2
3
4
5
6
7
8
9
10
11
12
13
14
15
16
17
18
19
20
21
22
23
24
@DataJpaTest public class CustomerServiceTests { private static CustomerService service; @BeforeAll static void beforeAll (@Autowired CustomerRepository repository) { service = new CustomerService (repository); } @AfterAll static void afterAll () { System.out.println("test finished" ); } @Test void create_and_find_customer () { Customer customer = new Customer ("hello customer" ); customer = service.save(customer); Long customerId = customer.getCustomerId(); Customer sut = service.findById(customerId); Assertions.assertEquals(customerId, sut.getCustomerId()); } }
테스트 매서드들이 모두 실행 된 후 한번만 실행되는 static 메서드
@BeforeEach, @AfterEach
각 테스트 메서드 호출마다 실행되는 일반 메서드, [@BeforeAll, @AfterAll] 와 마찬가지로 초기화/마무리 할 때 사용하지만@Order 어노테이션으로 순서를 강제지정 할 수 있지만 테스트 속도가 느려짐으로 잘 사용하지 않는다.
@JsonTest json serialize, deserialize 를 테스트 할 수 있는 어노테이션
@JsonComponent ObjectMapper JacksonTest GsonTester BasicJsonTest
1
2
3
4
5
6
7
8
9
10
11
12
13
14
15
16
17
18
19
20
21
22
23
24
25
26
27
@JsonTest public class UserJsonTests { @Autowired private JacksonTester<User> json; @BeforeAll static void beforeAll (@Autowired ObjectMapper objectMapper) { objectMapper.setPropertyNamingStrategy(PropertyNamingStrategies.SNAKE_CASE); } @Test void json_serialize_user () throws IOException { Company company = new Company ("mycorp.com" , 1 ); User user = new User ("user@gmail.com" , UserType.CUSTOMER, "demo-user" , company); JsonContent<User> userJson = json.write(user); System.out.println(userJson.getJson()); File file = new ClassPathResource ("domain/user/User.json" ).getFile(); User sut = json.read(file).getObject(); Assertions.assertEquals(user.getName(), sut.getName()); Assertions.assertEquals(user.getEmail(), sut.getEmail()); Assertions.assertEquals(user.getType(), sut.getType()); Assertions.assertEquals(user.getCompany().getNumberOfEmployees(), sut.getCompany().getNumberOfEmployees()); } }
@JsonTest 에선 기본생성된 ObjectMapper 를 테스트한다.
만약 직접만든 ObjectMapper 를 테스트하고 싶다면 아래와 같이 @ContextConfiguration 를 사용해 ObjectMapper 가 Bean 으로 등록되어 있는 클래스 지정한다.
@ContextConfiguration, @Import test 시에 부족한 Bean 을 Spring Container 에 등록할 때 아래 2가지 어노테이션을 사용 가능하다.
@ContextConfiguration @Import
1 2 3 4 5 @ContextConfiguration(classes = {WebConfig.class}) @Import({WebConfig.class})
@Import 는 ComponentScan 과 비슷한 기능을 하는 어노테이션,Spring Test Layer 에서 사용하는 @ContextConfiguration 사용을 권장한다.
Mockito
java 모킹 프레임워크https://site.mockito.org/
Mockito.mock 함수를 사용해 Mock 객체를 쉽게 생성 가능하다.
1
2
3
4
5
6
7
8
9
10
11
12
13
14
15
16
17
18
19
20
21
22
23
24
25
26
27
28
29
30
public class PurchaseServiceTests { @Test void purchase_normal_test () { long productId = 23 ; int quantity = 10 ; long storeId = 1 ; Store store = createStore(productId, quantity); StoreRepository storeRepository = Mockito.mock(StoreRepository.class); PurchaseService service = new PurchaseService (storeRepository); Mockito.when (storeRepository.findById(storeId)).thenReturn(Optional.of(store)); Mockito.when (storeRepository.save(ArgumentMatchers.any(Store.class))).thenReturn(store); Store sut = service.purchase(storeId, productId, 3 ); Assertions.assertEquals(quantity - 3 , sut.getInventory(productId)); Mockito.verify(storeRepository, Mockito.times(1 )).findById(storeId); Mockito.verify(storeRepository, Mockito.times(1 )).save(ArgumentMatchers.any(Store.class)); } private Store createStore (long productId, int quantity) { Store store = new Store ("mock-store" ); store.addInventory(productId, quantity); return store; } }
Mockito.spy 함수를 사용해 Spy 객체를 쉽게 생성 가능하다.
1
2
3
4
5
6
7
8
9
10
11
12
13
14
15
16
17
18
19
20
@Test public void purchase () { PurchaseService service = new PurchaseService (null ) { @Override public Store purchase (long storeId, long productId, int quantity) { Store store = new Store ("spy-store" ); store.addInventory(productId, 20 - quantity); return store; } }; CustomerController controller = new CustomerController (Mockito.spy(service)); int productId = 23 ; int quantity = 7 ; Store sut = controller.purchase(0 , productId, quantity); Assertions.assertEquals("spy-store" , sut.getName()); Assertions.assertEquals(13 , sut.getInventory(productId)); }
아래 익스텐더를 추가하면 Mockito 관련된 어노테이션을 사용해 Mock 객체를 제어할 수 있다.
1 @ExtendWith(MockitoExtension.class)
@Mock @Spy @InjectMock @MockBean
@Mock, @Spy Mockito 프레임워크에서 제공하는 어노테이션
[Mockito.mock, Mockito.spy] 메서드를 사용하지 않고 [@Mock, @Spy] 어노테이션을 통해 객체 생성이 가능하다.
1
2
3
4
5
6
7
8
9
10
11
12
13
14
15
16
17
18
19
20
21
22
23
24
25
26
27
28
29
30
@ExtendWith(MockitoExtension.class) public class PurchaseServiceTests { @Mock StoreRepository storeRepository; @Test void purchase_normal_test () { long productId = 23 ; int quantity = 10 ; long storeId = 1 ; Store store = createStore(productId, quantity); PurchaseService service = new PurchaseService (storeRepository); Mockito.when (storeRepository.findById(storeId)) .thenReturn(Optional.of(store)); Mockito.when (storeRepository.save(ArgumentMatchers.any(Store.class))) .thenReturn(store); Store sut = service.purchase(storeId, productId, 3 ); Assertions.assertEquals(quantity - 3 , sut.getInventory(productId)); Mockito.verify(storeRepository, Mockito.times(1 )).findById(storeId); Mockito.verify(storeRepository, Mockito.times(1 )).save(ArgumentMatchers.any(Store.class)); } private Store createStore (long productId, int quantity) { Store store = new Store ("mock-store" ); store.addInventory(productId, quantity); return store; } }
1
2
3
4
5
6
7
8
9
10
11
12
13
14
15
16
17
18
19
20
21
22
23
@ExtendWith(MockitoExtension.class) public class CustomerControllerTests { @Spy PurchaseService service; @Test public void purchase () { int productId = 23 ; int quantity = 7 ; Mockito.doAnswer(invocation -> { Store store = new Store ("spy-store" ); store.addInventory(productId, 20 - quantity); return store; }).when (service).purchase(0 , productId, quantity); CustomerController controller = new CustomerController (service); Store sut = controller.purchase(0 , productId, quantity); Assertions.assertEquals("spy-store" , sut.getName()); Assertions.assertEquals(13 , sut.getInventory(productId)); } }
@Spy 은 함수 블럭으로 구현할 뿐 @Mock 과 크게 다를 건 없다.
@InjectMocks @Mock 이 붙은 Mock 객체를 @InjectMocks 이 붙은 객체에 주입시킬 수 있다.
1
2
3
4
5
6
7
8
9
10
11
12
13
14
15
16
17
18
19
20
21
22
23
24
25
26
27
28
@ExtendWith(MockitoExtension.class) public class StoreServiceTests { @Mock StoreRepository repository; @InjectMocks StoreService service; @Test void save_and_find_store () { Store store1 = createStore("test store1" ); Store store2 = createStore("test store2" ); Mockito.when (repository.save(ArgumentMatchers.any())).thenReturn(store1); Mockito.when (repository.findById(2l )).thenReturn(Optional.of(store2)); Store sut1 = service.save(store1); Store sut2 = service.findById(2l ); Assertions.assertEquals("test store1" , sut1.getName()); Assertions.assertEquals("test store2" , sut2.getName()); } private Store createStore (String storeName) { Store store = new Store (storeName); store.addInventory(1l , 10 ); store.addInventory(2l , 10 ); return store; } }
@MockBean
org.springframework.boot.test.mock.mockito 패키지에 속해있는 어노테이션
Mock 으로 생성된 객체를 Spring Context 에 삽입해야할 경우 사용@WebMvcTest 의 경우 주로 Web Layer 이후 Mock Service Bean 들을 Spring Context 에 넣어야 하다보니 @MockBean 을 사용한다.
1
2
3
4
5
6
7
8
9
10
11
12
13
14
15
16
17
18
19
20
21
22
23
24
25
26
27
28
29
30
@WebMvcTest(UserController.class) public class UserControllerTests { private static ObjectMapper objectMapper = new ObjectMapper (); @MockBean UserService service; @Autowired private MockMvc mockMvc; @Test public void rename_user () throws Exception { User user = createUser(); when (service.findById(1l )).thenReturn(user); when (service.save(user)).thenReturn(user); UserPatchRequestDto requestDto = new UserPatchRequestDto (); requestDto.setRename("rename" ); MvcResult sut = mockMvc.perform(patch("/user/1" ) .contentType(MediaType.APPLICATION_JSON) .content(objectMapper.writeValueAsString(requestDto)) ) .andExpect(status().isOk()) .andReturn(); UserDto sutUser = objectMapper.readValue(sut.getResponse().getContentAsString(), UserDto.class); Assertions.assertEquals(user.getName(), sutUser.getName()); } }
로그 출력 [org.testcontainers, com.github.dockerjava] 두개 패키지 클래스의 DEBUG 로그들을 제거하고 싶다면src/test/resources/logback.xml 파일을 아래와 같이 구성
1 2 3 4 5 6 7 8 9 10 <configuration > <appender name ="STDOUT" class ="ch.qos.logback.core.ConsoleAppender" > <encoder > <pattern > %d{HH:mm:ss.SSS} [%thread] %-5level %logger - %msg%n</pattern > </encoder > </appender > <root level ="info" > <appender-ref ref ="STDOUT" /> </root > <logger name ="org.testcontainers" level ="INFO" /> <logger name ="com.github.dockerjava" level ="WARN" /> </configuration >
Jacoco
https://github.com/jacoco/jacoco https://docs.gradle.org/current/userguide/jacoco_plugin.html https://techblog.woowahan.com/2661/
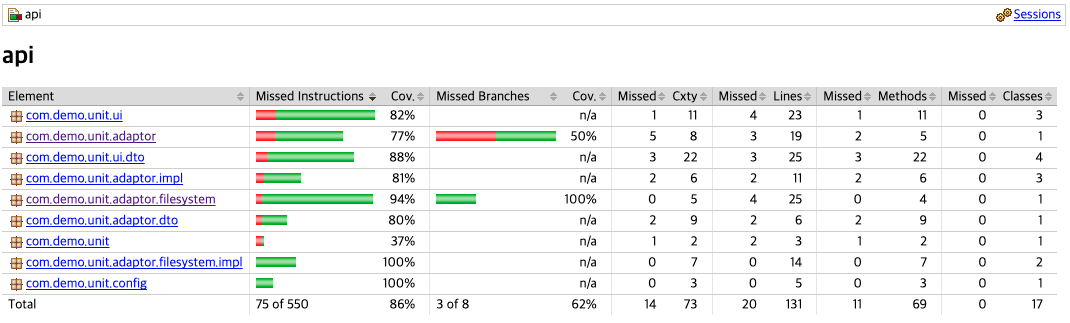
Jacoco 는 테스트 커버리지를 측정하는 라이브러리로, 테스트코드를 실행했을 때 얼마나 많은 운영코드가 실행되는지 측정하는 도구이다.
Jacoco 는 ASM 라이브러리를 사용하여 생성되는 바이트코드를 조작한다.
ASM(어셈블리 이름을 따온듯)https://asm.ow2.io/
1 2 3 4 5 6 7 8 9 10 11 12 13 14 15 16 17 18 19 20 21 22 23 24 25 26 27 28 29 30 31 32 33 34 35 36 37 38 39 40 41 42 43 44 45 46 47 48 49 50 51 52 53 54 55 56 57 58 59 60 61 62 63 64 65 66 67 plugins { id 'java' id 'org.springframework.boot' version "$springBootVersion" apply false id 'io.spring.dependency-management' version "$springDependencyManagement" apply false id 'jacoco' } allprojects { jacoco { toolVersion = "$jacocoVersion" } test { finalizedBy jacocoTestReport } jacocoTestReport { reports { html.required = true csv.required = false xml.required = false } } jacocoTestCoverageVerification { violationRules { rule { limit { minimum = 0.3 } } rule { enabled = true includes = ['com.demo.unit.domain.*' ] element = 'CLASS' limit { counter = 'LINE' value = 'COVEREDRATIO' minimum = 0.3 } } } } }
1 ./gradlew --console verbose test jacocoTestReport jacocoTestCoverageVerification
jacocoTestCoverageVerification task 는 아래 url 참고
https://docs.gradle.org/current/dsl/org.gradle.testing.jacoco.tasks.JacocoCoverageVerification.html https://docs.gradle.org/current/javadoc/org/gradle/testing/jacoco/tasks/rules/JacocoViolationRule.html
Testcontainers
https://testcontainers.com/ https://github.com/testcontainers/testcontainers-java https://testcontainers.com/guides/getting-started-with-testcontainers-for-java/
Testcontainers 는 도커환경에서 다양한 서드파티(DB, Redis, Broker) 시스템을 쉽게 테스트할 수 있도록 도와주는 테스트 지원 라이브러리.
테스트가 종료되면 테스트 컨테이너 자원도 남김없이 깔끔하게 종료된다.
1
2
3
4
5
dependencies { testImplementation 'org.testcontainers:rabbitmq:1.18.3' testImplementation 'org.testcontainers:junit-jupiter:1.18.3' ... }
H2DB 는 훌륭한 테스트용 In-Memory DB 이지만 native query 는 테스트가 부정확할 수 있다.프로세스 외부 의존성의 경우 테스트를 Mock 으로 대체하거나 테스트를 포기해야할 경우가 있는데, 이때 도움을 주는게 컨테이너 기반 테스트이다.
실제 테스트용 Docker 컨테이너를 실행시켜 테스트를 지원한다.
1
2
3
4
5
6
7
8
9
10
11
12
13
14
15
16
17
18
19
20
21
22
23
24
25
26
27
@Testcontainers @ActiveProfiles("test") public class MysqlTestContainer { static MySQLContainer MY_SQL_CONTAINER = new MySQLContainer ("mysql:8" ) .withDatabaseName("testdb" ) .withUsername("testuser" ) .withPassword("testpassword" ); @DynamicPropertySource public static void properties (DynamicPropertyRegistry registry) { registry.add("spring.datasource.url" , MY_SQL_CONTAINER::getJdbcUrl); registry.add("spring.datasource.username" , MY_SQL_CONTAINER::getUsername); registry.add("spring.datasource.password" , MY_SQL_CONTAINER::getPassword); } @BeforeAll static void beforeAll () { MY_SQL_CONTAINER.start(); } @AfterAll static void afterAll () { MY_SQL_CONTAINER.stop(); } }
만약 직접 DataSource 를 구축해야 한다면 아래와 같이 @ContextConfiguration 으로 DatsSource 빈을 등록한다.
1
2
3
4
5
6
7
8
9
10
11
12
13
14
15
16
17
18
19
20
21
22
23
24
25
26
27
28
29
30
31
32
33
@Testcontainers @ContextConfiguration(classes = MysqlTestContainer.TestDataSourceConfiguration.class) public class MysqlTestContainer { static MySQLContainer MY_SQL_CONTAINER = new MySQLContainer ("mysql:8" ) .withDatabaseName("testdb" ) .withUsername("testuser" ) .withPassword("testpassword" ); @BeforeAll static void beforeAll () { MY_SQL_CONTAINER.start(); } @AfterAll static void afterAll () { MY_SQL_CONTAINER.stop(); } @TestConfiguration public static class TestDataSourceConfiguration { @Bean public DataSource dataSource () { DataSourceBuilder dataSourceBuilder = DataSourceBuilder.create(); dataSourceBuilder.driverClassName("com.mysql.cj.jdbc.Driver" ); dataSourceBuilder.url(MY_SQL_CONTAINER.getJdbcUrl()); dataSourceBuilder.username(MY_SQL_CONTAINER.getUsername()); dataSourceBuilder.password(MY_SQL_CONTAINER.getPassword()); return dataSourceBuilder.build(); } } }
데모코드
https://github.com/Kouzie/unit-test-demo