@Bean public ObjectMapper objectMapper() { ObjectMapperobjectMapper=newObjectMapper(); // for zone date time SimpleModulemodule=newJavaTimeModule() .addSerializer(ZonedDateTime.class, newZonedDateTimeSerializer(formatter)) .addDeserializer(ZonedDateTime.class, newZonedDateTimeDeserializer()); objectMapper.registerModule(module); objectMapper.setTimeZone(TimeZone.getTimeZone(zoneId));
// for Date class objectMapper.setDateFormat(dateFormat); // WRITE_DATES_AS_TIMESTAMPS JSON에서 날짜를 문자열로 표시 objectMapper.disable(SerializationFeature.WRITE_DATES_AS_TIMESTAMPS); objectMapper.setPropertyNamingStrategy(PropertyNamingStrategies.LOWER_CAMEL_CASE); // 네이밍 전략 objectMapper.setSerializationInclusion(JsonInclude.Include.NON_NULL); // null 필드는 변환 X
// UnrecognizedPropertyException 처리, 알수없는 필드 처리 X objectMapper.configure(DeserializationFeature.FAIL_ON_UNKNOWN_PROPERTIES, false); // InvalidDefinitionException, Object 클래스는 빈 객체로 변환(필드가 없는 객체도 변환하도록) objectMapper.configure(SerializationFeature.FAIL_ON_EMPTY_BEANS, false); // {}, [] 같은 빈 json 객체를 null 로 변환처리 objectMapper.configure(DeserializationFeature.ACCEPT_EMPTY_ARRAY_AS_NULL_OBJECT, true) objectMapper.configure(DeserializationFeature.ACCEPT_EMPTY_STRING_AS_NULL_OBJECT, true) return objectMapper; }
Visibility
[getter, setter, is-getter, creator, field] 에 대해 json 구성에서 visibility 여부를 결정할 수 있는데 기본설정은 아래와 같다.
1 2 3 4 5 6 7
protectedfinalstaticStdDEFAULT=newStd( Visibility.PUBLIC_ONLY, // getter Visibility.PUBLIC_ONLY, // is-getter Visibility.ANY, // setter Visibility.ANY, // creator -- legacy, to support single-arg ctors Visibility.PUBLIC_ONLY // field );
[setter, creator] 는 접근제어자가 public 이 아니어도 상관없지만 [getter, is-getter, field] 는 public 이 아닐경우 보이지 않는다는 설정이기에 json 이 별도처리하지 않는다
최근에는 setter 와 같은 메서드를 별도정의하지 않기 때문에 field 값만 가지고 json 역질렬화를 수행하기 위해 아래와 같은 설정을 하기도 한다.
[ { "id":"60d5dbf87f3e6e3b2f4b2b3a", "notificationType":"message", "userId":"1", "message":"You have a new message from Alice", "timestamp":"2023-08-01T10:00:00Z", "senderId":2 }, { "id":"60d5dbf87f3e6e3b2f4b2b3b", "notificationType":"friend_request", "userId":"1", "message":"Bob sent you a friend request", "timestamp":"2023-08-01T10:05:00Z", "requesterId":3 }, { "id":"60d5dbf87f3e6e3b2f4b2b3c", "notificationType":"event_invite", "userId":"1", "message":"You are invited to Sarah birthday party", "timestamp":"2023-08-01T10:10:00Z", "eventId":5, "location":"123 Main St" } ]
아래와 같이 Notification 클래스의 상속구조로 구성하고 jackson 의 @JsonTypeInfo, @JsonSubTypes 어노테이션을 사용해 비직렬화시 다형성을 지원할 수 있다.
가끔 json 문자열을 지원하는 라이브러리에서 @class, @type 같은 필드를 가지는 경우 해다 어노테이션을 사용한 경우이다.
@PostMapping publicvoidsendNotification(@RequestBody List<Notification> notifications) { // 받은 notifications를 처리하는 로직 추가 notifications.forEach(notification -> { // 예시로 각 알림의 'type'을 출력하는 로직 log.info("Received notification of type: " + notification.getNotificationType()); log.info(notification.toString()); }); } /* curl -X POST http://localhost:8080/mapper \ -H "Content-Type: application/json" \ -d '[ { "id": "60d5dbf87f3e6e3b2f4b2b3a", "notificationType": "message", "userId": "1", "message": "You have a new message from Alice", "timestamp": "2023-08-01T10:00:00Z", "senderId": 2 }, { "id": "60d5dbf87f3e6e3b2f4b2b3b", "notificationType": "friend_request", "userId": "1", "message": "Bob sent you a friend request", "timestamp": "2023-08-01T10:05:00Z", "requesterId": 3 }, { "id": "60d5dbf87f3e6e3b2f4b2b3c", "notificationType": "event_invite", "userId": "1", "message": "You are invited to Sarah birthday party", "timestamp": "2023-08-01T10:10:00Z", "eventId": 5, "location": "123 Main St" } ]' */
Date Time String
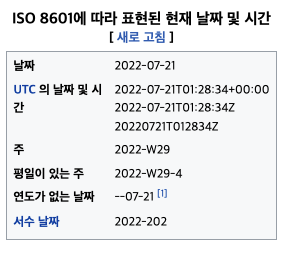
시간값을 표현하는 방식은 time format 을 통해 결정된다. 현재 날짜를 표기하는 문자열로 전 세계 공통으로 사용하는 format 은 ISO 8601 이다.
위키: ISO 8601 은 날짜 및 시간 관련 데이터 의 전 세계적인 교환 및 통신을 다루는 국제 표준 입니다. 큰 시간 기간(일반적으로 1년)이 왼쪽에 배치되고 연속적으로 작은 각 기간이 이전 기간의 오른쪽에 배치되도록 정렬 특정 의미가 할당된 특정 컴퓨터 문자(예: “-“, “:”, “+”, “T”, “W”, “Z”)의 조합으로 작성된 문자열을 뜻합니다. https://en.wikipedia.org/wiki/ISO_8601
이중 ISO 8601 의 가장 많이 사용하는 format 문자열은 LocalTimeFormat 을 표현하는 yyyy-MM-dd'T'HH:mm:ss 이다.
스프링에서 DateTimeFormatter.ISO_DATE_TIME 를 formatter 로 사용하면 된다.
ObjectMapperobjectMapper=newObjectMapper(); // for zone date time SimpleModulemodule=newJavaTimeModule() .addSerializer(ZonedDateTime.class, newZonedDateTimeSerializer(dateTimeFormat)) .addDeserializer(ZonedDateTime.class, newZonedDateTimeDeserializer()); objectMapper.registerModule(module); objectMapper.setTimeZone(zone);
Time Format String
DateTimeFormatter.ISO_DATE_TIME 와 같이 미리 제공된 Formatter 말고 직접 타임포멧문자열 을 사용해서 Formatter 를 생성하고 싶다면 날짜를 표현하는 여러가지 문자 및 기호를 알아야 한다.
default message [Failed to convert property value of type 'java.lang.String' to required type 'java.time.ZonedDateTime' for property 'beginDate' ... Parse attempt failed for value [2019-09-01T09:00:00 9:00]]<EOL>Field error in object 'testRequestDto' on field 'endingDate'
대충 봐도 request parameter parsing 에 실패한 것을 알 수 있다. 그리고 서버가 해독한 URL 내의 날짜 데이터 부분이 이상한 것을 알 수 있다.
URL 에서 + 기호는 공백을 표기하기도 하기에 위처럼 인코딩 과정을 거친 후 보내면 정상동작한다.
Zulu time 을 사용하였을 때에도 URL 을 인코딩 하는 것을 권장한다. 브라우저나 서버 프레임워크별로 차이가 있을 수 있음.
Converter
1
2
3
4
Stringtime="2011-12-03T10:15:30"; // Text '2011-12-03T10:15:30' could not be parsed: Unable to obtain ZonedDateTime from TemporalAccessor ZonedDateTimezdt= ZonedDateTime.parse(time, DateTimeFormatter.ISO_DATE_TIME); System.out.println(zdt.format(DateTimeFormatter.ISO_DATE_TIME));
보다싶이 ZoneDateTime 은 문자열에 ZoneId 가 없으면 파싱과정에서 에러가 발생한다. 이는 @DateTimeFormat 어노테이션을 사용해 파싱할 때도 똑같이 발생한다.
위와 같이 LocalDateTime 형식의 문자열이 들어올 경우 시스템, 혹은 사용자 별도 지정한 ZoneId 를 사용해 ZoneDateTime 을 생성하도록 Converter 를 생성해보자.
org.springframework.core.convert 패키기의 Converter 클래스를 사용해 직접 String -> ZoneDateTime 할 수 있는 클래스를 만들기로 했다.