k8s - Service, Ingress, MetalLB!
Service
https://kubernetes.io/ko/docs/concepts/services-networking/service/
출처: https://medium.com/google-cloud/kubernetes-nodeport-vs-loadbalancer-vs-ingress-when-should-i-use-what-922f010849e0
pod 는 동일한 공간에서 항상 생성되지 않기 때문에 pod 끼리 접근할 수 있도록 연결구성이 필요하다.
이때 클러스터 내부 pod 간의 연결구성이 Service 라 할 수 있다.
각 노드별로 kube-proxy 를 가지고 있으며 Service 관련 yaml 을 작성하면, 각 노드의 kube-proxy 는 [userspace, iptables, IPVS] 등을 기능을 사용해 패킷 라우팅을 구현한다.
IPVS (IP Virtual Server) 는 리눅스 L4 로드밸런싱 기능,
Service 타입
Service 타입에는 크게 4가지가 존재한다.
- ClusterIP(default)
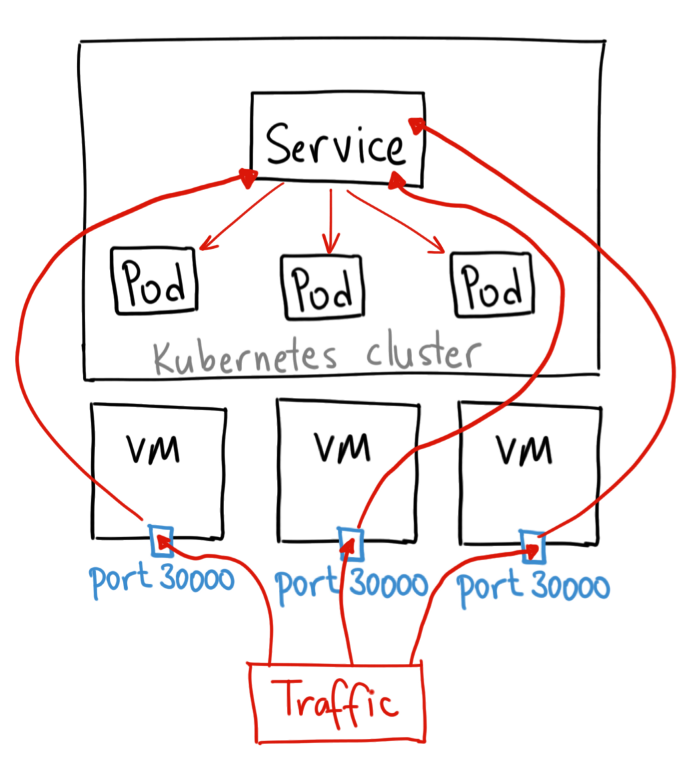
클러스터 내부 서비스끼리만 통신시 사용하는Service - NodePort
클러스터 외부에서 내부로 접근할 수 있는 가장 쉬운 방법,
외부에서 접근가능하도록 외부포트를30000-32768범위내 지정,
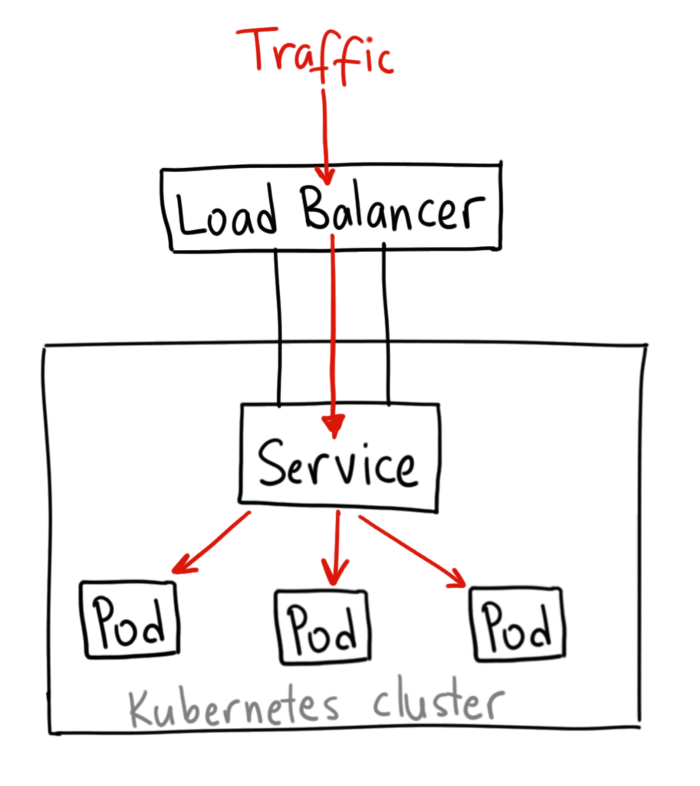
외부포트를 통해Pod접근 할 수 있다. - LoadBalancer(ExternalIp)
공인 IP 가 설정된 로드밸런서 장비가 있어야 한다.
AWS, GCP 등의 퍼블릭 클라우드 서비스에서 지원한다.MetalLB오픈소스를 사용해 로컬 클러스터에서도 제한적으로 사용 가능. - ExternalName
spec.externalName필드에 설정한 값과 연결,
클러스터내부에서 외부로 접근할 때 주로 사용.
ClusterIP
아래와 같이 Service 생성 후, 다른 Pod 에서 미리 생성해둔 Nginx Pod 에 접근 테스트.
1 | ## clusterip-service.yaml |
테스트를 위해 Service 를 통해 접근하는 Nginx Pod 생성
1 | # nginx app 생성 |
NodePort
1 | ## nodeport.yaml |
1 | # nginx app 생성 |
NodePort 가 ClusterIP 개념을 포함함으로, 클러스터 내부에서도 해당 Service 에 접근 가능하다.
외부에선 nodePort 인 30000 을 통해 접근한다.
ExternalName
내부에서 외부로 가기위한 서비스이다.
1 | ## externalname.yaml |
1 | $ kubectl apply -f externalname.yaml |
LoadBalancer
밑의 MetalLB 에서 추가 설명
1 | ## loadbalancer.yaml |
MetalLB(LoadBalancer), Ingress Controller 설치
https://metallb.universe.tf/
https://metallb.universe.tf/configuration/
https://github.com/metallb/metallb
기존 베어메탈 클러스터 환경에서 Pod 에 접근하기 위해 NodePort Service 를 사용해왔다.NodePort 의 경우 포트범위가 30000 - 32768 임으로 가독성 있는 endpoint 작성이 힘들다.
AWS EKS 같은 상용 클러스터에선 프로비저닝 되는 LoadBalancer Service 를 사용할 수 있는데,MetalLB 를 사용하면 베어메탈 클러스터에서도 LoadBalancer Service 생성이 가능하다.
1 | curl https://raw.githubusercontent.com/metallb/metallb/v0.13.12/config/manifests/metallb-native.yaml -o metallb.yaml |
MetalLB 에서 구성할 수 있는 모드로는 다음 2가지
- Layer2 모드
- Layer3 모드(BGP 모드)
로컬네트워크안에 모든 노드가 존재한다면 Layer2 를 사용하면 된다.
여기선 Layer2 모드를 사용한다.
addresses 에 사용가능한 LoadBalancer 의 IP 작성, MetalLB 에선 가지고 있는 노드의 IP 목록을 작성하면 된다.
하나의 노드로 클러스터를 구성하였음으로 IP 하나만 작성.
1 | # metallb-config.yaml |
이제부터 LoadBalancer Service 생성이 가능하다.
AWS EKS 에서 Ingress 사용시 자체 제공하는 Application Load Balancers 로 프로비저닝 Ingress Controller 가 동작한다.
로컬 클러스터에서 L7 LB 역할을 해줄 Ingress Controller 소프트웨어는 가장 유명하고 공식지원하는 ingress-nginx 를 사용한다.
이 외에도 HAProxy, Kong 등 여러가지 Ingress Controller 가 있다.
설치 완료했다면 기존 ingress-controller 의 NodePort 로 운영하던 서비스를 LoadBalancer 로 변경
기본적으로 LoadBalancer Service 는 Ingress 를 고려하지 않아 IP 하나가지고 여러개의 LoadBalacner Service 가 생성될 수 없다.
앞으로 생성할 모든 LoadBalance Service 에 metallb.universe.tf/allow-shared-ip 주석을 추가하여 선택적 IP 공유를 활성화할 수 있다.
1 | # MetalLB 설치 |
1 | kubectl get service -n ingress-nginx |
NGINX Ingress Controller를 MetalLB와 연동하여 설치.
1 | # NGINX Ingress Controller 설치 |
- 설정 확인:
- EXTERNAL-IP가
192.168.10.232로 할당되었는지 확인 <pending>상태인 경우 아래 진단 단계 참조
- EXTERNAL-IP가
1 | kubectl get deploy,svc -n ingress-nginx |
Ingress
Ingress: 입장권
https://kubernetes.io/ko/docs/concepts/services-networking/ingress/
클러스터 내부에서 동작하는 L7 LB. 하나의 외부 IP와 포트로 여러개의 서비스를 로드밸런싱할 수 있다.
공인IP 가 귀하다 보니 Ingress 를 LoadBalancer 에 등록해서 여러개의 트래픽을 분산처리하는데 사용한다.
Ingress = L7
Service = L4
Service 와 Ingress 모두 클러스터 외부로 포트를 노출, 로드밸런싱 기능을 포함한다.

먼저 Ingress 를 통해 접근할 앱을 Pod, Service 정의
1 | # apple-banana-service.yaml |
생성 후 연결 및 요청 테스트.
1 | kubectl apply -f apple-banana-service.yaml |
사전에 Ingress Controller 를 NodePort Service 로 등록해두었다.
해당 NodePort 와 ingress 를 통해 apple, banana 서비스에 접근할 수 있도록 설정.
이때 path 를 사용해 요청을 분기시킨다.
1 | # apple-banana-ingress.yaml |
1 | kubectl apply -f apple-banana-ingress.yaml |
k8s 네트워킹
k8s에선 컨테이너간 통신, kuberctl 을통한 명령어 실행을 해야하는데 k8s 네트워킹을 알아보자.
kubnet
kubnet 은 k8s 표준 네트워크 플러그인이다.k8s 내부에서 자동으로 이런 네트워크 구조와 라우팅 테이블을 유지된다.
노드간 연결은 10.100.0.0/16
각 노드내부 CIDR은 10.1.1.0/24, 10.1.2.0/24Pod 별로 가상 이더넷 인터페이스 할당 후 IP 부여
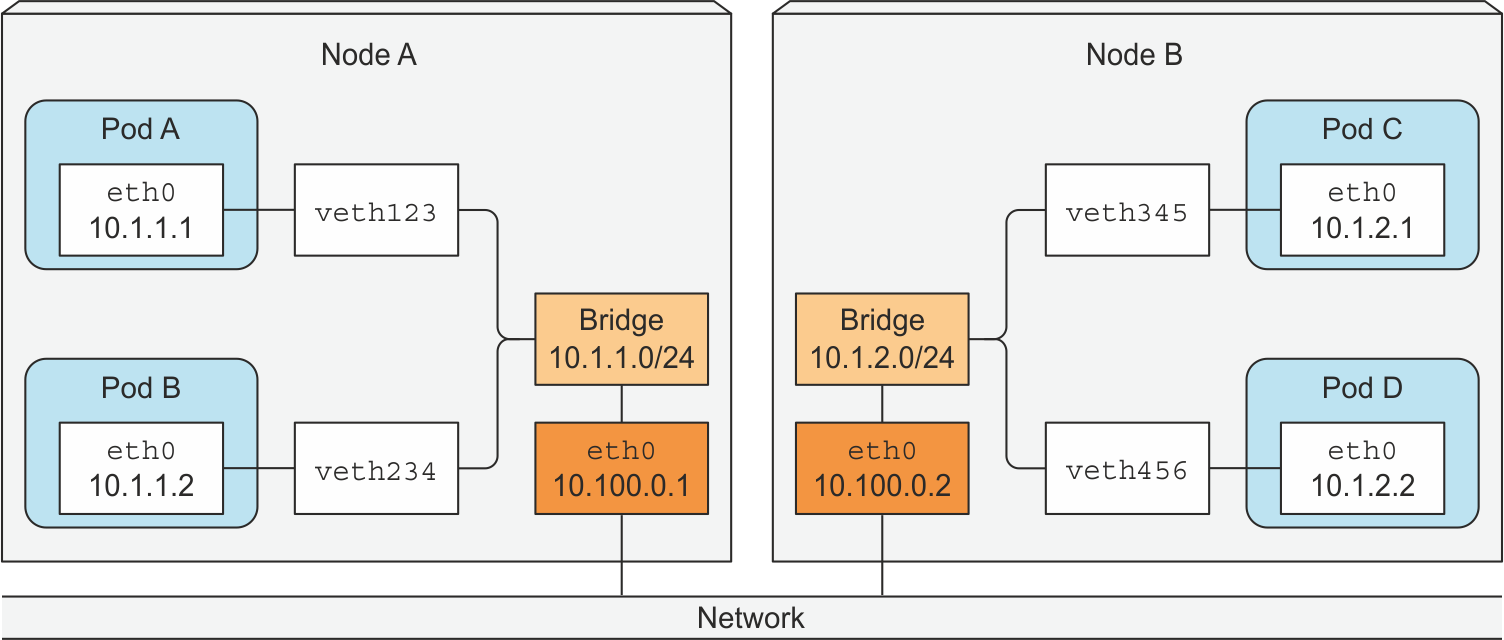
Pod IP는 클러스터 전체에서 검사 후 결정된다, 그리고 중복되지 않는 Pod CIDR을 할당한다.Pod 통신지원을 위해 특정 Pod 에 접근할 수 있는 노드의 인터페이스를 라우팅 테이블에 기록한다.
Pod Network
출처: https://medium.com/google-cloud/understanding-kubernetes-networking-pods-7117dd28727
도커 네트워킹에서 베스(veth, virtual ethernet) 라는 가상 장치를 사용해서 IP 를 부여하는데 k8s에선 파드 단위로 컨테이너들을 관리한다.
좌측이 도커 네트워크 구조, 우측이 파드 네트워킹 구조이다.
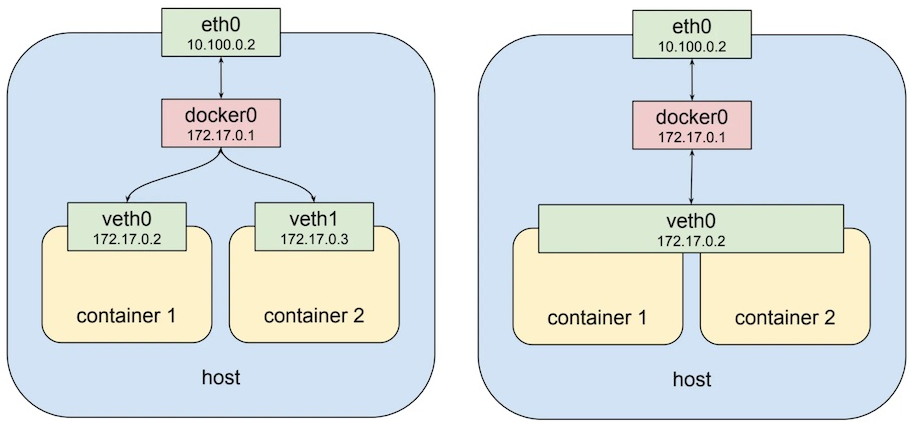
파드 네트워킹에서 파드당 하나의 virtual ethernet 생성되고 파드에 속한 컨테이너들은 virtual ethernet 하나를 공유한다 컨테이너들은 이 하나의 IP 를 공유한다.
Pod 내부에선 localhost 를 통해 컨테이너간 통신이 가능하다.
1 | apiVersion: v1 |
생성된 ubuntu 컨테이너에서 web 컨테이너로 localhsot 를 통해 요청할 수 있다.
Service Network
Service 가 생성되면 각 노드 NAT 에 별개의 대역을 가진 Service 전용 IP 가 추가되며,NAT 테이블엔 Service IP 와 Pod IP 가 매핑된다.
해당 Servuce IP 로 접근시 파드로의 접근이 진행된다.
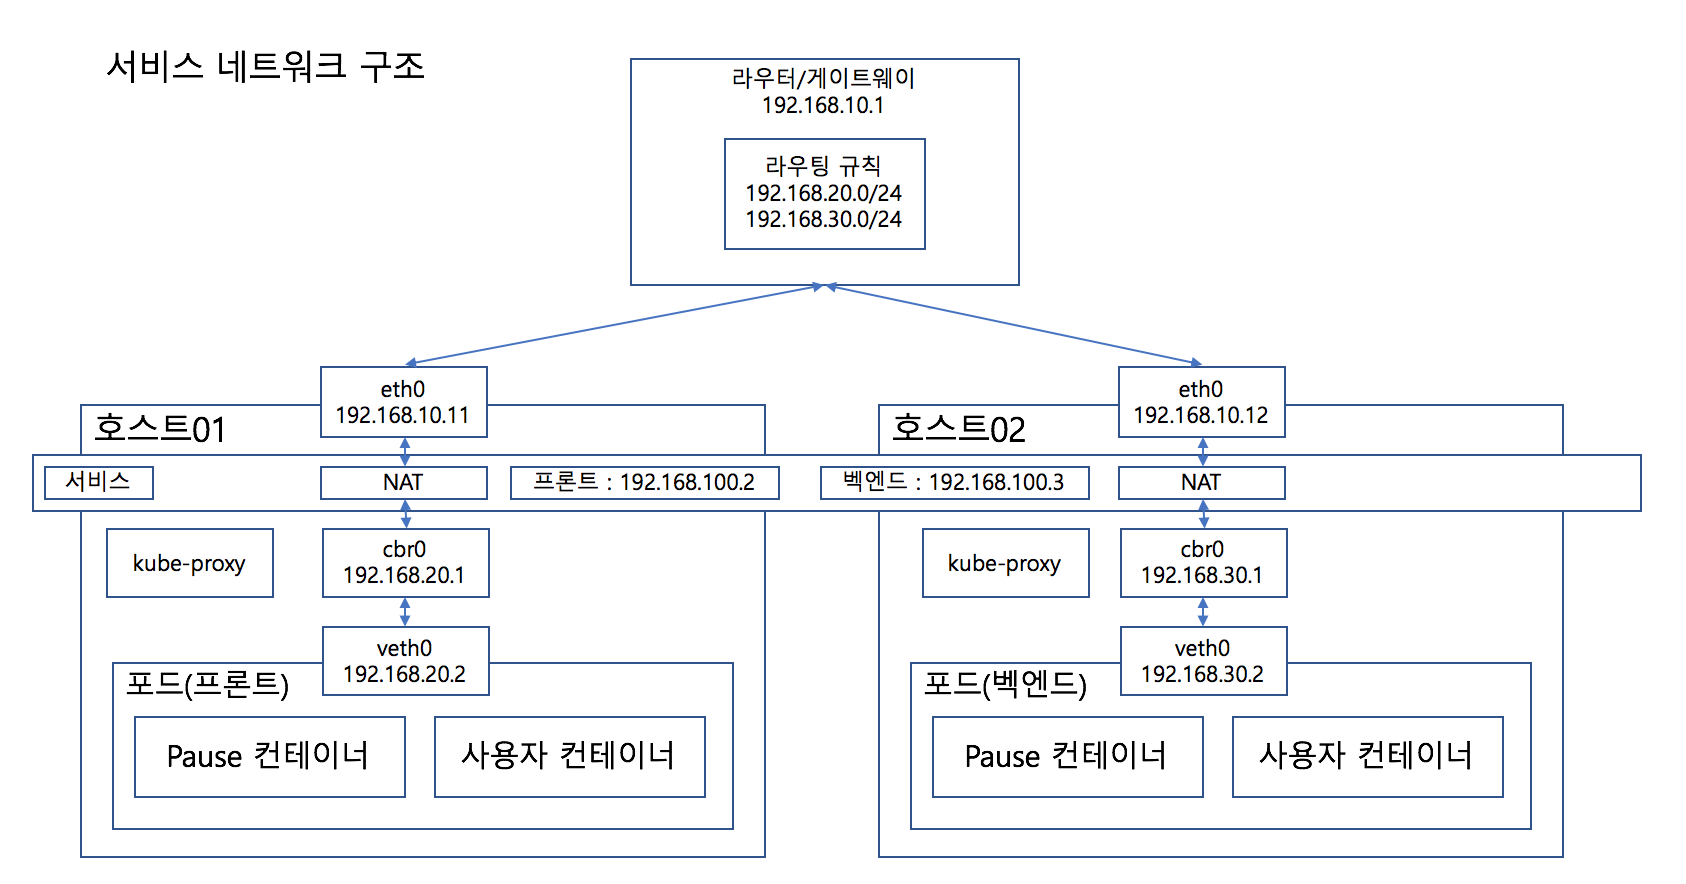
노드 컴포넌트인 kube-proxy 가 해당 역할을 수행하며 NAT 테이블을 만든다.
kube-proxy가 직접 패킷을 받는 서버는 아니고iptables만 수정하는 컴포넌트이다.
실제 패킷은 리눅스의 넷필터(netfilter) 가 처리한다.
NodePort 로 만들시 각 클러스터의 NAT 에만 추가되는 것이 아닌 게이트웨이에도 라우팅 테이블이 추가된다.
CNI(Container Network Interface)
출처: https://github.com/dybooksIT/kubernetes-book/blob/master/readme/errata/errata.md
k8s 에서는 Pod 각각이 모두 고유의 IP를 갖도록 구성하기에CNI(Container Network Interface)라는 플러그인을 사용한다.
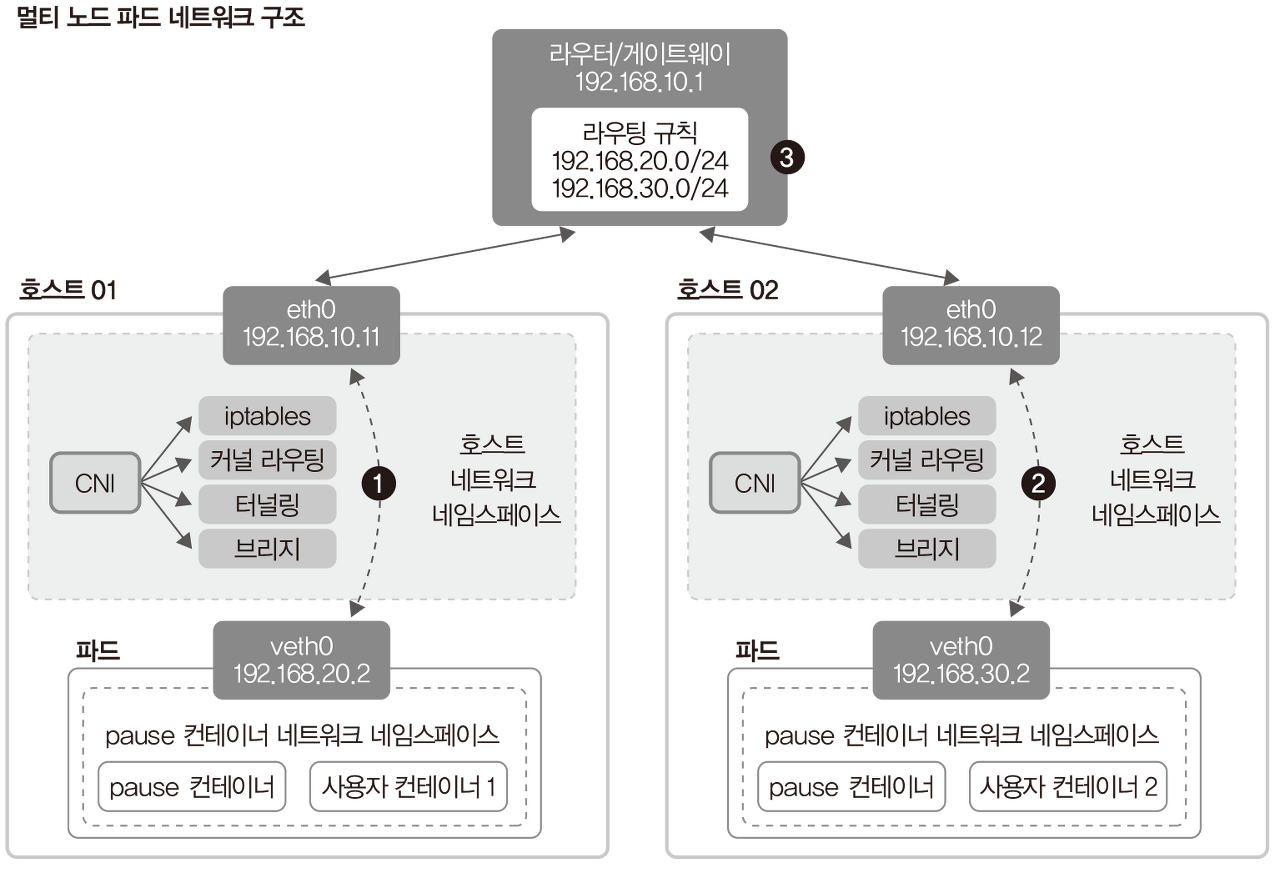
CNI 는 각 노드마다 별도의 Pod CIDR 대역을 설정,기록,공유 하고 아래와 같은 기능들을 수행한다.
- 커널 라우팅
- 동적 라우팅
- veth 생성 및 IP, Subnet, Routing Table 설정
- Proxy ARP 기능
CNI 의 구현체로 플라넬, 칼리코, 실리엄 이 있으며 네트워크 플러그인에 따라서 호스트 네트워크를 구성하는 방법과 특성이 다르다.
k8s DNS
Service 간 통신에서 클러스터 안에서만 사용하는 DNS를 설정해서 사용한다.{service-name}.{name-space}.svc.cluster.local
1 | apiVersion: v1 |
만약 위와같은 서비스 정의시에 도메인은 아래와 같다.
prometheus-app.monitoring.svc.cluster.local
파드에 접근할 수 있는 도메인 생성이 가능하다.
1 | apiVersion: apps/v1 |
spec에 도메인 관련 설정시 접근가능한 도메인은 아래와 같다.appname.default-subdomain.default.svc.cluster.local{host-name}.{sub-domain-name}.{namespace-name}.svc.cluster.local
coreDNS
DNS 질의를 처리해주는 coreDNS Pod, Service 가 존재한다.
1 | kubectl get pod,svc -n kube-system |
과거엔
kube-dns파드를 사용했었으나 현재는coreDNS를 주로 사용, 서비스의 이름만kube-dns로 유지됨
coreDNS 는 Corefile 설정파일을 통해 운영되며 컨피그맵으로 Corefile 을 설정할 수 있다.
기본으로 설정된 Corefile 컨피그맵은 아래와 같다.
1 | kubectl describe configmap coredns -n kube-system |
Pod DNS Server 설정
1 | apiVersion: v1 |
.spec.dnsPolicy 설정을 통해 k8s 에서 DNS 질의 우선순위 조절이 가능하다.
Default- 노드의 DNS 설정에 따름ClusterFirst- 클러스터 외부 DNS 서버에 질의ClusterFirstWithHostNet- 파드를 호스트 모드로 사용하겠다고 설정None- k8s 클러스터 안 DNS 설정을 무시, 별도의 DNS 서버 설정 필요
.spec.dnsPolicy 설정을 통해 /etc/resolv.conf 에 들어갈 속성을 지정할 수 있다.
3가지 속성을 지정할 수 있다. nameservers, searches, options
1 | kubectl exec dns-test cat /etc/resolv.conf |
단순 서비스의 이름만 지정해도 자동으로 {service-name}.{namespace-name}.svc.cluster.local 으로 설정해서 찾기 때문에 정확한 위치를 찾을 수 있는것.