Spring Security
Spring doc : https://spring.io/projects/spring-security https://spring.io/guides/topicals/spring-security-architecture/
Spring Security 에서 보편적으로 사용하는 설정에 대해 학습한다.
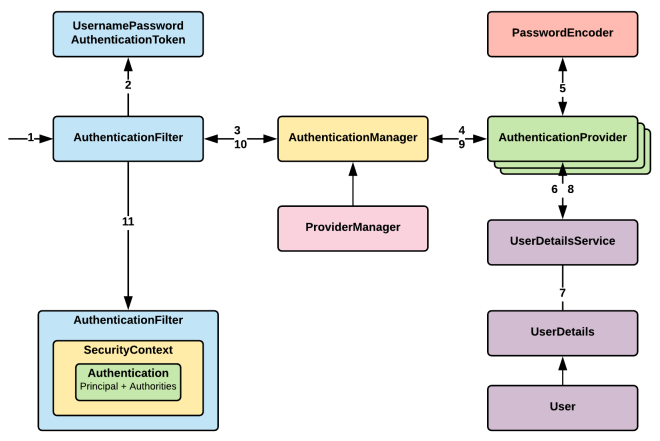
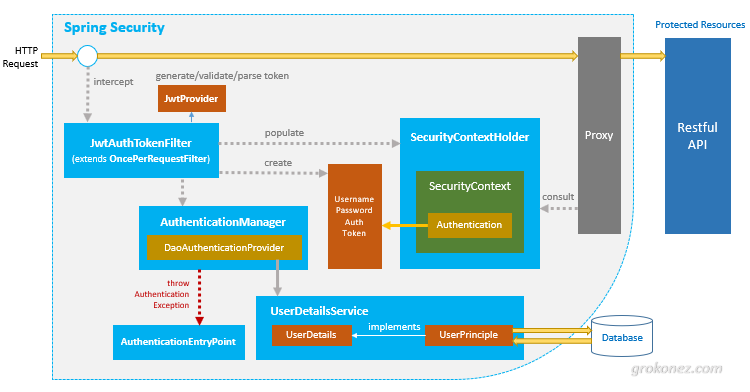
AuthenticationFilter(인증 필터) Authentication 인증객체를 수신받아 관리하고 UsernamePasswordAuthenticationToken 도 인증객체중 하나.AuthenticationManager(인증 매니저) providerManager 는 AuthenticationManager 의 구현체 AuthenticationProvider(인증 제공자) AuthenticationManager 의 요청을 수행하는 클래스, AuthenticationManager 에 등록되어 인증을 수행한다.[DB, LDAP, JWT] 등 여러 AuthenticationProvider 정의가 가능하다. UserDetailsService DaoAuthenticationProvider 가 조건에 의해 생성됨.DaoAuthenticationProvider 가 UserDetailsService 를 통해 사용자 검색 및 Authentication 인증객체를 생성.
UserDetails, User
1 2 3 4 <dependency > <groupId > org.springframework.boot</groupId > <artifactId > spring-boot-starter-security</artifactId > </dependency >
dependency 만 추가하고 컨트롤러를 아무거나 추가해서 실행하면 아래와 같은 password 메세지가 출력된다.
default 아이디 user, 비밀번호는 아래 security password
Using generated security password: 60e8b37d-147a-4174-9003-3ca02800aada
생성한 컨트롤러에 접근하면 아래의 이미지처럼 /login url 로 redirect 되고security session 을 위한 쿠키가 설정된다.
PasswordEncoder PasswordEncoder를 통해 해시 인코딩 후 비교
1
2
3
4
@Bean public PasswordEncoder passwordEncoder () { return new BCryptPasswordEncoder (); }
BCryptPasswordEncoder 가 가장 무난하게 사용 가능, 특징은 아래와 같다.
코스트 팩터(WorkFacfor) 를 사용해 해싱 반복
항상 랜덤한 솔트값을 생성하고 해시값 앞에 salt 값을 붙여 관리한다
slow hashing 을 통해 고의적으로 느리계 해시값을 출력해 무작위 대입을 방지
1
2
3
4
5
6
7
8
9
$2a$cost$salt&hash cost: 해시 반복 횟수 salt: 솔트값 hash: 해시값 $2a$10$vQlFworGFqSGg/i7CSxYSunD2RQw4aYJHe8KNlVf0HP3MzstXxXyG 2a - BCrypt 버전 정보 vQlFworGFqSGg/i7CSxYSu - 솔트값, 첫 22자리(16byte salt) 값 nD2RQw4aYJHe8KNlVf0HP3MzstXxXyG - 해시값
솔트값 없이 단순 해시함수를 통과한 값을 사용하면 사전에 사용할 수 있는 문자열들을 해시화해 놓고, 그 해시 값을 실제 해시 값과 비교하여 비밀번호를 알아내는 공격인 레인보우 테이블 공격(Rainbow Table Attack)에 취약하다.
솔트값을 사용하더라도 $2a$cost$salt&hash 값이 전부 유출되면 레인보우 테이블 에 있는 값들은 시간이 걸릴뿐 결국 복호화될 수 있다.
이미 유출되었던 데이터(전화번호, 주민번호, 이름) 등을 관리할 때에는 외부 인증용(서명)으로 해시를 제공하고 솔트값은 내부에서 안전하게 관리하는것을 권장한다.
DelegatingPasswordEncoder DelegatingPasswordEncoder 를 사용하면 다양한 PasswordEncoder 구현체를 동시에 사용할 수 있다.
BCryptPasswordEncoderPbkdf2PasswordEncoderSCryptPasswordEncoderArgon2PasswordEncoder
1
2
3
4
5
6
7
8
9
10
11
12
13
14
15
16
17
18
19
20
21
22
23
24
25
26
27
28
29
private static final int ITERATIONS = 10000 ;private static final int HASH_LENGTH = 256 ;private static final SecureRandom random = new SecureRandom ();private static byte [] salt = new byte [16 ];static { random.nextBytes(salt); Base64.getEncoder().encodeToString(salt); } @Bean public DelegatingPasswordEncoder delegatingPasswordEncoder () { Map encoders = new HashMap <>(); encoders.put("bcrypt" , new BCryptPasswordEncoder ()); encoders.put("pbkdf2" , new Pbkdf2PasswordEncoder (new String (salt), ITERATIONS, HASH_LENGTH, PBKDF2WithHmacSHA256)); encoders.put("sha256" , new StandardPasswordEncoder ()); return new DelegatingPasswordEncoder ("bcrypt" , encoders); } public static String hashPbkdf2Password (String rawPassword, String salt) { Pbkdf2PasswordEncoder encoder = new Pbkdf2PasswordEncoder (new String (salt), ITERATIONS, HASH_LENGTH, PBKDF2WithHmacSHA256); return encoder.encode(rawPassword); } public static boolean checkPbkdf2Password (String rawPassword, String encodedPassword, String salt) { Pbkdf2PasswordEncoder encoder = new Pbkdf2PasswordEncoder (salt, ITERATIONS, HASH_LENGTH, PBKDF2WithHmacSHA256); return encoder.matches(rawPassword, encodedPassword); }
일반적으로 password 해싱에는 BCrypt 를 사용하고 그외 표준 해싱 방식을 사용해야할 경우 다른 알고리즘을 사용하는 편이다.
EnableWebSecurity Spring Security 는 DSL 형식의 언어로 구성이 가능하며
1
2
3
4
5
6
7
8
9
10
11
12
13
14
15
16
17
18
19
20
21
22
23
24
25
26
27
28
29
30
31
32
33
34
35
36
37
38
39
40
41
42
43
44
45
46
47
48
49
50
51
52
53
54
55
56
57
58
59
60
61
@Slf4j @Configuration @EnableWebSecurity @EnableMethodSecurity public class RestSecurityConfig { @Bean @Order(1) public SecurityFilterChain securityFilterChain (HttpSecurity http) throws Exception { http .csrf(AbstractHttpConfigurer::disable) .cors(AbstractHttpConfigurer::disable) .httpBasic(AbstractHttpConfigurer::disable) .formLogin(AbstractHttpConfigurer::disable) .sessionManagement(session -> session.sessionCreationPolicy(SessionCreationPolicy.STATELESS)) .authorizeHttpRequests(auths -> auths .requestMatchers("/boards/random" ).hasAnyRole("BASIC" , "MANAGER" ) .requestMatchers("/boards/list" ).permitAll() .anyRequest().authenticated() ) .exceptionHandling(exceptions -> exceptions .authenticationEntryPoint(authenticationEntryPoint()) .accessDeniedHandler(accessDeniedHandler()) ); return http.build(); } @Bean @Order(2) public SecurityFilterChain jwtSecurityFilterChain (HttpSecurity http) throws Exception { http.addFilterBefore(new JwtFilter (), UsernamePasswordAuthenticationFilter.class); return http.build(); } @Bean public WebSecurityCustomizer webSecurityCustomizer () { return (web) -> web.ignoring() .requestMatchers("/auth/login_demo" ) .requestMatchers("/error" ) .requestMatchers("/h2-console/**" ); } private AuthenticationEntryPoint authenticationEntryPoint () { return new AuthenticationEntryPoint () { @Override public void commence (HttpServletRequest request, HttpServletResponse response, AuthenticationException authException) throws IOException, ServletException { response.sendError(HttpServletResponse.SC_UNAUTHORIZED); } }; } private AccessDeniedHandler accessDeniedHandler () { return new AccessDeniedHandler () { @Override public void handle (HttpServletRequest request, HttpServletResponse response, AccessDeniedException accessDeniedException) throws IOException, ServletException { response.sendError(HttpServletResponse.SC_FORBIDDEN); } }; } }
XSS(Cross-site Scripting): 악성 스크립트가 담긴 게시물을 올린 뒤 사용자나 관리자가 해당 게시글을 읽으면서 악성 스크립트 실행, 세션탈취, 쿠키탈취 등의 동작을 수행
사이트 차원에서 악성스크립트를 올리지 못하도록 특수문자 필터링 필요.
WebSecurity ignoring 과 HttpSecurity permitAll 의 차이는 SecurityFilterChain 을 거치는지 아닌지 차이WebSecurity ignoring 사용이 성능상 유리하다.HttpSecurity permitAll 를 사용하면 된다.
위 설정처럼 antMatchers("...").hasAnyRole("...") 접근제한이 가능하지만
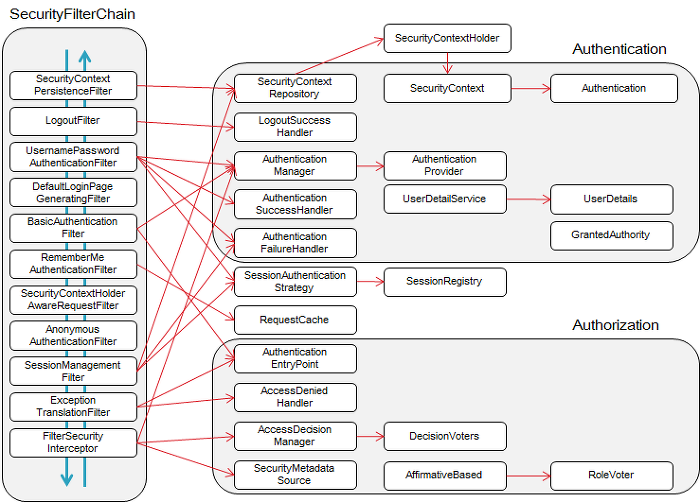
SecurityFilterChain @EnableWebSecurity 사용과 동시에 기본적으로 SecurityFilterChain 빈 객체가 생성되고,Spring Security Filter 내부 수많은 Filter 들이 객체요청에 대응한다.
아무것도 설정하지 않고 spring-boot-starter-security 의존성만 넣었을 때 적용되는 HttpSecurity 의 설정은 아래와 같다.
1
2
3
4
5
6
7
8
9
10
11
12
13
14
15
16
17
18
19
20
21
22
23
24
@Configuration(proxyBeanMethods = false) public class WebSecurityConfiguration implements ImportAware , BeanClassLoaderAware { ... @Bean(name = AbstractSecurityWebApplicationInitializer.DEFAULT_FILTER_NAME) public Filter springSecurityFilterChain () throws Exception { boolean hasFilterChain = !this .securityFilterChains.isEmpty(); if (!hasFilterChain) { this .webSecurity.addSecurityFilterChainBuilder(() -> { this .httpSecurity.authorizeHttpRequests((authorize) -> authorize.anyRequest().authenticated()); this .httpSecurity.formLogin(Customizer.withDefaults()); this .httpSecurity.httpBasic(Customizer.withDefaults()); return this .httpSecurity.build(); }); } for (SecurityFilterChain securityFilterChain : this .securityFilterChains) { this .webSecurity.addSecurityFilterChainBuilder(() -> securityFilterChain); } for (WebSecurityCustomizer customizer : this .webSecurityCustomizers) { customizer.customize(this .webSecurity); } return this .webSecurity.build(); } }
formLogin: 세션기반 로그인
UsernamePasswordAuthenticationFilter
아래에서 소개할 UserDetailService 와 연동
httpBasic: Basic 헤더 기반 인증
BasicAuthenticationFilter
위 @EnableWebSecurity 설정에선 2개 SecurityFilterChain 을 등록하였는데, 여러 개의 SecurityFilterChain이 정의된 경우, 각 요청은 여러 필터 체인 중에서 가장 적합한 하나에 의해 처리된다, /api/** 과 같은 패턴매칭, 정확한 일치(Exact Match) 이 있으며 정확한 일치SecurityFilterChain 을 우선으로 찾는다.
실제 Spring Security Filter 에 등록된 Filter 들을 출력하면 아래와 같다.
1
2
3
4
5
6
7
8
9
10
11
12
13
14
15
16
17
18
19
20
21
22
23
24
25
26
27
28
29
30
31
32
private final FilterChainProxy filterChainProxy;@PostConstruct public void printSecurityFilters () { List<SecurityFilterChain> filterChains = filterChainProxy.getFilterChains(); for (SecurityFilterChain chain : filterChains) { var filters = chain.getFilters(); System.out.println("Security Filter Chain: " + chain); for (var filter : filters) { System.out.println(filter.getClass()); } } }
마지막에 정의된 AuthorizationFilter 에서 Spring Security Context 에 저장되어 있는 Authentication 객체를 확인, URL 등과 매칭 후 인가여부를 확인하고 비인가 요청일 경우 AccessDeniedException(401) 에러를 발생시킨다.
ExceptionTranslationFilter 에는 예외를 처리할 수 있는 핸들러 함수를 사용해 에러를 조치한다(redirect OR error reponse)
1
2
3
4
5
6
7
8
9
10
11
12
13
14
15
16
17
18
19
20
@Bean @Order(1) public SecurityFilterChain securityFilterChain (HttpSecurity http) throws Exception { http .securityMatcher("/auth/**" ) .csrf(AbstractHttpConfigurer::disable) .cors(AbstractHttpConfigurer::disable) ... return http.build(); } @Bean @Order(2) public SecurityFilterChain jwtSecurityFilterChain (HttpSecurity http) throws Exception { http.addFilterBefore(new JwtFilter (), UsernamePasswordAuthenticationFilter.class); http.securityMatcher("/api/**" ) ... return http.build(); }
여러개 SecurityFilterChain 존재하더라도 하나의 요청이 모든 Filter Chain 을 거치진 않는다.
FilterChainProxy가 요청을 받고 리스트 형태로 관리하는 SecurityFilterChain 중 요청 URL 패턴과 매칭되는 하나의 SecurityFilterChain를 선택한다.
URL 패턴 매칭이 여러개 될 경우 우선순위에 따라 첫번째 SecurityFilterChain 를 매칭한다.
대부분의 Filter 에서 filterChain.doFilter(request, response) 함수를 호출한다.UsernamePasswordAuthenticationFilter 의 부모클래스인 AbstractAuthenticationProcessingFilter
주석의 경우 UsernamePasswordAuthenticationFilter 에서 실행하는 doFilter 의 동작을 설명.
1
2
3
4
5
6
7
8
9
10
11
12
13
14
15
16
17
18
19
20
21
22
23
24
25
26
27
28
29
30
31
32
33
public class AbstractAuthenticationProcessingFilter extends AbstractAuthenticationProcessingFilter { private void doFilter (HttpServletRequest request, HttpServletResponse response, FilterChain chain) throws IOException, ServletException { if (!requiresAuthentication(request, response)) { chain.doFilter(request, response); return ; } try { Authentication authenticationResult = attemptAuthentication(request, response); if (authenticationResult == null ) { return ; } this .sessionStrategy.onAuthentication(authenticationResult, request, response); if (this .continueChainBeforeSuccessfulAuthentication) { chain.doFilter(request, response); } successfulAuthentication(request, response, chain, authenticationResult); } catch (InternalAuthenticationServiceException failed) { this .logger.error("An internal error occurred while trying to authenticate the user." , failed); unsuccessfulAuthentication(request, response, failed); } catch (AuthenticationException ex) { unsuccessfulAuthentication(request, response, ex); } } }
filterChain.doFilter 를 사용하는 경우와 사용하지 않는 경우는 아래와 같다.
사용하는 경우
다음 필터로 요청을 전달: 요청이 필터 체인을 따라 다음 필터로 전달. 최종적으로 서블릿 또는 컨트롤러에 도달할 수 있도록함, 대부분의 필터에서는 요청을 중단하지 않고, 다른 필터가 요청을 처리할 수 있도록 이 메서드를 호출한다.
사용하지 않는 경우
보안 검증 실패 시: 인증이 실패하거나 사용자 권한이 부족한 경우, 필터에서 응답을 직접 처리하고 필터 체인을 중단한다. 이 경우 필터에서 최종 응답을 생성하고 요청을 끝낸다. 데이터를 직접 반환하거나 특정 경로로 리디렉션한다.
AuthenticationManager AuthenticationManager 는 인증객체를 검증하는 하는 AuthenticationProvider 객체를 관리하는 클래스, 빈으로 관리되며 여러개의 SecurityFilterChain 에서 사용된다.
여러개의 SecurityFilterChain 에 각각의 AuthenticationProvider 를 설정할 수 도 있다.
1 2 3 4 5 6 7 8 9 10 11 12 13 14 15 16 17 18 19 20 21 22 23 @Bean public SecurityFilterChain apiFilterChain (HttpSecurity http) throws Exception { http.securityMatcher("/api/**" ) .authenticationProvider(apiAuthenticationProvider()) .authorizeHttpRequests(authorize -> authorize.anyRequest().hasRole("API_USER" ) ) .httpBasic(); return http.build(); } @Bean public SecurityFilterChain adminFilterChain (HttpSecurity http) throws Exception { http.securityMatcher("/admin/**" ) .authenticationProvider(adminAuthenticationProvider()) .authorizeHttpRequests(authorize -> authorize.anyRequest().hasRole("ADMIN" ) ) .formLogin(); return http.build(); }
인증을 수행하는 Spring Security Filter 에서 AuthenticationManager 에게 Authentication 인증객체를 전달하면 알맞는 AuthenticationProvider 객체를 찾아 인증을 수행하고 반환한다.
아래는 Spring Security 의 AuthenticationManager 기본 구현객체인 ProviderManager 가 Authentication 인증객체에 맞는 AuthenticationProvider 를 찾아 인증을 수행하는 코드.
AuthenticationProvider 객체는 순서에 맞춰 iterator 형태로 묶여있다.
1
2
3
4
5
6
7
8
9
10
11
12
13
14
15
16
17
18
19
20
21
22
23
24
25
26
27
28
29
30
31
32
33
34
35
36
37
38
39
40
41
42
43
44
public interface AuthenticationManager { Authentication authenticate (Authentication authentication) throws AuthenticationException; } public class ProviderManager implements AuthenticationManager , MessageSourceAware, InitializingBean { ... public Authentication authenticate (Authentication authentication) throws AuthenticationException { ... Iterator var9 = this .getProviders().iterator(); while (var9.hasNext()) { AuthenticationProvider provider = (AuthenticationProvider)var9.next(); Class<? extends Authentication > toTest = authentication.getClass(); ... if (provider.supports(toTest)) { ... try { result = provider.authenticate(authentication); if (result != null ) { this .copyDetails(authentication, result); break ; } ... } catch (AuthenticationException var15) { AuthenticationException ex = var15; lastException = ex; } } } if (result == null && this .parent != null ) { try { parentResult = this .parent.authenticate(authentication); result = parentResult; } catch (AuthenticationException var13) { parentException = var13; lastException = var13; } } } }
Spring Security Filter 과 AuthenticationManager 가 여러개일 경우 @Order 순서에 맞춰 parent, child 관계를 맺으며 AuthenticationProvider 를 공유한다.
BasicAuthenticationFilter 에서 Http Request 의 인증을 AuthenticationManager 를 통해 수행하는 코드
1 2 3 4 5 6 7 8 9 10 11 12 13 14 15 16 17 18 19 20 21 22 23 24 25 26 27 28 29 30 31 32 33 34 35 36 37 38 39 @Override protected void doFilterInternal (HttpServletRequest request, HttpServletResponse response, FilterChain chain) throws IOException, ServletException { try { Authentication authRequest = this .authenticationConverter.convert(request); ... String username = authRequest.getName(); if (authenticationIsRequired(username)) { Authentication authResult = this .authenticationManager.authenticate(authRequest); SecurityContext context = this .securityContextHolderStrategy.createEmptyContext(); context.setAuthentication(authResult); this .securityContextHolderStrategy.setContext(context); if (this .logger.isDebugEnabled()) { this .logger.debug(LogMessage.format("Set SecurityContextHolder to %s" , authResult)); } this .rememberMeServices.loginSuccess(request, response, authResult); this .securityContextRepository.saveContext(context, request, response); onSuccessfulAuthentication(request, response, authResult); } } catch (AuthenticationException ex) { this .securityContextHolderStrategy.clearContext(); this .logger.debug("Failed to process authentication request" , ex); this .rememberMeServices.loginFail(request, response); onUnsuccessfulAuthentication(request, response, ex); if (this .ignoreFailure) { chain.doFilter(request, response); } else { this .authenticationEntryPoint.commence(request, response, ex); } return ; } chain.doFilter(request, response); }
AuthenticationProvider AuthenticationManagr 를 직접 정의하는 방식을 제한적인 환경(제공받은 메서드로만 구성해야함)으로 인해 잘 사용하지 않는다.
위와 같이 테스트용도로 inMemory, jdbc SQL 를 직접 정의하여 사용할 때에나 사용한다.
대부분 AuthenticationProvider 을 Bean 으로 등록하고 AuthenticationManager 에서 자동으로 선택받아 사용되도록 구성한다.
UserDetailsService 사용자 테이블로 부터 커스텀하게 로그인처리를 구현하는 경우가 많아 UserDetailService 를 사용해서 AuthenticationProvider 를 구성한다.
DaoAuthenticationProvider 가 UserDetailService 를 사용하기 위해 만들어진 객체임.
먼저 간단히 사용할 사용자 클래스 정의
1
2
3
4
5
6
7
8
9
10
11
12
13
14
15
16
17
18
19
20
21
22
23
24
25
26
@Table(name = "tbl_members") public class Member { @Id @GeneratedValue(strategy = GenerationType.IDENTITY) private Long uid; private String uname; private String upw; @OneToMany(cascade = {CascadeType.PERSIST, CascadeType.REMOVE}, fetch = FetchType.EAGER) @JoinColumn(name = "uid") List<MemberRole> roles; @CreationTimestamp private LocalDateTime regdate; @UpdateTimestamp private LocalDateTime updatedate; } @Table(name = "tbl_member_role") public class MemberRole { @Id @GeneratedValue(strategy = GenerationType.IDENTITY) private Long fno; private String roleName; }
1
2
3
4
5
6
7
8
9
10
11
12
13
14
15
16
17
18
19
20
21
22
23
24
25
26
27
28
29
30
31
32
33
34
35
36
37
38
39
40
41
42
43
44
45
46
47
48
@Service @RequiredArgsConstructor public class CustomSecurityUsersService implements UserDetailsService { private final MemberRepository memberRepository; private final PasswordEncoder passwordEncoder; @PostConstruct private void init () { if (memberRepository.findByUname("basic" ).isEmpty()) { memberRepository.save(new Member ("basic" , passwordEncoder.encode("basic" ), "BASIC" )); } if (memberRepository.findByUname("manager" ).isEmpty()) { memberRepository.save(new Member ("manager" , passwordEncoder.encode("manager" ), "MANAGER" )); } if (memberRepository.findByUname("admin" ).isEmpty()) { memberRepository.save(new Member ("admin" , passwordEncoder.encode("admin" ), "ADMIN" )); } } @Override public UserDetails loadUserByUsername (String username) throws UsernameNotFoundException { Member member = memberRepository.findByUname(username) .orElseThrow(() -> new IllegalArgumentException ()); return new CustomSecurityUser (member); } } @Getter @Setter public class CustomSecurityUser extends User { private static final String ROLE_PREFIX = "ROLE_" ; private Member member; public CustomSecurityUser (Member member) { super (member.getUname(), member.getUpw(), makeGrantedAuth(member.getRoles())); this .member = member; } private static List<GrantedAuthority> makeGrantedAuth (List<MemberRole> roles) { List<GrantedAuthority> list = new ArrayList <>(); roles.forEach(memberRole -> list.add(new SimpleGrantedAuthority (ROLE_PREFIX + memberRole.getRoleName()))); return list; } }
UserDetailsService, User 객체가 Spring Security 의 핵심 클래스
User 클래스는 UserDetails 의 구현체.
AuthenticationManager 가 알아서 Bean 으로 등록된 UserDetailService 을 사용함으로 별다른 설정을 하지 않아도 된다.
직접 설정하려면 아래처럼 SecurityConfig 에 해당 userDetailService 를 사용해 인증객체를 생성하도록 설정
1
2
3
4
5
6
7
@Autowired private UserDetailsService userDetailsService;@Override protected void configure (AuthenticationManagerBuilder auth) throws Exception { auth.userDetailsService(userDetailsService); }
Authentication Spring Security 는 [inMemory, jdbc, DAO, LDAP] 등 다양한 인증서비스를 제공한다.
이에 맞는 AuthenticationProvider 를 정의해야 하며, 이러한 다양한 인증과정에서 Authentication 구현객체를 표준으로 사용한다.
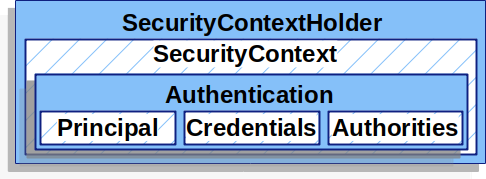
Credential : 자격, 인증서 Pincipal : 주체 Authorities : Role & Authority, 권한
1
2
3
4
5
6
public interface Authentication extends Principal , Serializable { Collection<? extends GrantedAuthority > getAuthorities(); Object getCredentials () ; Object getPrincipal () ; ... }
Credential, Pincipal 모두 Object 이기 때문에 로직에 맞는 보안객체를 할당하면 된다.
위에서 사용한 DaoAuthenticationProvider 가 Authentication 을 구현한 UsernamePasswordAuthenticationToken 을 지원하기 때문에 해당 객체를 Authentication 객체로 자주 사용한다.
Crendential 에 username, Principal 에 password 를 자주 설정한다.
1 2 3 4 5 6 7 8 9 10 11 12 13 14 15 16 17 18 19 20 UsernamePasswordAuthenticationToken authRequest = new UsernamePasswordAuthenticationToken (username, password);
Spring Security 내부 코드에서 Role 과 Authority 를 처리하는 방법은 동일하다.
둘다 권한을 뜻하는 개념이고 SimpleGrantedAuthority 클래스를 사용한다.AbstractAuthenticationToken 객체에 권한(Role, Authority) 들이 들어간다.
Spring Security 설정에 따라 authorities 내부를 검사하는데
hasAnyRole('ADMIN') 과 같은 코드가 있다면 ROLE_ADMIN 과 같은 문자열이 있는지 탐색,hasAuthority('getBoard') 과 같은 코드가 있다면 getBoard 문자열이 있는지 탐색한다.
실제 비밀번호를 가진 UsernamePasswordAuthenticationToken 객체의 인증은 UsernamePasswordAuthenticationFilter 가 DaoAuthenticationProvider 의 인증 메서드를 호출하면서 수행된다.
DaoAuthenticationProvider 는 UserDetailService 로부터 UsernamePasswordAuthenticationToken 의 username 을 사용해 사용자를 검색하고 password 를 비교해서 인증을 수행한다.
AuthenticationEntryPoint 401, 403 에러와 같이 비인가 요청을 처리하기 위한 객체.
1
2
3
4
5
6
7
package org.springframework.security.web;public interface AuthenticationEntryPoint { void commence (HttpServletRequest request, HttpServletResponse response, AuthenticationException authException) throws IOException, ServletException;}
Spring Security 사용시 기본적으로 AccessDenied 예외 발생시 LoginUrlAuthenticationEntryPoint 가 처리한다. 로그인 실패시 해당 요청 url 을 session 에 SAVED_REQUEST key 값으로 임시 저장한다
Login 페이지로 Redirect 시키는 역할을 수행한다.
1
2
3
4
5
6
7
8
9
10
11
12
13
14
15
16
17
18
19
20
21
22
23
24
25
26
27
28
29
30
31
32
33
34
35
36
37
38
39
40
41
42
43
44
45
46
47
48
49
50
51
52
53
54
55
56
57
58
59
60
61
62
63
64
65
66
67
68
69
70
71
72
73
74
75
76
77
78
79
80
81
82
83
84
85
86
87
88
89
90
91
92
93
94
95
96
97
98
99
100
101
102
103
104
105
106
107
108
109
110
111
112
113
114
115
116
117
118
119
120
121
122
123
124
125
126
127
128
129
130
131
132
133
134
135
136
137
138
139
140
141
142
143
144
145
146
147
148
149
150
151
152
153
154
public class LoginUrlAuthenticationEntryPoint implements AuthenticationEntryPoint , InitializingBean { private static final Log logger = LogFactory.getLog(LoginUrlAuthenticationEntryPoint.class); private PortMapper portMapper = new PortMapperImpl (); private PortResolver portResolver = new PortResolverImpl (); private boolean forceHttps = false ; private boolean useForward = false ; private String loginFormUrl; private final RedirectStrategy redirectStrategy = new DefaultRedirectStrategy (); public LoginUrlAuthenticationEntryPoint (String loginFormUrl) { Assert.notNull(loginFormUrl, "loginFormUrl cannot be null" ); this .loginFormUrl = loginFormUrl; } @Override public void commence (HttpServletRequest request, HttpServletResponse response, AuthenticationException authException) throws IOException, ServletException { if (!this .useForward) { String redirectUrl = buildRedirectUrlToLoginPage(request, response, authException); this .redirectStrategy.sendRedirect(request, response, redirectUrl); return ; } String redirectUrl = null ; if (this .forceHttps && "http" .equals(request.getScheme())) { redirectUrl = buildHttpsRedirectUrlForRequest(request); } if (redirectUrl != null ) { this .redirectStrategy.sendRedirect(request, response, redirectUrl); return ; } String loginForm = determineUrlToUseForThisRequest(request, response, authException); logger.debug(LogMessage.format("Server side forward to: %s" , loginForm)); RequestDispatcher dispatcher = request.getRequestDispatcher(loginForm); dispatcher.forward(request, response); return ; } protected String buildRedirectUrlToLoginPage (HttpServletRequest request, HttpServletResponse response, AuthenticationException authException) { String loginForm = determineUrlToUseForThisRequest(request, response, authException); if (UrlUtils.isAbsoluteUrl(loginForm)) { return loginForm; } int serverPort = this .portResolver.getServerPort(request); String scheme = request.getScheme(); RedirectUrlBuilder urlBuilder = new RedirectUrlBuilder (); urlBuilder.setScheme(scheme); urlBuilder.setServerName(request.getServerName()); urlBuilder.setPort(serverPort); urlBuilder.setContextPath(request.getContextPath()); urlBuilder.setPathInfo(loginForm); if (this .forceHttps && "http" .equals(scheme)) { Integer httpsPort = this .portMapper.lookupHttpsPort(serverPort); if (httpsPort != null ) { urlBuilder.setScheme("https" ); urlBuilder.setPort(httpsPort); } else { logger.warn(LogMessage.format("Unable to redirect to HTTPS as no port mapping found for HTTP port %s" , serverPort)); } } return urlBuilder.getUrl(); } protected String buildHttpsRedirectUrlForRequest (HttpServletRequest request) throws IOException, ServletException { int serverPort = this .portResolver.getServerPort(request); Integer httpsPort = this .portMapper.lookupHttpsPort(serverPort); if (httpsPort != null ) { RedirectUrlBuilder urlBuilder = new RedirectUrlBuilder (); urlBuilder.setScheme("https" ); urlBuilder.setServerName(request.getServerName()); urlBuilder.setPort(httpsPort); urlBuilder.setContextPath(request.getContextPath()); urlBuilder.setServletPath(request.getServletPath()); urlBuilder.setPathInfo(request.getPathInfo()); urlBuilder.setQuery(request.getQueryString()); return urlBuilder.getUrl(); } logger.warn( LogMessage.format("Unable to redirect to HTTPS as no port mapping found for HTTP port %s" , serverPort)); return null ; } public void setForceHttps (boolean forceHttps) { this .forceHttps = forceHttps; } protected boolean isForceHttps () { return this .forceHttps; } public String getLoginFormUrl () { return this .loginFormUrl; } public void setPortMapper (PortMapper portMapper) { Assert.notNull(portMapper, "portMapper cannot be null" ); this .portMapper = portMapper; } protected PortMapper getPortMapper () { return this .portMapper; } public void setPortResolver (PortResolver portResolver) { Assert.notNull(portResolver, "portResolver cannot be null" ); this .portResolver = portResolver; } protected PortResolver getPortResolver () { return this .portResolver; } public void setUseForward (boolean useForward) { this .useForward = useForward; } protected boolean isUseForward () { return this .useForward; } }
아래와 같이 Filter 마다 각자의 구현객체가 적용되어 인증/인가 예외 발생시 호출된다.
AuthenticationEntryPoint 는 BasicAuthenticationFilter 과정에서 바로처리되기도 하고
1
2
3
4
5
6
7
8
9
10
11
12
13
14
15
16
17
18
19
20
21
22
23
24
25
26
27
28
29
30
31
32
33
34
35
36
37
38
39
40
41
42
43
44
45
46
47
48
49
50
public class BasicAuthenticationEntryPoint implements AuthenticationEntryPoint , InitializingBean { private String realmName; @Override public void afterPropertiesSet () { Assert.hasText(this .realmName, "realmName must be specified" ); } @Override public void commence (HttpServletRequest request, HttpServletResponse response, AuthenticationException authException) throws IOException { response.setHeader("WWW-Authenticate" , "Basic realm=\"" + this .realmName + "\"" ); response.sendError(HttpStatus.UNAUTHORIZED.value(), HttpStatus.UNAUTHORIZED.getReasonPhrase()); } } public class BasicAuthenticationFilter extends OncePerRequestFilter { private AuthenticationEntryPoint authenticationEntryPoint; ... @Override protected void doFilterInternal (HttpServletRequest request, HttpServletResponse response, FilterChain chain) throws IOException, ServletException { try { Authentication authRequest = this .authenticationConverter.convert(request); if (authRequest == null ) { this .logger.trace("Did not process authentication request since failed to find " + "username and password in Basic Authorization header" ); chain.doFilter(request, response); return ; } ... } catch (AuthenticationException ex) { this .securityContextHolderStrategy.clearContext(); this .logger.debug("Failed to process authentication request" , ex); this .rememberMeServices.loginFail(request, response); onUnsuccessfulAuthentication(request, response, ex); if (this .ignoreFailure) chain.doFilter(request, response); else this .authenticationEntryPoint.commence(request, response, ex); return ; } chain.doFilter(request, response); } ... }
최종 Authentication 처리를 진행하는 ExceptionTranslationFilter 과정에서 처리되기도 한다.
1
2
3
4
5
6
7
8
9
10
11
12
13
14
15
16
17
18
19
20
21
22
23
24
25
26
27
28
29
30
31
32
33
34
35
36
37
38
39
40
41
42
43
44
45
46
47
48
49
50
public class ExceptionTranslationFilter extends GenericFilterBean implements MessageSourceAware { private AuthenticationEntryPoint authenticationEntryPoint; ... private void doFilter (HttpServletRequest request, HttpServletResponse response, FilterChain chain) throws IOException, ServletException { try { chain.doFilter(request, response); } catch (IOException ex) { throw ex; } catch (Exception ex) { Throwable[] causeChain = this .throwableAnalyzer.determineCauseChain(ex); RuntimeException securityException = (AuthenticationException) this .throwableAnalyzer .getFirstThrowableOfType(AuthenticationException.class, causeChain); ... if (response.isCommitted()) { throw new ServletException ("Unable to handle the Spring Security Exception " + "because the response is already committed." , ex); } handleSpringSecurityException(request, response, chain, securityException); } } private void handleSpringSecurityException (HttpServletRequest request, HttpServletResponse response, FilterChain chain, RuntimeException exception) throws IOException, ServletException { if (exception instanceof AuthenticationException) { handleAuthenticationException(request, response, chain, (AuthenticationException) exception); } else if (exception instanceof AccessDeniedException) { handleAccessDeniedException(request, response, chain, (AccessDeniedException) exception); } } private void handleAuthenticationException (HttpServletRequest request, HttpServletResponse response, FilterChain chain, AuthenticationException exception) throws ServletException, IOException { this .logger.trace("Sending to authentication entry point since authentication failed" , exception); sendStartAuthentication(request, response, chain, exception); } protected void sendStartAuthentication (HttpServletRequest request, HttpServletResponse response, FilterChain chain, AuthenticationException reason) throws ServletException, IOException { SecurityContext context = this .securityContextHolderStrategy.createEmptyContext(); this .securityContextHolderStrategy.setContext(context); this .requestCache.saveRequest(request, response); this .authenticationEntryPoint.commence(request, response, reason); }
Spring Security Filter 마다 다른 AuthenticationEntryPoint 를 가질 수 있으며 구현체인 DelegatingAuthenticationEntryPoint 에서 통합 관리한다.
1
2
3
4
5
6
7
8
9
10
11
12
13
14
15
16
17
18
19
20
21
22
23
24
25
26
27
28
29
30
31
package org.springframework.security.web.authentication;public class DelegatingAuthenticationEntryPoint implements AuthenticationEntryPoint , InitializingBean { private static final Log logger = LogFactory.getLog(DelegatingAuthenticationEntryPoint.class); private final LinkedHashMap<RequestMatcher, AuthenticationEntryPoint> entryPoints; private AuthenticationEntryPoint defaultEntryPoint; public DelegatingAuthenticationEntryPoint (LinkedHashMap<RequestMatcher, AuthenticationEntryPoint> entryPoints) { this .entryPoints = entryPoints; } @Override public void commence (HttpServletRequest request, HttpServletResponse response, AuthenticationException authException) throws IOException, ServletException { for (RequestMatcher requestMatcher : this .entryPoints.keySet()) { logger.debug(LogMessage.format("Trying to match using %s" , requestMatcher)); if (requestMatcher.matches(request)) { AuthenticationEntryPoint entryPoint = this .entryPoints.get(requestMatcher); logger.debug(LogMessage.format("Match found! Executing %s" , entryPoint)); entryPoint.commence(request, response, authException); return ; } } logger.debug(LogMessage.format("No match found. Using default entry point %s" , this .defaultEntryPoint)); this .defaultEntryPoint.commence(request, response, authException); } }
GenericFilterBean, OncePerRequestFilter Spring Security 에서 제공하는 대부분의 Filter 는 GenericFilterBean 의 구현체이다.
1
2
3
4
5
6
7
8
9
10
11
public abstract class GenericFilterBean implements Filter , BeanNameAware, EnvironmentAware, EnvironmentCapable, ServletContextAware, InitializingBean, DisposableBean { private String beanName; private Environment environment; private ServletContext servletContext; private FilterConfig filterConfig; private final Set<String> requiredProperties = new HashSet <>(4 ); ... }
스프링 웹서버 동작시에 필요한 Context 정보를 가지고 있는 Filter 객체,
OncePerRequestFilter 는 GenericFilterBean 의 구현체로 한번만 Filter 를 수행하고 필터를 수행하지 않을 각종 조건을 설정할 수 있다.
shouldNotFilter(HttpServletRequest request) 조건 검사를 통해 수행 여부 결정 shouldNotFilterErrorDispatch() 에러가 발생한 요청의 수행 여부 결정, default true(수행 X) shouldNotFilterAsyncDispatch() CompletableFuture, DeferredResult 등 비동기로 동작하는 요청에 대해 수행 여부 결정, default true(수행 X)
EnableMethodSecurity @EnableMethodSecurity 어노테이션 설정, 다른 클래스에서도 시큐리티 어노테이션을 사용할 수 있도록 설정한다.
1
2
3
4
5
6
@Configuration @EnableWebSecurity @EnableMethodSecurity(prePostEnabled = true, securedEnabled = true) public class DefaultSecurityConfig { ... }
@EnableMethodSecurity 속성
prePostEnabled : @PreAuthorize, @PostAuthorize 활성화.securedEnabled : @Secured 활성화.
권한/역할 기반 어노테이션
@PreAuthorize : 메서드 실행 전에 권한 검사, SpEL 사용. @PostAuthorize : 메서드 실행 후에 결과를 기반 권한 검사, SpEL 사용. @Secured : 간단한 Role 기반 검사, SpEL 사용. @RolesAllowed : Role 기반 검사, JSR-250 표준 사용.
1
2
3
4
5
6
7
8
9
10
11
12
13
14
15
16
17
18
19
20
21
22
23
@Service public class SampleService { @PreAuthorize("hasRole('ADMIN')") public String adminOnly () { return "This is an admin-only service." ; } @PreAuthorize("hasAuthority('WRITE_PRIVILEGE')") public String writePrivilegeOnly () { return "This service requires WRITE_PRIVILEGE." ; } @Secured("ROLE_USER") public String userOnly () { return "This is a user-only service." ; } @RolesAllowed({"ROLE_ADMIN", "ROLE_USER"}) public String adminOrUser () { return "This service is accessible to admin or user." ; } }
내부에선 UserDetails.getAuthorities 에 들어간 role, auth 의 존재여부를 검사하는 어노테이션들이다.hasRole, hasAuthority 차이는 앞에 ROLE_ prefix 를 붙이는 여부임으로 hasAuthority 에 ROLE_ 를 붙여 혼용 사용해도 상관없다.
@PostAuthorize 의 경우 아래와 같이 Service 로직에서 응답 객체에 대한 권한 확인용으로 많이 사용.
1
2
3
4
5
@Transactional(readOnly = true) @PostAuthorize("returnObject.isPresent() && returnObject.get().uname == authentication.name && returnObject.get().uname == #uname") public Optional<MemberEntity> findByUnameSecurity (String uname) { return repository.findByUname(uname); }
커스텀 검증 로직로직 복잡한 권한검증코드의 경우 별도의 Bean 을 작성해서 처리하면 편하다.CustomSecurityUser 객체의 uid 와 입력받은 uid 가 일치하는지 판단하는 과정이다.
1
2
3
4
5
6
7
8
9
10
@Slf4j @Service("cssecu") public class CustomSecurityService { public boolean hasAccess (Authentication authentication, Long uid) { CustomSecurityUser user = (CustomSecurityUser) authentication.getPrincipal(); log.info("cssecu hasAccess invoked, username:{}, uid:{}" , user.getUsername(), user.getUid()); return uid.equals(user.getUid()); } }
1
2
3
4
5
@GetMapping("/custom/{id}") @PreAuthorize("@cssecu.hasAccess(authentication, #id)") public String accessResource (@PathVariable Long id) { return "Resource with ID: " + id; }
PermissionEvaluator 구현체를 Bean 으로 등록하면 hasPermission SpEL 를 사용하여 커스텀한 검증코드 작성이 가능하다.
1
2
3
4
5
6
7
8
9
10
11
12
13
14
15
16
17
18
19
20
21
22
23
24
25
26
27
28
29
@Component @RequiredArgsConstructor public class CustomPermissionEvaluator implements PermissionEvaluator { private final MemberRepository repository; @Override public boolean hasPermission (Authentication authentication, Object targetDomainObject, Object permission) { if (targetDomainObject == null ) return false ; String username = authentication.getName(); String requiredPermission = (String) permission; if (targetDomainObject instanceof MemberEntity entity) { return entity.getUname().equals(username) && "READ" .equals(requiredPermission); } return false ; } @Override public boolean hasPermission (Authentication authentication, Serializable targetId, String targetType, Object permission) { if ("MemberEntity" .equalsIgnoreCase(targetType)) { Long id = (Long) targetId; String requiredPermission = (String) permission; return repository.findById(id) .filter(entity -> entity.getUname().equals(authentication.getName()) && "READ" .equalsIgnoreCase(requiredPermission)) .isPresent(); } return false ; } }
위와 같이 구현체 작성 후 MethodSecurityExpressionHandler 에 Bean 으로 등록
1
2
3
4
5
6
@Bean public MethodSecurityExpressionHandler createExpressionHandler (PermissionEvaluator customPermissionEvaluator) { DefaultMethodSecurityExpressionHandler expressionHandler = new DefaultMethodSecurityExpressionHandler (); expressionHandler.setPermissionEvaluator(customPermissionEvaluator); return expressionHandler; }
컨트롤레 메서드에서 들어갈때 @PreAuthorize 를 통해 한번 검증하고
1 2 3 4 5 6 7 8 @PostMapping("/user/{id}") @PreAuthorize("hasPermission(#id, 'MemberEntity', 'READ')") public MemberEntity updateResource (@PathVariable Long id) { return service.findById(id); }
서비스 메서드에서 나올때 @PostAuthorize 를 통해 다시 한번 검증
1
2
3
4
5
@Transactional(readOnly = true) @PostAuthorize("hasPermission(returnObject, 'READ')") public MemberEntity findById (Long id) { return repository.findById(id).orElseThrow(); }
RoleHierarchy Role 계층 정의를 통해 상위 Role 은 하위 Role 접근을 가능하게 설정한다.
1
2
3
4
5
6
7
8
9
@Bean public RoleHierarchy roleHierarchy () { RoleHierarchyImpl roleHierarchy = new RoleHierarchyImpl (); roleHierarchy.setHierarchy(""" ROLE_ADMIN > ROLE_MANAGER ROLE_MANAGER > ROLE_USER """ ); return roleHierarchy; }
1
2
3
4
5
6
7
8
9
10
11
12
13
14
15
16
17
18
19
@Service public class SampleService { @PreAuthorize("hasRole('ADMIN')") public String adminOnly () { return "Accessible by ROLE_ADMIN." ; } @PreAuthorize("hasRole('MANAGER')") public String managerAndAbove () { return "Accessible by ROLE_MANAGER or higher (including ROLE_ADMIN)." ; } @PreAuthorize("hasRole('USER')") public String userAndAbove () { return "Accessible by ROLE_USER or higher." ; } }
Authority 의 경우 계층정의가 없어 위에 이야기 했던 @PreAuthorize 커스텀 로직으로 처리할 수 있다.
세션 기반 스프링 시큐리티 formLogin 과 세션기반의 Spring Security 설명
로그인폼 설정 별도의 SecurityFilterChain 빈 객체 설정을 하지 않을경우 formLogin, httpBasic 가 설정된 기본 Spring Security Config 를 사용한다.
/login 을 호출하면 AuthenticationManager 에 따라 로그인 절차가 이루어지고 세션에 로그인정보가 남게된다./logout 을 호출하면 세션을 초기화하는 과정을 진행한다.
1
2
3
4
5
6
7
8
9
10
11
12
13
14
15
16
17
18
19
20
21
22
23
24
25
26
27
28
29
30
31
32
33
34
35
36
37
38
39
40
41
42
@Bean public SecurityFilterChain securityFilterChain (HttpSecurity http) throws Exception { http .httpBasic(AbstractHttpConfigurer::disable) .csrf(AbstractHttpConfigurer::disable) .authorizeHttpRequests(auths -> auths .requestMatchers("/boards/random" ).hasAnyRole("BASIC" , "MANAGER" ) .requestMatchers("/boards/list" ).permitAll() .anyRequest().authenticated() ) .formLogin(formLogin -> formLogin .usernameParameter("username_demo" ) .passwordParameter("password_demo" ) .loginPage("/auth/login_demo" ) .loginProcessingUrl("/auth/login_demo_process" ) .successHandler(new CustomLoginSuccessHandler ("/boards/list" )) .failureUrl("/auth/login_demo?error=true" ) ) .logout(logout -> logout .logoutUrl("/auth/logout_demo" ) .logoutSuccessUrl("/boards/list" ) .invalidateHttpSession(true ) ) .exceptionHandling(exceptions -> exceptions .accessDeniedPage("/auth/access_denied" ) ) .rememberMe(rememberMe -> rememberMe .rememberMeParameter("remember-me" ) .key("spring-demo-security-key" ) .tokenValiditySeconds(60 * 60 * 24 ) .alwaysRemember(false ) .userDetailsService(userDetailsService) ) ; return http.build(); }
rememberMe 서버 session 에 로그인 데이터를 저장해놓고 로그인을 유지하는 방법,로그인토큰 을 저장해 로그인을 유지하는 방법이 있다.
위와 같이 rememberMe config 를 설정하면 RememberMeAuthenticationFilter 가 추가 Security Filter Chain 에 추가된다.
TokenBasedRememberMeServices 객체가 userDetailsService 를 사용하 사용자정보를 가져와 로그인토큰을 만들수 있도록 설정한다.
로그인 폼에 remember-me 파라미터를 추가
1 2 3 4 5 6 <form method ="post" > <p > <label for ="username" > Username</label > <input type ="text" id ="username" name ="username" value ="user88" /> </p > <p > <label for ="password" > Password</label > <input type ="password" id ="password" name ="password" value ="pw88" /> </p > <p > <label for ="remember-me" > Remember-Me</label > <input type ="checkbox" id ="remember-me" name ="remember-me" /> </p > <button type ="submit" class ="btn" > Log in</button > </form >
로그인후 쿠키에서 remember-me 를 확인
1
2
YmFzaWM6MTY4MDIzMDczNDgwMDo1OWMyYjI0NjU0ZGUzYzQ3OWZjMjFjMzQ3OTdkN2UwNg username:expiryTime:Md5(username:expiryTime:password:key)
브라우저를 종료하더라도 로그인토큰이 쿠키값으로 유지되기에 로그인이 유지되며TokenBasedRememberMeServices 가 전달받은 로그인토큰 기반으로 재 로그인처리를 진행한다.
서버가 재실행되거나 동시에 여러대의 서버가 실행되어도 로그인이 풀리지 않는다.
영구적으로 토큰관리하는 방법도 있다, PersistentTokenBasedRememberMeServices 를 사용하면 별도의 토큰용 DB 를 사용태 remember-me 쿠키를 비교한다.
1
2
3
4
5
6
7
8
@Autowired DataSource datasource; private PersistentTokenRepository getJDBCRepository () { JdbcTokenRepositoryImpl jdbcTokenRepository = new JdbcTokenRepositoryImpl (); jdbcTokenRepository.setDataSource(datasource); return jdbcTokenRepository; }
1
2
3
4
5
6
7
http.rememberMe() .rememberMeParameter("remember-me" ) .key("spring-demo-security-key" ) .tokenValiditySeconds(60 * 60 * 24 ) .alwaysRemember(false ) .tokenRepository(getJDBCRepository()) ;
아래와 같이 로그인토큰 관리용 테이블 생성
persistent_logins 테이블명이 하드코딩되어있음으로 테이블명 변경 불가능
1
2
3
4
5
6
7
8
9
10
11
12
@Getter @Setter @Table(name = "persistent_logins") @Entity public class PersistentLogin { @Id private String series; private String username; private String token; private LocalDateTime lastUsed; }
로그인 정보 표시 현재 thymeleaf를 통해 뷰 페이지를 출력하고 있으며 시큐리티에 대한 태그를 사용하려면 thymeleaf-extras-springsecurity5 의존성을 추가해야 한다.
1 2 3 4 5 <dependency > <groupId > org.thymeleaf.extras</groupId > <artifactId > thymeleaf-extras-springsecurity5</artifactId > <version > 3.0.4.RELEASE</version > </dependency >
1
2
3
4
5
6
7
8
9
10
11
12
13
14
15
16
17
<div class="panel panel-default" > <div sec:authorize="isAuthenticated()" > <h3>LOGIN USER INFO</h3> <div sec:authentication="name" >Spring seucurity username</div> <div>[[${#authentication.name}]]</div> <div sec:authorize="hasRole('ROLE_ADMIN')" >This Conetent Only For ADMIN</div> <div sec:authorize="hasRole('ROLE_MANAGER')" >This Conetent Only For MANAGER</div> <div sec:authorize="hasRole('ROLE_BASIC')" >This Conetent Only For BASIC</div> <div sec:authorize="hasAnyRole('ROLE_ADMIN', 'ROLE_MANAGER', 'ROLE_BASIC')" >This Content For Everyone</div> <div>[[${#authentication.principal}]]</div> <div th:with="member=${#authentication.principal.member}" > <div>[[${member.uid}]]</div> <div>[[${member.upw}]]</div> <div>[[${member.uname}]]</div> </div> </div> </div>
로그인 후 페이지 이동 로그인 후 기존 url 로 다시 이동시키려면 단순 redirect 형식으로는 불가능하고referer 헤더에 저장된 이전 url 을 세션에 저장해두었다가 login success handler 가 세션에서 데이터를 꺼내어 redirect 하는 방식을 사용한다.
직접 /login url로 로그인시에는 루트 디렉토리로 이동
다음과 같이 successForwardUrl 대신 successHandler 를 사용
1
2
3
4
5
6
7
http ... .formLogin() .successHandler(new CustomLoginSuccessHandler ("/boards/list" )) ... ;
1
2
3
4
5
6
7
8
9
10
11
12
13
14
15
16
17
18
19
20
21
22
public class CustomLoginSuccessHandler extends SavedRequestAwareAuthenticationSuccessHandler { public CustomLoginSuccessHandler (String defaultTargetUrl) { setDefaultTargetUrl(defaultTargetUrl); } @Override public void onAuthenticationSuccess (HttpServletRequest request, HttpServletResponse response, Authentication authentication) throws ServletException, IOException { HttpSession session = request.getSession(); if (session != null ) { String redirectUrl = (String) session.getAttribute("prevPage" ); if (redirectUrl != null ) { session.removeAttribute("prevPage" ); getRedirectStrategy().sendRedirect(request, response, redirectUrl); } else { super .onAuthenticationSuccess(request, response, authentication); } } else { super .onAuthenticationSuccess(request, response, authentication); } } }
세션에 prevPage 데이터를 넣는 과정은 아래 login[GET] 과정에서 진행한다.
1
2
3
4
5
6
@GetMapping("/login_demo") public void login (HttpServletRequest request) { String referrer = request.getHeader("Referer" ); request.getSession().setAttribute("prevPage" , referrer); }
만약 로그인버튼에 /auth/login_demo?prefPage 형식처럼 파라미터를 붙일 수 있다면/auth/login_demo 에 인터셉터를 걸어서도 사용가능하다.
1
2
3
4
5
6
7
8
9
10
11
12
13
14
15
16
17
18
@Configuration public class InterceptorConfig implements WebMvcConfigurer { @Override public void addInterceptors (InterceptorRegistry r egistry) { registry.addInterceptor(new LoginCheckInterceptor ()).addPathPatterns("/auth/login_demo" ); WebMvcConfigurer.super .addInterceptors(registry); } } public class LoginCheckInterceptor extends HandlerInterceptorAdapter { @Override public boolean preHandle (HttpServletRequest request, HttpServletResponse response, Object handler) throws Exception { String prevPage = request.getParameter("prevPage" ); if (prevPage != null ) request.getSession().setAttribute("prevPage" , prevPage); return super .preHandle(request, response, handler); } }
Rest API 기반 스프링 시큐리티 Spring Boot 가 Rest API 위주의 서비스 지원 서버가 되면서 JWT 기반의 session less 한 방식을 주로 사용한다.
remember-me 와 비슷하게 JWT 라는 로그인토큰을 발급해서 인증한다.
JWT(JSON Web Token)https://jwt.io/
스프링 시큐리티 + JWT
참고: https://www.javainuse.com/spring/boot-jwt https://github.com/jwtk/jjwt#install-jdk-gradle
Spring Security 에서 공식적으로 제공하는 JWT 관련 AuthenticationProvider 을 제공하지 않음으로 인증시에 생성해야할 클래스가 많다.
로그인은 직접 JWT 토큰을 발급하는 Rest API 를 작성해야 하고,session less 함으로 매 요청마다 filter 를 통해 Authentication 객체를 Security Context 에 집어넣어줘야 한다.
해당 역할을 수행하는 filter 역시 직접 생성행야 한다.
jwt 토큰 생성을 위해 아래 dependency 포함
1
2
3
4
5
6
7
dependencies { implementation 'io.jsonwebtoken:jjwt-api:0.11.5' runtimeOnly 'io.jsonwebtoken:jjwt-impl:0.11.5' , 'io.jsonwebtoken:jjwt-jackson:0.11.5' }
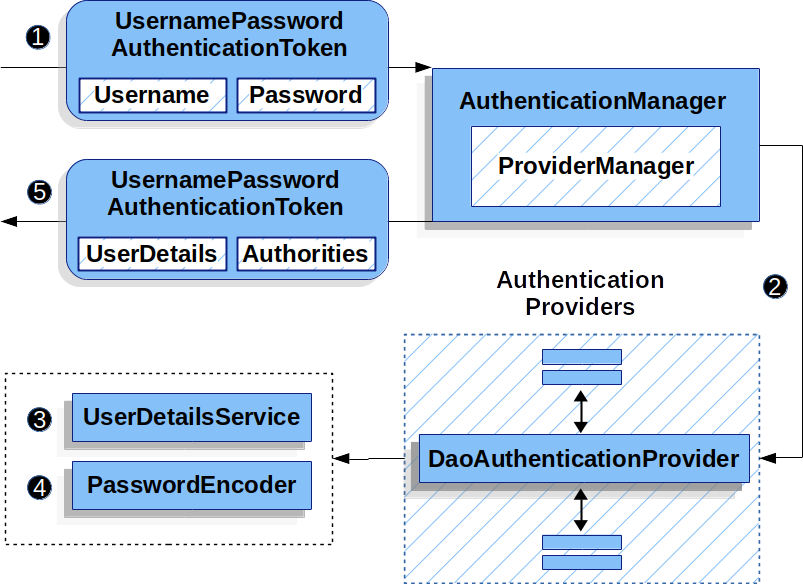
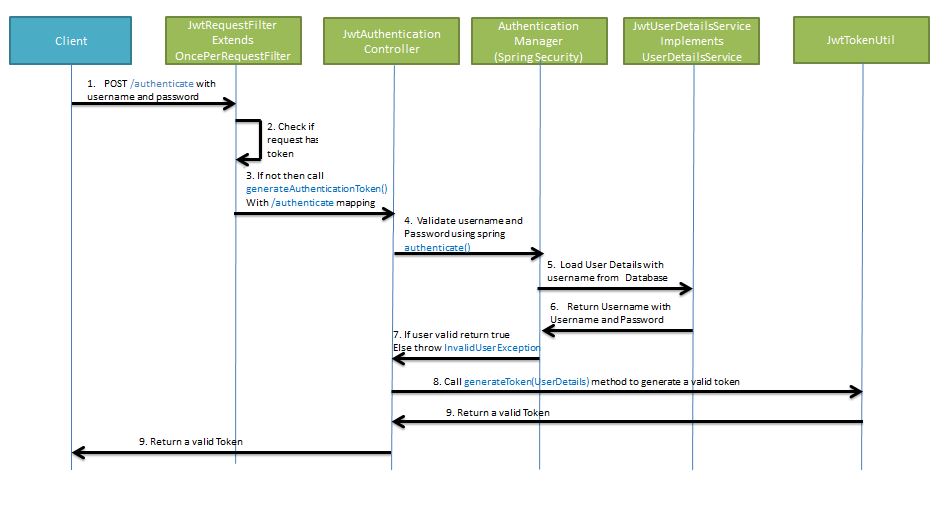
로그인시 jwt 토큰을 생성 및 반환하는 구조는 아래 사진과 같다.
/authenticate url 로 username, password 정보와 함께 jwt 토큰 요청 이미 토큰 데이터를 가지고 있지 않은지 확인
없다면 generateAuthenticateToken() 메서드 호출
authenticate() 를 사용해 username, password 를 검증 검증을 위해 username 을 DB 에서 검색, Userdetails 를 요청
UserdetailsService 로부터 로그인정보 수신 반환값을 토대로 성공/실패 결정
generateToken() 메서드 호출, 로그인정보로 JWT 토큰 생성요청 토큰값 반환
JwtTokenUtil 먼저 JWT 토큰을 생성가능한 JwtTokenUtil 정의
1
2
3
4
5
6
7
8
9
10
11
12
13
14
15
16
17
18
19
20
21
22
23
24
25
26
27
28
29
30
31
32
33
34
35
36
37
38
39
40
41
42
43
44
45
46
47
48
49
50
51
52
53
54
55
56
57
58
59
60
61
62
63
64
public class JwtTokenUtil implements Serializable { public static final long JWT_TOKEN_VALIDITY_SEC = 5 * 60 ; public static Random random = new Random (); private static SecretKey secretKey; static { byte [] data = new byte [255 ]; random.nextBytes(data); String secret = "tM6S1ERulKlPWSsvzZa3Kun9vpH3YbikZpospKYhYS97vtUKiNDFFXFnyTqJX1bL" ; secretKey = Keys.hmacShaKeyFor(secret.getBytes()); } public static String generateToken (CustomSecurityUser customSecurityUser) { Map<String, Object> claims = customSecurityUser.getClaims(); String subject = customSecurityUser.getUsername(); long currentTimeMillis = System.currentTimeMillis(); return Jwts.builder() .setClaims(claims) .setSubject(subject) .setIssuedAt(new Date (currentTimeMillis)) .setExpiration(new Date (currentTimeMillis + JWT_TOKEN_VALIDITY_SEC * 1000 )) .signWith(SignatureAlgorithm.HS512, secretKey) .compact(); } private static <T> T getClaimFromToken (String token, Function<Claims, T> claimsResolver) { final Claims claims = getAllClaimsFromToken(token); return claimsResolver.apply(claims); } private static String getUsernameFromToken (String token) { return getClaimFromToken(token, Claims::getSubject); } private static Date getExpirationDateFromToken (String token) { return getClaimFromToken(token, Claims::getExpiration); } public static Claims getAllClaimsFromToken (String token) { return Jwts.parserBuilder().setSigningKey(secretKey).build() .parseClaimsJws(token) .getBody(); } public static Boolean isTokenExpired (String token) { final Date expiration = getExpirationDateFromToken(token); return expiration.before(new Date ()); } public static Boolean validateToken (String token, UserDetails userDetails) { final String username = getUsernameFromToken(token); return (username.equals(userDetails.getUsername()) && !isTokenExpired(token)); } }
JwtRequestFilter 토큰으로부터 유저 아이디를 확인하고 해당 토큰이 로그인시에 암호화해서 발급했던 토큰이 맞는지 확인
1
2
3
4
5
6
7
8
9
10
11
12
13
14
15
16
17
18
19
20
21
22
23
24
25
26
27
28
29
30
31
32
33
34
35
36
37
38
39
40
41
@Slf4j public class JwtFilter extends OncePerRequestFilter { private static final String AUTHORIZATION_HEADER = "Authorization" ; private static final String BEARER = "Bearer" ; private final List<String> ignoreUrls; public JwtFilter (List<String> ignoreUrls) { this .ignoreUrls = ignoreUrls; } @Override protected boolean shouldNotFilter (HttpServletRequest request) { return ignoreUrls.contains(request.getRequestURI()); } @Override protected void doFilterInternal (HttpServletRequest request, HttpServletResponse response, FilterChain chain) throws ServletException, IOException { final String authorization = request.getHeader(AUTHORIZATION_HEADER); if (authorization == null || !authorization.startsWith(BEARER)) { log.warn("JWT Token does not begin with Bearer String, url:{}" , request.getRequestURL()); request.setAttribute("exception" , "INVALID AUTHORIZATION HEADER" ); } else { String jwtToken = authorization.substring(7 ); Map<String, Object> claims = JwtTokenUtil.getAllClaimsFromToken(jwtToken); Authentication authentication = getAuthentication(claims); SecurityContextHolder.getContext().setAuthentication(authentication); } chain.doFilter(request, response); } private Authentication getAuthentication (Map<String, Object> claims) { Long uid = Long.valueOf(claims.getOrDefault("uid" , 0 ).toString()); String subject = claims.getOrDefault("sub" , "" ).toString(); List<String> roles = (List<String>) claims.get("roles" ); UserDetails userDetails = new CustomSecurityUser (uid, subject, roles); return new UsernamePasswordAuthenticationToken (userDetails, "" , userDetails.getAuthorities()); } }
doFilterInternal 에 jwt 기반으로 DB검색을 통해 authentication 를 생성해도 되지만authentication 객체를 생성, 사용해도 된다.
jwt 토큰 해시검증을 통해 로그인한 사용자임은 알 수 있음으로 패스워드와 같은 정보를 비교할 필요가 없다.
CustomSecurityUser 객체는 아래와 같이 jwt 토큰으로 생성할 수 있도록 변경
1
2
3
4
5
6
7
8
9
10
11
12
13
14
15
16
17
18
19
20
21
22
23
24
25
26
27
28
29
30
31
32
33
34
35
36
37
38
39
40
41
@Getter @Setter public class CustomSecurityUser extends User { private static final String ROLE_PREFIX = "ROLE_" ; private final Long uid; private final String uname; public CustomSecurityUser (Member member) { super (member.getUname(), member.getUpw(), makeGrantedAuth(member.getRoles())); this .uid = member.getUid(); this .uname = member.getUname(); } public CustomSecurityUser (Long uid, String subject, List<String> roles) { super (subject, "" , roles.stream().map(role -> new SimpleGrantedAuthority (role)).collect(Collectors.toList())); this .uid = uid; this .uname = subject; } private static List<GrantedAuthority> makeGrantedAuth (List<MemberRole> roles) { List<GrantedAuthority> list = new ArrayList <>(); roles.forEach(memberRole -> list.add(new SimpleGrantedAuthority (ROLE_PREFIX + memberRole.getRoleName()))); return list; } public Map<String, Object> getClaims () { Map<String, Object> claims = new HashMap <>(); claims.put("uid" , uid); claims.put("uname" , uname); claims.put("roles" , getAuthorities().stream() .map(GrantedAuthority::getAuthority) .collect(Collectors.toList())); return claims; } }
SecurityContextRepository 위에서 정의한 JwtRequestFilter 처럼 직접 SecurityContextHolder 에 접근해서 Authentication 객체를 삽입하였는데SecurityContextRepository 를 사용하면 좀더 Spring Security 표준스럽게 작성 가능하다.
JwtFilter 에선 JWT 의 검증에만 집중하고 SecurityContextRepository 에선 Authentication 객체를 생성하도록 코드의 책임 분리가 가능하다.
Spring Boot 3.x 부터 SecurityContextHolderFilter 가 SecurityContextRepository 를 사용해 보안 컨텍스트를 load 하고 save 하는 역할을 수행한다.
saveContext 는 호출설정을 직접 명시해야 마지막 Filter 인 AuthenticationFilter 에서 호출된다.
JwtTokenFilter 대신 SecurityContext 에 Authentication 객체를 저장해줄 JwtSecurityContextRepository 정의
1
2
3
4
5
6
7
8
9
10
11
12
13
14
15
16
17
18
19
20
21
22
23
24
25
26
27
28
29
30
31
32
33
34
35
36
37
38
39
40
41
42
43
44
45
46
47
48
49
50
51
@Slf4j public class JwtSecurityContextRepository implements SecurityContextRepository { private static final String AUTHORIZATION_HEADER = "Authorization" ; private static final String BEARER = "Bearer" ; private final List<String> ignoreUrls; public JwtSecurityContextRepository (List<String> ignoreUrls) { this .ignoreUrls = ignoreUrls; } @Override public SecurityContext loadContext (HttpRequestResponseHolder requestResponseHolder) { HttpServletRequest request = requestResponseHolder.getRequest(); SecurityContext context = SecurityContextHolder.createEmptyContext(); if (ignoreUrls.contains(request.getRequestURI())) { return context; } String authorization = request.getHeader(AUTHORIZATION_HEADER); if (authorization == null || !authorization.startsWith(BEARER)) { log.warn("JWT Token does not begin with Bearer String, url:{}" , request.getRequestURL()); request.setAttribute("exception" , "INVALID AUTHORIZATION HEADER" ); return context; } String jwtToken = authorization.substring(7 ); Map<String, Object> claims = JwtTokenUtil.getAllClaimsFromToken(jwtToken); Authentication authentication = CustomSecurityUser.getAuthentication(claims); context.setAuthentication(authentication); return context; } @Override public void saveContext (SecurityContext context, HttpServletRequest request, HttpServletResponse response) { log.info("saveContext invoked" ); } @Override public boolean containsContext (HttpServletRequest request) { String authorization = request.getHeader(AUTHORIZATION_HEADER); return authorization != null && authorization.startsWith(BEARER); } }
1
2
3
4
5
6
7
8
9
10
11
12
@Bean public SecurityFilterChain securityFilterChain (HttpSecurity http) throws Exception { http ... .securityContext(context -> context .securityContextRepository(new JwtSecurityContextRepository (List.of("/login" ))) .requireExplicitSave(true ) ) ; return http.build(); }
Login Controller 1 2 3 4 5 6 7 8 9 10 11 12 13 14 15 @RestController @RequiredArgsConstructor @RequestMapping("/auth") public class RestAuthController { private final AuthenticationManagerBuilder authenticationManagerBuilder; @PostMapping("/login_demo") public LoginResponseDto login (@RequestBody LoginRequestDto requestDto) { Authentication authentication = new UsernamePasswordAuthenticationToken (requestDto.getUsername(), requestDto.getPassword()); authentication = authenticationManagerBuilder.getObject().authenticate(authentication); String jwtToken = JwtTokenUtil.generateToken((CustomSecurityUser) authentication.getPrincipal()); return new LoginResponseDto (jwtToken); } }
Spring Security cors 에러 이슈 spring-security를 사용하지 않는경우 CorsRegistry 등록하여 cors 에러 이슈 처리방식을 사용해왔다.
1 2 3 4 5 6 7 8 9 10 11 12 13 14 15 @Configuration @RequiredArgsConstructor public class WebAdminConfig implements WebMvcConfigurer , Filter { @Override public void addCorsMappings (CorsRegistry registry) { registry.addMapping("/**" ) .allowedOrigins("*" ) .allowedMethods("*" ) .allowedHeaders("*" ) .allowCredentials(true ) .maxAge(3600 ); } }
spring-security 를 사용한다면 configure 에 해당 필터를 등록해준다.
1 2 3 4 5 6 7 8 9 10 11 12 public class CorsFilter implements Filter { @Override public void doFilter (ServletRequest request, ServletResponse response, FilterChain chain) throws IOException, ServletException { HttpServletResponse resp = (HttpServletResponse) response; resp.setHeader("Access-Control-Allow-Origin" , "*" ); resp.setHeader("Access-Control-Allow-Methods" , "POST, GET, OPTIONS, DELETE" ); resp.setHeader("Access-Control-Max-Age" , "3600" ); resp.setHeader("Access-Control-Allow-Headers" , "Content-Type,XFILENAME,XFILECATEGORY,XFILESIZE,X-Token" ); chain.doFilter(request, resp); } }
1 .addFilterBefore(new CorsFilter (), ChannelProcessingFilter.class)
최신 spring-security 사용시에 CorsConfiguration 를 사용한 cors 이슈 처리
https://stackoverflow.com/questions/36809528/spring-boot-cors-filter-cors-preflight-channel-did-not-succeed
1 2 3 4 5 6 7 8 9 10 11 12 13 14 15 16 17 18 19 20 21 22 23 24 25 26 27 28 @EnableWebSecurity @EnableGlobalMethodSecurity(prePostEnabled = true) public class SecurityConfig extends WebSecurityConfigurerAdapter { ... ... @Override protected void configure (HttpSecurity http) throws Exception { http ... .cors().configurationSource(corsConfigurationSource()) ... ; } @Bean public CorsConfigurationSource corsConfigurationSource () { CorsConfiguration configuration = new CorsConfiguration (); configuration.setAllowedOrigins(Arrays.asList("*" )); configuration.setAllowedMethods(Arrays.asList("HEAD" , "GET" , "POST" , "PUT" , "DELETE" )); configuration.setAllowCredentials(false ); configuration.setAllowedHeaders(Arrays.asList("Authorization" , "TOKEN_ID" , "X-Requested-With" , "Authorization" , "Content-Type" , "Content-Length" , "Cache-Control" )); UrlBasedCorsConfigurationSource source = new UrlBasedCorsConfigurationSource (); source.registerCorsConfiguration("/**" , configuration); return source; } }
주의 : WebSecurity 의 web.ignoring() 사용시에 spring-security filter 에서 아예 제외됨으로 CORS 설정을 사용하지 않는다.HttpSecurity 와 permitAll() 을 통해 진행하는 것을 권장
HandlerMethodArgumentResolver 템플릿용 @Controller 의 메서드에선 Authentication 를 파라미터로 사용시 org.springframework.security.web.method.annotation 패키지의 AuthenticationPrincipalArgumentResolver 를 통해 주입해준다.
1 2 3 4 5 6 7 8 9 10 11 12 13 14 15 @Controller @RequestMapping("/boards") @RequiredArgsConstructor public class BoardController { private final BoardService boardService; @GetMapping("/list") public void list (Authentication authentication, Model model) { log.info(authentication.toString()); Pageable page = PageRequest.of(0 , 1000 , Sort.by("bno" )); Page<Board> result = boardService.findAll(page); model.addAttribute("result" , result); } }
RestController 에는 해당 기능사용하기 위해 별도로 HandlerMethodArgumentResolver 를 작성해야 한다.
1 2 3 4 5 6 7 8 9 10 11 12 13 14 15 16 17 18 19 20 21 22 23 24 25 26 27 @Target(ElementType.PARAMETER) @Retention(RetentionPolicy.RUNTIME) public @interface LoginUser {} public class LoginUserArgumentResolver implements HandlerMethodArgumentResolver { @Override public boolean supportsParameter (MethodParameter parameter) { boolean isLoginUserAnnotation = parameter.getParameterAnnotation(LoginUser.class) != null ; boolean isUserClass = CustomSecurityUser.class == parameter.getParameterType(); return isLoginUserAnnotation && isUserClass; } @Override public Object resolveArgument (MethodParameter parameter, ModelAndViewContainer mavContainer, NativeWebRequest webRequest, WebDataBinderFactory binderFactory) throws Exception { Authentication authentication = SecurityContextHolder.getContext().getAuthentication(); if (authentication == null || !(authentication.getPrincipal() instanceof UserDetails)) { return null ; } return authentication.getPrincipal(); } }
코드 가독성을 위해 어노테이션 클래스를 하나 정의하여 사용하는 것을 권장.
1
2
3
4
5
6
7
8
@Configuration @RequiredArgsConstructor public class WebConfig implements WebMvcConfigurer { @Override public void addArgumentResolvers (List<HandlerMethodArgumentResolver> resolvers) { resolvers.add(new LoginUserArgumentResolver ()); } }
1
2
3
4
5
@GetMapping("/list") public List<Board> list (@LoginUser CustomSecurityUser user) { log.info(user.toString()); return boardService.findAll(PageRequest.of(0 , 1000 )).getContent(); }